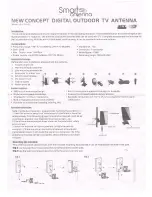
background image

Parts List 

Item 
No. Part 

No. 

Description 

Qty. 

2 871049

Base 

Assembly 

190900

Tube, M1, 11/4 x 48", slotted 

5 463056

Insulator, 

upper 

523057

Screw, hex head, #10-24x1" 

190303

Tube, M2, 11/8 x 52" 

190603

Tube, M3, 1" x 8" 

190605

Tube, M4, 1" x 6.5" 

10 

877157

Tube, M5, 7/16"x 56" 

11 

877132

Trap, 10 Meter 

12 

464723

Trap Cap, 7/8" x 15/8" 

13 461466

Trap 

Spacer 

14 

877131

Trap, 15 Meter 

15 

877129

Trap, 20 Meter 

16 

358756

Clamp, Tubing No. 6 

17 

358757

Clamp, Tubing No. 10 

18 

358758

Clamp, Tubing No. 16 

19 

455624

Caplug, 1/8" dia 

20 

504069

Bolt, hex head, #10-24x1" 

21 

565697

Lockwasher, internal, #10 

22 561165

Flatwasher, 

#10 

23 555693

Nut, 

square, 

#10-24 

24 

505266

Bolt, hex head, 1/4 "-20 x 3/4"

26 

562967

Lockwasher, internal, 1/4" 

27 

554099

Nut, Hex, 1/4-20 

29 

543792

U-Bolt, 5/16" x 15/8"x 21/4" 

30 

564792

Lockwasher, split 5/16 

31 

555747

Nut, hex, 5/16"-18 


80 Meter Loading Coil Assembly Parts List 


190315

Tube 1 1/8" x 20" SW 

11-
18avqii-1 Loading 

Coil 

Assembly 

810-0640-
27 

36" spokes 

10 

4 872016

Parts 

Pack 

656-
0375S 

6-32" x 3/8" 

18 

705-
06325-k 

6-32" kep nuts 

18 

7 74531105

Hose 

Clamp 

8  

Manual(18-AVQII) 


Summary of Contents for 18AVQII

Page 1: ...re and element clamps for all electrical and most mechanical connections Theory of Operation The use of heavy duty Hy Q Traps provides automatic band selection The Hy Q Traps are parallel resonant circuits which isolate the various sections of the antenna and give quarter wavelength resonance on all bands The top loading coil is used for operation on the 80 meter band while the overall height of t...

Page 2: ...bove ground Since the radials of a ground mounted vertical are actually on if not in the ground they are coupled by capacitance or conduction to the ground thus resonance effects are not important Basically the function of radials is to provide a low loss return path for ground currents The reason that short radials are sufficient when few are used is that at the perimeter of the circle to which t...

Page 3: ...Before you begin read the instructions and study the illustrations Compare the parts against the Parts List at the end of this manual Decide where to mount your antenna rooftop or ground and what mode of transmission you will use Phone CW or Mid Band Take special notice of the dimensions in Figure 2 The SWR charts will help you decide which dimensions to choose See Figure 8 ...

Page 4: ...2 12 12 12 1 4 8 3 4 8 3 4 8 3 4 14 5 13 5 13 CW MB Ground Mount Ground Mount Item No Description 2 Base Assembly 18AVQII 4 Tube M 1 1 4 x 48 slotted 5 Insulator upper 7 Tube M2 1 1 8 X 52 8 Tube M3 1 x 8 9 Tube M4 1 X 6 10 Tube M5 7 16 x 56 11 Trap 10 Meter 14 15 16 Clamp Tubing No 6 17 18 Trap 15 Meter Trap 20 Meter Clamp Tubing No 10 Clamp Tubing No 16 Antenna Assembly Dimensions 20 5 22 22 5 F...

Page 5: ...the clamp near the tube end with the top of the clamp over the slot in the tube as shown in Figure 2 After adjustment of the tubing lengths tighten the clamp with a 5 16 inch nut driver socket or open end wrench until the tubing will not twist or telescope DO NOT over tighten Figure 3 Tubing Clamps ...

Page 6: ...two un tightened 10 tubing clamps Item No 17 over the 1 x 8 long M3 section Item No 8 Slide the M3 section part way over the upper end of the 10 meter trap then slide the lower end of the 15 meter trap Item No 14 into the M3 section Set dimension C as shown in Figure 1 and locate the M3 so that it is equally spaced between the two traps Tighten the clamps around the ends of the M3 just enough to k...

Page 7: ...nd of the loading coil assembly tube as shown in Figure 4 4 Secure the tubing in place with one of the supplied hose clamps Be sure to place the connection tab between the aluminum tubing and the clamp as shown in Figure 4 5 Place the remaining hose clamp onto the aluminum tube This clamp is used to secure the MK 80 to an existing AV 14AVQ antenna See Figure 4 6 Place four capacitance spokes into ...

Page 8: ... 16 nuts and 5 16 lock washers Items Nos 29 31 and 30 Use three 3 1 4 20 x 3 4 bolts nuts and lock washers Item No s 24 27 26 to attach the insulator to the upper end of the mounting bracket If you are roof mounting your antenna use four 4 sets of 1 4 20 hardware for the preceding step Before tightening them attach two adjacent radials to each set of hardware as shown in Figures 3 and 5 If desired...

Page 9: ...system must be grounded for lightning protection Connect a ground wire to one U bolt on the antenna base and run it to a buried 8 foot 250 cm ground rod by the shortest route If you are ground mounting your antenna install it as shown in Figure 4 You must install an 8 foot ground rod as shown CAUTION Keep the radials out of reach of children or pets They are HOT with RF proportional to the power o...

Page 10: ...installation is influenced by the soil conditions and the proximity effect of nearby objects the dimensions in the manual must be fine tuned to put the antenna VSWR exactly where you want it on each band 3 Beginning on 10 meters make a VSWR curve checking the low end center and high end of the band This will indicate if the antenna favors the low end or the high end as installed 4 The antenna oper...

Page 11: ...a to a lower frequency as outlined above 5 Next repeat this same procedure for 15 meters to put that band on frequency 6 The same procedure is then used to set up the 20 meter band as well as the remaining bands available depending upon the model involved 7 Most verticals are monopole antennas or half of a dipole For this reason the soil conditions when the antenna is ground mounted are important ...

Page 12: ...Tubing No 10 5 18 358758 Clamp Tubing No 16 1 19 455624 Caplug 1 8 dia 3 20 504069 Bolt hex head 10 24x1 1 21 565697 Lockwasher internal 10 3 22 561165 Flatwasher 10 4 23 555693 Nut square 10 24 1 24 505266 Bolt hex head 1 4 20 x 3 4 4 26 562967 Lockwasher internal 1 4 5 27 554099 Nut Hex 1 4 20 4 29 543792 U Bolt 5 16 x 15 8 x 21 4 2 30 564792 Lockwasher split 5 16 4 31 555747 Nut hex 5 16 18 4 8...

Page 13: ...thout charge to the original owner any defective product under warranty provided the product is returned postage prepaid to hy gain 3 Under no circumstances is hy gain liable for consequential damages to person or property by the use of any hy gain products 4 Out of warranty Service hy gain will repair any out of warranty product provided the unit is shipped prepaid All repaired units will be ship...

Reviews: