Hussmann Specialty Products
CR3FO Installation & Operation Manual Download Page 8

iGfp-cr3fo-1209

8

refrigeration

plumbing

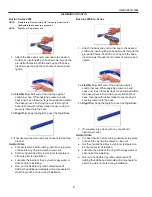
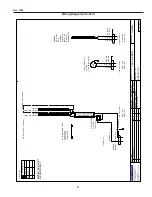
Waste outlet and p-trap

The waste outlet is located off the center of the case on 

one side allowing drip piping to be run lengthwise under 

the fixture. There are 3 drains in each fixture that can be 

easily located.

1-1/2",  1"  and  3/4"  P-TRAPS  and  threaded  adapters 

are supplied with each fixture. The 3 P-TRAPS must be 

installed to prevent air leakage and insect entrance into 

the fixture.

note:   pVc-dWV solvent cement is recommended. follow the 

manufacturer’s instructions.

installing condensate drain

Poorly  or  improperly  installed  condensate  drains  can 

seriously interfere with the operation of this refrigerator, and 

result in costly maintenance and product losses. Please 

follow the recommendations listed below when installing 

condensate drains to insure a proper installation:

1.   Never use pipe for condensate drains smaller 

than the nominal diameter of the pipe or P-TRAP 

supplied with the case.

2.   When connecting condensate drains, the P-TRAP 

must be used as part of the condensate drain 

to prevent air leakage or insect entrance. Store 

plumbing system floor drains should be at least 14" 

off the center of the case to allow use of the P-TRAP 

pipe section. Never use two water seals in series in 

any one line. Double P-TRAPS in series will cause a 

lock and prevent draining.

3.   Always provide as much down hill slope ("fall") as 

possible; 1/8" per foot is the preferred minimum. 

PVC pipe, when used, must be supported to 

maintain the 1/8" pitch and to prevent warping.

4.   Avoid long runs of condensate drains. Long runs 

make it impossible to provide the "fall" necessary for 

good drainage.

5.   Provide a suitable air break between the flood rim of 

the floor drain and outlet of condensate drain. 1" is 

ideal.

6.   Prevent condensate drains from freezing:

a. Do not install condensate drains in contact with 

non-insulated suction lines. Suction lines should 

be insulated with a non - absorbent insulation 

material such as Armstrong's Armaflex.

b. Where condensate drains are located in dead 

air spaces (between refrigerators or between a 

refrigerator and a wall), provide means to prevent 

freezing. The water seal should be insulated to 

prevent condensation.

refrigerant type

The  standard  refrigerant  will  be  R-22  unless  otherwise 

specified on the customer order. Check the serial plate on 

the case for information.
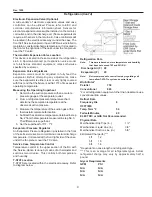
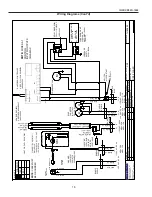
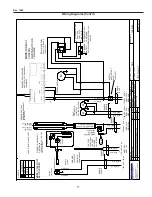
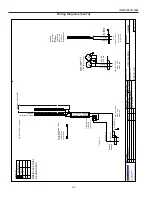
piping

The  refrigerant  line  outlets  are  located  under  the  case. 

Locate first the electrical box, the outlets are then on the 

same side of the case but at the opposite end. Insulate 

suction lines to prevent condensation drippage.

refrigeration lines

Liquid


Suction

3/8” O.D.

5/8” O.D. 

note:   the standard coil is piped at 

5

/

8

” (suction); however, 

the store tie-in may vary depending on the number of 

coils and the draw the case has. depending on the case 

setup, the connecting point in the store may be 

5

/

8

”, 

7

/

8

”, 

or 1

1

/

8

”. refer to the particular case you are hooking up.

Refrigerant  lines  should  be  sized  as  shown  on  the 

refrigeration legend furnished by the store.

Install 

p-traps

 (oil traps) at the base of all suction line 

vertical risers.

pressure drop

 can rob the system of capacity. To keep the 

pressure drop to a minimum, keep refrigerant line run as 

short as possible, using the minimum number of elbows. 

Where elbows are required, use long radius elbows only.

control settings

See  CR3FO  technical  data  sheet  for  the  appropriate 

settings for your merchandiser. Maintain these parameters 

to achieve near constant product temperatures. Product 

temperature should be measured first thing in the morning, 

after  having  been  refrigerated  overnight.  Defrost  times 

should be as follows: OFF CYCLE - Defrost times should 

be as directed in the CR3FO technical data sheet. The 

number of defrosts per day and the duration of the defrost 

cycle may be adjusted to meet conditions present at your 

location.

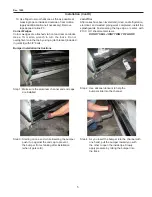
access to tX Valves and drain lines

Mechanical -

 Remove product from end of case. Remove 

product  racks.  Remove  refrigeration  and  drain  access 

panels (labeled). TX valve (mechanical only) and drain are 

located under each access panel at end of the case.

electronic - 

The Electronic Expansion valve master and 

slave cylinder(s) are located within the electrical access 

panel(s).

Summary of Contents for Specialty Products CR3FO

Page 1: ...IDE DOE 2012 Energy Efficiency Compliant Hussmann refrigerated merchandisers configured for sale for use in the United States meet or surpass the requirements of the DOE 2012 energy efficiency standards CHINO CR3FO Versatile Service Top and Self Service Front Deli Merchandiser Rev 0112 Installation Operation Manual ...

Page 2: ...endix D Recommendations to User 25 This Booklet Contains Information on CR3FO Versatile Service Top and Self Service Front Deli Merchandiser Shipping Damage All equipment should be thoroughly examined for shipping damage before and during unloading This equipment has been carefully inspected at our factory and the carrier has assumed responsibility for safe arrival If damaged either apparent or co...

Page 3: ...53 31 3 4 36 1 16 32 3 4 Compressor Housing CR3FO Self Service Service Deli Merchandiser Remote 12 18 26 22 3 4 22 3 4 19 3 4 Optional Dry Dome 20 7 8 42 9 1 2 33 1 2 6 5 8 26 7 8 CR3FO Plan Views Rear Mount Compressor Option or Bottom Mount Compressor Standard Scale 1 2 10 13 16 5 7 8 7 11 16 4 3 16 4 3 16 7 11 16 Drain Rear Mount Compressor Option Electrical Drop 50 32 5 8 3 11 16 3 11 16 Electr...

Page 4: ...IMPORTANT IT IS IMPERATIVE THAT CASES BE LEVELED FROM FRONT TO BACK AND SIDE TO SIDE PRIOR TO JOINING A LEVEL CASE IS NECESSARY TO INSURE PROPER OPERATION WATER DRAINAGE PLEXIGLASS ALIGNMENT NOTE A To avoid removing concrete flooring begin lineup leveling from the highest point of the store floor B When wedges are involved in a lineup set them first All cases were leveled and joined prior to shipm...

Page 5: ...piping work completed install the splashguards Fasten along the top edge or center with 10 X 3 3 sheet metal screws DO NOT SEAL JOINT TRIM TO FLOOR Installation Cont d Bumper Installation Instructions Step 1 Make sure the aluminum channel and end caps are installed Step 2 Use silicone lubricant to help the bumper slide into the channel Step 3 Starting on one end while inserting the bumper push it ...

Page 6: ...e before installing Over cut the flexible vinyl and compression fit Adding the additional materials will compensate for stretching which occurs during installation Installation Cont d Boston 2000 Eco Series 1 Attach the base and end corner cap to the desired surface by inserting 8 pan head screws through the pre slotted holes in both the end cap and the base Insert screws through the two holes of ...

Page 7: ...top so that vinyl legs are positioned within the base grooves Roll vinyl top over full length of base then tap with rubber mallet to ensure vinyl is securely locked into the base 2b Rigid Top Snap the Rigid Top over the Rigid Base 3 If necessary wipe clean with any household cleaning product Helpful Hints For best results before cutting install a scrap piece of base into vinyl top to achieve a cle...

Page 8: ...ains are located in dead air spaces between refrigerators or between a refrigerator and a wall provide means to prevent freezing The water seal should be insulated to prevent condensation Refrigerant Type The standard refrigerant will be R 22 unless otherwise specified on the customer order Check the serial plate on the case for information Piping The refrigerant line outlets are located under the...

Page 9: ...uction gas at the thermostatic remote bulb location 4 Subtract the saturation temperature obtained in step No 2 from the temperature measured in step No 3 The difference is superheat 5 Set the superheat for 5 F 7 F Evaporator Pressure Regulator An Evaporator Pressure Regulator is installed in the front of the self service section to maintain a constant discharge temperature It is located at the fr...

Page 10: ...ey are not intended nor suitable for large motors or other external appliances Field Wiring and Serial Plate Amperage Field Wiring must be sized for component amperes printed on the serial plate Actual ampere draw may be less than specified Field wiring from the refrigeration control panel to the merchandisers is required for refrigeration thermostats Case amperes are listed on the wiring diagram ...

Page 11: ...duct Cleaning Glass and Mirrors Only use a soft cloth and mild glass cleaning for cleaning any glass or mirrored components Be sure to rinse and or dry completely Never use hot water on cold glass surfaces It may shatter and cause serious injury Allow glass surfaces to warm first Replacing Fluorescent Lamps Fluorescent lamps are furnished with a shatterproof protective coating The same type of lam...

Page 12: ...od and table salt One of the worst perpetrators of chlorides can come from household and industrial cleaners Don t Despair Here are a few steps that can help prevent stainless steel rust 1 Use the Proper Tools When cleaning your stainless steel products take care to use non abrasive tools Soft Clothes and plastic scouring pads will NOT harm the steel s passive layer Stainless steel pads can also b...

Page 13: ...ription Size Diagram CR3 FO SC CR3 FO 3 SC 3 W0180083 CR3 FO 4 SC 4 1H66893 CR3 FO 5 SC 5 1H69652 CR3 FO 6 SC 6 1H24193 CR3 FO 8 SC 8 1H69653 CR3 FO R CR3 FO 3 R 3 W8700010 CR3 FO 4 R 4 1H69654 CR3 FO 5 R 5 1H69655 CR3 FO 6 R 6 1H69656 CR3 FO 8 R 8 1H69657 ...

Page 14: ...T 1 CONDENSING UNITS COPELAND M4FH 0050 CAA 212 225 03 0081 RJ 45 NETWORK JACK 125 01 0200 125 01 0203 125 01 0204 L LIGHT SWITCH TIPPETTE 125 01 0311 PRESSURE SAFETY L1 N G F14T5 36 125 03 1126 WARMER 125 01 0767 RAYCHEM 10BUT CR 10W 30 WATTS 0 26AMP 115V RELAY DPDT MARS 90341 125 01 1343 POWER CORD 15 AMP 125 01 0986 120V 15A PLUG NEMA 5 15P B G W DUPLEX 125 01 3178 CIRCUIT 2 L1 N M CONDENSING U...

Page 15: ...33AMP 120V M FP21 830 T5 36 125 03 1128 EVAP PAN DM10W 1D 1000W 8 33A 120V 125 01 0758 BUNDLE PURPLE LABELED EVAP PAN CIRCUIT SAFETY SWITCH FLOAT SWITCH N L1 SWITCH SQUARE D 55447 125 01 0271 RELAY TYCO T92P7A22 120 0459304001 N L1 L1 N BUNDLE BLUE BLACK 14 WHITE 14 FP21 830 T5 36 125 03 1128 L1 N BALLAST 125 01 3266 FULHAM LH3 120 L FP21 830 T5 36 125 03 1128 CAP OFF CANOPY SHELVES 120 VAC 1Ø 60 ...

Page 16: ...5 01 0271 RELAY MARS 90341 COIL 110 120VAC 125 01 1343 6 5 3 2 4 1 BUNDLE PURPLE BUNDLE BROWN BUNDLE ORANGE BUNDLE BLUE BUNDLE YELLOW SAFETY SWITCH FLOAT SWITCH PLUG NEMA 5 15P G BLACK 14 WHITE 14 DUPLEX 125 01 0096 120 VAC 60 Hz BLK 14 L1 N MCA 13 1A MOP 20A WHT 14 120 VAC 60 Hz L1 N MCA 65A MOP 15A BLK 14 WHT 14 120 VAC 60 Hz L1 N MCA 65A MOP 15A BLK 14 WHT 14 120 VAC 60 Hz L1 N MCA 58A MOP 15A ...

Page 17: ...ATTS 0 5AMP 120V M SWITCH MOTOR START SQ D 125 01 0271 RELAY MARS 90341 COIL 110 120VAC 125 01 1343 6 5 3 2 4 1 F35T5 60 125 03 1135 BUNDLE PURPLE BUNDLE BROWN BUNDLE ORANGE BUNDLE BLUE BUNDLE YELLOW SAFETY SWITCH FLOAT SWITCH PLUG NEMA 5 15P G BLACK 14 WHITE 14 DUPLEX 125 01 0096 120 VAC 60 Hz BLK 14 L1 N MCA 14 3A MOP 20A WHT 14 120 VAC 60 Hz L1 N MCA 65A MOP 15A BLK 14 WHT 14 120 VAC 60 Hz L1 N...

Page 18: ...VAC 125 01 1343 6 5 3 2 4 1 BUNDLE PURPLE BUNDLE BROWN BUNDLE ORANGE BUNDLE BLUE BUNDLE YELLOW SAFETY SWITCH FLOAT SWITCH PLUG NEMA 5 15P G BLACK 14 WHITE 14 DUPLEX 125 01 0096 120 VAC 60 Hz BLK 14 L1 N MCA 14 3A MOP 20A WHT 14 120 VAC 60 Hz L1 N MCA 65A MOP 15A BLK 14 WHT 14 120 VAC 60 Hz L1 N MCA 97A MOP 15A BLK 14 WHT 14 120 VAC 60 Hz L1 N MCA 93A MOP 15A BLK 14 WHT 14 BUNDLE PURPLE 120 VAC 60 ...

Page 19: ...T 1 note CASE MUST BE GROUNDED 0 5 L1 120 V LOADING 120 VAC 60 Hz CIRCUIT 1 RJ 45 NETWORK JACK 125 01 0200 125 01 0203 125 01 0204 L LIGHT SWITCH TIPPETTE 125 01 0311 L1 N G M BUNDLE BROWN BUNDLE ORANGE 120 VAC 60 Hz LI N WARMER 125 01 0767 TYCO THERMAL CONTROLS 10BTV1 CR 30 WATTS 28AMP 120V BUNDLE PURPLE LI N 120 VAC 60 Hz MCA 14A MOP 15A MCA 15A MOP 15A MCA 35A MOP 15A WHT 14 BLK 14 GREEN 14 EVA...

Page 20: ...0 Hz CIRCUIT 1 RJ 45 NETWORK JACK 125 01 0200 125 01 0203 125 01 0204 L LIGHT SWITCH TIPPETTE 125 01 0311 L1 N G M BUNDLE BROWN BUNDLE ORANGE 120 VAC 60 Hz LI N WARMER 125 01 0767 TYCO THERMAL CONTROLS 10BTV1 CR 40 WATTS 37AMP 120V BUNDLE PURPLE LI N 120 VAC 60 Hz MCA 21A MOP 15A MCA 15A MOP 15A MCA 46A MOP 15A WHT 14 BLK 14 GREEN 14 EVAP FAN MOTOR 0477653 0 12A 4W 120VAC WHT 14 BLK 14 WHITE 14 BL...

Page 21: ...z CIRCUIT 1 RJ 45 NETWORK JACK 125 01 0200 125 01 0203 125 01 0204 L LIGHT SWITCH TIPPETTE 125 01 0311 L1 N G M BUNDLE BROWN BUNDLE ORANGE 120 VAC 60 Hz LI N WARMER 125 01 0767 TYCO THERMAL CONTROLS 10BTV1 CR 50 WATTS 46AMP 120V BUNDLE PURPLE LI N 120 VAC 60 Hz MCA 28A MOP 15A MCA 15A MOP 15A MCA 58A MOP 15A WHT 14 BLK 14 GREEN 14 EVAP FAN MOTOR 0477653 0 12A 4W 120VAC WHT 14 BLK 14 WHITE 14 BLACK...

Page 22: ...G 120 VAC 60 Hz CIRCUIT 1 RJ 45 NETWORK JACK 125 01 0200 125 01 0203 125 01 0204 L LIGHT SWITCH TIPPETTE 125 01 0311 L1 N G M BUNDLE BROWN BUNDLE ORANGE 120 VAC 60 Hz LI N WARMER 125 01 0767 TYCO THERMAL CONTROLS 10BTV1 CR 60 WATTS 56AMP 120V BUNDLE PURPLE LI N 120 VAC 60 Hz MCA 35A MOP 15A MCA 30A MOP 15A MCA 69A MOP 15A WHT 14 BLK 14 GREEN 14 EVAP FAN MOTOR 2 0477653 0 12A 4W 120VAC WHT 14 BLK 1...

Page 23: ...CK 125 01 0200 125 01 0203 125 01 0204 L LIGHT SWITCH TIPPETTE 125 01 0311 L1 N G M BUNDLE BROWN BUNDLE ORANGE 120 VAC 60 Hz LI N WARMER 125 01 0767 TYCO THERMAL CONTROLS 10BTV1 CR 80 WATTS 74AMP 120V BUNDLE PURPLE LI N 120 VAC 60 Hz MCA 35A MOP 15A MCA 30A MOP 15A MCA 69A MOP 15A WHT 14 BLK 14 GREEN 14 EVAP FAN MOTOR 2 0477653 0 12A 4W 120VAC WHT 14 BLK 14 WHITE 14 BLACK 14 LIGHT CIRCUIT 33A 36W ...

Page 24: ...form a complete start up evaluation prior to the loading of food into the refrigerator which includes such items as a Initial temperature performance Coils should be properly fed with a refrigerant according to manufacturer s recommendations b Observation of outside influences such as drafts radiant heating from the ceiling and from lamps Such influence should be properly corrected or compensated ...

Page 25: ...h warm product 2 Is the product loaded beyond the Safe Load Line markers 3 Are the return air ducts blocked 4 Are the entering air ducts blocked 5 Is a dumped display causing turbulent air flow and mixing with room air 6 Are spotlights or other high intensity lighting directed onto the product 7 Are there unusual draft conditions from heating air conditioning ducts open doors etc 8 Is there exposu...

Page 26: ...perature recovery Food store refrigerators are not food chillers nor can they reclaim quality lost through previous mishandling d Care must be taken when cross merchandising products to ensure that potentially hazardous vegetable products are not placed in non refrigerated areas e Display and storage equipment doors should be kept closed during periods of inactivity f Minimize the transfer time of...

Page 27: ..._______________________________________________ _______________ ___________________________________________________________________________________________________ _______________ ___________________________________________________________________________________________________ _______________ ___________________________________________________________________________________________________ ____...

Reviews: