background image

3

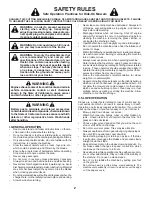
SAFETY RULES

Safe Operation Practices for Ride-On Mowers

• 

Ensure the area is clear of bystanders before operating.  

Stop machine if anyone enters the area.

• 

Never carry passengers.

•  Do not mow in reverse unless absolutely necessary. 

Al ways look down and behind before and while backing.

• 

Never carry children, even with the blades shut off.  They 

may fall off and be seriously injured or interfere with safe 

machine operation. Children who have been given rides 

in the past may suddenly appear in the mowing area 

for another ride and be run over or backed over by the 

machine.

• 

Keep children out of the mowing area and in the watchful 

care of a responsible adult other than the operator.

• 

Be alert and turn machine off if a child enters the area.

• 

Before and while backing, look behind and down for small 

children.

• 

Mow up and down slopes (15° Max), not across.

• 

Choose a low ground speed so that you will not have to 

stop or shift while on the slope.

• 

Avoid starting, stopping, or turning on a slope.  If the tires 

lose traction,  disengage the blades and proceed slowly 

straight down the slope.

•  If machine stops while going uphill, disengage blades, 

shift into reverse and back down slowly.

• 

Do not turn on slopes unless necessary, and then, turn 

slowly and gradually downhill, if possible.

• 

When loading or unloading this machine, do not exceed 

the maximum recommended operation angle of 15°.

III. CHILDREN

WARNING.  CHILDREN CAN BE INJURED BY 

THIS EQUIPMENT.  The American Academy 

of Pediatrics recommends that children be a 

minimum of 12 year of age before operating 

a pedestrian controlled lawn mower and a 

minimum of 16 years of age before operating 

a riding lawn mower. 

Tragic accidents can occur if the operator is not alert to the 

presence of children.  Children are often attracted to the ma-

chine and the mowing activity.  Never assume that children 

will remain where you last saw them.
• 

Keep children out of the mowing area and in the watchful 

care of a responsible adult other than the operator.

• 

Be alert and turn machine off if a child enters the area.

• 

Before and while backing, look behind and down for small 

children. 

• 

Never carry children, even with the blades shut off.  They 

may fall off and be seriously injured or interfere with safe 

machine operation. Children who have been given rides 

in the past may suddenly appear in the mowing area for 

another ride and be run over or backed over by the machine.

• 

Never allow children to operate the machine.

• 

Use extra care when approaching blind corners, shrubs, 

trees, or other objects that may block your view of a child.

IV. TOWING

•  Tow only with a machine that has a hitch designed for 

towing. Do not attach towed equipment except at the hitch 

point.

•  Follow the manufacturer's recommendation for weight 

limits for towed equipment and towing on slopes.

• 

Never allow children or others in or on towed equipment.

• 

On slopes, the weight of the towed equipment may cause 

loss of traction and loss of control.

• 

Travel slowly and allow extra distance to stop. 

V. SERVICE

SAFE HANDLING OF GASOLINE

To avoid personal injury or property damage, use extreme 

care in handling gasoline. Gasoline is extremely flammable 

and the vapors are explosive.
• 

Extinguish all cigarettes, cigars, pipes, and other sources 

of ignition.

• 

Use only approved gasoline container.

• 

Never remove gas cap or add fuel with the engine running. 

Allow engine to cool before refueling.

• 

Never fuel the machine indoors.

•  Never store the machine or fuel container where there 

is an open flame, spark, or pilot light such as on a water 

heater or other appliances.

•  Never fill containers inside a vehicle or on a truck or 

trailer bed with plastic liner. Always place containers on 

the ground away from your vehicle when filling.

• 

Remove gas-powered equipment from the truck or trailer 

and refuel it on the ground. If this is not possible, then 

refuel such equipment with a portable container, rather 

than from a gasoline dispenser nozzle.

• 

Keep the nozzle in contact with the rim of the fuel tank or 

container opening at all times until fueling is complete. 

Do not use a nozzle lock-open device.

• 

If fuel is spilled on clothing, change clothing immediately.

•  Never overfill fuel tank. Replace gas cap and tighten 

securely.

GENERAL SERVICE

• 

Never operate machine in a closed area.

• 

Keep all nuts and bolts tight to ensure the equipment is 

in safe working condition.

•  Never tamper with safety devices. Check their proper 

operation regularly.

• 

Keep machine free of grass, leaves, or other debris build-

up.  Clean oil or fuel spillage and remove any fuel-soaked 

debris.  Allow machine to cool before storing.

• 

If you strike a foreign object, stop and inspect the machine. 

Repair, if necessary, before restarting.

• 

Never make any adjustments or repairs with the engine 

run ning.

• 

Check grass catcher components and the discharge chute 

frequently and replace with manufacturer's recommended 

parts, when necessary.

• 

Mower blades are sharp.  Wrap the blade or wear gloves, 

and use extra caution when servicing them.

• 

Check brake operation frequently.  Adjust and service as 

required.

• 

Maintain or replace safety and instruction labels, as nec-

essary.

Summary of Contents for YTH48XLS

Page 1: ...dtheproductwarranty Estamáquinapuedeutilizargasolinaconuncontenido dehastael10 deetanol E10 Elusodeunagasolina que supere el 10 de etanol E10 anulará la garantía del producto the product warranty Please read the operator s manual carefully and make sure you understand the instructions before using the machine Por favor lea cuidadosamente y comprenda estas intrucciones antes de usar esta maquina ...

Page 2: ...lope Keep all movement on the slopes slow and gradual Do not make sudden changes in speed or direction which could cause the machine to roll over Use extra care while operating machine with grass catch ers or other attachments they can affect the stability of the machine Do no use on steep slopes Do not try to stabilize the machine by putting your foot on the ground Do not mow near drop offs ditch...

Page 3: ...Use extra care when approaching blind corners shrubs trees or other objects that may block your view of a child IV TOWING Tow only with a machine that has a hitch designed for towing Do not attach towed equipment except at the hitch point Follow the manufacturer s recommendation for weight limits for towed equipment and towing on slopes Never allow children or others in or on towed equipment On sl...

Page 4: ...ective Equipment PPE while operating this machine including at a minimum sturdyfootwear eyeprotection andhearingprotection Do not mow in shorts and or open toed footwear Always let someone know you are outside mowing WARNING This tractor is equipped with an internal com bustion engine and should not be used on or near any un improved forest covered brush covered or grass covered land unless the en...

Page 5: ...the steering wheel Fig 1 LABEL TO CHECK BATTERY See Fig 1 Lift hood to raised position NOTE If this battery is put into service after month and year indicated on label label is located between terminals charge battery for minimum of one hour at 6 10 amps See BATTERY in Maintenance section of this manual for charging instructions ASSEMBLY A TOREMOVETRACTORFROMCARTON UNPACK CARTON Remove all accessi...

Page 6: ...connections are still secure and wires are properly clamped Before driving tractor be sure freewheel control is in transmission engaged position see TO TRANS PORT in the Operation section of this manual WHILE LEARNING HOW TO USE YOUR TRACTOR PAY EXTRA ATTENTION TO THE FOLLOWING IMPORTANT ITEMS Engine oil is at proper level Fuel tank is filled with fresh clean regular unleaded gasoline Become famil...

Page 7: ...entify safety inform ation about hazards which can result in death serious injury and or property damage DANGER indicates a hazard which if not avoided will result in death or serious injury WARNING indicates a hazard which if not avoided could result in death or serious injury CAUTION indicates a hazard which if not avoided might result in minor or moderate injury CAUTION when used without the al...

Page 8: ...mower blades or other attachments mounted to your tractor F IGNITION SWITCH Used for starting and stopping the engine G REVERSE OPERATION SYSTEM ROS ON POSITION Allows operation of mower or other powered attachment while in reverse H LIGHT SWITCH Turns the headlights on and off J CRUISE CONTROL LEVER Used to set forward movement of tractor at desired speed without holding the forward drive pedal K...

Page 9: ...rs the best mower performance TO USE CHOKE CONTROL N See Fig 6 Use choke control whenever you are starting a cold engine Do not use to start a warm engine To engage choke control N pull knob out Slowly push knob in to disengage GROUND DRIVE To stop ground drive depress brake pedal into full BRAKE position IMPORTANT FORWARD AND REVERSE DRIVE PEDALS RETURN TO NEUTRAL POSITION WHEN NOT DEPRESSED STOP...

Page 10: ... trimmimg or turning With forward drive pedal depressed to desired speed pull cruise control lever J up and hold while lifting your foot off the pedal then release the lever To disengage the cruise control depress the brake pedal or tap on forward drive pedal Fig 8 J K L A 3 4 9 16 TO ADJUST MOWER CUTTING HEIGHT See Fig 8 The position of the attachment lift lever A determines the cutting height Pu...

Page 11: ...turnignitionkeycounterclockwise to ROS ON position Look down and behind before and while backing Slowly depress reverse drive pedal to start movement When use of the ROS is no longer needed turn the ignition key clockwise to engine ON position TOWING CARTS AND OTHER ATTACHMENTS Tow only the attachments that are recommended by and comply with specifications of the manufacturer of your trac tor Use ...

Page 12: ... Do not overfill For cold weather operation you should change oil for easier starting See OIL VISCOSITY CHART in the Maintenance section of this manual To change engine oil see the Maintenance section in this manual ADD GASOLINE Fill fuel tank to bottom of filler neck Do not overfill Use fresh clean regular gasoline with a minimum of 87 octane Do not mix oil with gasoline Purchase fuel in quantiti...

Page 13: ...NSMISSION WARM UP Beforedrivingtheunitincoldweather thetransmission should be warmed up as follows Be sure the tractor is on level ground Release the parking brake and let the brake slowly return to operating position Allow one minute for transmission to warm up This can be done during the engine warm up period The attachments can be used during the engine warm up period after the transmission has...

Page 14: ...es driveways etc After one or two rounds mow in the opposite direction making left hand turns until finished See Fig 14 If grass is extremely tall it should be mowed twice to reduce load and possible fire hazard from dried clip pings Make first cut relatively high the second to the desired height Do not mow grass when it is wet Wet grass will plug mower and leave undesirable clumps Allow grass to ...

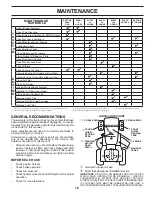
Page 15: ...steners Check Replace Mower Blades Che Clean Debris Off Steering Plate ck Transaxle Cooling Che Check Operator Presence ROS Systems ck V Belts Check Mower Levelness LUBRICATION CHART GENERAL RECOMMENDATIONS The warranty on this tractor does not cover items that have beensubjectedtooperatorabuseornegligence Toreceive full value from the warranty operator must maintain tractor as instructed in this ...

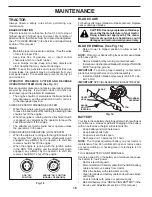
Page 16: ...is running with the ignition switch in the ROS ON position and the attachment clutch engaged any attempt by the operator to shift into reverse should NOT shut off the engine BLADE CARE Forbestresultsmowerbladesmustbekeptsharp Replace bent or damaged blades BATTERY Yourtractorhasabatterychargingsystemwhichissufficient for normal use However periodic charging of the battery with an automotive charge...

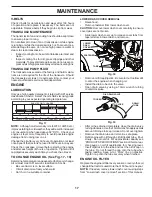
Page 17: ...rclockwise After oil has drained completely close the drain valve turningclockwise Usethe10mmwrenchtoapplyasmall amount of torque to keep it closed Do not over tighten Remove the drain tube and store in a safe place Refill engine with oil through oil fill dipstick tube Pour slowly Do not overfill For approximate capacity see PRODUCTSPECIFICATIONS sectionofthismanual Use gauge on oil fill cap dipst...

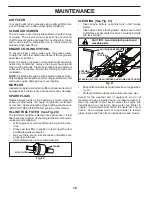
Page 18: ...housing and other cooling shrouds Clean the cooling fins and external surfaces as necessary Ensure the cooling shrouds are reinstalled NOTE Operating the engine with a blocked grass screen dirtyorpluggedcoolingfins and orcoolingshroudsremoved will cause engine damage due to overheating CLEAN AIR SCREEN The air screen is over the air intake blower located on top of engine The air screen must be kep...

Page 19: ...position on the tractor re start the engine and place the throttle lever in the Fast position IMPORTANT Recheck the area to ensure the area is clear Ensure no children are in the area while cleaning the deck 6 Move the tractor s attachment clutch control to the ENGAGED position Remainintheoperator sposition with the cutting deck engaged until the deck is cleaned 7 Move the tractor s attachment clu...

Page 20: ...wer suspension arm A from chassis and rear lift link C from rear mower bracket D remove retainer springs and washers Go to other side of mower and disconnect the suspen sion arm and rear lift link CAUTION After rear lift links are discon nected the attachment lift lever will be springloaded Haveatightgriponliftlever when changing position of the lever Slide mower out from under right side of tract...

Page 21: ...TOREPLACEMOWER BLADE DRIVE BELT in this section of the manual D C Fromrightsideofmower firstinsert90 endofanti sway bar S into hole in transaxle bracket T located near left rear tire in front of transaxle NOTE Flashlight may be helpful NOTE Depending on model bracket T may be differ ent than shown but hole for anti sway bar will be in same position location ANTI SWAY BAR S LOCATION TRANSAXLE BRACK...

Page 22: ...djustment is necessary see steps in Visual Adjust ment instructions above Recheck measurements adjust if necessary until both sides are equal NOTE Each full turn of the adjustment nut will change mower height about 1 8 3 1 mm Recheck measurements adjust if necessary until front tip of blade is 1 8 to 1 2 3 1 to 12 7 mm lower than the rear tip Hold adjustment nut in position with wrench and tighten...

Page 23: ...he idler pulley Fig 35 IDLER ARM NUT EYEBOLT SPRING BELT ROUTING BLADE BELT IDLER PULLEY ENGINE Double check belt routing to make sure it matches the routing decal and that the belt does not have any twist Correct if needed Adjust belt tension by turning the eyebolt until spring is extended to a length of 5 1 13 cm Belt tension should be set to 30 Ft Lbs 40 Nm Replace mandrel covers on both mandre...

Page 24: ... REMOVE MOWER section in this manual NOTE Observe entire motion drive belt and position of all belt guides and keepers 2 Disconnect clutch wire harness A 3 Remove anti rotation link B on right side of tractor 4 Removebeltfromstationaryidler C andclutchingidler D 5 Remove belt from centerspan idler E 6 Pull belt slack toward rear of tractor Carefully remove belt upwards from transmission input pull...

Page 25: ...om fuel tank and battery TO REMOVE CABLES REVERSE ORDER BLACK cable first from chassis and then from the fully charged battery RED cable last from both batteries WEAK OR DEAD BATTERY FULLY CHARGED BATTERY Fig 40 SERVICE AND ADJUSTMENTS REPLACING BATTERY See Fig 41 WARNING Do not short battery termi nals by allowing a wrench or any other object to contact both terminals at the same time Before conn...

Page 26: ...Stand in front of tractor Grasp hood at sides tilt toward engine and lift off of tractor To replace reverse above procedure Fig 42 SERVICE AND ADJUSTMENTS TRANSMISSION REMOVAL REPLACEMENT Should your transmission require removal for service or replacement it should be purged after reinstallation and beforeoperatingthetractor See PURGETRANSMISSION in the Operation section of this manual 07002 HEADL...

Page 27: ... Plastic cannot breathe which allows condensation to form and will cause your tractor to rust IMPORTANT NEVER COVER TRACTOR WHILE ENGINE AND EXHAUST AREAS ARE STILL WARM Immediately prepare your tractor for storage at the end of the season or if the tractor will not be used for 30 days or more WARNING Neverstorethetractorwith gasoline in the tank inside a building where fumes may reach an open fla...

Page 28: ...heck replace ignition switch 8 Faulty solenoid or starter 8 Check replace solenoid or starter 9 Faulty operator presence switch es 9 Contact an authorized service center department Engine clicks but will not start 1 Weak or dead battery 1 Recharge or replace battery 2 Corroded battery terminals 2 Clean battery terminals 3 Loose or damaged wiring 3 Check all wiring 4 Faulty solenoid or starter 4 Ch...

Page 29: ...e mower drive belt 9 Blades improperly installed 9 Reinstall blades sharp edge down 10 Improper blades used 10 Replace with blades listed in parts manual 11 Cloggedmowerdeckventholesfrombuildup of grass leaves trash around mandrels 11 Clean around mandrels to open vent holes Headlight s not working if so equipped 1 Switch is OFF 1 Turn switch ON 2 Bulb s or lamp s burned out 2 Replace bulb s or la...

Page 30: ... never across the face Do not mow slopes greater than 15 degrees Make turns gradually to prevent tipping or loss of control Exercise extreme caution when changing direction on slopes 1 Fold this page along dotted line indicated above 2 Hold page before you so that its left edge is vertically parallel to a tree trunk or other upright structure 3 Sight across the fold in the direction of hill slope ...

Page 31: ... are not covered by this Limited Warranty In most cases these items are NOT manufactured by Husqvarna in which case they may be covered separately by their respective manufacturer s warranties if one is provided and included with the product at the time of purchase The following transmission transaxle manufacturers Dana Hydro Gear Tuff Torq provide a warranty for the transmission transaxle to the ...

Page 32: ...and or improper storage p Sprayers pumping or spraying caustic or flammable materials lack of or broken strainers or q Continued use of product after initial operational problem or failure occurs 9 Reinforced Stamped Armor Protected 10 Year Limited Fabricated Limited Lifetime Deck Warranties These Limited Warranties are for the deck shell only mechanical components parts such as belts pulleys spin...

Page 33: ... Warranty y t n a r r a W o N y t n a r r a W o N Battery 1 Year Pro rated 1 Year Pro rated No Warranty Consumer Wheeled Limited Warranty Chart 2013 Riding Lawn Tractors Product Component Residential Zero Turn Mowers RZ Only Residential Zero Turn Mowers EZ MZ M ZT Battery 1 Year Pro rated 1 Year Pro rated No Warranty y t n a r r a W o N r a e Y 1 s r a e Y 3 s t n e n o p m o C e l b a d n e p x E...

Page 34: ...on Tiller tines and Fabricated Deck shell is for the life of the product or 7 seven years after the last date of the complete unit s final production whichever comes first Deck Shell replacement will be limited to a maximum of two 2 decks within the Limited Lifetime Warranty See reference 4 b of the warranty statement RZ Two 2 Year Consumer warranty parts labor with Hydro Gear Distributor network ...

Page 35: ...u otros es combros que pueden tocar el tubo de escape partes del motor calientes y quemarse No permitir que el puente del cortacésped cargue hojas u otros residuos que pu eden causar acumulaciones Limpiar toda salpicadura de aceite o carburante antes de hacer operaciones sobre la máquina o guardarla Dejarla enfriar antes de guardarla II FUNCIONAMIENTO EN PENDIENTES Las pendientes son el mayor fact...

Page 36: ...e del depósito de carburante o la abertura del contenedor durante toda la operación de abastecimiento No utilizar un dispositivo con boquilla cerrada abierta OPERACIONES DE SERVICIO GENERALES Nunca hacer funcionar la máquina en un área cerrada Mantener todas las tuercas y pernos apretados para asegu rarse de que trabaja en condiciones seguras Nunca modificar los dispositivos de seguridad Controlar...

Page 37: ... incluidos como mínimo calzado de seguridad gafasprotectorasyprotecciónauditiva Noutilicepantalones cortos y o calzado abierto cuando corte la hierba Informe siempre a alguien de que se dispone a cortar la hierba en el exterior ADVERTENCIA Este tractor viene equipado con un motor de combustión interna y no se debe usar sobre o cerca de un terreno no desarrollado cubierto de bosques de arbustos o d...

Page 38: ...nservey les AVANTRETIRERLETRACTEURDEPALETTE Votre nouveau tracteur a été monté à l usine sauf les pièces qui ne sont pas montées pour l expédition LES OUTILS EXIGÉS POUR LE MONTAGE DE VOTRE TRACTEUR Un jeu de clé à douille rendra le montage Les dimensions nor males des clés sont inscrites 2 Clés de 7 16 Manomètre à pneu 1 Clé de 1 2 Couteau tout usage Pince Quand on utilise l expression DROITE ou ...

Page 39: ...lage Assurez vousquetouteslesconnexions soient bien attachées et que les fils soient correctement serrés Avantdeconduireletracteur assurez vousquelacommande delarouelibresoitàlapositionde transmissionEMBRAYÉE Référez vous aux sections de POUR TRANSPORTER dans le Manuel e l Opérateur PENDANT QUE VOUS APPRENEZ À UTILISER VOTRE TRACTEUR FAITES ATTENTION AU Niveau d huile de moteur Réservoird essence ...

Page 40: ...s qui peuvent avoir pour résultats la mort de sérieuses blessures et ou endommager votre propriété DANGER indique un risque qui s il n est pas évité aura comme conséquence la mort ou des blessures sérieuses AVERTISSEMENT indique un risque qui s il n est pas évité pourrait avoir comme conséquence la mort ou des blessures sérieuses ATTENTION indique un risque qui s il n est pas évité pourrait causer...

Page 41: ...GE permet de démarrer et de couper le moteur G COMMUTATEUR DU SYSTÈME DE PRÉSENCE DE L OPÉRATEUR ROS POSITION ON Permet le fonctionnement de la plate forme de faucheuse ou de tout autre attachement actionné tandis qu à l envers H L INTERUPTEURDESLUMIÈRES permetd allumer éteindre les phares du tracteur Fig 3 J LEVIER DE COMMANDE DE VITESSE Sert à faire avancer le tracteur à la vitesse voulue sans a...

Page 42: ...AS DESSUS ATTENTION Arrêtez toujours le tracteur complètement comme décrit ci dessus avant de quitter le tracteur de vider le ramasse herbe etc MOTEUR Placer la commande des gaz en position D SLOW lent REMARQUE Le fait de ne pas déplacer la commande des gaz en position SLOW lent et de laisser le moteur tourner au ralentiavantdecouperlesgazpeutentraînerunretourdeflamme Tournez la clé de contact à l...

Page 43: ...e POURRÉGLERLAHAUTEURDECOUPEDELA TONDEUSE dans la section fonctionnement de ce manuel Quand la tondeuse est à désirée hauteur de coupe désirée les roues devraient être montéis afin qu elles soient un peu au dessus de la terre Installez la roue dans le trou approprié comme indiqué et serrez à fond Répétez de l autre côté Installez la roue dans le même trou réglable Fig 8 Fig 9 J K L A POUR RÉGLER L...

Page 44: ...nécessaire faites tourner la clé de contact en sens horaire sur ON POUR ARRÊTER LES LAMES DE TONDEUSE Déplacez la commande d embrayage d accessoire à la position DÉBRAYÉE ATTENTION N utilisezpaslatondeusesans le déflecteur ou sans le ramasse herbe s il y a lieu Voir La Fig 10 02828 ROS SUR ON POSITION DE MOTEUR ON OPÉRATION NORMALE POUR UTILISER DANS LES PENTES AVERTISSEMENT N utilisez jamais le t...

Page 45: ...s devriez changerl huile Voirle TABLEAUDEVISCOSITÉD HUILE dans la section Entretien de ce manuel Pour changer l huile de moteur voir la section Entretien de ce manuel REMPLIR LE RÉSERVOIR D ESSENCE Remplissezleréservoirjusqu auniveaudugoulotderemplis sage Ne remplissez pas trop Utilisez une essence neuve propre ordinaire sans plomb d au moins 87 d octane Ne mélangez pas d huile à l essence Achetez...

Page 46: ...r l hiver la transmission doit être chauffée comme suit Assurez vous que le tracteur soit garé sur un terrain plat Relâchez le frein de stationnement et permetez que frein retourne dans la position d opération Permetez que la transmission se réchauffe pendant une minute Cecipeutêtrefaitpendantletempsd échauffement Les accessoires peuvent êtres utilisés pendant le temps d échauffement après que la ...

Page 47: ...e de façon à ce que l herbe ne soit pas déversée sur les arbustes les clôtures les allées etc Après un ou deux tours tondez en sens inverse en tournant à gauche jusqu à ce que le travail soit achevé Voir la Fig 14 Si le gazon est très long il faut le tondre deux fois pour réduire la charge et les risques d incendie de l herbe sèche La première fois réglez l appareil pour une coupe assez haute La d...

Page 48: ...on Vérifiez le niveau de batterie Vérifiez le système de présence d opéateur et le système del ROS Vérifiez le système de frein Nettoyez la batterie et les bornes Vérifiez le refroidissement de transmission Remplacez le filtre d essence Nettoyez de la plaque de direction 2 2 3 4 5 1 2 Remplacez l huile du moteur pour modèles sans filtre à huile Remplacez l huile du moteur pour modèles avec filtre ...

Page 49: ...age engagé le moteur ne s arrête PAS ENTRETIEN DES LAMES Pourobtenirlesmeilleursrésultats leslamesdetondeusedoivent toujours être tranchantes Remplacez les lames courbées ou endommagées ENLEVER LA LAME Voir la Fig 16 Rellvezlatondeuseleplushautpossiblepouravoirauxlames REMARQUE Protégezvosmainsavecdesgantset ouenveloppez la lame dans un linge épais Enlevez le boulon de lame en le tournant dans le ...

Page 50: ...mande inférieur afin de dégager les pattes de fixation du couvercle des fentes coniquesauniveaudutableauinférieure puisdéposezletout Enlevez le bouchon de remplissage d huile avec la jauge d huile Ne permettez pas que des saletés entrent dans le moteur quand vous changez l huile Installez le tube de drainage sur la valve Pour ouvrir la valve utilisez une clé de 10mm et tournez dans le sens contrai...

Page 51: ...t référez vous à la section de SPÉCIFICA TIONS DU PRODUIT de ce manuel Fig 20 00667 BRIDE DE SERRAGE BRIDE DE SERRAGE FILTRE D ESSENCE FILTRE D ESSENCE INSTALLÉ EN LIGNE Voir la Fig 20 Le filtre d essence devrait être remplacé au moins chaque saison Silefiltred essenceestbouchéetobstruel écoulementd essence au carburateur il faut le remplacer Quand le moteur est froid enlevez le filtre et bouchez ...

Page 52: ...collerette de blocage de l adaptateur de la buse de lavage puis poussez l adaptateur sur le raccord de lavage du plateau de coupe situé à l extrémité gauche du plateau de coupe de la tondeuse Relâchez la collerette de blocage pour bloquer l adaptateur sur la buse de lavage IMPORTANT Tirer le tuyau d arrosage pour vous assurer que le raccordement est sécurisé 4 Ouvrez le robinet d eau 5 Prenez plac...

Page 53: ...use A pointent vers l avant avant de glisser la tondeuse sous le tracteur Glisser la tondeuse sous le tracteur jusqu à ce qu elle soit au centre de celui ci POUR ENLEVER LA TONDEUSE Voir Fig 23 Placez l embrayage d accrochage à la position DISEN GAGED Abaissez le levier le levage à sa position la plus basse Dégager la courroie de la poulie d embrayage électrique M Se référer à Dépose De La Courroi...

Page 54: ...Manuel FIXEZ LES BRAS DE SUSPENSION LATÉRAUX DE LA TONDEUSE AU CHÂSSIS Placez l orifice du bras sur la tige B àl extérieurduchâssisdutracteuretfixezsolidement à l aide d une ressort arrêtoir Répétez de l autre côté du tracteur REMARQUE Selon le modèle le support T peut être différent de celui illustré cependant le trou de la barre stabilisatrice sera au même endroit dans la même position Fig 25 S ...

Page 55: ... tondeuse d environ 4 7 mm 3 16 po Vérifiez l ajustement en tondant de la pelouse non coupée et en vérifiant sont apparence Faites un autre ajustement si nécessaire jusqu à ce que vous soyez satisfait du résultat AJUSTEMENT LATÉRAL DE PRÉCISION Voir la Fig 32 Assurez vous que vos pneus sont adéquatement gonflés puis stationnez le tracteur sur un terrain de niveau ou une entrée de cour ATTENTION Le...

Page 56: ...uveau l acheminement de la courroie afin de s assurer qu elle correspond à l autocollant d acheminement et qu elle n est pas enroulée Corriger si nécessaire Régler la tension de la courroie en tournant le boulon à oeil jusqu à ce que le ressort soit détendu jusqu à une longueur de 5 1 po 13 cm Latensiondelacourroiedoitêtrerégléeentre30lb pi 41Nm Replacer les caches mandrin sur les deux logements d...

Page 57: ...e tous les guides et dispositifs de retenue 2 Débranchez le faisceau de câbles de l embrayage A 3 Retirez la bielle anti rotation B à la droite du tracteur 4 Retirez la courroie de la poulie de tension fixe C et la poulie d embrayage D 5 Retirez la courroie de la poulie de tension centrale E 6 Tirez la courroie libre vers l arrière du tracteur Retirez soi gneusement la courroie de la poulie d entr...

Page 58: ...a Fig 40 AVERTISSEMENT Les batteries au plomb et à l acide produisent des gaz explosifs Gardez les étincelles les flammes les cigarettes etc loin des batteries Portez toujours des lunettes protectrices lorsque vous êtes pré d une batterie Sivotrebatterieesttropfaiblepourdémarrerlemoteur elledevrait être rechargée Voir BATTERIE dans la section Entretien de ce manuel Si vous utilisez des câbles de s...

Page 59: ...pour un entretien ou pour être remplacée elle doit être purgée après avoir été réinstallée et avant de faire fonctionner le tracteur Voir PURGEZ LA TRANSMISSION dans la section Utilisation de ce manuel VERROUS ET RELAIS Un câblage desserré ou avarié peut être la cause du mauvais fonctionnement de l arrêt ou du non démarrage du tracteur Vérifiez le câblage POUR REMPLACER LE FUSIBLE Remplacez par un...

Page 60: ...ng terme lorsque le chargeur est connecté MOTEUR SYSTÈME D ESSENCE IMPORTANT C EST TRÈS IMPORTANT D ÉVITER LA FOR MATION DES DÉPÔTS DE GOMME DANS LE CARBURA TEUR LE FILTRE D ESSENCE LE TUYAU D ESSENCE OU LE RÉSERVOIR D ESSENCE PENDANT L ENTREPOSAGE L EXPÉRIENCE DÉMONTRE QUE LES CARBURANTS QUI SONTMÉLANGÉSAVECDEL ALCOOL ÉTHANOLOUMÉTHA NOL ET PARFOIS APPELÉS GASOHOL PEUVENT ATTIRER L HUMIDITÉ QUI CA...

Page 61: ...8 Vérifiez remplacez le solénoïde ou le démarreur 9 L interrupteur qui détecte la présence du con ducteur est défectueux 9 Contactez un centre d entretien autorisé II y a un déclic mais le moteur ne démarre pas 1 Batterie faible ou à plat 1 Rechargez ou remplacez la batterie 2 Les bornes de batterie sont corrodées 2 Nettoyez les bornes de batterie 3 Le câblage est lâche ou endommagé 3 Vérifiez tou...

Page 62: ... d entraînement de tondeuse 9 Les lames n ont pas été correctement montées 9 Réinstallez les lames avec le bord tranchant vers le bas 10 Les mauvaises lames ont été montées 10 Remplacez les lames avec les lames recommandées dans ce manuel 11 Les trous d évent du carter de tondeuse sont ob strués par l accumulation de l herbe de feuilles et de débris autour des mandrins 11 Nettoyez les faces de man...

Page 63: ... A N T L E S P O I N T I L L É S C E C I E S T U N E P E N T E A 1 5 D E G R É S TONDEZ LES PENTES EN MONTANT OU EN DESCENDANT MAIS JAMAIS EN TRAVERS GUIDE SUGGÈRE POUR L ÉVALUATION DES PENTES AFIN D AMÉLIORER LA SÉCURITÉ D UTILISATION ...

Page 64: ...usqvarna auquel cas ils peuvent être couverts séparément par les garanties de leur fabricant respectif si elles sont fournies et accompagnent le produit au moment de l achat Les fabricants suivants de transmission boîte pont Dana Hydro Gear Tuff Torq offrent une garantie sur la transmission ou la boîte pont à l acheteur final ou à Husqvarna Husqvarna attribuera par la suite la garantie du fabrican...

Page 65: ...onformer aux intervalles recommandés de graissage dommages causés par l eau ou l humidité ou entreposage inadéquat p Pulvérisateurs à pompage ou bien pulvérisation de matériaux inflammables ou caustiques crépines absentes ou brisées ou q Utilisation prolongée d un produit lorsqu un problème de fonctionnement ou une défaillance initiale survient 9 Garanties limitées à vie de fabrication et limitées...

Page 66: ...7003902 e i t n a r a g e n u c u A e i t n a r a g e n u c u A s n a 0 1 1 2 0 5 2 t e 3 0 9 3 0 0 7 6 9 Tableau de garantie limitée des produits sur roues de consommateur 2013 Tondeuses à siège Produit composant Tondeuses Zero Turn usage résidentiel RZ seulement Tondeuses Zero Turn usage résidentiel EZ MZ M ZT e i v à e é t i m i l e i t n a r a G e é u q i r b a f e p u o c e d é t i n u d e u ...

Page 67: ... l unité de coupe est pour la durée de vie utile du produit ou 7 sept années après la dernière date de la production complète finale de l équipement selon la première éventualité Le remplacement de la coque de l unité de coupe est limité à 2 unités de coupe dans le cadre de la garantie à vie limitée Voir la référence 4 b de l énoncé de garantie RZ Deux 2 ans de garantie au consommateur pièces et m...

Page 68: ...09 04 2013 BD ...
Reviews: