


110
10.3
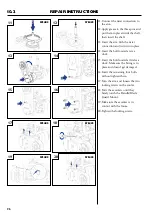
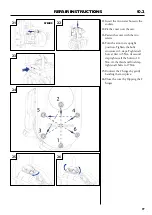
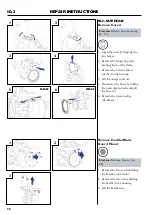
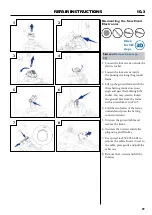
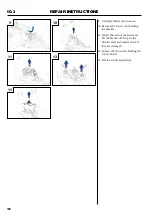
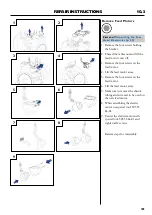
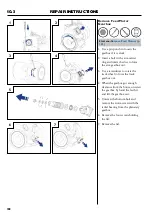
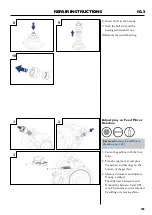
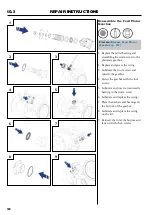
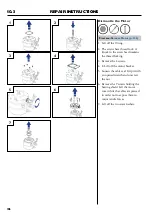
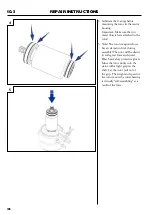
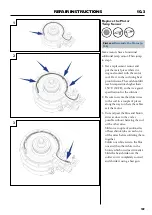
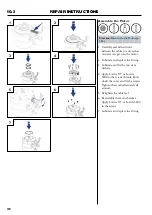
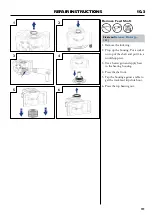
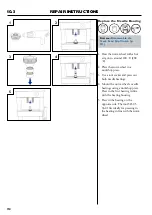
REPAIR INSTRUCTIONS
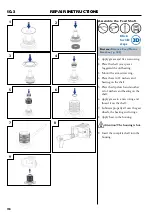
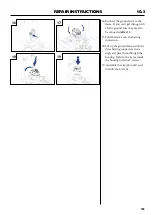
Assemble the Motor
1� Carefully seal with silicone
between the cables to ensure that
no water can get into the motor�
2� Lubricate and replace the O-ring�
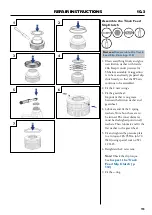
3�
Lubricate and fit the two wave
washers�
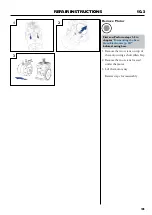
4� Apply Loctite 577 or Loctite
5400 to the screws threads� Push
down the cover and fit the screws.
Tighten the screws alternately all
around�
5� Retighten the cable seal�
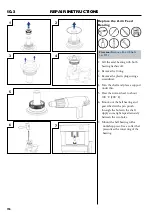
6� Reassemble the motor bracket�
Apply Loctite 577 or Loctite 5400
to the screws�
7� Lubricate and replace the O-ring�
1
3
4
2
5
7
6
First see:
Summary of Contents for PP440HF
Page 1: ...HUSQVARNA CONSTRUCTION PRODUCTS Workshop manual WS440HF WS482HF PP440HF PP480HF PP490HF ...
Page 2: ...2 LEGEND ...
Page 43: ...8 43 TECHNICAL INFORMATION AND TROUBLESHOOTING Function test Remote Control p 22 ...
Page 44: ...44 8 TECHNICAL INFORMATION AND TROUBLESHOOTING Power Supply p 46 ...
Page 52: ...52 8 TECHNICAL INFORMATION AND TROUBLESHOOTING Internal water valve p 62 ...
Page 55: ...8 55 TECHNICAL INFORMATION AND TROUBLESHOOTING ...
Page 56: ...56 8 TECHNICAL INFORMATION AND TROUBLESHOOTING ...
Page 58: ...58 8 TECHNICAL INFORMATION AND TROUBLESHOOTING ...
Page 60: ...60 8 TECHNICAL INFORMATION AND TROUBLESHOOTING ...
Page 65: ...8 65 TECHNICAL INFORMATION AND TROUBLESHOOTING ...
Page 66: ...66 8 TECHNICAL INFORMATION AND TROUBLESHOOTING ...
Page 156: ...1 5 6 13 WIRING DIAGRAMS 13 WIRING DIAGRAMS Electrical Drawings WS482 Saw Head Circuit Board ...
Page 157: ...13 1 5 7 WIRING DIAGRAMS PP480 ...
Page 158: ...1 5 8 13 WIRING DIAGRAMS PP490 4 pin ...
Page 159: ...13 1 5 9 WIRING DIAGRAMS PP490 5 pin ...
Page 161: ...13 1 6 1 WIRING DIAGRAMS PP490 ...
Page 162: ...1 6 2 13 WIRING DIAGRAMS Remote Control ...
Page 164: ...1 6 4 13 WIRING DIAGRAMS Contact connected to PP 480 440 HF Straight connection ...
Page 165: ...www husqvarnacp com 115 84 14 26 English 2013 04 ...