background image

The mower is equipped with a maintenance 

free battery and does not need servicing. 

However, periodic charging of the battery with an 

automotive type battery charger will extend its life.

• 

Keep battery and terminals clean.

• 

Keep battery bolts tight.

•  See chart for charging times.

STD

BATTERY

STATE

OF

CHARGE

APPROXIMATE CHARGING TIME*


TO FULL CHARGE AT 80

F

Maximum Rate at:

50 Amps 30 Amps 20 Amps 10 Amps

12.6V

100%

 - FULL CHARGE -

12.4V

75%

20 min.

35 min.

48 min.

90 min.

12.2V

50%

45 min.

75 min.

95 min.

180 min.

12.0V

25%

65 min.

115 min. 145 min. 280 min.

11.8V

0%

85 min.

150 min. 195 min. 370 min.

*Charging time depends on battery capacity,


condition, age, temperature and efficiency of charger

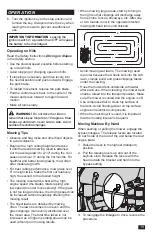
Cleaning the battery and terminals

Corrosion and dirt on the battery and terminals 

can cause the battery to lose power.

1. 

Lift the seat and rotate fully forward until 

supported by the seat rod.

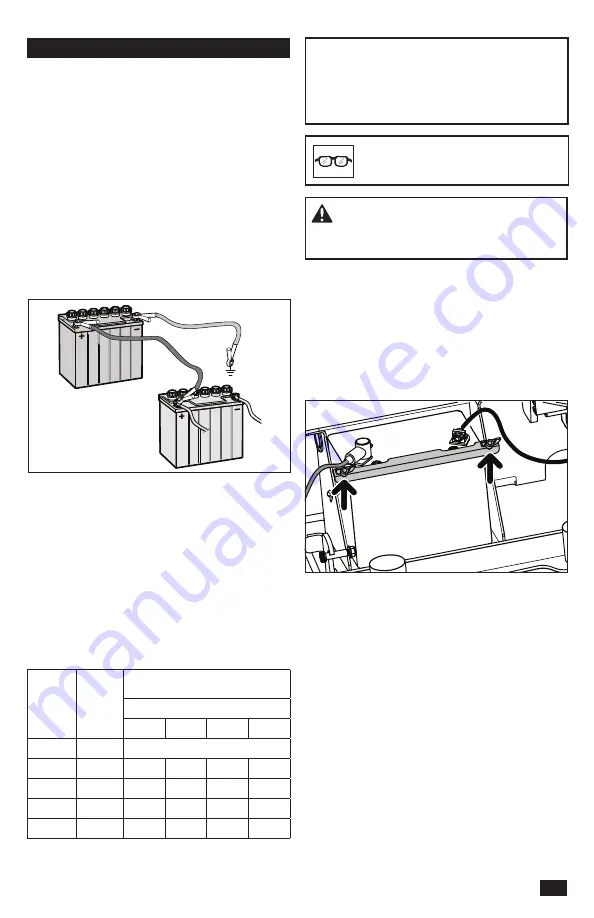
2.  Loosen the two wing nuts attached to the side 

J bolts just enough that the battery mount 

bracket slides down off the battery.

  CAUTION!

  Lead-acid batteries generate 

explosive gases. Keep sparks, flame and 

smoking materials away from batteries. 

Battery

If the battery is too weak to start the engine, it 

must be recharged.

Jumper Cable Use

1. 

Connect each end of the RED cable to the 

POSITIVE (+) terminal on each battery, taking 

care not to short against chassis.

2.  Connect one end of the BLACK cable to the 

NEGATIVE (-) terminal of the fully charged 

battery.

3.  Connect the other end of the BLACK cable 

to a good CHASSIS GROUND on the mower 

with the discharged battery, away from the 

fuel tank and battery.

To remove cables, reverse order

1. 

Remove BLACK cable first from chassis and 

then from the fully charged battery.

2. 

Remove RED cable last from both batteries.

3. 

Using two 1/2" wrenches disconnect BLACK 

battery cable then RED battery cable.

4. 

Carefully remove the battery from the mower

5. 

Rinse the battery with plain water and dry.

6. 

Clean terminals and battery cable ends with a 

wire brush until shiny.

7.  Coat the terminals with grease or petroleum 

jelly.

Replacing

1. 

Reinstall battery with terminals in the same 

position as prior to removal..

2. 

Connect RED battery cable first to positive (+) 

battery terminal.

3.  Connect BLACK grounding cable to negative 

(-) battery terminal.

4. 

Slide mount bracket back up over battery and 

retighten wing nuts.

CAUTION! 

Always wear eye 

protection when around batteries.

IMPORTANT INFORMATION  

Do not open 

or remove caps or covers. Adding or checking 

level of electrolyte is not necessary.
Always use two wrenches for the terminal 

screws.

23

MAINTENANCE

Summary of Contents for 97045560100

Page 1: ...asolina que tenga más de 10 de etanol E10 anulará la garantía del producto English Spanish Operator Manual Manual del operador MZ48 97045560100 Please read the operator manual carefully and make sure you understand the instructions before using the machine Gasoline containing a maximum of 10 ethanol E10 is permitted for use in this machine The use of gasoline with more than 10 ethanol E10 will voi...

Page 2: ...ions or damage the unit WARNING Failure to follow cautious operating practices can result in dangerous injury to the operator or other persons The owner must understand these instructions and must let only approved persons who understand these instructions to operate the mower Each person operating the mower must be of sound mind and body and must not be under the influence of mind altering substa...

Page 3: ...porte en vías públicas 43 Remolque 43 Funcionamiento 43 SÍMBOLOS Y RÓTULOS 45 SEGURIDAD 46 Seguridad infantil 46 Equipo de seguridad personal 47 Funcionamiento en pendientes 47 Manipulación segura de la gasolina 48 Transporte 50 Remolque 50 Parachispas 50 CONTROLES 51 Palancas de control de la dirección 52 Freno de estacionamiento 52 Control del acelerador 52 Estrangulador 53 Interruptor de la cuc...

Page 4: ... make sure that the machine is correctly attached DO NOT operate this machine on public roadways Towing If machine is equipped with a tow hitch use much more caution when towing Do not let children or others in or on the towed equipment Make wide turns to avoid jack knifing Travel slowly and leave more distance to stop Do not tow on sloped ground The weight of the towed equipment may cause loss of...

Page 5: ...ber The machine s manufacturing number can be found on the printed plate affixed to the engine compartment Stated on the plate from the top are The machine s type designation I D The manufacturer s type number Model The machine s serial number Serial no Please have the type designation and serial number available when ordering spare parts This manual belongs to the machine with the manufacturing n...

Page 6: ...anual Shut off engine remove key before maintenance or repair Keep a safe distance from the machine Use on slopes no greater than 10 No passengers Whole body exposure to thrown objects Severing of fingers and toes Do not open or remove safety shields wIth engine running Careful backing up watch for other people Careful going forward watch for other people Warning Battery acid is corrosive explosiv...

Page 7: ...g material against a wall or obstruction Material may ricochet back toward the operator Stop the blades when crossing gravel surfaces Do not operate machine without the full grass catcher discharge guard or other safety devices in place and working Slow down before turning WARNING CHILDREN CAN BE SERIOUSLY INJURED OR KILLED BY THIS EQUIPMENT Carefully read and follow all the safety instruction tha...

Page 8: ...Tall grass can hide obstacles Choose a low ground speed so that you will not have to stop while on the slope Do not mow on wet grass Tires may lose traction Avoid starting stopping or turning on a slope If the tires lose traction disengage the blades and proceed slowly straight down the slope Keep movement on the slopes slow and gradual Do not make sudden changes in speed or direction which could ...

Page 9: ... a wheel is over the edge or the edge caves in WARNING Do not drive up or down hills with slopes greater than 10 degrees Do not drive across slopes Safe Handling of Gasoline To avoid personal injury or property damage use much more care in handling gasoline Gasoline is very flammable and the vapors are explosive Extinguish all cigarettes cigars pipes and other sources of ignition Use only approved...

Page 10: ...le normally negative black is removed from the battery Disconnect the grounding cable from the battery first and reconnect it last Do not make a bridge short circuit across the starter relay to run the starter Be very careful when handling battery acid Acid on skin can cause serious corrosive burns If you spill battery acid on your skin rinse immediately with water Acid in the eyes can cause blind...

Page 11: ...on for weight limits for towed equipment Do not tow near ditches canals and other hazards Spark Arrestor This mower is equipped with an internal combustion engine and must not be used on or near unimproved forested bush covered or grassy lands unless the engine s system is equipped with a spark arrestor meeting applicable local or state laws Federal laws apply on federal lands If a spark arrestor ...

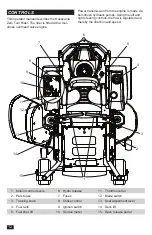
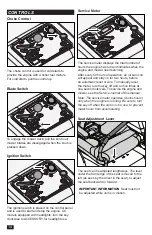
Page 12: ...de via belt driven hydraulic pumps Using the left and right steering controls the flow is regulated and thereby the direction and speed 1 Motion control levers 2 Park brake 3 Tracking knob 4 Fuel tank 5 Fuel shut off 6 Hydro release 7 Fuses 8 Choke control 9 Ignition switch 10 Service meter 11 Throttle control 12 Blade switch 13 Seat adjustment lever 14 Deck lift 15 Deck release pedal 12 CONTROLS ...

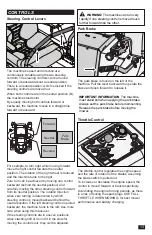
Page 13: ...trol The throttle control regulates the engine speed and the rate of rotation of the blades assuming the blade switch is pulled out To increase or decrease the engine speed the control is moved forward or back respectively Avoid idling the engine for long periods as there is a risk of fouling the spark plugs USE FULL THROTTLE WHEN MOWING for best mower performance and battery charging For example ...

Page 14: ...eset occurs To manually reset the meter turn the key off and on five times at one second intervals To service the engine and mower see the Service Journal of this manual Note The service meter operates clocks hours only when the engine is running Be sure to turn the key off when the unit is not in use to prevent meter hours from accumulating Choke Control The choke control is used for cold starts ...

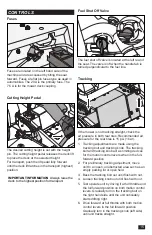
Page 15: ...the mower is not tracking straight check the air pressure in both rear tires Recommended air pressure for the rear tires is 15 psi 1 bar 1 Tracking adjustments are made using the tracking bolt and tracking knob The tracking bolt and tracking knob act as limiting devices for the motion control levers when in the full forward position 2 For preliminary tracking adjustment move unit to an open unobst...

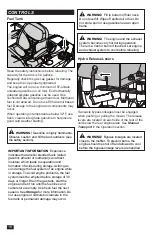
Page 16: ...hol ethanol or methanol can attract moisture which leads to separation and formation of acids during storage Acidic gas can damage the fuel system of an engine while in storage To avoid engine problems the fuel system must be emptied before storage of 30 days or longer Drain the gas tank start the engine and let it run until the fuel lines and carburetor are empty Use fresh fuel the next season Se...

Page 17: ...a straight line Pull the control levers back to the neutral position and the mower will stop moving Pull back slightly on control levers allowing the mower to move backwards Push the control levers forward to the neutral position and mower will stop moving To turn to the right While moving in a forward direction pull the right lever back towards the neutral position while maintaining the position ...

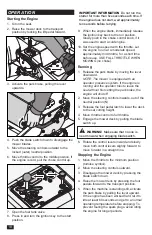
Page 18: ...ort position 5 When the machine is standing still activate the park brake by pulling the lever upward If the engine has been worked hard let it to idle at least 60 seconds and get to a normal operating temperature before stopping To prevent fouling the spark plugs avoid idling the engine for longer periods 9 When the engine starts immediately release the ignition key back to the run position Slowl...

Page 19: ...y and low speed the rider moves slowly If the grass is not too long and dense the driving speed can be increased without negatively affecting the mowing result The finest lawns are obtained by mowing often The lawn becomes more even and the grass clippings more evenly distributed over the mown area The total time taken is not increased as a higher operating speed can be used without poor mowing re...

Page 20: ...ments unless the engine is stopped the ignition key is removed the park brake is activated WARNING Bypass linkages are located close to the muffler To prevent burns the engine should be shut off and allowed to cool before the bypass linkage levers are handled Load the machine into truck or trailer by driving up ramps in low gear DO NOT LIFT The machine is not intended to be lifted by hand 20 OPERA...

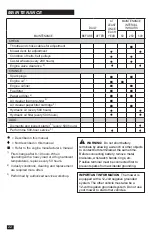
Page 21: ... 2 ALSO Inspect muffler spark arrestor Start the engine blades listen for unusual sounds Sharpen 3 Replace mower blades Described in this manual Not described in this manual Refer to the engine manufacturer s manual 1 First change after 8 10 hours When operating with a heavy load or at high ambient temperatures replace every 50 hours 2 In dusty conditions cleaning and replacement are required more...

Page 22: ...ribed in this manual Refer to the engine manufacturer s manual 1 First change after 8 10 hours When operating with a heavy load or at high ambient temperatures replace every 50 hours 2 In dusty conditions cleaning and replacement are required more often 3 Performed by authorized service workshop IMPORTANT INFORMATION The mower is equipped with a 12 volt negative grounded system The other vehicle m...

Page 23: ...e it must be recharged Jumper Cable Use 1 Connect each end of the RED cable to the POSITIVE terminal on each battery taking care not to short against chassis 2 Connect one end of the BLACK cable to the NEGATIVE terminal of the fully charged battery 3 Connect the other end of the BLACK cable to a good CHASSIS GROUND on the mower with the discharged battery away from the fuel tank and battery To rem...

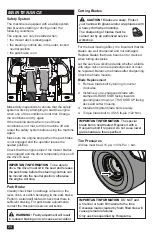
Page 24: ...s are engaged and the driver temporarily moves off the driver s seat Cutting Blades IMPORTANT INFORMATION The special blade bolt is heat treated Replace it with a Husqvarna bolt if required Do not a use lower grade hardware than specified CAUTION Blades are sharp Protect your hands with gloves and or wrap blades with a heavy cloth when handling The sharpening of blades must be carried out by an au...

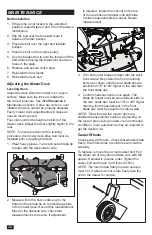
Page 25: ...ease idler arm to tension belt 6 Check that there are not twists in the belt and that the routing matches the routing decal 7 Replace belt shields on both mandrel housings and secure with fasteners Pump Belt The belts are not adjustable Replace belts if they begin to slip from wear Replacing Pump Belt Park the mower on a level surface Engage the park brake Belt Removal From the top side of the dec...

Page 26: ...8 to 3 8 higher than the front measurement In the front blade tips must be equal from side to side NOTE This will place the mower deck in a standard measurement position Depending on the type of grass being mowed or environmental conditions more adjustments may be required to get the desired cut Belt Installation 1 If the pump is not locked in the extended position repeat Steps 4 and 5 from the ab...

Page 27: ...he park brake and vehicle linkage to insure proper action and adjustment of the parking 5 Inspect the vehicle control linkage to the directional control arm on the transaxle Also make sure the control arm is securely fastened to the trunnion arm of the transaxle 6 Inspect the bypass mechanism on the transaxle and unit linkage to make sure it rotates and releases fully IMPORTANT INFORMATION Any ser...

Page 28: ...ning it must be replaced Gasoline or other petroleum products must not be used to clean belts Change hydraulic drive filters p Change engine oil every 50 hours 12 12 Every year Lubricate with grease gun 1 52 Every Week Filter change 1 365 Every day Oil change Level check Lubrication Schedule IMPORTANT INFORMATION Use minimal lubrication and remove excess lubricant so that is does not come into con...

Page 29: ...rrect replacement oil and filter change recommendations 1 Park on a level surface Apply park brake 2 Clean the dirt and debris from the area around the oil fill cap 3 Remove the cap dipstick 4 Locate the drain hose at the left rear of the engine Place an adequately sized container under the end of the drain hose and remove the oil drain plug 5 Allow the oil to fully drain from the engine 6 Replace...

Page 30: ... 180 in lbs 12 Continue to fill the transaxles through the expansion tank until the FULL COLD line is reached this will take approximately 23 additional ounces 13 Reinstall the expansion tank cap by hand Be careful to not overtighten Transmission Purging Purge procedures must be implemented if the hydrostatic system has been opened for maintenance or when more oil has been added to the system Due ...

Page 31: ...ic system Machine vibrates Blades are loose Blades are incorrectly balanced Engine is loose Engine overheats Clogged air intake or cooling fins Engine overloaded Poor ventilation around engine Defective engine speed regulator Too little or no oil in the engine Contamination in the fuel line Fouled spark plugs Battery not charging Battery terminal cable contacts are defective Charging lead is disco...

Page 32: ...abilizer Start the engine and let it run until the carburetor is drained of fuel or the stabilizer has reached the carburetor 5 Remove the spark plug and pour about a tablespoon of engine oil into the cylinder Turn over the engine so that the oil is evenly distributed and then refit the spark plug 6 Lubricate all grease zerks joints and axles 7 Remove the battery Clean charge and store the battery...

Page 33: ...33 SCHEMATIC ...

Page 34: ...Pa 1 bar FRAME Cutting Width 48 122 cm Cutting Height 1 1 2 4 1 2 3 8 cm 11 4 cm Number of Blades 3 Blade Length 16 1 2 41 8 cm Nose roller Yes Sprung Seat Standard Hinged Arm Rests Yes Service Meter Digital Blade Engagement Ogura GT48 Deck Construction 11 gauge fabricated Productivity 2 74 acres h 11 088 m2 h DIMENSIONS Weight 740 lbs 335 kg Base Machine Length 75 1 2 192 cm Base Machine Height 4...

Page 35: ... 305 3 4 250 339 370 502 7 8 378 512 591 801 1 1 8 782 1060 1410 1912 Grade 5 Minimum commercial quality lower quality not recommended Metric Standard Hardware Grade Grade 8 8 Grade 10 9 Grade 12 9 Size ft lbs Nm ft lbs Nm ft lbs Nm Shank Size Diameter in millimeters fine or coarse thread M4 1 5 2 2 2 3 2 7 3 7 M5 3 4 4 5 6 5 2 7 M6 5 2 7 7 5 10 8 2 11 M7 8 2 11 12 16 15 20 M8 13 5 18 18 8 25 21 8...

Page 36: ...e is drive to both wheels r Check mower deck pitch and adjustment r Check Safety switch for the park brake r Safety switch for the mower deck r Safety switch in the seat r Safety switch in the steering controls r Park brake functionality and adjustment r Driving forward r Driving backward r Engaging the blades r Idle speed r Engine high idle speed r Inform the customer about Need and advantages of...

Page 37: ... system for leaks r Inspect safety guards and shields r Check brake adjustment r DAILY SERVICE Action Date mtr reading stamp sign Clean debris from mower r Check engine oil level r Check the tire pressures r Check underside of deck r Inspect deck pulleys r Check clean the engine s cooling air intake r Check safety system r Check seat belt r Check fuel system for leaks r Inspect safety guards and s...

Page 38: ...ine oil level r Check the tire pressures r Check underside of deck r Inspect deck pulleys r Check clean the engine s cooling air intake r Check safety system r Check seat belt r Check fuel system for leaks r Inspect safety guards and shields r Check brake adjustment r 38 SERVICE JOURNAL ...

Page 39: ...el filter r Check engine RPM r Clean underside of deck r Check blade pitch r Grease blade spindles r Inspect spindle bearings r Inspect deck belt and blades r Inspect idler arm bearings r Inspect deck idler pulleys r Inspect hydraulic filter r Inspect hydraulic drive belt r Inspect hydraulic hoses r Check neutral position r Inspect battery connections r Check safety system r Check seat belt r Chec...

Page 40: ...derside of deck r Check blade pitch r Grease blade spindles r Inspect spindle bearings r Inspect deck belt and blades r Inspect idler arm bearings r Inspect deck idler pulleys r Change hydraulic oil level r Change hydraulic filter r Replace hydraulic drive belt r Inspect hydraulic hoses r Check neutral position r Inspect battery connections r Load test battery r Clean electrical connections r Chec...

Page 41: ...ke r Replace the air cleaner s foam pre filter r Replace the air filter s paper cartridge r Change the engine oil r Replace the engine oil filter r Check adjust the cutting height r Check adjust the park brake r Clean Change the spark plugs r Check the engine valve clearance r 41 SERVICE JOURNAL ...

Page 42: ...ulo contienen o emiten químicos que según el Estado de California provocan cáncer y malformaciones congénitas u otros daños reproductivos CERTIFICADOS DE CONFORMIDAD Requisitos para EE UU En el motor y o en el compartimiento del motor hay etiquetas que indican que la máquina cumple con los requisitos Esto también es aplicable a requisitos especiales para cualquiera de los estados normas de emision...

Page 43: ...logados y asegurarse de que la máquina esté bien sujeta NO utilice esta máquina en vías públicas Remolque Si la máquina está equipada con un sistema de remolque tenga extrema precaución al remolcar No lleve a niños ni otras personas dentro del equipo remolcado o sobre él Realice giros amplios para evitar el efecto tijera Desplácese lentamente y guarde más distancia para detenerse No remolque en un...

Page 44: ...ontrar en la placa impresa colocada en el compartimiento del motor En la placa se indican los siguientes detalles desde la parte superior La designación del tipo de máquina I D El número de tipo del fabricante Modelo El número de serie de la máquina Número de serie Tenga a mano la designación del tipo y el número de serie cuando haga pedidos de piezas de repuesto Este manual pertenece a la máquina...

Page 45: ...Reversa Neutro Rápido Lento Estrangulador Combustible Freno de estacionamiento Advertencia Use gafas de protección Use guantes protectores Utilice protección auditiva No se pare aquí Advertencia El ácido de la batería es corrosivo explosivo e inflamable Advertencia No toque las piezas Advertencia Cuchillas giratorias manténgase alejado del equipo de descarga Advertencia No opere sin el colector o ...

Page 46: ...uchillas cuando atraviese superficies de grava ADVERTENCIA ESTA MÁQUINA CORTADORA PUEDE AMPUTAR MANOS Y PIES Y ARROJAR OBJETOS SI NO SIGUE LAS INSTRUCCIONES DE SEGURIDAD PUEDE CAUSAR DAÑOS GRAVES O LA MUERTE ADVERTENCIA ESTE EQUIPO ES PELIGROSO PARA LOS NIÑOS PUEDE CAUSAR LESIONES GRAVES O LA MUERTE Lea y siga atentamente todas las instrucciones de seguridad que se indican a continuación INFORMACI...

Page 47: ...a conducción de un cortacésped Estos operadores deben evaluar su habilidad para operar la cortadora de césped en forma suficientemente segura como para protegerse a sí mismos y a los demás de una lesión grave Siga las recomendaciones del fabricante para los pesos de las ruedas o los contrapesos Mantenga la máquina libre de cualquier acumulación de césped hojas u otra basura pues podrían entrar en ...

Page 48: ...on forro de plástico Coloque siempre los recipientes en el suelo y lejos del vehículo durante el llenado No llene de más el tanque de combustible Vuelva a colocar la tapa de la gasolina y asegúrela apretándola Retire el equipo que funciona con gasolina del camión o trailer y rellénelo en el suelo Si esto no es posible rellene el equipo con un recipiente portátil en lugar de hacerlo directamente co...

Page 49: ...emente y no haya sustancias inflamables almacenadas en un recipiente abierto Pueden producirse chispas cuando se trabaja con la batería y los cables pesados del circuito del motor AVISO Utilice gafas de protección para trabajos de mantenimiento de arranque Esto puede causar una explosión de la batería incendio o daños en los ojos No se producirán chispas una vez que el cable de conexión a tierra p...

Page 50: ...ente causar daños graves al operador Cargue la unidad en un camión o remolque utilizando rampas de una resistencia correcta y a baja velocidad No levante la máquina La máquina no está diseñada para ser levantada manualmente Al cargar o descargar la máquina no exceda el ángulo de operación máximo recomendado de 10 Remolque Si la máquina está equipada con un sistema de remolque extreme las precaucio...

Page 51: ...e liberación hidrostática 7 Fusibles 8 Estrangulador 9 Interruptor de encendido 10 Medidor de servicio 11 Control del acelerador 12 Interruptor de la cuchilla 13 Palanca de ajuste del asiento 14 Elevación del equipo 15 Pedal de desenganche del equipo válvula superior de cuatro tiempos La transmisión del motor se hace mediante bombas hidráulicas accionadas por correa Utilizando los controles de la ...

Page 52: ...enga mucho cuidado al realizar esta maniobra Si los controles de la dirección están en posiciones irregulares cuando está detenido o no encajan en las ranuras para mover los controles hacia afuera pueden ajustarse ADVERTENCIA La máquina puede girar muy rápidamente si mueva un control de la dirección mucho más que el otro Freno de estacionamiento INFORMACIÓN IMPORTANTE La máquina debe estar absolut...

Page 53: ...ad total de horas que el motor ha estado funcionando e indica cuando el motor y el cortacésped necesitan reparación Cada 50 horas de funcionamiento aparecerá un icono de lata de aceite que permanecerá encendido durante dos horas antes de que se produzca un reinicio automático Para restablecer manualmente el medidor gire la llave a la posición de apagado cinco veces con intervalos de un segundo Par...

Page 54: ...empre la plataforma a la posición más alta para el transporte Si el cortacésped no se mueve en línea recta revise la presión de aire de los dos neumáticos traseros La presión de aire recomendada para los neumáticos traseros es de 15 psi 1 bar 1 Los ajustes de la rodadura se realizan mediante el perno de alineación y el botón de seguimiento El perno de alineación y el botón de seguimiento actúan co...

Page 55: ...a El motor funcionará con un mínimo de gasolina sin plomo de 87 octanos sin mezcla de aceite Se puede utilizar gasolina de alquilatos adaptada para el medio ambiente Consulte la sección Datos técnicos relacionada con el combustible etanol No se admite el uso de combustible metanol No utilice combustible E85 a base de alcohol Puede producir daños en el motor y sus componentes Cuando use la máquina ...

Page 56: ...potencia el operador debe sentarse en el asiento y arrancar el motor consulte Antes de arrancar en la sección Operación Ajuste el régimen del motor a ralentí desconecte el freno de estacionamiento pero no conecte las cuchillas en este momento Gire las palancas de control hacia adentro Mientras las palancas de control no se muevan hacia delante o hacia atrás el cortacésped no se moverá Mueva lentam...

Page 57: ...Arranque del motor 1 Siéntese en el asiento 2 Levante el equipo de corte hasta la posición de transporte bloqueando los pedales de elevación completamente hacia adelante 3 Active el freno de estacionamiento 4 Desacople las cuchillas de corte presionando el interruptor de la cuchilla hacia abajo 5 Mueva los controles de la dirección hacia afuera a la posición neutra bloqueada exterior 6 Mueva el ac...

Page 58: ...sición neutra y empújelas hacia afuera Aplique el freno de estacionamiento Para volver a iniciar el movimiento suelte el freno de estacionamiento Mueva las palancas de control de regreso al centro del cortacésped y presiónelas hacia adelante para volver al movimiento de avance Dé todas las vueltas despacio ADVERTENCIA No conduzca en lomas con pendientes superiores a 10 grados No conduzca a través ...

Page 59: ...ue termine INFORMACIÓN IMPORTANTE El cortacésped está equipado con un sistema de conexión a tierra negativo de 12 voltios El otro vehículo también debe tener un sistema de conexión a tierra negativo de 12 voltios No utilice el cortacésped con sistema para hacer arrancar otros vehículos ADVERTENCIA Las baterías de plomo y ácido generan gases explosivos Mantenga las baterías alejadas de chispas llam...

Page 60: ... Utilice aire comprimido para limpiar la superficie superior del equipo Evite que se acumule agua en la superficie superior en el motor y los componentes eléctricos Cuando se utiliza el kit para triturar es importante que el intervalo de corte sea frecuente ADVERTENCIA Tenga mucho cuidado cuando cargue la máquina en un camión o remolque usando las rampas Existe la posibilidad de daños graves o pel...

Page 61: ...DIARIO AL MENOS UNA VEZ AL AÑO INTERVALO DE MANTENIMIENTO EN HORAS ANTES DESPUÉS 50 250 500 COMPROBAR Freno de estacionamiento Nivel de aceite del motor cada reabastecimiento Sistema de seguridad Que no haya fugas de combustible ni aceite Si hay daños Si hay tornillería floja tornillos tuercas El equipo de corte si hay daños La presión de los neumáticos Las conexiones de la batería LIMPIAR La toma...

Page 62: ...el reemplazo se debe realizar cada 50 horas 2 En condiciones de mucho polvo se debe aumentar la frecuencia de la limpieza y el reemplazo 3 Realizado por un taller de servicio autorizado Descrito en este manual No se describe en este manual Consulte el manual del fabricante del motor ADVERTENCIA Lista de comprobación para antes de realizar cualquier operación de mantenimiento o ajuste Aplique el fr...

Page 63: ...rar o si hay que reemplazarla Equilibre las cuchillas después del afilado Revise los montajes de las cuchillas Reemplazo de las cuchillas 1 Quite el tornillo de la cuchilla girándolo hacia la izquierda 2 Instale cuchillas nuevas o reafiladas con el lado que lleva estampadas las palabras GRASS SIDE lado del pasto orientado hacia el suelo hierba hacia abajo o THIS SIDE UP este lado hacia arriba orie...

Page 64: ...la capacidad el estado y la antigüedad de la batería la temperatura y la eficacia de cargador 3 Con dos llaves 1 2 desconecte el cable de la batería NEGRO y después el cable de la batería ROJO 4 Retire con cuidado la batería del cortacésped 5 Enjuague la batería con agua pura y séquela 6 Limpie las terminales y los extremos del cable de la batería con un cepillo de alambre hasta que brillen 7 Cubr...

Page 65: ...trico que está ubicada en el eje del motor 2 Pase la correa hacia delante entre la polea de resorte y la polea fija 3 Coloque la correa alrededor de la polea tensora de resorte 4 Enrolle la correa alrededor de la polea tensora fija y de los alojamientos del mandril 5 Empuje hacia dentro el brazo guía y dirija cuidadosamente la correa sobre la polea tensora fija Una vez que la correa está correctam...

Page 66: ...o menos aire de lo necesario no podrá ajustar el equipo correctamente Compruebe la presión de los neumáticos antes de efectuar el ajuste del equipo de corte Consulte Presiones de los neumáticos en la sección Mantenimiento Los ajustes incorrectos del equipo de corte producirán un corte irregular Cuatro ranuras controlan la altura y el ángulo de funcionamiento del equipo de corte El equipo se debe a...

Page 67: ... lavadoras de alta presión ni equipos de limpieza al vapor Evite rociar el motor y los componentes eléctricos con agua No lave las superficies calientes con agua fría Deje que la unidad se enfríe antes de lavarla Tornillería Revísela diariamente Inspeccione toda la máquina para ver si faltan tornillos o si hay tornillos sueltos ZT 3100 Powertrain El mantenimiento externo regular del ZT 3100 Powert...

Page 68: ...rficies de avance de las poleas de correa Si esto ocurre intente limpiarlas con alcohol Si la correa continúa deslizándose Cambie los filtros del mando hidráulico p Cambie el aceite del motor cada 50 horas 12 12 Cada año Lubricar con una pistola de engrase 1 52 Cada semana Cambiar filtro 1 365 Todos los días Cambiar aceite Comprobar el nivel Programa de lubricación después de la limpieza se debe r...

Page 69: ...ione la máquina en una superficie nivelada Aplique el freno de estacionamiento 2 Limpie la suciedad y los desechos del área alrededor de la tapa del tanque de llenado de aceite 3 Quité la tapa varilla de nivel 4 Ubique la manguera de drenado que se encuentra al lado trasero izquierdo del motor Ponga un contenedor de un tamaño adecuado bajo el extremo de la manguera de drenado y quite el tapón de v...

Page 70: ...ículo 10 Llene con aceite de motor 20W50 hasta que el aceite aparezca en la parte inferior del orificio superior de cada transeje aproximadamente 2 cuartos por transeje 4 cuartos en total Instale el tapón del orificio superior en cada transeje cuando el nivel de aceite alcance el orificio 11 Apriete los tapones de los orificios a 180 pulg lb 12 Siga llenando los transejes a través del depósito de ...

Page 71: ... el motor 4 Es posible que sea necesario repetir los pasos 2 y 3 hasta purgar completamente todo el aire del sistema Si el mando hidráulico funciona con niveles de ruido normales y se mueve suavemente hacia adelante y en marcha atrás a velocidades normales se considera purgado 5 Después de utilizar el vehículo dos veces se debe comprobar el nivel de aceite cuando el aceite esté frío y se debe ajus...

Page 72: ...s cuchillas están mal equilibradas El motor está suelto El motor se sobrecalienta Obstrucción en la entrada de aire o las aletas de refrigeración Sobrecarga del motor Ventilación deficiente alrededor del motor Regulador del régimen del motor defectuoso Escasez o ausencia de aceite en el motor Contaminación de la tubería de combustible Bujías sucias La batería no se carga Mal contacto de las conexi...

Page 73: ...jos de llamas abiertas o fuentes de ignición No utilice gasolina para la limpieza Utilice un desengrasador y agua tibia Para preparar la máquina para el almacenamiento 1 Limpie la máquina completamente en especial debajo del equipo de corte Retoque los daños en la pintura y rocíe una capa delgada de aceite en la parte inferior del equipo de corte para evitar la corrosión 2 Inspeccione la máquina p...

Page 74: ...74 ESQUEMA ...

Page 75: ...x 10 10 Presión de los neumáticos 15 PSI 103 kPa 1 bar BASTIDOR Ancho de corte 122 cm Altura de corte 3 8 11 4 cm Número de cuchillas 3 Longitud de la cuchilla 41 8 cm Rodillo de nariz Sí Asiento Suspensión Reposabrazos con bisagras Sí Medidor de servicio Digital Acoplamiento de la cuchilla Ogura GT48 Construcción del equipo Fabricado con calibre 11 Productividad 11 088 m2 h DIMENSIONES Peso 335 k...

Page 76: ...rosca fina o gruesa 1 4 9 12 13 18 5 16 18 24 28 38 24 33 3 8 31 42 46 62 40 54 7 16 50 68 75 102 1 2 75 102 115 156 9 16 110 149 165 224 5 8 150 203 225 305 3 4 250 339 370 502 7 8 378 512 591 801 1 1 8 782 1060 1410 1912 Grado 5 Calidad comercial mínima no se recomienda una menor calidad Tornillería estándar en sistema métrico Grado Grado 8 8 Grado 10 9 Grado 12 9 Tamaño pies lb Nm pies lb Nm pi...

Page 77: ...en ambas ruedas r Comprobar el ajuste del equipo de corte r Verificar Interruptor de seguridad del freno de estacionamiento r Interruptor de seguridad del equipo de corte r Interruptor de seguridad en el asiento r Interruptor de seguridad en los controles de la dirección r Funcionalidad del freno de estacionamiento r Avance hacia delante r Marcha atrás r Acoplamiento de las cuchillas r Revisar el ...

Page 78: ...nes y blindajes de seguridad r Revisar el ajuste del freno r MANTENIMIENTO DIARIO Acción Fecha Lectura De Medidor Sello Firma Limpiar los residuos del cortacésped r Revisar el nivel del aceite del motor r Comprobar la presión de los neumáticos r Revisar la parte inferior del equipo r Inspeccionar las poleas del equipo r Comprobar limpiar la toma de aire de refrigeración del motor r Comprobar el si...

Page 79: ...os r Revisar la parte inferior del equipo r Inspeccionar las poleas del equipo r Comprobar limpiar la toma de aire de refrigeración del motor r Comprobar el sistema de seguridad r Comprobar el cinturón de seguridad r Comprobar si hay fugas en el sistema de combustible r Inspeccionar las protecciones y blindajes de seguridad r Revisar el ajuste del freno r 79 REGISTRO DE SERVICIO ...

Page 80: ...visar el ángulo de la hoja r Engrasar los ejes de la cuchilla r Inspeccionar los cojinetes del eje r Inspeccionar la correa del equipo y las cuchillas r Inspeccionar los cojinetes del brazo guía r Inspeccionar las poleas tensoras del equipo r Revisar el nivel del aceite hidráulico r Inspeccionar el filtro hidráulico r Inspeccionar la correa de transmisión hidráulica r Inspeccionar las mangueras hi...

Page 81: ...ja r Engrasar los ejes de la cuchilla r Inspeccionar los cojinetes del eje r Inspeccionar la correa del equipo y las cuchillas r Inspeccionar los cojinetes del brazo guía r Inspeccionar las poleas tensoras del equipo r Cambiar el aceite hidráulico r Cambiar el filtro hidráulico r Cambiar la correa de transmisión hidráulica r Inspeccionar las mangueras hidráulicas r Comprobar la posición neutra r I...

Page 82: ... del purificador de aire espuma r Reemplazar el cartucho de papel del filtro de aire r Cambiar el aceite del motor r Reemplazar el filtro de aceite del motor r Comprobar ajustar la altura de corte r Comprobar ajustar el freno de estacionamiento r Limpiar cambiar las bujías r Comprobar el reglaje de la válvula del motor r 82 REGISTRO DE SERVICIO ...

Page 83: ......

Page 84: ...2019 10 15 SR ...

Reviews: