Husqvarna 970445607 Operator'S Manual Download Page 13

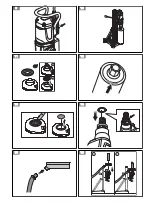
7. Put the slurry ring on the drill spindle (C). Install the

drill bit to the drill spindle (D). (Fig. 16)

8. Start the slurry collector.
9. Lift the drill bit to the ceiling. Attach the slurry ring to

the ceiling. (Fig. 17)

To connect and open the water supply

CAUTION: Make sure that the maximum

water pressure is not too high. Refer to 

Technical data on page 17

.

CAUTION: Use only clean water to prevent

that dirt causes a blockage in the water

system.

CAUTION: Use only an approved water

supply coupling. Speak to your dealer for

more information.

1. Connect the ball valve to the water supply (A). (Fig.

18)

2. Open the water system (B). Set the water pressure

to remove all waste material from the drill hole.

To decrease the temperature of the

motor

• Operate the product with no load for 2 minutes to

decrease the temperature of the motor.

To change gear

CAUTION: Change gear only when the

motor decreases in speed or stops. Do not

use force to change gear.

• Make sure that you always use the applicable speed

for the drill bit diameter. Refer to the rating plate on

the product or 

Technical data on page 17

.

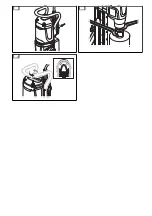
• Turn the gear selector to change gear. (Fig. 19)

To use Smartstart

The Smartstart

 function decreases the speed of the

motor. This helps to make a starter hole.
1. Start the motor. Make sure that the drill does not

touch the material.

2. Push the Smartstart

 button (A) one time. The

speed is decreased and the first green LED will flash

while the Smartstart

 function is on. (Fig. 20)

3. Drill a starter hole in the material.
4. Push the Smartstart

 button (A) again. The speed is

increased back to usual speed.

The speed is automatically increased back to usual

speed 1 minute after start of the Smartstart

 function if

the Smartstart

 button (A) is not pushed again.

Note: Only use the Smartstart

 function to start a hole.

The power will be very much decreased if it is used

during usual operation.

To start the product

WARNING: Make sure that the drill bit can

rotate freely. It starts to rotate when the

motor starts.

WARNING: If this is the first time the product

is started for the day, make sure you make a

check of the PRCD. Refer to 

To examine the

PRCD on page 11

.

1. Push the "RESET" button on the PRCD. (Fig. 21)
2. To set the operation speed, turn the drill spindle and

at the same time move the gear selector. Set the

gear selector in the correct position for the operation.

(Fig. 22)

3. Make sure that the water system is open. (Fig. 23)
4. Set the ON/OFF switch to "1". (Fig. 24)

To operate the product

WARNING: If the PRCD engages, remove

the drill bit from the hole before you push

"RESET".

WARNING: Dangerous accidents can occur

if the concrete core stays in the drill bit when

you remove the drill bit from the hole.

WARNING: When you use a drill stand,

operate the power tool by the insulated

grasping surfaces of the drill stand.

CAUTION: Make sure that no objects hit the

drill bit.

CAUTION: Do not use more force than

necessary. This only makes the operation

slow and causes overload to the motor.

1. Start the motor. Refer to 

To start the product on

page 13

.

2. Let the motor speed increase to the maximum speed

before the drill bit touches the surface.

3. Push the drill bit into the surface with the feed lever.
4. If you drill through iron reinforcements, use more

initial pressure and a lower gear than if there were

no iron reinforcements.

5. Use very small pressure initially to keep the drill bit in

correct position.

1188 - 008 - 14.09.2020

13

Summary of Contents for 970445607

Page 1: ...DM400 DM430 EN Operator s manual 6 20 ES MX Manual del usuario 21 38 FR CA Manuel d utilisation 39 57 ...

Page 2: ...1 9 10 7 3 8 11 15 4 12 13 5 14 6 2 1 2 3 4 5 6 7 8 ...

Page 3: ...9 10 11 A B 12 13 14 15 16 C D ...

Page 4: ...17 18 A B 19 20 A 21 22 23 24 ...

Page 5: ...25 26 27 ...

Page 6: ... be used and maintained National Local regulations could restrict the use of this product Find out what regulations are applicable where you work before you start using the product Product description This Husqvarna Drill Motor is a transportable diamond core drill to be used with an approved drill stand The diamond drill bit is a hollow drill that has diamond segments Water goes through the ball ...

Page 7: ...and the instructions before you use this product Fig 4 Always use approved personal protective equipment Refer to Personal protective equipment on page 10 Fig 5 Environmental mark The product or package of the product is not domestic waste Recycle it at an approved disposal location for electrical and electronic equipment Fig 6 Make sure that water cannot leak into the product when you drill in th...

Page 8: ...e equipment such as dust mask non skid safety shoes hard hat or hearing protection used for appropriate conditions will reduce personal injuries Prevent unintentional starting Ensure the switch is in the off position before connecting to power source and or battery pack picking up or carrying the tool Carrying power tools with your finger on the switch or energising power tools that have the switc...

Page 9: ...iece is not smooth flat or well affixed the pad may pull away from the workpiece Ensure there is sufficient vacuum before and during drilling If the vacuum is insufficient the pad may release from the workpiece Never perform drilling with the machine secured by the vacuum pad only except when drilling downwards If the vacuum is lost the pad will release from the workpiece When the drilling through...

Page 10: ...n of the product When the drill points up during operation always use an applicable container to collect the water Always attach the product to an applicable drill stand before operation Refer to Accessories on page 19 Make sure that you always can stop the motor quickly in an emergency Make sure that there are no pipes or electrical cables in the area where the hole will be made If the product do...

Page 11: ...urrent the PRCD engages The red light shows that the PRCD is on and that the product can be started If the red light does not show push the RESET button Fig 7 To examine the PRCD WARNING Not applicable for 110V type sold in United Kingdom and Ireland Refer to PRCD on page 11 WARNING The PRCD must be examined each time the power plug is connected to a power outlet WARNING If the PRCD must be repair...

Page 12: ...t the product is installed correctly The drill bit and the drill stand must be attached correctly Fig 10 7 When you do inverted drilling make sure that you comply to the applicable instructions Refer to To prepare the product for inverted drilling on page 12 8 Make sure that the water system is not damaged and that it is connected to the product 9 Do the daily maintenance Refer to Maintenance sche...

Page 13: ...matically increased back to usual speed 1 minute after start of the Smartstart function if the Smartstart button A is not pushed again Note Only use the Smartstart function to start a hole The power will be very much decreased if it is used during usual operation To start the product WARNING Make sure that the drill bit can rotate freely It starts to rotate when the motor starts WARNING If this is...

Page 14: ... grease 2 Use the wrenches to remove the drill bit Fig 26 3 Lubricate the tool thread with water resistant grease 4 Use the wrenches to attach the new drill bit Maintenance Introduction WARNING Read and understand the safety chapter before you do maintenance on the product WARNING To prevent injury disconnect the power cord before you do maintenance Maintenance schedule General maintenance done by...

Page 15: ... inner and outer diameter of the drill bit tube Lubricate the drill bit thread with water resistant grease This makes it easy to loosen the tool Make sure that the radial run out at the diamond segments of the drill bit is not more than 1 mm To replace the gear oil CAUTION If there is gear oil leakage stop the product and speak to an approved service center The gear becomes damaged if the gear oil...

Page 16: ...diamond segments with a SiC grind stone Unwanted material collects around the hole during oper ation The water pressure is too low Increase the water pressure Refer to Technical data on page 17 The diamond segments on the drill bit are pulled out of their bond There are much vibration in the product during the oper ation Use correct load when you operate the product There is leakage of gear oil Se...

Page 17: ...A Drill bit Max drill diameter in concrete mm inch 350 14 450 18 Min drill diameter in concrete mm inch 55 2 100 4 Weight kg lb 13 5 29 8 14 2 31 3 Water cooling Water coupling Gardena Gardena Maximum water pressure bar 3 3 Tool connection Spindle thread JP SE RoW A Rod CRI 28 1 1 4 G A Rod CRI 28 1 1 4 G Dust and slurry Drill bit diameter to use a slurry ring mm inch 50 350 2 13 8 50 350 2 13 8 O...

Page 18: ...onnected to mains voltage and can be used N A Power output is less than 50 of available out put power 2 green LEDs Power output is between 50 and 65 of avail able output power 3 green LEDs Power output is between 65 and 80 of avail able output power 3 green LEDs and 1 yellow LED Maximum power output Power output is more than 80 of available output power 3 green LEDs 1 yellow LED and 1 red LED Ther...

Page 19: ... pad OK Other securing OK Slurry ring OK OK Sealing disc OK OK Rubber washer part number 598 72 14 01 OK OK Contact you local service agent for more information Service Approved service center To find your nearest Husqvarna Construction Products approved service center go to the web site www husqvarnacp com 1188 008 14 09 2020 19 ...

Page 20: ...Registered trademarks The Bluetooth word mark and logos are registered trademarks owned by Bluetooth SIG inc and any use of such marks by Husqvarna is under license 20 1188 008 14 09 2020 ...

Reviews: