background image

Summary of Contents for 968999250

Page 1: ...Operators Manual 968999250 Z4818BIA Models Please read these instructions carefully and make sure you understand them before using the machine MANUAL NO 539109797 REV IR 09 18 04 ...

Page 2: ...tering substance CAUTION 1 Keep all shields guards and safety devices in place and in proper working condition 2 Stop engine and remove spark plug wires or remove key before adjusting servicing or perform ing maintenance Engine exhaust some of it s constituents and certain vehicle componets contain or emit chemicals known to the State of California to cause cancer and birth defects or other repro ...

Page 3: ...1 CUSTOMER RESPONSIBILITIES 22 Maintenance Schedule 22 Lubrication Chart 23 Tires 23 Operator Presence System 23 Blade Care 23 V Belts 25 Engine 25 Air Screen Air Filter 26 Oil Filter 26 Spark Plugs 26 Fuel Filter 26 Cleaning 26 SERVICE AND ADJUSTMENT 27 Mower 27 Deck Level 27 Deck Belt Replacement 28 IZT Integraded Zeroturn Transaxle Belt Replacement 29 Seat Adjustment 30 Control Levers Adjustmen...

Page 4: ...ss you engage the IZT Intergraded Zeroturn Transaxle bypass linkages Battery acid is corrosive explosive and flammable Read Operator s Manual Shut off engine remove key before perform ing any maintenance or repair work Keep a safe distance from the machine Use on slopes no greater than 10 No passen gers Whole body exposure to thrown objects Severing of fingers toes Do not open or remove safety shi...

Page 5: ... in the blades and thrown out Beware of the discharge deck and do not point it at any one Do not use the machine without the discharge deck in place Stop the engine and prevent it from start ing before you clean the discharge deck Remember that the operator is responsible for dangers or accidents Never take passengers The machine is only intended for use by one person Always look down and behind b...

Page 6: ... it Local laws may regulate the age of the user Make sure that you have first aid equipment close at hand when using the machine Never use the machine when barefoot Always wear protective shoes or boots preferably with steel toecaps Always wear approved protective glasses or a full visor when assembling or driving Never wear loose clothing that can get caught in moving parts WARNING Engine exhaust...

Page 7: ...und if a wheel goes over the edge of a drop or ditch or if an edge gives way Do not mow wet grass It is slippery and the tires can lose their grip so that the machine slides Try not to stabilize the machine by putting a foot on the ground When cleaning the chassis the machine may never be driven near verges or ditches Mow up and down not side to side 8003 004 Be extra cautious when driving on slop...

Page 8: ...dren to operate the machine Be particularly cautious near corners bushes trees or other objects that block your view SAFETY INSTRUCTIONS WARNING The engine must not be started when the driver s floor plate or any protective plate for the mower deck s drive belt is removed Never allow children to operate the machine 8011 517 8011 516 Stop the engine Prevent the engine from starting by removing the ...

Page 9: ...en servicing the battery Explosive gases form in the battery Never perform maintenance on the battery when smoking or near open flames or sparks The battery can explode and cause serious injury damage Ensure that nuts and bolts especially the fastening bolts for the blade attachments are properly tightened and that the equipment is in good condition Do not modify safety equipment Check regularly t...

Page 10: ...ving grass leaves and other debris that may have accumulated on the machine Allow the machine to cool before putting it in storage Transport The machine is heavy and can cause serious crushing injuries Be extra cautious when it is loaded on or unloaded from a vehicle or trailer Use an approved trailer to transport the machine Activate the parking brake turn off the fuel supply and fasten the machi...

Page 11: ...improved forest covered brush covered or grass covered land un less the engine s exhaust system is equipped with a spark arrester meeting applicable local or state laws if any If a spark arrester is used it should be main tained in effective working order by the op erator A spark arrester for the muffler is available through your nearest authorized engine service center department CONGRATULATIONS ...

Page 12: ...2 Tire pressure gauge 3 Nail bar or claw hammer 4 Wire snips When right or left hand is mentioned in this manual it means when you are in the operating position seated TO REMOVE THE MOWER FROM CRATE UNPACK CRATE Using the nail bar or hammer remove the top of the crate first Then remove the sides of the crate and place these out of the way Be careful of any exposed nails or staples Remove the plast...

Page 13: ...ay be required to position the seat in the desired position Refer to the Service and Adjustment section of this manual FIGURE 1 ATTACH CONTROL LEVERS See Fig 2 Using the 9 16 wrench or socket and ratchet remove the bottom hex bolt and spring washer from the control arm Rotate the control lever up until the bolt and spring washer can be placed thru the slot in the bottom of the control lever and th...

Page 14: ... this manual Be sure the mower is in a well ventilated area Be sure the area in front of the mower is clear of other people and objects ASSEMBLY Be sure all of the above assembly steps have been completed Check engine oil level and fill fuel tank with gasoline Place the IZT Integraded Zeroturn Transaxle bypass linkages into the drive position See TRANSPORT in the Operation section of this manual S...

Page 15: ...nleaded gasoline Check your engine manual for fuel requirements Become familiar with all controls their location and function Operate them before you start the engine Become familiar with unit operation on a flat and level area with the mower deck shut off Be sure the brake system is in a safe operating condition If adjustment is needed see Service and Adjustment section ASSEMBLY CHECK THE TIRE PR...

Page 16: ...starting a cold engine 5 THROTTLE CONTROL Used to control Engine Speed 6 IZT Integraded Zeroturn Transaxle BYPASS LINKAGES Bypasses IZT s for pushing or pulling mower 7 IGNITION SWITCH Used to start or stop the engine 8 PARKING BRAKE LEVER Engages and disengages the park brakes 9 TENSION RELIEF LEVER Used to release the belt tension on the deck belt for ease in removing or replacing the belt 10 HO...

Page 17: ... down on the PTO Switch into the disengaged position ENGINE Move throttle control to slow position NOTE Failure to move the throttle control to slow position and allow engine to idle before stopping may cause engine to backfire Turn ignition key to OFF position and remove key Always remove key when leaving the mower to prevent unauthorized use Never use choke to stop engine IMPORTANT LEAVING THE I...

Page 18: ...b TO MOVE FORWARD AND BACKWARD See Fig 4 IMPORTANT CONTROL LEVERS RETURN TO NEUTRAL WHEN RELEASED THIS MAY CAUSE A SUDDEN STOP OF THE MOWER The direction and speed of movement is controlled by the control levers on either side of the mower The left lever controls the flow of oil in the left IZT Integraded Zeroturn Transaxle to the left wheel The right lever controls the flow of oil in the right IZ...

Page 19: ... the machine to turn in that direction To turn left while moving in a forward direction pull the left lever back towards the neutral position this will slow the rotation of the left wheel and cause the machine to turn in that direction To zero turn pull one lever back beyond neutral while holding the other slightly ahead of neutral NOTE The direction of the zero turn will be determined by which le...

Page 20: ...wn into the notch in the height plate The cutting height range is from 1 1 2 to 4 1 2 in 1 2 increments The heights are measured from the ground up to the blade tip with the engine not running The average lawn should be cut to 2 1 2 during the cool season and to over 3 during the hot months For healthier and better looking lawns mow often and after moderate growth For best cutting performance gras...

Page 21: ...the deck to the desired cutting height see TO ADJUST DECK CUTTING HEIGHT in the operation section of this manual Using a 3 4 wrench and a 9 16 wrench remove the nut and shoulder bolt from the anti scalp roller Lower the anti scalp roller to the ground and raise it up to the next highest hole Replace and tighten the nut and shoulder bolt Be sure to adjust all of the anti scalp rollers to the same p...

Page 22: ...gain forward motion Make all turns slowly TO OPERATE MOWER Your mower is equipped with an operator presence system When the engine is running any attempt by the operator to leave the seat without first setting the park brake will shut off the engine Select desired height of cut Start deck blades by pulling the PTO switch up into the engaged position To stop the deck blades press down on the PTO Sw...

Page 23: ...n Pull the IZT bypass linkages out and into the slots and release so that it is held in the bypass position To reengage the IZT s to drive reverse the above procedure WARNING Do not tow any trailers etc with this mower They may jackknife or overturn causing damage to the mower and possibly serious injury to the operator OPERATION FIGURE 7 FIGURE 7A FIGURE 7B CZ 10 CZ 11 CZ 12 1 1 IZT BYPASS LINKAG...

Page 24: ...k Do not over fill Wipe off any spilled oil or fuel Do not store spill or use gasoline near an open flame ADD GASOLINE Fill fuel tank Use fresh clean regular unleaded gasoline with a minimum of 87 octane Use of leaded gasoline will increase carbon and lead oxide deposits and reduce valve life Do not mix oil with gasoline Purchase fuel in quantities that can be used within 30 days to ensure fuel fr...

Page 25: ...If the engine starts to run roughly press the throttle control back forward to choke the engine for a few seconds Then continue to pull the throttle control back to the fast position The PTO switch and ground drive can now be used If the engine does not accept the load restart the engine and allow it to warm up for one minute using the choke as described above TO START ENGINE See Fig 3 When starti...

Page 26: ...to assure better mowing performance and proper discharge of material Regulate ground speed by going slow enough to allow proper deck cutting performance as well as the quality of cut desired When operating attachments select a ground speed that will suit the terrain and give best performance of the attachment being used OPERATION begins to run smoothly Continue to pull back on the throttle control...

Page 27: ... Fins Replace Spark Plug Replace Air Filter Paper Cartridge Replace Fuel Filter CUSTOMER RESPONSIBILITIES MAINTENANCE SCHEDULE Before each use EVERY 8 Hours 25 Hours 50 Hours 100 Hours Season Before Storage X X X X X X X X X X X X X X X X X X X X X X X X X X X X X X 1 2 2 3 4 5 1 2 1 2 2 2 2 1 change more often when operating under a heavy load or in high ambient temperatures 2 Service more often ...

Page 28: ... your mower All adjustments in the Service and Adjustments section of the this manual should be checked at least once each season Once a year you should replace the spark plug clean or replace air filter and check blades and belts for wear A new spark plug and clean air filter assure proper air fuel mixture and help your engine run better and last longer BEFORE EACH USE Check engine oil level Chec...

Page 29: ...RICANTSWILLATTRACTDUSTANDDIRTTHATWILLSHORTENTHELIFEOFTHESELF LUBRICATING BEARINGS IF YOU FEEL THEY MUST BE LUBRICATED USE ONLYA DRY POWDERED GRAPHITETYPELUBRICANTSPARINGLY GREASE LUBE POINTS EVERY 25 HOURS CHECK TIRE AIR PRESSURE FRONT TIRES 15 PSI REAR TIRES 15 PSI REFER TO ENGINE OPERATORS MANUAL PRIOR TO SERVICING THE ENGINE ...

Page 30: ...tion as described repair the problem immediately The engine should not start unless the parking brake is engaged the PTO switch is disengaged pressed down the operator is on the seat and the control levers are rotated to the outside of the mower When the engine is running any attempt by the operator to leave the seat without first setting the park brake should shut off the engine When the engine i...

Page 31: ...counterclockwise Install new or resharpened blade with stamped THIS SIDE UP facing deck and cutter housing CUSTOMER RESPONSIBILITIES IMPORTANT SPECIAL BLADE BOLT IS HEAT TREATED FIGURE 8 IMPORTANT TO ENSURE PROPERASSEMBLY CENTER HOLE IN BLADE MUST ALIGN WITH STAR ON CUTTER HOUSING Install and tighten blade bolt securely 45 55 ft lbs torque 2 1 5 3 4 1 BLADE 2 CENTER HOLE 3 STAR 4 CUTTER HOUSING 5 ...

Page 32: ...tions supplied with balancer NOTE Do not use a nail for balancing the blade The lobes of the center hole may appear to be centered but are not Slide blade on to an un threaded portion of the steel bolt or pin and hold the bolt or pin parallel with the ground If the blade is balanced it should remain in a horizontal position If either end of the blade moves downward sharpen the heavy end until the ...

Page 33: ...l guard Disconnect BLACK battery cable first then the RED battery cable and remove the battery from the tractor Rinse the battery with plain water and dry Clean terminals and battery cable ends with wire brush until shiny Coat terminals with grease or petroleum jelly Reinstall battery See REPLACING BATTERY in the SERVICE AND ADJUSTMENT section of this manual BATTERY Your mower is equipped with a m...

Page 34: ...t use Refill engine with oil through the oil dipstick tube Pour slowly Do not overfill See Engine Owners Manual for type and capacity of the oil ENGINE LUBRICATION Refer to you Engine Owners Manual TO CHANGE ENGINE OIL See Fig 10 Be sure the mower is on a level surface Oil will drain more freely when warm Place a suitable container under the right rear corner of the rear of the mower Remove oil di...

Page 35: ...external surfaces as neces sary Make sure the cooling shrouds are rein stalled NOTE Operating the engine with a blocked grass screen dirty or plugged cooling fins and or cooling shrouds removed will cause engine damage due to overheating AIR FILTER Your engine will not run properly using a dirty air filter Service air cleaner more often under dusty conditions See Engine Manual ENGINE OIL FILTER Re...

Page 36: ...ow pointing toward the carburetor Be sure there are no fuel leaks and clamps are secure and properly positioned Immediately wipe up any spilled gasoline FIGURE 12 1 ENGINE FUELFILTER 1 FUEL SHUT OFF VALVE FIGURE 11 CLEANING Clean engine battery seat finish etc of all foreign matter Keep finished surfaces and wheels free of all gasoline oil etc Protect painted surfaces with automotive type wax We d...

Page 37: ...can not properly adjust your deck NOTE It may be easier to adjust the front lift linkages by removing the floor pan before any adjustments are made SIDE TO SIDE ADJUSTMENT See Figs 13 and 14 Raise the deck into the highest cutting position 4 1 2 Measure height from the bottom edge of the deck to the ground at both front corners Distance A at both corners should be the same If adjustment is necessa...

Page 38: ... any blade so that the tip is pointing straight forward Measure distance B at the front and rear tip of the blade Before making any necessary adjustments check to make sure that the deck is level side to side With the deck in the highest cutting position 4 1 2 measure the front tip of the blade to see if the deck is higher or lower than 4 1 2 To lower the front tip of the blade using a 9 16 wrench...

Page 39: ... shaft The belt can now be removed SERVICE AND ADJUSTMENT DECK BELT INSTALLATION See Figs 16 and 17 NOTE For ease in installing the deck belt refer to the routing decal on the front edge of the deck Wrap the deck belt around the electric clutch that is located on the engine shaft Push the rest of the belt through the IZT Integraded Zeroturn Transaxle support and up onto the deck Starting on the ri...

Page 40: ...s as this can affect cooling or damage the IZT s Remove the deck belt see TO REPLACE DECK BELT in this section of the manual Create slack in the belt by removing the spring on the pump idler arm The belt should now be able to be removed from the engine pulley and IZT pulleys BELT INSTALLATION Wrap the IZT belt around the IZT pulleys Route the belt around the inside of the idler pulley Now you can ...

Page 41: ...ower Using a 3 4 wrench and or socket w drive ratchet remove hex nut and hex bolt from the caster fork Remove the tire from the fork Remove the spacer from the inside of the caster rim Repair tire Reassemble in the reverse order of the previous steps FRONT CASTER TIRES Identify which control lever moves further forward Using a 9 16 wrench slightly loosen the bottom hex bolt about 1 2 turn on the o...

Page 42: ...S GROUND away from the fuel tank and battery TO START AN ENGINE WITH A WEAK BATTERY WARNING Lead acid batteries generate explosive gases Keep sparks flame and smoking materials away from batteries Always wear eye protection when around batteries If your battery is too weak to start the engine it should be recharged See BATTERY in the Customer Responsibilities section of this manual If jumper cable...

Page 43: ...g two 1 2 wrenches disconnect BLACK battery cable then RED battery cable Using 7 16 wrench remove terminal guard Carefully remove the battery from the mower Install new battery with terminals in the same position as the old battery Reinstall terminal guard First connect RED battery cable to positive battery terminal with hex bolt and hex nut Connect BLACK grounding cable to negative battery termin...

Page 44: ...acking and keep making adjustments with the tire pressure until the unit tracks straight DO NOT exceed maximum recommended tire pressure 24 psi Record the tire pressure for future reference TO ADJUST PARK BRAKE NOTE Make sure the brake arm is engaged into brake sprocket on both sides You can push the mower to make it engage into the sprocket FIGURE 21 parkbrake 1 4 5 2 1 CONNECTING LINK 2 SECONDAR...

Page 45: ... manual Lubricate as shown in the Customer Responsibilities section of this manual Be sure that all nuts bolts and screws are securely fastened Inspect moving parts for damage breakage and wear Replace if necessary Touch up all rusted or chipped paint surfaces sand lightly before painting BATTERY Fully charge the battery for storage After a period of time in storage battery may require recharging ...

Page 46: ... at least 10 minutes after adding stabilizer to allow the stabilizer to reach the carburetor Do not drain the gas tank and carbu retor if using fuel stabilizer ENGINE OIL Drain oil with engine warm and replace with clean engine oil See ENGINE in the Customer Responsibilities section of this manual IT IS IMPORTANT TO PREVENT GUM DEPOS ITS FROM FORMING IN ESSENTIAL FUEL SYSTEM PARTS SUCH AS CARBURET...

Page 47: ... to another Replace your gasoline can if your can starts to rust Rust and or dirt in your gasoline will cause problems If possible store your mower indoors and cover it to give protection from dust and dirt Cover your mower with a suitable protective cover that does not retain moisture Do not use plastic Plastic cannot breathe which allows condensation to form and will cause your mower to rust IMP...

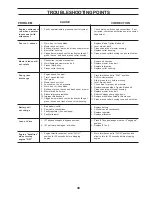
Page 48: ... 2 Disengage attachment clutch 3 Recharge or replace battery 4 Replace fuse 5 Clean battery terminals 6 Check all wiring 7 Check replace ignition switch 8 Check replace solenoid or starter 9 Contact an authorized service center department Engine clicks but will not start 1 Weak or dead battery 2 Corroded battery terminals 3 Loose or damaged wiring 4 Faulty solenoid or starter 1 Recharge or replace...

Page 49: ...rn bent or loose blade 7 Buildup of grass leaves and trash under mower 8 Mower drive belt worn 9 Blades improperly installed 10 Improper blades used 11 Clogged mower deck vent holes from buildup of grass leaves and trash around cutter housing 1 Place throttle control in FAST position 2 Shift to slower speed 3 Allow grass to dry before mowing 4 Level mower deck 5 Check tires for proper air pressure...

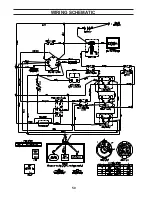
Page 50: ...50 WIRING SCHEMATIC ...

Page 51: ...51 ...

Page 52: ......

Reviews: