background image

29

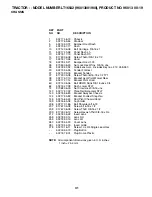
TRACTOR - - MODEL NUMBER LT16542 (96013001900), PRODUCT NO. 960 13 00-19

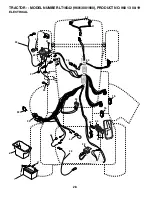
ELECTRICAL      

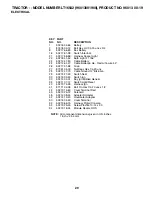
KEY    PART
NO.     NO.                   DESCRIPTION

1         532 16 34-65    Battery  
2         874 76 04-12    Bolt Hex Hd 1/4-20 unc x 3/4
8         532 17 66-89    Box Battery
16       532 17 61-38    Switch Interlock
21       532 17 56-88    Harness Socket Light 
22       532 00 41-52    Bulb, Light # 1156
24       532 12 47-80    Cable Battery 
25       532 14 61-47    Cable Battery 6 Ga.  Red w/16 wire 44"
26       532 17 51-58    Fuse 
27       873 51 04-00    Nut Keps Hex 1/4-20 unc
28       532 12 47-73    Cable Ground 12" Blk 6 Ga.
29       532 19 27-49    Switch Seat
30       532 19 33-50    Switch Ign 
33       532 14 04-01    Key Ign Molded Generic
34       532 11 07-12    Switch Light/Reset
40       532 19 74-28    Harness Ign  
41       871 11 04-08    Bolt Fin Hex 1/4-20 unc x 1/2
42       532 13 15-63    Cover Terminal Red
43       532 19 25-07    Solenoid
48       532 14 08-44    Adapter Ammeter
52       532 14 19-40    Hourmeter Adapter
90       532 18 04-49    Cover Terminal
92       532 19 66-15    Harness Pigtail Console
93       532 19 25-40    Screw Plastite 10-14 x 2.0
94       532 19 18-34    Module Revers ROS

NOTE:

  All component dimensions given in U.S. inches


1 inch = 25.4 mm

Summary of Contents for 96013001900

Page 1: ...02494 LT16542 Owner s Manual ...

Page 2: ...arking brake stop engine and remove keys before dismounting Disengage blades when not mowing Shut off engine and wait for all parts to come to a complete stop before cleaning the machine removing the grass catcher or unclogging the discharge guard Operate machine only in daylight or good artificial light Do not operate the machine while under the influence of alcohol or drugs Watch for traffic whe...

Page 3: ...h towed equipment except at the hitch point Follow the manufacturer s recommendation for weight limits for towed equipment and towing on slopes Never allow children or others in or on towed equip ment On slopes the weight of the towed equipment may cause loss of traction and loss of control Travel slowly and allow extra distance to stop V SERVICE SAFE HANDLING OF GASOLINE To avoid personal injury ...

Page 4: ...TIES Read and observe the safety rules Follow a regular schedule in maintaining caring for and using your tractor Follow the instructions under Maintenace and Stor age sections of this owner s manual SAFETY RULES 2 3 PRODUCT SPECIFICATIONS 4 CUSTOMER RESPONSIBILITIES 4 ASSEMBLY 6 8 OPERATION 9 14 MAINTENANCE SCHEDULE 15 MAINTENANCE 15 18 SERVICE AND ADJUSTMENTS 19 23 STORAGE 24 TROUBLESHOOTING 25 ...

Page 5: ...Wheel Steering Wheel Insert 1 Large Flat Washer Steering Boot Steering Wheel Adapter Seat 2 Keys Slope Sheet Key 1 Oil Drain Tube 1 Knob 1 Washer 17 32 x 1 3 16 x 12 Gauge 1 Hex Bolt 5 16 18 x 4 1 5 16 Lock Washer Steering Extension Shaft ...

Page 6: ...pan Push down on seat to engage shoulder bolt in slot and pull seat towards rear of tractor Pivot seat and pan forward and assemble adjustment knob and flat washer loosely Do not tighten Lower seat into operating position and sit on seat Slide seat until a comfortable position is reached which allows you to press clutch brake pedal all the way down Get off seat without moving its adjusted position...

Page 7: ...ects Be sure all the above assembly steps have been com pleted Check engine oil level and fill fuel tank with gasoline Sit on seat in operating position depress clutch brake pedal and set the parking brake Place gear shift lever in neutral N position Press lift lever plunger and raise attachment lift lever to its highest position Remove key from bag and start the engine see TO START ENGINE in the ...

Page 8: ...k is filled with fresh clean regular unleaded gasoline Become familiar with all controls their location and function Operate them before you start the engine Be sure brake system is in safe operating condition Be sure Operator Presence System and Reverse Op eration System ROS are working properly See the Operation and Maintenance sections in this manual CHECK TIRE PRESSURE The tires on your tracto...

Page 9: ...entify safety inform ation about hazards which can result in death serious injury and or property damage DANGER indicates a hazard which if not avoided will result in death or serious injury WARNING indicates a hazard which if not avoided could result in death or serious injury CAUTION indicates a hazard which if not avoided might result in minor or moderate injury CAUTION when used without the al...

Page 10: ...s the speed and direction of the tractor IGNITION SWITCH Used for starting and stopping the engine Our tractors conform to the applicable safety standards of the American National Standards Institute FIG 4 PARKING BRAKE CLUTCH BRAKE PEDAL THROTTLE CHOKE CONTROL GEAR SHIFT LEVER ATTACHMENT LIFT LEVER LIFT LEVER PLUNGER IGNITION SWITCH ATTACHMENT CLUTCH LEVER ROS ON POSITION HEIGHT ADJUSTMENT INDICA...

Page 11: ...Turn ignition key to OFF position and remove key Always remove key when leaving tractor to prevent unauthorized use Never use choke to stop engine IMPORTANT LEAVING THE IGNITION SWITCH IN ANY POSITION OTHER THAN OFF WILL CAUSE THE BATTERY TO BE DISCHARGED DEAD ATTACHMENT CLUTCH LEVER ENGAGED POSITION IGNITION KEY DISENGAGED POSITION PARKING BRAKE ENGAGED POSITION GEAR SHIFT LEVER THROTTLE CHOKE CO...

Page 12: ...h engaged should only be done when the operator decides it is necessary to reposition the machine with the attachment engaged Do not mow in reverse unless absolutely necessary USING THE REVERSE OPERATION SYSTEM Depress clutch brake pedal all the way down and hold Withenginerunning turnignitionkeycounterclockwise to ROS ON position Look down and behind before backing Move gear shift lever to revers...

Page 13: ...be sure hood is closed and secured to tractor Use an appropriate means of tying hood to tractor rope cord etc TOWING CARTS AND OTHER ATTACH MENTS Tow only the attachments that are recommended by and comply with specifications of the manufacturer of your trac tor Use common sense when towing Too heavy of a load while on a slope is dangerous Tires can lose traction with the ground and cause you to l...

Page 14: ...ug mower and leave undesirable clumps Allow grass to dry before mowing Always operate engine at full throttle when mow ing to assure better mowing performance and proper discharge of material Regulate ground speed by se lecting a low enough gear to give the mower cutting performance as well as the quality of cut desired When operating attachments select a ground speed that will suit the terrain an...

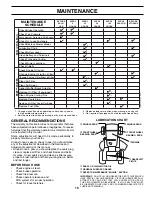
Page 15: ...spark plug and clean air filter assure proper air fuel mixture and help your engine run better and last longer BEFORE EACH USE Check engine oil level Check brake operation Check tire pressure Check operator presence and ROS systems for proper operation Check for loose fasteners T R A C T 0 R Inspect Muffler Spark Arrester Clean Air Filter Change Engine Oil with oil filter Replace Air Filter Paper ...

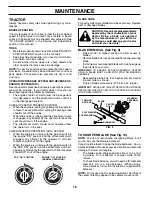
Page 16: ...CIFICATIONS section of this manual Keep tires free of gasoline oil or insect control chemi cals which can harm rubber Avoid stumps stones deep ruts sharp objects and other hazards that may cause tire damage NOTE To seal tire punctures and prevent flat tires due to slow leaks tire sealant may be purchased from your local parts dealer Tire sealant also prevents tire dry rot and corrosion OPERATOR PR...

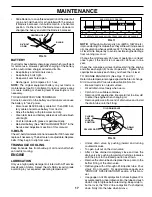
Page 17: ...itting Unlock drain valve by pushing inward and turning counterclockwise To open pull out on the drain valve After oil has drained completely close and lock the drain valve by pushing inward and turning clockwise until the pin is in the locked position as shown Remove the drain tube and replace the cap onto to the bottom fitting of the drain valve Refill engine with oil through oil fill dipstick t...

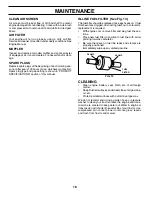
Page 18: ...g fuel line sec tions Place new fuel filter in position in fuel line with arrow pointing towards carburetor Be sure there are no fuel line leaks and clamps are properly positioned Immediately wipe up any spilled gasoline FIG 13 FUEL FILTER CLAMP CLAMP AIR FILTER Your engine will not run properly using a dirty air filter Service air cleaner more often under dusty conditions See Engine Manual MUFFLE...

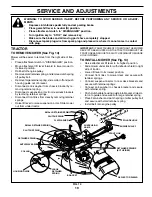
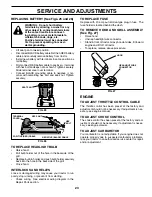
Page 19: ...gs Disconnect front links from deck by removing retainer springs Raise lift lever to raise suspension arms Slide mower out from under tractor IMPORTANT IFANATTACHMENTOTHERTHANTHEMOWER DECK IS TO BE MOUNTED ON THE TRACTOR REMOVE THE FRONTLINKSANDHOOKTHECLUTCHSPRINGINTOSQUARE HOLE IN FRAME TO INSTALL MOWER See Fig 14 Raise attachment lift lever to its highest position Slide mower under tractor with ...

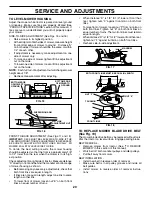
Page 20: ...n equal number of turns FIG 18 BOTH FRONT LINKS MUST BE EQUAL IN LENGTH FIG 17 TO LEVEL MOWER HOUSING Adjust the mower while tractor is parked on level ground or driveway Make sure tires are properly inflated See PRODUCT SPECIFICATIONS section of this manual If tires are over or underinflated you will not properly adjust your mower SIDE TO SIDE ADJUSTMENT See Figs 15 and 16 Raise mower to its high...

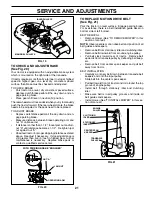
Page 21: ... CHECK AND ADJUST BRAKE See Fig 20 Your tractor is equipped with an adjustable brake system which is mounted on the right side of the transaxle If tractor requires more than five 5 feet to stop at highest speed in highest gear on a level dry concrete or paved surface then brake must be checked and adjusted TO CHECK BRAKE Park tractor on a level dry concrete or paved surface depress clutch brake pe...

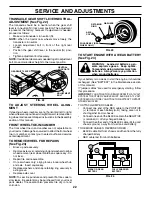
Page 22: ...eye protection when around batteries If your battery is too weak to start the engine it should be recharged See BATTERY in the Maintenance section of this manual If jumper cables are used for emergency starting follow this procedure IMPORTANT YOURTRACTOR IS EQUIPPEDWITH A 12VOLT SYSTEM THE OTHER VEHICLE MUST ALSO BE A 12 VOLT SYSTEM DO NOT USEYOUR TRACTOR BATTERY TO START OTHER VEHICLES TO ATTACH ...

Page 23: ...lose hood INTERLOCKS AND RELAYS Loose or damaged wiring may cause your tractor to run poorly stop running or prevent it from starting Check wiring See electrical wiring diagram in the Repair Parts section HOOD HEADLIGHT WIRE CONNECTOR FIG 27 TO REMOVE HOOD AND GRILL ASSEMBLY See Fig 27 Raise hood Unsnap headlight wire connector Stand in front of tractor Grasp hood at sides tilt toward engine and l...

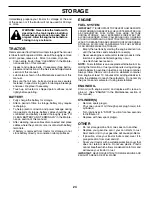
Page 24: ...FUEL SYSTEM PARTS SUCH AS CARBURETOR FUEL FILTER FUEL HOSE OR TANK DURING STORAGE ALSO EXPERIENCE INDICATES THAT ALCOHOL BLENDED FUELS CALLED GASOHOL OR USING ETHANOLORMETHANOL CANATTRACTMOISTUREWHICH LEADSTOSEPARATIONANDFORMATIONOFACIDSDURING STORAGE ACIDIC GAS CAN DAMAGE THE FUEL SYSTEM OF AN ENGINE WHILE IN STORAGE Empty the fuel tank by starting the engine and let it run until the fuel lines a...

Page 25: ...Faulty ignition switch 7 Check replace ignition switch 8 Faulty solenoid or starter 8 Check replace solenoid or starter 9 Faulty operator presence switch es 9 Contact an authorized service center department Engine clicks but will not 1 Weak or dead battery 1 Recharge or replace battery start 2 Corroded battery terminals 2 Clean battery terminals 3 Loose or damaged wiring 3 Check all wiring 4 Fault...

Page 26: ...el speed too fast 2 Shift to slower speed 3 Wet grass 3 Allow grass to dry before mowing 4 Mower deck not level 4 Level mower deck 5 Low uneven tire air pressure 5 Check tires for proper air pressure 6 Worn bent or loose blade 6 Replace sharpen blade Tighten blade bolt 7 Buildup of grass leaves and trash under mower 7 Clean underside of mower housing 8 Mower drive belt worn 8 Replace mower drive b...

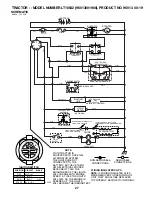
Page 27: ...TERNATOR SYSTEM THE LIGHTS ARE NOT CONNECTED TO THE BATTERY BUT HAVE THEIR OWN ELECTRICAL SOURCE BECAUSE OF THIS THE BRIGHTNESS OF THE LIGHTS WILL CHANGE WITH ENGINE SPEED AT IDLE THE LIGHTS WILL DIM AS THE ENGINE IS SPEEDED UP THE LIGHTS WILL BECOME THEIR BRIGHTEST WIRING INSULATED CLIPS NOTE IF WIRING INSULATED CLIPS WERE REMOVED FOR SERVICING OF UNIT THEY SHOULD BE REPLACED TO PROPERLY SECURE Y...

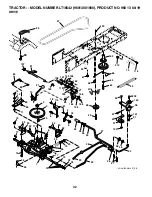
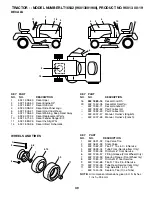
Page 28: ...28 TRACTOR MODEL NUMBER LT16542 96013001900 PRODUCT NO 960 13 00 19 ELECTRICAL 197428 28 29 94 93 26 24 42 43 27 25 41 27 27 40 33 30 92 34 8 2 1 27 48 22 21 52 16 90 16 ...

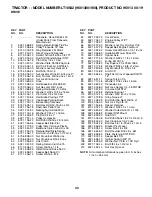
Page 29: ...1 04 00 Nut Keps Hex 1 4 20 unc 28 532 12 47 73 Cable Ground 12 Blk 6 Ga 29 532 19 27 49 Switch Seat 30 532 19 33 50 Switch Ign 33 532 14 04 01 Key Ign Molded Generic 34 532 11 07 12 Switch Light Reset 40 532 19 74 28 Harness Ign 41 871 11 04 08 Bolt Fin Hex 1 4 20 unc x 1 2 42 532 13 15 63 Cover Terminal Red 43 532 19 25 07 Solenoid 48 532 14 08 44 Adapter Ammeter 52 532 14 19 40 Hourmeter Adapte...

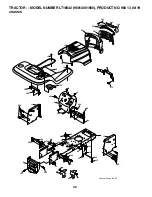
Page 30: ...1900 PRODUCT NO 960 13 00 19 CHASSIS 64 74 10 30 208 13 208 11 209 31 1 209 2 9 209 208 209 5 5 207 144 26 26 60 26 144 26 10 209 209 142 209 142 143 60 145 37 37 18 206 14 14 38 38 17 261 28 259 260 258 278 39 159 212 chassis husqy stlt_29 ...

Page 31: ...sm Pivot Mower Rear 39 532 17 47 14 Bracket Pivot Hood 60 872 14 06 06 Bolt RDHD Sqnk 3 8 16 unc x 3 4 64 532 15 47 98 Dash Lower STLT 74 873 68 06 00 Nut Crownlock 3 8 16 unc 142 532 17 57 02 Plate Reinforcement STLT 143 532 18 66 89 Bracket Swaybar Chassis 144 532 17 55 82 Bracket Footrest Step thru 145 532 15 65 24 Rod Pivot Chassis Hood 159 532 16 65 08 Cupholder 206 532 17 01 65 Bolt Shoulder...

Page 32: ... 78 76 77 1 25 19 24 2 53 35 34 37 36 35 62 36 59 212 55 77 61 22 27 26 6 113 18 51 5 18 6 85 52 30 32 32 30 52 11 85 80 4 3 13 81 84 82 64 65 15 79 16 96 26 27 51 48 150 151 202 49 47 50 120 21 8 10 156 165 168 166 163 14 159 161 198 158 112 83 162 169 89 197 6 170 66 56 63 116 70 69 26 drive fender stlt_46 ...

Page 33: ...ownlock 3 8 16 unc 52 873 68 05 00 Nut Crownlock 5 16 18 unc 53 532 19 96 52 Link Clutch 55 532 10 57 09 Spring Return Clutch 6 75 56 817 06 06 20 Screw 3 8 16 x 1 1 4 57 532 16 08 55 V Belt Ground Drive 95 30 59 532 16 96 91 Keeper Belt Span Ctr 61 817 12 06 14 Screw 3 8 16 x 875 62 532 12 48 72 Cover Pedal 63 532 17 54 10 Engine Pulley LT YT 64 532 17 39 37 Bolt Hex 65 810 04 07 00 Washer Lock H...

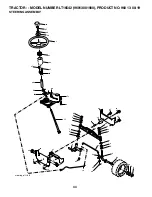
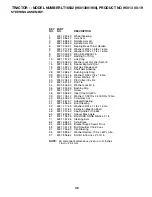
Page 34: ...42 96013001900 PRODUCT NO 960 13 00 19 STEERING ASSEMBLY 44 5 9 5 7 7 9 4 3 32 43 95 43 8 10 40 11 8 6 9 46 46 8 6 9 2 26 30 28 1 41 42 37 36 37 38 97 39 34 68 67 67 67 13 65 68 15 15 15 29 29 82 88 71 17 29 43 91 steering_pl lt_68 ...

Page 35: ...17 00 06 12 Screw 3 8 16 x 75 30 876 02 04 12 Pin Cotter 1 8 x 3 4 32 532 19 27 57 Rod Tie 34 810 04 05 00 Washer Lock 5 16 36 532 15 50 99 Bushing Strg 37 532 15 29 27 Screw 38 532 19 36 52 Insert Cap Strg Wh 39 819 11 38 12 Washer 11 32 ID x 2 3 8 OD x 12 Ga 40 873 54 06 00 Crownlock nut 41 532 18 67 37 Adapter Steering 42 532 16 96 34 Boot Steering 43 532 12 17 49 Washer 25 32 x 1 1 4 x 16 Ga 4...

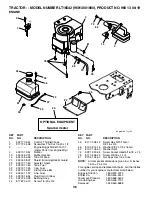
Page 36: ... Throttle Choke 2 817 72 04 08 Screw Hex Thd Cut 1 4 20 x 1 2 3 Engine Briggs Model 31A707 Order Parts from Engine Mfg 4 532 13 73 52 Muffler 13 532 16 52 91 Muffler Gasket 14 532 14 84 56 Tube Oil Drain 23 532 16 98 37 Shield Browning Debris Guard 29 532 13 71 80 Arrester Spark 31 532 18 77 50 Tank Fuel 32 532 19 77 25 Cap Fuel 33 532 12 34 87 Clamp Hose Blk 37 532 40 11 37 Line Fuel 38 532 18 16...

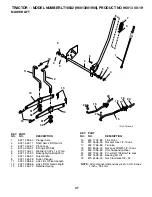
Page 37: ...Id 7 532 12 56 31 Grip Handle 8 532 12 45 26 Button Plunger 11 532 13 98 65 Link Lift LH Fixed Length 12 532 13 98 66 Link Lift RH Fixed Length 13 532 12 46 70 Retainer Spring KEY PART NO NO DESCRIPTION NOTE All component dimensions given in U S inches 1 inch 25 4 mm 15 532 17 32 88 Link Front 16 873 35 08 00 Nut Jam Hex 1 2 13 unc 17 532 17 56 89 Trunnion 18 873 80 08 00 Nut Lock W Wsh 1 2 13 unc...

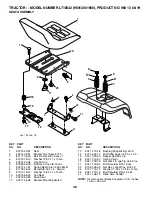
Page 38: ... 69 Knob Seat 12 532 17 46 48 Bracket Mounting Switch 13 532 12 12 48 Bushing Snap Blk Nyl 50 Id 14 872 05 04 12 Bolt Rdhd Sqnk 1 4 20 x 1 1 2 15 532 13 43 00 Spacer Split 28 x 96 16 532 12 12 50 Spring Cprsn 17 532 12 39 76 Nut Lock 1 4 Lge Flg Gr 5 Zinc 21 532 17 18 52 Bolt Shoulder 5 16 18 unc 22 873 80 05 00 Nut Hex Lock W Ins 5 16 18 24 819 17 19 12 Washer 17 32 x 1 3 16 x 12 Ga 25 532 12 70 ...

Page 39: ... 9 532 10 62 68 Tire R T 18 x 9 5 8 Service 10 532 12 49 26 Tube Rear Service Item Only 11 532 17 50 39 Cap Axle Blk 1 50 x 1 00 532 14 43 34 Sealant Tire 10 oz Tube 1 532 19 38 63 Decal Oper 2 532 18 48 50 Decal Engine HP 3 532 18 89 17 Decal Hood LH 4 532 40 38 02 Decal Side Panel Logo 5 532 18 09 41 Decal Hood Cust Resp 6 532 17 05 63 Decal Warning Keep Hand Away 7 532 40 37 94 Decal Replacemen...

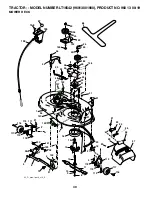
Page 40: ... 21 24 25 26 27 2 28 29 23 21 21 21 18 18 20 2 48 59 19 4 3 129 92 131 130 92 5 6 21 40 143 36 40 40 159 42_D_man t path_stlt_3 142 TRACTOR MODEL NUMBER LT16542 96013001900 PRODUCT NO 960 13 00 19 MOWER DECK 21 117 119 116 2 111 118 113 113 117 116 118 119 21 2 112 185 67 158 4 2 _ c l u t c h _ m o d _ 7 152 ...

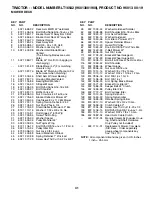
Page 41: ...unc x 1 1 2 Gr 5 36 532 13 14 94 Pulley Idler Flat 40 873 90 06 00 Nut Lock 3 8 16 unc 44 532 14 00 88 Guard Mandrel LH Black 45 532 12 47 88 Spring Retainer 1 Zinc cad 46 532 13 77 29 Screw Hex Thd Cut 1 4 20 x 5 8 T 48 532 13 39 44 Washer Hardened Smaller 52 532 13 98 88 Bolt Shoulder 5 16 18 unc Blkz 53 532 18 49 07 Arm Asm Pad Brake 54 532 17 85 15 Washer Hardened 55 532 15 50 46 Arm Idler 42 ...

Page 42: ...at the time of pur chase all claims must be sent to the appropriate manufacturer 4 Lawn and garden attachments are covered by a third party which gives a warranty all claims for war ranty should be sent to the manufacturer and 5 Emission Control System components necessary to comply with CARB TIER II and EPA regulations which are manufactured by third party engine manufacturer SECTION 4 EXCEPTIONS...

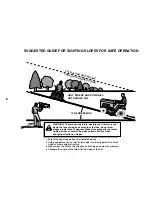
Page 43: ...the face Do not mow slopes greater than 15 degrees Make turns gradually to prevent tipping or loss of control Exercise extreme caution when changing direction on slopes 1 Fold this page along dotted line indicated above 2 Hold page before you so that its left edge is vertically parallel to a tree trunk or other upright structure 3 Sight across the fold in the direction of hill slope you want to me...

Page 44: ...532 40 37 47 02 08 06 VB Printed in U S A ...

Reviews: