background image

3

CONGRATULATIONS

 on your purchase of a new snow 

thrower.  It has been designed, engineered and man u fac -

tured to give best possible dependability and per for mance.
Should you experience any problem you cannot easily 

remedy, please contact your nearest authorized service 

center.  We have competent, well-trained tech ni cians and 

the proper tools to service or repair this unit.
Please read and retain this manual.  The instructions will 

enable you to assemble and maintain your snow thrower 

prop er ly.  Always observe the “SAFETY RULES”.

SERIAL NUMBER: ___________________________

DATE OF PURCHASE:  _______________________

THE MODEL AND SERIAL NUMBERS WILL BE FOUND 

ON A DECAL ATTACHED TO THE REAR OF THE SNOW 

THROWER HOUSING.

YOU SHOULD RECORD BOTH SERIAL NUMBER AND 

DATE OF PURCHASE AND KEEP IN A SAFE PLACE 

FOR FUTURE REFERENCE.     

CUSTOMER RESPONSIBILITIES

•  Read and observe the safety rules.
•  Follow a regular schedule in maintaining, caring for 

and using your snow thrower.

• 

Follow the instructions under “Maintenance” and “Stor-

 age” sec tions of this own er’s manual.

6.  When cleaning, repairing or inspecting the snow thrower, 

stop the engine and make certain the collector/impel-

ler and all moving parts have stopped. Disconnect the 

spark plug wire and keep the wire away from the plug to 

prevent someone from accidentally starting the engine.

7.  Do not run the engine indoors, except when starting 

the engine and for transporting the snow thrower in or 

out of the building. Open the outside doors; exhaust 

fumes are dangerous.

8.  Exercise extreme caution when operating on slopes.
9.  Never operate the snow thrower without proper guards, 

and other safety protective devices in place and working.

10. Never direct the discharge toward people or areas 

where property damage can occur.  Keep children and 

others away.

11. Do not overload the machine capacity by attempting 

to clear snow at too fast a rate.

12. Never operate the machine at high transport speeds 

on slippery surfaces. Look behind and use care when 

operating in reverse.

13.  Disengage power to the collector/impeller when snow 

thrower is transported or not in use.

14. Use only attachments and accessories approved by 

the manufacturer of the snow thrower (such as wheel 

weights, counterweights, or cabs).

15.  Never operate the snow thrower without good visibility 

or light. Always be sure of your footing, and keep a firm 

hold on the handles. Walk; never run.

16.  Never touch a hot engine or muffler.

Clearing a Clogged Discharge Chute

Hand contact with the rotating impeller inside the discharge 

chute is the most common cause of injury associated with 

snow throwers. Never use your hand to clean out the dis-

charge chute.  To clear the chute:
1.  SHUT THE ENGINE OFF!
2.  Wait 10 seconds to be sure the impeller blades have  

stopped rotating.

3.  Always use a clean-out tool, not your hands.

Maintenance and Storage

1.  Check shear bolts and other bolts at frequent intervals 

for proper tightness to be sure the equipment is in safe 

working condition.

2.  Never store the machine with fuel in the fuel tank 

inside a building where ignition sources are present 

such as hot water heaters, space heaters, or clothes 

dryers. Allow the engine to cool before storing in any 

enclosure.

3.  Always refer to operator’s manual for important details 

if the snow thrower is to be stored for an extended 

period.

4.  Maintain or replace safety and instruction labels, as  

necessary.

5.  Run the machine a few minutes after throwing snow 

to prevent freeze-up of the collector/impeller.

MAINTENANCE ..................................................... 14-15

SERVICE AND AD JUST MENTS ........................... 16-18

STORAGE ................................................................... 19

TROU BLE SHOOT ING ................................................ 20

WARRANTY ........................................................... 22-25

SAFETY RULES ........................................................ 2-3

PRODUCT SPECIFICATIONS ...................................... 3

CUSTOMER RESPONSIBILITIES ................................ 3

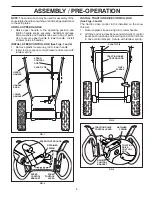
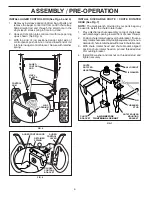
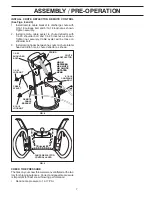
ASSEMBLY / PRE-OPERATION ............................... 4-7

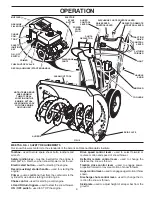
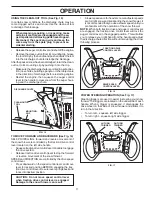
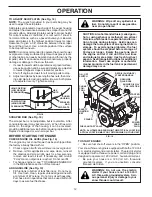
OPERATION ............................................................ 8-13

MAINTENANCE SCHEDULE ..................................... 14

TABLE OF CONTENTS

PRODUCT SPECIFICATIONS

Gasoline Capacity

  0.5 Gallons (1,89 Liters)

and Type:


Unleaded Regular only

Oil Type


SAE 30 (above 50°F)

(API SG–SL):


SAE 5W-30 or 10W-30 (32° to 50°F)


SAE 5W-30 (below 32°F)

Oil Capacity:


16 Ounces (0,47 Liters)

Spark Plug:

 Champion 

F6RTP

Gap:


0.030" (0,762 mm)

Summary of Contents for 924HV

Page 1: ...taining up to 10 ethanol E10 is acceptable for use in this machine The use of any gasoline exceeding 10 ethanol E10 will void the product warranty Please read the owner s manual carefully and make sure you understand the instructions before using the machine ...

Page 2: ... the machine Operation 1 Do not put hands or feet near or under rotating parts Keep clear of the discharge opening at all times 2 Exercise extreme caution when operating on or cross ing gravel drives walks or roads Stay alert for hidden hazards or traffic 3 After striking a foreign object stop the engine motor remove the wire from the spark plug disconnect the cord on electric motors thoroughly in...

Page 3: ...t high transport speeds on slippery surfaces Look behind and use care when operating in reverse 13 Disengage power to the collector impeller when snow thrower is transported or not in use 14 Use only attachments and accessories approved by the manufacturer of the snow thrower such as wheel weights counterweights or cabs 15 Never operate the snow thrower without good visibility or light Always be s...

Page 4: ...poses All parts such as nuts washers bolts etc necessary to complete the assembly have been placed in the parts bag To ensure safe and proper operation of your snow thrower all parts and hardware you assemble must be tightened securely Use the correct tools as necessary to ensure proper tightness REMOVE SNOW THROWER FROM CARTON 1 Remove all accessible loose parts and parts boxes from carton ASSEMB...

Page 5: ... See Figs 1 and 2 1 Remove plastic tie securing rod to lower handle 2 Insert rod into speed control bracket and secure with retainer spring INSTALL TRACTION DRIVE CONTROL ROD See Figs 3 and 4 The traction drive control rod is installed on the snow thrower 1 Remove plastic tie securing rod to lower handle 2 With top end of rod positioned under left side of control panel push rod down and insert top...

Page 6: ...d tighten securely CHUTE ROTATER HEAD 3 8 WASHER 3 8 LOCKNUT THREADED STUD PIN ROTATER HEAD MOUNTING BRACKET CHUTE BRACKET FIG 7 ALIGN BEFORE TIGHTENING LOCKNUT AUGER CONTROL LEVER AUGER CONTROL ROD AUGER CONTROL BRACKET RETAINER SPRING FIG 6 INSTALL AUGER CONTROL ROD See Figs 5 and 6 1 Retrieve vinyl sleeve and spring from bag of parts and retrieve the auger control rod from carton chute tray Sli...

Page 7: ...mote cable bracket to discharge chute with 5 16 18 carriage bolt and 5 16 18 locknut as shown Tighten securely 2 Install remote cable eyelet to chute deflector with 1 4 20 shoulder bolt and 1 4 20 locknut as shown Tighten nut securely Cable eyelet will be loose on shoulder bolt 3 Install spring hooks between hex nuts on chute rotater head and into hole in chute deflector as shown HOOK BETWEEN HEX ...

Page 8: ...s Save this manual for future reference These symbols may appear on your snow thrower or in literature supplied with the product Learn and understand their meaning FORWARD PRIMER IGNITION KEY INSERT TO START AND RUN PULL OUT TO STOP READ AND FOLLOW ALL SAFETY INFORMATION AND INSTRUCTIONS BEFORE USE OF THIS PRODUCT KEEP THESE INSTRUCTIONS FOR FUTURE REFERENCE DANGER OR WARNING REVERSE SNOW DISCHARG...

Page 9: ...ed for starting the engine Primer pumps additional fuel from the carburetor to the cylinder for use when starting a cold engine Choke control used for starting a cold engine LH and RH turn triggers used to steer the snow thrower ON OFF switch used to STOP the engine MEETS A N S I SAFETY REQUIREMENTS Our snow throwers conform to the standards of the American National Standards Institute TRACTION DR...

Page 10: ...olled by the auger control lever located on the right side handle Squeeze auger control lever to handle to engage the auger and throw snow Release the auger control lever to stop throwing snow AUGER CONTROL LEVER FIG 14 TO CONTROL SNOW DISCHARGE See Fig 13 WARNING Snow throwers have ex posed rotating parts which can cause severe injury from contact or from ma terial thrown from the discharge chute...

Page 11: ...andletoengage the drive system Release traction drive control lever to stop the forward or reverse movement of the snow thrower SPEED and DIRECTION are controlled by the drive speed control lever Press downward on the speed control lever and move lever to desired position BEFORE engaging the trac tion drive control lever Be sure lever springs back and locks into desired position CAUTION Do not mov...

Page 12: ...120 Volt A C three wiregroundedsystem Seri ous personal injury or damage to your snow thrower could result BEFORE STARTING THE ENGINE CHECK ENGINE OIL LEVEL See Fig 19 The engine on your snow thrower has been shipped from the factory already filled with oil 1 Check engine oil with snow thrower on level ground 2 Remove oil fill cap dipstick and wipe clean reinsert the dipstick and screw tight wait ...

Page 13: ...ween each time you try to start Wait 5 to 10 seconds between each attempt 7 When the engine starts release the starter button and slowly move the choke control to the OFF position 8 Disconnect the power cord from the receptacle first then from the engine Allow the engine to warm up for a few minutes Engine will not develop full power until it has reached normal operat ing temperature WARM START EL...

Page 14: ...Follow the maintenance schedule in this manual NOTE Use only Original Equipment Manufacturer OEM parts to service this unit Failure to do so can cause the unit to malfunction and pose a risk of injury to the operator BEFORE EACH USE 1 Check engine oil level 2 Check for loose fasteners 3 Checkcontrolstobesuretheyarefunctioningproperly LUBRICATION Keep your snow thrower well lubricated See LUBRICATI...

Page 15: ...e 8 Refill engine with oil through oil dipstick tube Pour slowly Do not overfill For approximate capacity see PRODUCTSPECIFICATIONS sectionofthismanual 9 Use gauge on oil fill cap dipstick for checking level Be sure dipstick cap is tightened securely for accurate reading Keep oil at FULL line on dipstick 10 Wipe off any spilled oil MUFFLER Inspect and replace corroded muffler as it could create a ...

Page 16: ...s in the OFF position 2 Remove safety ignition key 3 Make sure the augers and all moving parts have completely stopped 4 Disconnect spark plug wire from spark plug and place wire where it cannot come in contact with plug SNOW THROWER TO ADJUST SNOW THROWER HEIGHT See TO ADJUST SKID PLATES and SCRAPER BAR in the Operation section of this manual CHUTE DEFLECTOR The chute deflector attached to the to...

Page 17: ...er and traction drive belts are not adjustable If the belts are damaged or begin to slip from wear they should bereplaced Itisrecommendedthatthebelt s bereplaced by a Sears service center department NOTE It is recommended that both the auger and traction drive belt be replaced at the same time TheV beltsonyoursnowthrowerareofspecialconstruction andshouldbereplacedbyoriginalequipmentmanufacturer OE...

Page 18: ... TURN BUCKLE FIG 24 ENGINE SPEED Never tamper with the engine governor which is factory set for proper engine speed Overspeeding the engine above the factory high speed setting can be dangerous and will void the warranty If you think the engine governed high speed needs adjusting contact a qualified service center which has proper equipment and experience to make any necessary adjustments TO REMOV...

Page 19: ...l system of an engine while in storage Empty the fuel tank by starting the engine and letting it run until the fuel lines and carburetor are empty Never use engine or carburetor cleaner products in the fuel tank or permanent damage may occur Use fresh fuel next season NOTE Fuel stabilizer is an acceptable alternative in mini mizing the formation of fuel gum deposits during storage Add stabilizer t...

Page 20: ...3 Remove ice and snow on and around fuel tank cap 4 Dirty or clogged muffler 4 Clean or replace muffler Engine idles or runs roughly 1 Choke is in FULL position 1 Move choke to OFF position 2 Blockage in fuel line 2 Clean fuel line 3 Stale fuel 3 Empty fuel tank carburetor refill with fresh clean gasoline 4 Water in fuel 4 Empty fuel tank carburetor refill with fresh clean gasoline 5 Carburetor is...

Page 21: ...21 SERVICE NOTES ...

Page 22: ...UDQW Q PRVW FDVHV WKHVH LWHPV DUH 127 PDQXIDFWXUHG E XVTYDUQD LQ ZKLFK FDVH WKH PD EH FRYHUHG VHSDUDWHO E WKHLU UHVSHFWLYH PDQXIDFWXUHU V ZDUUDQWLHV LI RQH LV SURYLGHG DQG LQFOXGHG ZLWK WKH SURGXFW DW WKH WLPH RI SXUFKDVH 7KH IROORZLQJ WUDQVPLVVLRQ WUDQVD OH PDQXIDFWXUHUV DQD GUR HDU 7XII 7RUT SURYLGH D ZDUUDQW IRU WKH WUDQVPLVVLRQ WUDQVD OH WR WKH XOWLPDWH SXUFKDVHU RU WR XVTYDUQD XVTYDUQD ZLOO D...

Page 23: ...RU PRGLILHG FXWWLQJ VKLHOGV JXDUGV RU VDIHW GHYLFHV P Q UHPRYHG GDPDJHG DLU ILOWHU H FHVVLYH GLUW DEUDVLYHV VDOW ZDWHU PRLVWXUH FRUURVLRQ UXVW YDUQLVK VWDOH IXHO RU DQ DGYHUVH UHDFWLRQ GXH WR LQFRUUHFW VWRUDJH SURFHGXUHV Q DLOXUHV GXH WR LPSURSHU VHW XS SUH GHOLYHU VHUYLFH RU UHSDLU VHUYLFH E DQ RQH RWKHU WKDQ DQ DXWKRUL HG XVTYDUQD VHUYLFLQJ GHDOHU GXULQJ WKH ZDUUDQW SHULRG R LUW FRQWDPLQDWHG JUH...

Page 24: ...Q SHQGDEOH RPSRQHQWV HDUV 12 55 17 12 55 17 6QRZ 7KURZHUV QJLQH 5HVLGHQWLDO HUR 7XUQ 0RZHUV 0 3URGXFW RPSRQHQW 5HVLGHQWLDO HUR 7XUQ 0RZHUV 5 2QO QJLQH 2WKHU 1RQ SHQGDEOH RPSRQHQWV HDUV GD V GD V 7LOOHUV QJLQH DWWHU HDU 3UR UDWHG 12 55 17 12 55 17 2WKHU 1RQ SHQGDEOH RPSRQHQWV HDUV 12 55 17 12 55 17 7LOOHU 7LQHV 12 55 17 12 55 17 RYHULQJ 7ULPPHUV QJLQH 2WKHU 1RQ SHQGDEOH RPSRQHQWV HDUV HDU GD V RQVX...

Page 25: ... G OO RWKHU 3UHVVXUH DVKHUV 3 3 3 3DUWV FFHVVRULHV LI SXUFKDVHG FFHVVRULHV H J JUDVV FDWFKHU EXPSHU JXDUG DFFHVVRULHV HWF HDU 12 55 17 12 55 17 3DUWV H J EHOWV EODGHV HWF GD V 12 55 17 12 55 17 3DUWV FFHVVRULHV LI UHSODFHG LQ DUUDQW 6HUYLFH 5HSODFHPHQW SDUWV DQG RU DFFHVVRULHV SURYLGHG XQGHU WKLV LPLWHG DUUDQW DUH ZDUUDQWHG RQO IRU WKH 1 RI WKH ZDUUDQW SHULRG DSSOLFDEOH WR WKH SDUW RU DFFHVVRU WKD...

Page 26: ...26 SERVICE NOTES ...

Page 27: ...27 SERVICE NOTES ...

Page 28: ...07 27 2011 SR ...

Reviews: