background image

14

ENGINE-GOVERNED HIGH SPEED NEEDS ADJUSTING, 

CONTACT YOUR NEAREST AUTHORIZED SER VICE CEN TER, 

WHICH HAS PROPER EQUIP MENT AND EXPERIENCE TO MAKE 

ANY NEC ES SARY ADJUSTMENTS. 

Immediately prepare your lawn mower for storage at the end 

of the season or if the unit will not be used for 30 days or more. 

LAWN MOWER

When lawn mower is to be stored for a period of time, clean 

it thoroughly, remove all dirt, grease, leaves, etc.  Store in 

a clean, dry area.
1.  Clean entire lawn mower (See “CLEANING” in the 

Maintenance section of this manual).

2.  Lubricate as shown in the Maintenance section of this 

manual.

3.  Be sure that all nuts, bolts, screws, and pins are se-

curely fastened.  Inspect  moving parts for damage, 

breakage and wear.  Replace if necessary.

4.  Touch up all rusted or chipped paint surfaces; sand 

lightly before painting.

HANDLE (See Figs. 18 and 19)

You can fold your lawn mower handle for storage.
1.  Remove bolts and nuts.
2.  Squeeze the bottom ends of the lower handle toward 

each other until the lower handle clears the handle 

bracket, then move handle forward.

3.  Loosen upper handle mounting bolts enough to allow 

upper handle to be folded back.

IMPORTANT:

  WHEN FOLDING THE HANDLE FOR STORAGE 

OR TRANSPORTATION, BE SURE TO FOLD THE HANDLE AS 

SHOWN OR YOU MAY DAMAGE THE CONTROL CABLES.

•  When setting up your handle from the storage posi-

tion, the lower han dle will automatically lock into the 

mow ing position. 

STORAGE

SERVICE AND ADJUSTMENTS

IMPORTANT:

  NEVER TAMPER WITH THE ENGINE GOVERNOR, 

WHICH IS FACTORY SET FOR PROPER ENGINE SPEED.  

OVER SPEED ING THE ENGINE ABOVE THE FACTORY HIGH 

SPEED SETTING CAN BE DANGEROUS.  IF YOU THINK THE 

FIG. 18

LOWER HANDLE

SQUEEZE 

TO ADJUST

FIG. 19

MOWING

POSITION

OPERATOR 

PRES ENCE

CONTROL 

BAR

FOLD

FORWARD

FOR

STORAGE

LOWER 

HANDLE

HANDLE 

KNOB

UPPER 

HANDLE  

NUT

BRACKET

BOLT

Summary of Contents for 7021P / 961330030

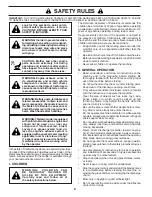
Page 1: ...heproductwarranty Vous pouvez utiliser de l essence contenant jusqu à 10 d éthanol E10 avec cet appareil L utilisation d essence contenant plus de 10 d éthanol annulera la garantie du produit Please read the operator s manual carefully and make sure you understand the instructions before using the machine Lisez très attentivement et soyez certain de comprende ces instructions avant d utiliser cett...

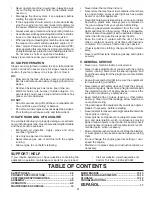
Page 2: ...owing activity Never assume that children will remain where you last saw them Keep children out of the mowing area and under the watchful care of a responsible adult other than the operator Be alert and turn machine off if children enter the area Before and while walking backwards look behind and down for small children Never allow children to operate the machine II GENERAL OPERATION Read understa...

Page 3: ...iler bed with a plastic liner Always place containers on the ground away from your vehicle before filling Remove gas powered equipment from the truck or trailer and refuel it on the ground If this is not possible then refuel such equipment with a portable container rather than from a gasoline dispenser nozzle Keep the nozzle in contact with the rim of the fuel tank or container opening at all time...

Page 4: ...adding holding operator presence control bar to upper handle Your lawn mower handle can be adjusted for your mowing comfort Refer to ADJUST HANDLE in the Service and Adjustments section of this manual CONGRATULATIONS on your purchase of a new lawn mower Ithasbeendesigned engineeredandmanufactured togiveyouthebestpossibledependabilityandperformance Should you experience any problem you cannot easil...

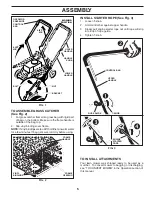
Page 5: ...ob 2 Hold control bar against upper handle 3 Slowly pull engine starter rope out until rope will slip into loop of rope guide 4 Tighten T knob FIG 2 FRAME HANDLE VINYL BINDINGS FRAME OPENING TO INSTALL ATTACHMENTS Your lawn mower was shipped ready to be used as a mulcher To convert mower to bagging or discharging see TO CONVERT MOWER in the Operation section of this manual FIG 1 OPERATOR PRESENCE ...

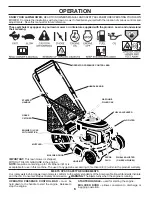
Page 6: ...ns with your lawn mower to familiarize yourself with the location of various controls and adjustments Save this manual for future reference These symbols may appear on your lawn mower or in literature supplied with the product Learn and understand their meaning OPERATION MEETS CPSC SAFETY REQUIREMENTS Our rotary walk behind power lawn mowers conform to the safety standards of the American National...

Page 7: ...s for high cut adjust cutting height to suit your requirements Medium position is best for most lawns Tochangecuttingheight squeezeadjusterlevertoward wheel Move wheel up or down to suit your require ments Be sure all wheels are in the same setting NOTE Adjusterisproperlypositionedwhenplatetabinserts intoholeinlever Also 9 positionadjusters ifsoequipped allow lever to be positioned between the pla...

Page 8: ...filler neck Do not over fill Use fresh clean regular unleaded gasoline with a minimum of 87 octane Do not mix oil with gasoline Purchase fuel in quantities that can be used within 30 days to assure fuel freshness CAUTION Wipe off any spilled oil or fuel Do not store spill or use gasoline near an open flame Alcohol blended fuels called gasohol or using ethanol or methanol can at tractmoisturewhichl...

Page 9: ...djust the lawn mower cutting height so that the lawn mower cuts off only the top one third of the grass blades See Fig 11 If the lawn is over grown it will be necessary to raise the height of cut to reduce pushing effort and to keep from overloading the engine and leaving clumps of mulched grass For extremely heavy mulching reduce your width of cut by overlapping previously cut path and mow slowly...

Page 10: ...RACT DUST AND DIRT THAT WILL SHORTEN THE LIFE OF THE SELF LUBRICATING BEARINGS IF YOU FEEL THEY MUST BE LUBRICATED USE ONLY A DRY POWDERED GRAPHITE TYPE LUBRICANT SPARINGLY SPRAY LUBRICANT SEE ENGINE IN MAINTENANCE SECTION ENGINE OIL HANDLE BRACKET MOUNTING PINS REAR DOOR HINGE MULCHER DOOR HINGE PIN WHEEL ADJUSTER ON EACH WHEEL Check for Loose Fasteners Clean Inspect Grass Catcher Check Tires Che...

Page 11: ...lt turning clockwise The recommended tightening torque is 35 40 ft lbs 47 54 Nm IMPORTANT BLADE SCREW IS HEAT TREATED IF SCREW NEEDSREPLACING REPLACEONLYWITHAPPROVEDSCREW TO SHARPEN BLADE NOTE We do not recommend sharpening blade but if you do be sure the blade is balanced An unbalanced bladewillcauseeventualdamagetolawnmowerorengine MAINTENANCE The blade can be sharpened with a file or on a grind...

Page 12: ...lug at the beginning of each mowing season or after every 100 hours of operation whichever occurs first Spark plug type and gap setting are shown in the PRODUCT SPECIFICATIONS section of this manual OIL FILL CAP DIPSTICK LOWER MARK UPPER MARK FIG 14 CONTAINER FIG 13 6 Wait one minute to allow oil to settle Use guage on oil fill cap dipstick for checking level Insert dipstick into the tube and rest...

Page 13: ...acewhereitcannotcomeincontactwithplug CLEANING IMPORTANT FOR BEST PERFORMANCE KEEP MOWER HOUSING FREE OF BUILT UP GRASS AND TRASH CLEAN THE UNDERSIDE OF YOUR MOWER AFTER EACH USE CAUTION Disconnect spark plug wire from spark plug and place wire where it cannot come in contact with plug Clean the underside of your lawn mower by scraping to remove build up of grass and trash Clean engine often to ke...

Page 14: ...ng HANDLE See Figs 18 and 19 You can fold your lawn mower handle for storage 1 Remove bolts and nuts 2 Squeeze the bottom ends of the lower handle toward each other until the lower handle clears the handle bracket then move handle forward 3 Loosen upper handle mounting bolts enough to allow upper handle to be folded back IMPORTANT WHEN FOLDING THE HANDLE FOR STORAGE OR TRANSPORTATION BE SURE TO FO...

Page 15: ...the stabilizer to reach the carburetor Do not empty the gas tank and carburetor if using fuel stabilizer ENGINE OIL Drain oil with engine warm and replace with clean en gine oil See ENGINE in the Maintenance section of this manual STORAGE CYLINDER 1 Remove spark plug 2 Pour one ounce 29 ml of oil through spark plug hole into cylinder 3 Pull starter handle slowly a few times to distribute oil 4 Rep...

Page 16: ... 6 Cut at slower walking speed Poor cut 1 Worn bent or loose blade 1 Replace blade Tighten blade bolt uneven 2 Wheel heights uneven 2 Set all wheels at same height 3 Buildup of grass leaves and trash under 3 Clean underside of mower housing mower Excessive 1 Worn bent or loose blade 1 Replace blade Tighten blade bolt vibration 2 Bent engine crankshaft 2 Contact a qualified service center Starter r...

Page 17: ...s Les enfants sont fréquemment attirés par la machine et par la tonte de la pelouse Ne croyez jamais que les enfants restent à l endroit où vous les avez vu en dernier Tenir les enfants loin de la zone de travail et sous la surveil lance attentive d un adulte autre que l opérateur Soyez vigilant et arrêtez la machine si un enfant pénètre dans l aire de tonte Avant de reculer et lorsque vous recule...

Page 18: ...die N utilisez qu un bidon homologué N enlevezjamaislebouchonetn ajoutezjamaisdecarburant lorsque le moteur est en marche Laissez le moteur refroidir avant de le remplir Ne remplissez jamais le réservoir à l intérieur Ne rangez jamais ni l appareil ni le bidon dans un endroit où se trouve une flamme nue des étincelles ou une flamme pilote chauffe eau ou autres appareils Neremplissezjamaislesbidons...

Page 19: ...nt votre tondeuse à gazon Observez toujours les RÈGLES DE SÉCURITÉ NUMÉRO DE SÉRIE _________________________________________ DATE D ACHAT ____________________________________ LES NUMÉROS DE SÉRIE ET DE MODÈLE SERONT SITUÉS SUR LA DÉCALCOMANIE COLLÉE SUR L ARRIÈRE DU BOÎTIER DE TONDEUSE VOUS DEVRIEZ NOTER CES NUMÉROS CI ET LA DATE D ACHAT CONSERVEZ LES POUR LA RÉFÉRENCE D AVENIR RESPONSABILITÉS DU ...

Page 20: ...t au dehors du haut du sac 2 Glissezlesétriersdepressiondevinylepar dessusducadre REMARQUE Si les étriers sont trop rigides mettez les dans de l eau chaude pendant quelques minutes Si le sac de décharge devient mouillé laissez le sécher avant de l utiliser INSTALLER LES ACCESSOIRES Votre tondeuse à gazon a été expédiée prête à utiliser comme une tondeuse broyeuse Pour la convertir au ramassage ou ...

Page 21: ...illustrations avec votre tondeuse à gazon afin de se mettre au courant des positions des différentes commandes et des différents réglages Conservez ce manuel pour la référence d avenir Ces symboles peuvent se montrer sur votre motovineuse à gazon ou dans les publications fournies avec le produit Apprenez et comprenez la signification des symboles UTILISATION RENCONTRE LES EXIGENCES DES NORMES DE S...

Page 22: ...des roues vers la roue Soulevez ou baissez les roues pour convenir à vos besoins Assurez vous que toutes les roues sont à la même hauteur REMARQUE Le dispositif est en position quand la patte de la plaque est dans le trou du levier Les dispositifs à 9 positions s il y a lieu permettent que le levier soit plaçé entre les pattes de la plaque POUR CONVERTIR LA TONDEUSE Votre tondeuse à gazon a été ex...

Page 23: ...ise le produit ÉTAPES FACILES À SE RAPPELER EN CONVERTISSANT LA TONDEUSE À GAZON POUR LE BROYAGE 1 La porte arrière fermée 2 La porte de la broyeuse est fermée et serrée à fond POUR LE RAMASSAGE ARRIÈRE 1 Le ramasse herbe est installé 2 La porte de la broyeuse est fermée et serrée à fond POUR LE DÉCHARGEMENT LATÉRAL 1 La porte arrière fermée 2 Le déflecteur de décharge est installé ATTENTION N uti...

Page 24: ...n donnera à la pelouse des substances nutritives Pour le meilleur rendement des lames la vitesse de moteur lame doit être maintenue à la position rapide Netondezpaslapelousequandl herbeestmouillée L herbe mouilléeformeralesmassesdel herbecoupéequigêneront avec l action de la broyeuse Le meilleur temps de tondre est au debout de l après midi La pelouse doit être sèche à cette heure et la zone coupé...

Page 25: ...air propre assure la présence d un mélange air essence correct et ainsi permet votre moteur de marcher mieux et de durer plus longtemps RespectezlesindicationsduGuided entretiendecemanuel AVANT CHAQUE UTILISATION 1 Vérifiez le niveau d huile de moteur 2 Vérifiez l intégrité des systèmes de fixation LUBRIFICATION Conservez votre machine bien lubrifiée Voir le TABLEAU DE LUBRIFICATION IMPORTANT NE M...

Page 26: ... 47 54 Nm IMPORTANT LE VIS DE LAME EST TRAITÉ À LA CHALEUR SI LE VIS A BESOIN REMPLACER REMPLACEZ SEULEMENT PAR LE VIS APPROUVÉ AFFILER LA LAME REMARQUE Nousnerecommandonspasquevousaffilezlalame mais si vous faites ça assurez vous que la lame soit équilibrée Il est nécessaire de conserver la lame équilibrée Une lame qui n estpaséquilibréecauseral avarieéventuellementàlatondeuse à gazon ou au moteu...

Page 27: ... CHAQUE UTILISATION ATTENTION Débranchez le fil de bougie d allumage et posez le de telle façon qu il ne puisse pas entrer en contact avec la bougie d allumage Nettoyez le dessous de la tondeuse en grattant pour enlever l accumulation d herbe et de débris FIG 14 BOUCHON DE REMPLISSAGE D ESSENCE MARQUE INFÉRIEUR MARQUE SUPÉRIEUR FIG 13 CUVETTE 6 Attendezuneminutepourpermettrequel huileserasseoiée P...

Page 28: ...iles soient arrêtées complètement 3 Débranchez le fil de bougie d allumage et posez le de telle façon qu il ne puisse pas entrer en contact avec la bougie d allumage Nettoyez fréquemment le moteur pour éviter l accumulation de débris Un moteur sale marche à une température plus élevéeetparconséquentàuneespérancedeviepluscourte que normale Essuyez les surfaces finies et les roues de toutes les trac...

Page 29: ...utomatiquement dans la position d utilisation POSI TION DE TONTE BARRE DE COMMANDE DE PRÉSENCE D OPÉRATEUR REPLIER EN AVANT POUR EN TREPOSAGE GUIDON INFÉRIEUR BOULON DE GUIDON GUIDON SUPÉR IEUR FIG 20 ÉCROU SUPPORT BOULON GUIDON INFÉRIEUR PRESSEZ POUR REPLIER FIG 19 MOTEUR SYSTÈME D ESSENCE IMPORTANT IL EST IMPORTANT DE PRÉVENIR PENDANT L ENTREPOSAGE LESDÉPÔTSDEGOMMEDANSLESPARTIES ESSENTIELLES DU ...

Page 30: ...rriver les problèmes Si possible entreposez votre tondeuse à gazon à l intérieur d un bâtiment et couvrez la pour la protéger des saletés et de la poussière Couvrez votre tondeuse à gazon avec une housse adéquate qui ne retient pas l humidité N utilisez pas de plastique Le plastiquenepeutpasrespirercequipermetlacondensation et la formation de rouille sur votre tondeuse à gazon IMPORTANT NE COUVREZ...

Page 31: ...ssez la vitesse de marcher Coupe irrégulière 1 Lame usée tordue ou desserrée 1 Remplacez la lame Serrez le boulon de lame 2 Vitesse de moteur basse 2 Réglez la commande de vitesse de moteur à la position rapide 3 Il y a une accumulation d herbe de feuilles 3 Nettoyez le dessous du boîtier de tondeuse à gazon et de débris sous la tondeuse Vibrations 1 Lame usée tordue ou desserrée 1 Remplacez la la...

Page 32: ...07 12 2016 BY ...

Reviews: