background image


English


 – 


7


GENERAL SAFETY PRECA


UTIONS


Mac


hine


′′′′


s safety equipment


This section descr


ibes the machine


s safety equipment, its 

purpose, and how checks and maintenance should be carried 
out to ensure that it operates correctly. See the ”What is 
what?” section to locate where this equipment is positioned 
on your machine.

The life span of the machine can be reduced and the risk of 
accidents can increase if machine maintenance is not carried 
out correctly and if service and/or repairs are not carried out 
professionally. If you need further information please contact 
your nearest service workshop.


Thr


ottle lockout


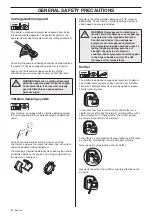
The throttle loc


kout is designed to prevent accidental 

operation of the throttle control. When you press the lock (A) 
(i.e. when you grasp the handle) it releases the throttle control 
(B). When you release the handle the throttle control and the 
throttle lockout both move back to their original positions. This 
movement is controlled by two independent return springs. 
This arrangement means that the throttle control is 
automatically locked at the idle setting.

Make sure the throttle control is locked at the idle setting 
when the throttle lockout is released.

Press the throttle lockout and make sure it returns to its 
original position when you release it.

Check that the throttle control and throttle lockout move freely 
and that the return springs work properly.

See instructions under the heading Start. Start the machine 
and apply full throttle. Release the throttle and check that the 
cutting attachment stops and remains at a standstill. If the 
cutting attachment rotates with the throttle in the idle position 
then the carburettor idle setting must be checked. See 
instructions under the heading Maintenance.


Stop s


witch


Use the stop s


witch to switch off the engine.

Start the engine and make sure the engine stops when you 
move the stop switch to the stop setting.

IMPORTANT!

All servicing and repair work on the machine requires 
special training. This is especially true of the machine


safety equipment. If your machine fails any of the checks 
described below you must contact your service agent. 
When you buy any of our products we guarantee the 
availability of professional repairs and service. If the retailer 
who sells your machine is not a servicing dealer, ask him for 
the address of your nearest service agent.

!


W


ARNING! Never use a machine with faulty 

safety equipment. The machine’s safety 
equipment must be checked and maintained 
as described in this section. If your machine 
fails any of these checks contact your 
service agent to get it repaired.

Summary of Contents for 324LDX-Series

Page 1: ...E En n n ng g g gl l l li i i is s s sh h h h 324LX series 324LDX series Operator s manual Please read the operator s manual carefully and make sure you understand the instructions before using the machine ...

Page 2: ...th saw blades or grass blades can be thrown violently to the side when the blade comes into contact with a fixed object This is called blade thrust The blade is capable of amputating an arm or leg Always keep people and animals at least 15 metres from the machine Arrows which show limits for handle positioning Always wear approved protective gloves Wear sturdy non slip boots Only use non metallic ...

Page 3: ...ctions 16 MAINTENANCE Carburettor 18 Muffler 18 Cooling system 18 Spark plug 19 Two piece shaft 19 Air filter 19 Maintenance schedule 20 TECHNICAL DATA Technical data 21 EC declaration of conformity 22 WARNING Long term exposure to noise can result in permanent hearing impairment So always use approved hearing protection WARNING Under no circumstances may the design of the machine be modified with...

Page 4: ...dustry Husqvarna s aim is also to be in the front edge according to ergonomics usability security and environmental protection That is the reason why we have developed many different features to provide our products within these areas We are convinced that you will appreciate with great satisfaction the quality and performance of our product for a very long time to come The purchase of one of our ...

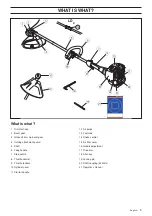
Page 5: ...tting attachment guard 5 Shaft 6 Loop handle 7 Stop switch 8 Throttle control 9 Throttle lockout 10 Cylinder cover 11 Starter handle 12 Air purge 13 Fuel tank 14 Choke control 15 Air filter cover 16 Handle adjustment 17 Drive disc 18 Allen key 19 Locking pin 20 Shaft coupling 324LDx 21 Operator s manual ...

Page 6: ...ce measures must be carried out by trained and qualified specialists See instructions under the heading Maintenance All covers guards and handles must be fitted before starting Ensure that the spark plug cap and ignition lead are undamaged to avoid the risk of electric shock The machine operator must ensure that no people or animals come closer than 15 metres while working When several operators a...

Page 7: ...le lockout and make sure it returns to its original position when you release it Check that the throttle control and throttle lockout move freely and that the return springs work properly See instructions under the heading Start Start the machine and apply full throttle Release the throttle and check that the cutting attachment stops and remains at a standstill If the cutting attachment rotates wi...

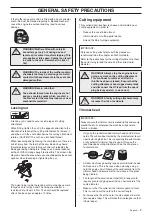
Page 8: ...er The muffler is designed to keep noise levels to a minimum and to direct exhaust fumes away from the user A muffler fitted with a catalytic converter is also designed to reduce harmful exhaust gases In countries that have a warm and dry climate there is a significant risk of fire We therefore fit certain mufflers with a spark arrestor mesh Check whether the muffler on your machine is fitted with...

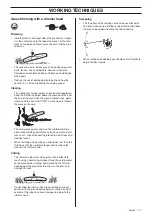
Page 9: ...machines generally require small trimmer heads and vice versa This is because when clearing using a cord the engine must throw out the cord radially from the trimmer head and overcome the resistance of the grass being cleared The length of the cord is also important A longer cord requires greater engine power than a shorter cord of the same diameter Make sure that the cutter on the trimmer guard i...

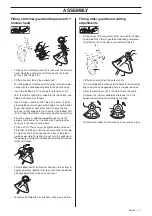
Page 10: ...nt snaps into place Before using the unit tighten the knob securely Dismantling Loosen the coupling by turning the knob at least 3 times Push and hold the button C While securely holding the engine end pull the attachment straight out of the coupling Assembling the cutting equipment A B WARNING When fitting the cutting attachment it is extremely important that the raised section on the drive disc ...

Page 11: ... centre hole Fit the nut G The nut must be tightened to a torque of 35 50 Nm 3 5 5 kpm Use the socket spanner in the tool kit Hold the shaft of the spanner as close to the blade guard as possible To tighten the nut turn the spanner in the opposite direction to the direction of rotation Caution left hand thread Fit the bottom half of the trimmer head K to the cover I by pressing them together with ...

Page 12: ...igh engine temperature and increased bearing load which can result in serious engine damage When working at continuous high revs a higher octane rating is recommended If the machine is not used for some time the fuel tank should be emptied and cleaned Engine oil Check the oil level before starting the machine A too low oil level can cause serious damage to the engine When the machine is new the en...

Page 13: ...sition before starting WARNING Taking the following precautions will lessen the risk of fire Do not smoke or place hot objects near fuel Always shut off the engine before refuelling Always stop the engine and let it cool for a few minutes before refuelling When refuelling open the fuel cap slowly so that any excess pressure is released gently Tighten the fuel cap carefully after refuelling Always ...

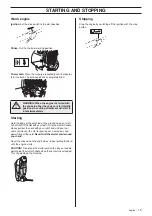
Page 14: ...covers must be correctly fitted and undamaged before you start the machine Starting and stopping Cold engine Ignition Set the stop switch to the start position Choke Set the choke control in the choke position Primer bulb Press the air purge repeatedly until fuel begins to fill the bulb The bulb need not be completely filled WARNING The complete clutch cover and shaft must be fitted before the mac...

Page 15: ...hand until you feel some resistance the starter pawls grip now quickly and powerfully pull the cord Never twist the starter cord around your hand Reset the choke when the engine fires repeat pulling the cord until the engine starts CAUTION Do not pull the starter cord all the way out and do not let go of the starter handle when the cord is fully extended This can damage the machine Stopping Stop t...

Page 16: ... speed after each working operation Long periods at full throttle without any load on the engine can lead to serious engine damage IMPORTANT This section takes up the basic safety precautions for working with a trimmer If you encounter a situation where you are uncertain how to proceed you should ask an expert Contact your dealer or your service workshop Avoid all usage which you consider to be be...

Page 17: ...rd wears quicker and must be fed forward more often when working against stones brick concrete metal fences etc than when coming into contact with trees and wooden fences When trimming and clearing you should use less than full throttle so that the cord lasts longer and to reduce the wear on the trimmer head Cutting The trimmer is ideal for cutting grass that is difficult to reach using a normal l...

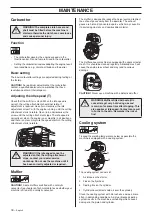
Page 18: ... direct the exhaust gases away from the operator The exhaust gases are hot and can contain sparks which may cause fire if directed against dry and combustible material The muffler on your machine is equipped with a spark arrestor mesh this should be cleaned regularly A blocked mesh will cause the engine to overheat and may lead to serious damage CAUTION Never use a machine with a defective muffler...

Page 19: ...5 hours or more regularly if conditions are exceptionally dusty Cleaning the air filter Remove the air filter cover and take out the filter Wash it clean in warm soapy water Ensure that the filter is dry before refitting it An air filter that has been in use for a long time cannot be cleaned completely The filter must therefore be replaced with a new one at regular intervals A damaged air filter m...

Page 20: ...correctly X Check that nuts and screws are tight X Check that there are no fuel leaks from the engine tank or fuel lines X Check the engine oil level and top up if necessary X Check the starter and starter cord X Check that the vibration damping elements are not damaged X Clean the outside of the spark plug Remove it and check the electrode gap Adjust the gap to 0 6 0 7 mm or replace the spark plu...

Page 21: ...ne output acc to ISO 8893 kW rpm 0 8 7000 0 8 7000 Catalytic converter muffler No No Speed regulated ignition system No No Ignition system Manufacturer type of ignition system Ikeda Ikeda Spark plug NGK CMR5H NGK CMR5H Electrode gap mm 0 6 0 6 Fuel and lubrication system Manufacturer type of carburettor Walbro Walbro Fuel tank capacity litre 0 5 0 5 Weight Weight without fuel cutting attachment an...

Page 22: ...ppsala Sweden has performed voluntary type examination on behalf of Husqvarna AB The certificates are numbered SEC 04 1013 01 164 037 324Lx LDx Huskvarna 15 March 2004 Michael Kullberg Business manager 324Lx 324LDx Approved accessories Type Cutting attachment guard Art no Blade shaft thread M10 Plastic blades Tricut Ø 255 mm 503 93 42 02 503 97 71 01 Tricut Ø 300 mm 503 93 42 02 Trimmer head Trimm...

Page 23: ...1 Super Auto II Super Auto II 1 2 3 4 5 6 7 8 9 10 4 0 m 13 2 4 mm 095 2 0 m 6 5 6 6 15 cm 15 cm ...

Page 24: ......

Page 25: ... Clic 1 2 3 5 6 7 10 11 8 5 m 28 4 8 4 2 m 14 2 4 2 7 mm 095 106 10 cm 4 6 15 cm S35 ...

Page 26: ... z R 6R z R 6R 1 2 4 3 2 4 2 7 mm 095 106 4 25 m 14 4 25 m 14 B 6 15 cm A 6 15 cm S35 5 ...

Page 27: ...T35 T35x Clic 1 2 3 5 6 7 9 8 5 m 28 4 8 4 3 m 14 2 4 2 7 mm 095 106 10 cm 4 6 15 cm ...

Page 28: ... z R 6R 2007 01 29 z R 6R 1150261 26 ...

Reviews: