


Manual de Instrucciones
18 Sp
Garantía Limitada - Pistolas Pulverizadoras Husky de Campbell Hausfeld
1
DURACION: A partir de la fecha de compra por el comprador original tal como se especifica a continuación: Productos
Estándard (Standard Duty) - Un año, Productos Resistentes (Serious Duty) -Dos años, Productos Robustos (Extreme Duty)
- Tres años.
2.
QUIEN OTORGA ESTA GARANTIA (EL GARANTE: Campbell Hausfeld / The Scott Fetzer Company 100 Production Drive,
Harrison, Ohio 45030 Teléfono: (800) 543-6400
3.
QUIEN RECIBE ESTA GARANTIA (EL COMPRADOR): El comprador original (que no sea un revendedor) del producto
Campbell Hausfeld.
4.
PRODUCTOS CUBIERTOS POR ESTA GARANTIA: Cualquier clavadora, grapadora, herramienta neumática, pistola pulver-
izadora, inflador o accesorio neumático suministrado o fabricado por el Garante.
5.
COBERTURA DE LA GARANTIA: Los defectos substanciales de material y fabricación que ocurran dentro del período de
validez de la garantía.
6.
LO QUE NO ESTA CUBIERTO POR ESTA GARANTIA:
A.
Las garantías implícitas, incluyendo aquellas de comercialidad E IDONEIDAD PARA FINES PARTICULARES, ESTAN
LIMITADOS A LO ESPECIFICADO EN EL PARRAFO DE DURACION. Si este producto es empleado para uso comercial,
industrial o para renta, la garantía será aplicable por noventa (90) días a partir de la fecha de compra. En algunos
estados no se permiten limitaciones a la duración de las garantías implícitas, por lo tanto, en tales casos esta lim-
itación no es aplicable.
B.
CUALQUIER PERDIDA DAÑO INCIDENTAL, INDIRECTO O CONSECUENTE QUE PUEDA RESULTAR DE UN DEFECTO,
FALLA O MALFUNCIONAMIENTO DEL PRODUCTO CAMPBELL HAUSFELD. En algunos estados no se permite la
exclusión o limitación de daños incidentales o consecuentes, por lo tanto, en tales casos esta limitación o exclusión
no es aplicable
C.
Cualquier falla que resulte de un accidente, abuso, negligencia o incumplimiento de las instrucciones de fun-
cionamiento y uso indicadas en el (los) manual(es) que se adjunta(n) al producto. Dichos accidentes, abusos por
parte del comprador, o falta de operar el producto siguiendo las instrucciones del manual de instrucciones sumin-
istrado también debe incluir la desconexión o modificación de los instrumentos de seguridad. Si dichos instrumen-
tos de seguridad son desconectados, la garantía quedaría cancelada.
D.
Los ajustes normales explicados en el(los) manual(es) suministrado(s) con el producto.
E.
Artículos o servicios normalmente requeridos para el mantenimiento del producto, tales como: anillos en O,
resortes, amortiguadores, defensas, hojas de impulsor, fusibles, baterías, empaques, almohadillas o sellos, boquillas
de fluído, agujas, boquillas para rociar arena, lubricantes, mangueras de material, elementos filtrantes, álabes de
motores, abrasivos, hojillas, discos para cortar, cinceles, retenes para cinceles, cortadores, collarines, mandriles, mor-
dazas para remachadoras, brocas para desarmadores, almohadillas para lijar, soportes de almohadillas, mecanismo
de impacto o cualquier otro artículo desgastable que no se haya enumerado específicamente . Estos artículos sólo
estarán cubiertos bajo esta garantía por noventa (90) días a partir de la fecha de compra original. Los artículos sub-
rayados sólo están garantizados por defectos de material o fabricación.
7.
RESPONSABILIDADES DEL GARANTE BAJO ESTA GARANTIA: Reparar o reemplazar, como lo decida el Garante, los pro-
ductos o componentes que estén defectuosos, se hayan dañado o hayan dejado de funcionar adecuadamente, durante
el período de validez de la garantía
8.
RESPONSABILIDADES DEL COMPRADOR BAJO ESTA GARANTIA:
A. Suministrar prueba fechada de compra y la historia de mantenimiento del producto.
B. Entregar o enviar el producto o componente Campbell Hausfeld al Centro de Servicio autorizado Campbell Hausfeld
más cercano. Los gastos de flete, de haberlos, deben ser pagados por el comprador.
C. Seguir las instrucciones sobre operación y mantenimiento del producto, tal como se indica(n) en el (los) manual(es)
del propietario
9.
CUANDO EFECTUARA EL GARANTE LA REPARACION O REEMPLAZO CUBIERTO BAJO ESTA GARANTIA: La reparación o
reemplazo dependerá del flujo normal de trabajo del centro de servicio y de la disponibilidad de repuestos.
Esta garantía limitada es válida sólo en los EE.UU., Canadá y México y otorga derechos legales específicos. Usted también
puede tener otros derechos que varían de un Estado a otro. o de un país a otro.
3
Preparation
(Cont.)
the air pressure or open the fluid con-
trol to spray more material.
If the spray is too coarse (spitting globs),
reduce the amount of material with the
fluid control knob or thin the paint.
Before spraying the workpiece, prac-
tice a few minutes on a cardboard tar-
get to ensure the pattern size and con-
sistency are set correctly.
Operation
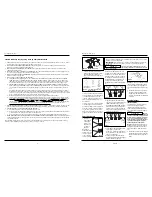
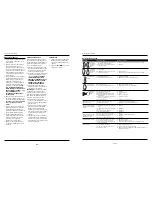
1. Begin spraying.
Always keep the
gun at right
angles to the
work. (See
Figure 4.)
Keep the nozzle
about 6 to 9 inches
from the work sur-
face throughout the
stroke and always
keep the gun in
motion while
spraying. Stopping gun movement in mid-
stroke will cause a build up of paint and
result in “runs.” Do not “fan” the gun
from side to side while painting. This will
cause a build-up of paint in the center of
the stroke and an insufficient coating at
each end (See Figure 5).
2. “Trigger” the gun properly. Start the
gun moving at the beginning of the
stroke BEFORE SQUEEZING THE TRIG-
GER and release the trigger BEFORE
STOPPING GUN MOVEMENT at the
end of the stroke. This procedure
will “feather” (blend) each stroke
with the next without showing over-
lap or unevenness).
3. The amount of paint being applied
can be varied by the speed of the
stroke, distance from the surface and
adjustment of the fluid control
knob.
4. Overlap strokes just enough to
obtain an even coat.
NOTE:
Two
thin coats of paint will yield better
results and have less chance of runs
than one heavy layer.
5. Use a piece of cardboard as a shield
to catch overspray at the edges of
the work to protect other surfaces.
Use masking tape to cover other
areas if needed.
Maintenance
DAILY CLEAN-UP
Local codes may require specific clean-
ing methods and equipment. Follow
local codes and manufacturer’s recom-
mendations for the use and disposal of
spray materials and solvent.
Clean spray gun
immediately after
use. Paint and other material dry quick-
ly in the small passages rendering gun
useless due to the difficulty of remov-
ing hardened paint from the passages
inside the gun.
NOTE:
In the instructions below, the use
of the word “solvent” refers to the spe-
cific solvent for the material used (eg:
lacquer thinner for lacquer, etc ).
1. Remove and empty the canister; then
rinse with a solvent recommended
for the paint or other material used.
2. Refill canister with clean solvent and
attach to the gun. Spray solvent
through the gun while shaking the
gun vigorously. Wipe the gun exteri-
or with a solvent soaked rag. Repeat
until the gun is clean.
3. Remove the air cap and soak in sol-
vent until clean. Use a small brush for
stubborn stains if necessary.
Toothpicks or small brushes may be
used to clean air passages; however,
NEVER USE METAL OBJECTS TO
CLEAN PRECISELY DRILLED PAS-
SAGES. DAMAGED PASSAGES WILL
CAUSE IMPROPER SPRAYING.
4. Clean gaskets with a solvent soaked
rag. To prevent equipment damage,
Do not immerse gaskets or spray
gun body in solvents.
5. After using water to clean out water
based paints or materials, spray min-
eral spirits through the gun to pre-
vent corrosion.
!
NOTICE
WATER/OIL IN COMPRESSED AIR
All compressor pumps discharge some condensed water, oil or contaminates with
the compressed air.
IMPORTANT:
This condensation will cause “fish eyes” to appear in the paint
job. Install appropriate water/oil removal equipment and controls as necessary
for the intended application.
Failure to install appropriate water/oil removal equipment
may result in damage to machinery or workpiece.
!
NOTICE
Operating Instructions
6 - 9”
Figure 4
Thin coat
Thin coat
Heavy coat
Figure 5
INCORRECT
6 - 9”
Pull
Trigger
Start
Stroke
Release
Trigger
End
Stroke
Figure 6
Figure 7


