background image

16

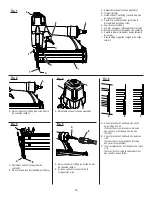
A - Adjustable exhaust (escape ajustable)

B - Trigger (gatillo)

C - Quick-connect air fitting (conexión de aire 

de conexión rápida)

D - Depth of drive adjustment (ajuste de la 

profundidad de introducción)

E - Jam release (soltador)

F - No-mar nosepiece (almohadilla protectora)

G - Workpiece contact (disparador de contacto)

H - Reload indicator (indicador de agotamiento 

de carga)

I  - Side-loading magazine (cargador de carga 

lateral)

Fig. 1

Fig. 2

Fig. 4

Fig. 6

Fig. 3

Fig. 5

I

C

D

A

B

G

E

F

H

A

A - Quick-connect air fitting (conexión de aire 

de conexión rápida)

A - Adjustable exhaust (escape ajustable)

A - Workpiece contact  (disparador de 

contacto)

B - No-mar nosepiece (almohadilla protectora)

A - Quick-connect air fitting (conexión de aire 

de conexión rápida)

B - Air hose connector (conector de la 

manguera de aire)

A

B

A

B

A

A - Correct placement: nail head sits on the 

upper edge of a rib 

(Colocación correcta:la cabeza del calvo 

apoya sobre el borde superior de una 

costilla)

B - Correct placement: nail head sits between 

ribs 

(Colocación correcta:la cabeza del calvo 

apoya entre las costillas)

C - Incorrect placement: nail head sits on top of 

a rib 

(Colocación incorrecta:la cabeza del clavo 

apoya sobre una costilla)

A

B

C

Summary of Contents for H200BND

Page 1: ...k you for your purchase GUARDE ESTE MANUAL PARA FUTURAS CONSULTAS Su clavadora de puntillas ha sido diseñada y fabricada de conformidad con nuestras estrictas normas para brindar fiabilidad facilidad de uso y seguridad para el operador Con el debido cuidado le brindará muchos años de sólido y eficiente funcionamiento Le agradecemos su compra ADVERTENCIA Para reducir el riesgo de lesiones el usuari...

Page 2: ...eguridad el desempeño y la fiabilidad por lo cual se facilita su manejo y mantenimiento Introduction 2 Introducción General Safety Rules 3 Reglas de seguridad generales Specific Safety Rules 4 5 Reglas de seguridad específicas Symbols 6 Símbolos Glossary of Terms 7 Glosario de términos Features 8 Características Assembly 8 Armado Operation 9 11 Funcionamiento Maintenance 12 13 Mantenimiento Access...

Page 3: ...ing parts Keep fingers away from trigger when not driving fasteners to avoid accidental firing Do not overreach Keep proper footing and balance at all times Proper footing and balance enables better control of the tool in unexpected situations Use safety equipment Always wear eye protection Dust mask nonskid safety shoes hard hat or hearing protection must be used for appropriate conditions Do not...

Page 4: ...with the air hose attached Do not operate this tool if it does not contain a legible warning label Do not continue to use a tool that leaks air or does not function properly operation Always assume that the tool contains fasteners Do not carry the tool from place to place holding the trigger Accidental discharge could result Always handle the tool with care Respect the tool as a working implement ...

Page 5: ... use with an air compressor which can po tentially exceed 200 psi as tool may burst possibly causing injury The connector on the tool must not hold pressure when air supply is disconnected If an incorrect fitting is used the tool can remain charged with air after discon necting and thus will be able to drive a fastener even after the air line is disconnected possibly causing injury Always disconne...

Page 6: ...rn their meaning Proper interpretation of these symbols will allow you to operate the tool better and safer SYMBOL NAME DESIGNATION EXPLANATION Eye Protection Hot Surface To reduce the risk of injury or damage avoid contact with any hot surface Eye Ear and Head Protection Always wear other personal protective equipment such as hearing protection and a hard hat when needed Keep Hands Away Keep hand...

Page 7: ...l Maximum air pressure The maximum allowable pressure of the compressed air as specified by the manufacturer for operating a tool Operating control A control that separately or as part of an actuation system can cause the actuation of a tool Single sequential actuation Anactuationsysteminwhichthereismorethanoneoperating control and the operating controls must be activated in a specific sequence to...

Page 8: ...fter woods side loading MAGAZINE The side loading magazine allows easy three step loading of fasteners TRIGGER Your brad nailer is equipped with a single sequential fire trigger WARNING If any parts are damaged or missing do not operate this product until the parts are replaced Failure to heed this warning could result in serious personal injury WARNING Do not attempt to modify this product or cre...

Page 9: ... the eye protection chosen has side shields or provides protection from flying debris both from the front and sides PREPARING the tool for use See Figure 2 page 16 Under normal use conditions the tool should be lubricated before connecting the tool to an air supply Add air tool oil into the air fitting on the tool once daily with minimal use or twice a day with heavy use Only a few drops of oil at...

Page 10: ...rst connected to the air supply Always connect the tool to the air supply before loading nails to prevent injury from unintended cycling Always make sure the tool s magazine is empty at the beginning of each work session before connecting to an air supply WARNING Keep the tool pointed away from yourself and others when loading nails Failure to do so could result in possible serious personal injury...

Page 11: ...eeded use the drive depth adjustment on the tool drivE depth ADJUSTMENT See Figure 9 page 17 The driving depth of the nail may be adjusted It is advisable to test the depth on a scrap workpiece to determine the required depth for the application To determine depth of drive first adjust the air pressure and drive a test nail To achieve the desired depth use the drive depth adjustment on the tool Di...

Page 12: ... from the effects of dirt and water in the system Restrictedairflowwillpreventthetoolfromreceiving an adequate volume of air even though the pressure reading is high The results will be a slow operation or reduced driving power Before evaluating tool problems for these symptoms trace the air supply from the tool to the supply source for restrictive connectors low points containing water and anythi...

Page 13: ...s The tool must not operate Press the workpiece contact firmly against the workpiece Pull the trigger The tool must operate With the workpiece contact still depressed release the trigger The driver must return to its up position If the tool successfully meets all the requirements in this checklist it is ready for use Load the proper fasteners for the desired application Set the depth of drive acco...

Page 14: ...ion Worn or damaged O rings or bumper Install Overhaul Kit Verify adequate air supply Lubricate tool Install Overhaul Kit Air leak near the bottom of the tool Worn or damaged O rings or bumper Incorrect fasteners Damaged fasteners Loose magazine Dirty magazine Worn or damaged driver Verify that fasteners are the correct size Replace fasteners Tighten screws Clean magazine Install Driver Maintenanc...

Page 15: ...ied in this operator s manual This warranty does not apply to any damage to the One World Technologies Inc product that is the result of improper maintenance or to any One World Technologies Inc product that has been altered or modified The warranty does not extend to repairs made necessary by normal wear or by the use of parts or accessories which are either incompatible with the OneWorldTechnolo...

Page 16: ...a alcanzar mayor distancia Mantenga una postura firme y buen equilibrio en todo momento La postura firme y el buen equilibrio permiten un mejor control de la herramienta en situaciones inesperadas Use equipo de seguridad Siempre póngase protección ocular Cuando lo exijan las circunstancias debe ponerse careta contra el polvo zapatos de seguridad antiderrapantes casco o protección auditiva No utili...

Page 17: ...mienta si no tiene una etiqueta de advertencia No continúe usando ninguna herramienta que tenga fugas de aire o que no funcione correctamente Funcionamiento Siempre suponga que la herramienta contiene sujetadores No traslade la herramienta de un lugar a otro con el dedo en el gatillo Podría producirse un disparo accidental Siempre maneje con cuidado la herramienta Respete la herramienta como un el...

Page 18: ...puedan excederse de 200 psi de presión ya que la herramienta puede estallar y causar lesiones El conector de la herramienta debe no conservar presión una vez desconectado el suministro de aire Si se utiliza una conexión inadecuada la herramienta puede permanecer cargada de aire después de desconectarla del suministro de aire y por lo tanto con capacidad de impulsar un sujetador clavo o grapa según...

Page 19: ...uplicamos estudiarlos y aprender su significado Una correcta interpretación de estos símbolos le permitirá utilizar mejor y de manera más segura la herramienta SÍMBOLO NOMBRE DENOMINACIÓN EXPLICACIÓN Protección ocular Superficie caliente Para reducir el riesgo de lesiones corporales o daños materiales evite tocar toda superficie caliente Protección para los ojos los oídos y la cabeza Siempre pónga...

Page 20: ...aire máxima Es la presión máxima permitida del aire comprimido según las especificaciones del fabricante para la utilización de una herramienta Control de accionamiento Esuncontrolque porseparadoocomopartedeunsistemade accionamiento de una herramienta sirve para accionarla Accionamiento secuencial sencillo Es un sistema de accionamiento en el cual hay más de un control de accionamiento y éstos deb...

Page 21: ...dor de carga lateral El cargador de carga lateral puede cargarse fácilmente de sujetadores puntillas clavos o grapas según sea el caso en tres pasos Gatillo Su clavadora de puntillas tiene un gatillo de accionamiento secuencial sencillo para la colocación precisa de los sujetadores ADVERTENCIA Si faltan piezas no utilice esta herramienta sin haber reemplazado todas las piezas faltantes La inobserv...

Page 22: ...a disponga de protectores laterales u ofrezca protección contra desechos disparados provenientes tanto del frente como de los lados Preparación de la herramienta para utilizarla Vea la figura 2 page 16 En condiciones normales la herramienta debe lubricarse antes de conectarla a un suministro de aire Vierta lubricante para herramientas neumáticas en la conexión del aire de la herramienta una vez al...

Page 23: ...rgarla de sujetadores clavos o grapas según sea el caso para evitar lesiones causadas por el ciclo de funcionamiento indeseado Siempre asegúrese de que el cargador de la herramienta esté vacío al inicio de cada serie de operaciones antes de conectar la herramienta al suministro de aire ADVERTENCIA Mantenga la herramienta apuntando en la dirección opuesta a donde se encuentra usted y otras personas...

Page 24: ...e la herramienta AJUSTE DE LA PROFUNDIDAD DE INTRODUCCIÓN Vea la figura 9 page 17 Puede ajustarse la profundidad de introducción del clavo Se recomienda probar la profundidad de introducción en un pedazo de desecho para determinar la profundidad requerida en cada caso en particular FUNCIONAMIENTO Para determinar la profundidad primero ajuste la presión de aire y luego introduzca un clavo de prueba...

Page 25: ...ectores limitantes o puntos bajos con contenido de agua y cualquier otra cosa que pueda impedir el flujo pleno de aire a la herramienta ADVERTENCIA Para el servicio de la unidad sólo utilice piezas de repuesto idénticas El empleo de piezas diferentes puede causar un peligro o dañar el producto ADVERTENCIA Siempre use gafas de seguridad o anteojos protectores con protección lateral al usar herramie...

Page 26: ...n esta posición durante al menos 5 segundos La herramienta no debe funcionar Presione el elemento de contacto con la pieza de trabajo firmemente contra ella Oprima el gatillo La herramienta debe funcionar Con el elemento de contacto con la pieza de trabajo todavía presionado suelte el gatillo El impulsor debe volver a la posición superior Si la herramienta cumple con todos los requisitos de esta l...

Page 27: ...s o dañados Instale el juego de mantenimiento general Verifique que haya un suministro de aire adecuado Lubrique la herramienta Instale el juego de mantenimiento general Fuga de aire cerca de la parte inferior de la herramienta Juntas tóricas o tope gastados o dañados La herramienta sufre atoramientos con frecuencia Sujetadores inadecuados Sujetadores dañados Afloje el cargador Cargador sucio Sist...

Page 28: ... según se especifica en este manual del operador Esta garantía no aplica a los daños en el producto de One World Technologies Inc que resulten de un mantenimiento indebido ni a producto alguno de One World Technologies Inc que haya sido alterado o modificado La garantíanocubrelasreparacionesqueresultennecesariaspor el desgaste normal o por el uso de piezas o accesorios que sean incompatibles con e...

Page 29: ...fitting conexión de aire de conexión rápida A Adjustable exhaust escape ajustable A Workpiece contact disparador de contacto B No mar nosepiece almohadilla protectora A Quick connect air fitting conexión de aire de conexión rápida B Air hose connector conector de la manguera de aire A B A B A A Correct placement nail head sits on the upper edge of a rib Colocación correcta la cabeza del calvo apoy...

Page 30: ...lo A Trigger gatillo B Workpiece contact disparador de contacto A Drive depth adjustment ajuste de la profundidad de introducción B To decrease depth para disminuir la profundidad C To increase depth para aumentar la profundidad A Jam release soltador B Latch pestillo A B A C B A B A ...

Page 31: ...18 NOTES NOTES NOTAS ...

Page 32: ... BRAD NAILER CALIBRE 18 Clavadora de PUNTILLAS H200BND ONE WORLD TECHNOLOGIES INC Hwy 8 Pickens SC 29671 Phone 1 866 340 3912 SERVICIO Ahora que ha adquirido este producto si alguna vez llega a necesitar piezas de repuesto o servicio simplemente comuníquese con el centro de servicio autorizado más cercano Asegúrese de proporcionar todos los datos pertinentes al llamar o al presentarse personalment...

Reviews: