background image

3

42695-01  •  09/08/09  •  Hunter Fan Company

Installer’s Choice and Optional Accessories

Understanding Mounting and Installer’s Choice

®

Hunter’s patented 3-position mounting system provides you maximum 
installation flexibility and ease. You can install your Hunter fan in one 
of three ways, depending on ceiling height and your preference: Low 
Profile, Standard, or Angled mounting. The steps in this manual include 
instructions for all three Installer’s Choice mounting methods.

Considering Optional Accessories

Consider using Hunter’s optional accessories, including a wall-mounted 
or remote speed control. To install and use the accessories, follow 
the instructions included with each product. For quiet and optimum 
performance of your Hunter fan, use only Hunter speed controls.

For ceilings higher than 8 feet, you can purchase 
Hunter extension downrods. All Hunter fans use 
sturdy 3/4” diameter pipe to assure stability and 
wobble-free performance. 

Standard Mounting

 hangs from the 

ceiling by a downrod (included). 

Angled Mounting

 recommended for a 

vaulted or angled ceiling

Support Brace

Standard 

Mounting 

Style

Ceiling 

Outlet Box

Support Brace

Ceiling 

Outlet Box

Angled 

Mounting 

Style

Low Profile Mounting

 fits close to the 

ceiling, recommended for ceilings less 
than 8 feet high

Support Brace

Low Profile 

Mounting 

Style

Ceiling 

Outlet Box

8

12

    CAUTION: 

To 

reduce the risk of 
personal injury, attach 
the fan directly to the 
support structure of 
the building according 
to these instructions, 
and use only the 
hardware supplied.

Summary of Contents for 42695-01

Page 1: ...lso attach your receipt or a copy of your receipt to the manual __________________________________________ Model Name __________________________________________ Model No ______________________________...

Page 2: ...oid possible electrical shock before installing your fan disconnect the power by turning off the circuit breakers to the outlet box and associated wall switch location If you cannot lock the circuit b...

Page 3: ...cluded with each product For quiet and optimum performance of your Hunter fan use only Hunter speed controls For ceilings higher than 8 feet you can purchase Hunter extension downrods All Hunter fans...

Page 4: ...endent upon installation site CheckingYourFanParts Carefully unpack your fan to avoid damage to the fan parts Refer to the included Parts Guide Check for any shipping damage to the motor or fan blades...

Page 5: ...ll four isolators are in place and were not removed during shipment 2 3 Place a flat washer on each of the two 3 wood screws 2 4 Thread the supply wires from the outlet box in the ceiling through the...

Page 6: ...embled do not remove the downrod For Low Profile mounting Note For low profile mounting the downrod is replaced with the low profile washer 3 4 Remove the setscrew from the adapter 3 5 Place the low p...

Page 7: ...and the green ground wire from the fan 4 4 Connect the white wire grounded from the ceiling to the white wire grounded from the fan 4 5 Connect the remaining wires as follows Dual Switch Wiring The bl...

Page 8: ...tall two canopy screws into the holes opposite the ceiling plate tabs 5 4 Partially install a canopy screw between the slots in the canopy When all the holes are properly aligned securely tighten all...

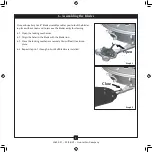
Page 9: ...tools and to remove the blades easily for cleaning 6 1 Open the locking mechanism 6 2 Align the holes in the blade with the blade iron 6 3 Close the locking mechanism securely You will feel it lock i...

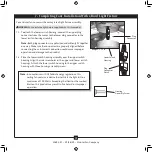
Page 10: ...Make sure the connectors are properly aligned before connecting them Incorrect connection could cause improper operation and damage to the product 7 2 Place the lower switch housing assembly over the...

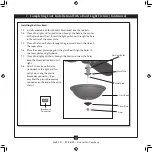
Page 11: ...5 Thread the fan pull chain through the grommet hole in the side of the cover plate 7 6 Place the cover plate up against the glass bowl Align the holes in the cover plate and glass bowl 7 7 Thread the...

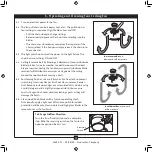
Page 12: ...ith a direct breeze In winter having the fan draw air upward clockwise blade rotation will distribute the warmer air trapped at the ceiling around the room without causing a draft 8 5 For cleaning fin...

Page 13: ...em Excessive wobbling 1 If your fan wobbles when operating use the enclosed balancing kit and instructions to balance the fan 2 Tighten all blade iron screws 3 Turn power off support fan very carefull...

Reviews: