Hunter 28671 Owner'S Manual Download Page 15

15

42435-01  •  05/24/10  •  Hunter Fan Company
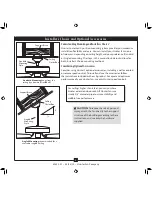
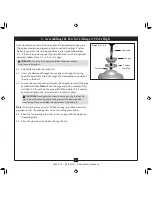
In warm weather

, use 

downward air flow pattern

In cold weather

, use upward 

air flow pattern

To Change Airflow Direction

Turn the fan off and let it come to a complete stop. 
Remove the glass bowl by pushing it up and turning it 
counterlockwise. Slide the reversing switch on the fan to 
the opposite position. Restart fan, and reinstall the glass 
bowl.

Reversing 

Switch

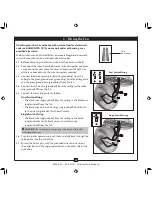
9-1.  Turn on electrical power to the fan.
9-2.  The fan pull chain controls power to the fan. The pull chain has four 

settings in sequence: High, Medium, Low and Off.

•  Pull the chain slowly to change settings.
•  Release slowly to prevent the chain from recoiling into the 

blades.

•  The chain uses a breakaway connector that separates if the 

chain is jerked. If this happens, simply reinsert the chain into the 
connector.

9-3.  The light pull chain controls power to the light. The pull chain has 

two settings: On and Off.

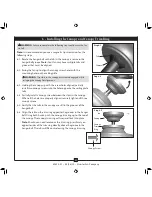
9-4.  Ceiling fans work best by blowing air downward (counterclockwise 

blade rotation) in warm weather to cool the room with a direct 
breeze. In winter, having the fan draw air upward (clockwise blade 
rotation) will distribute the warmer air trapped at the ceiling around 
the room without causing a draft. 

9-5.  The blades on this fan have been treated with Hunter’s Dust Armor 

protection, making the blades less likely to attract dust and dirt. Use 
a dry or slightly damp lint free cloth to clean the blades. Do not use a 
furniture polish or any other cleaners that leave any residue, as they 
will damage the protective Dust Armor on the blades. 

9-6.  For cleaning finishes, use a soft brush or lint-free cloth to prevent 

scratching. A vacuum cleaner brush nozzle can remove heavier dust. 
Remove surface smudges or accumulated dirt and dust using a mild 
detergent and a slightly dampened cloth. You may use an artistic 
agent, but never abrasive cleaning agents as they will damage the 
finish.

9 • Operating and Cleaning Your Ceiling Fan

Summary of Contents for 28671

Page 1: ...also attach your receipt or a copy of your receipt to the manual __________________________________________ Model Name __________________________________________ Model No __________________________________________ Date Purchased __________________________________________ Where Purchased English Español Owner s Guide and Installation Manual ...

Page 2: ...e installing your fan disconnect the power by turning off the circuit breakers to the outlet box and associated wall switch location If you cannot lock the circuit breakers in the off position securely fasten a prominent warning device such as a tag to the service panel All wiring must be in accordance with national and local electrical codes and ANSI NFPA 70 If you are unfamiliar with wiring use ...

Page 3: ...ne if the site is acceptable and safe for your new Hunter fan If you cannot check off every item prepare a new fan site as described on this page Fan Support System Fan attaches directly to building structure Fan support system will hold full weight of the fan and light kit Ceiling Hole The outlet box clearance hole is directly below the joist or support brace Outlet Box The outlet box is an UL ap...

Page 4: ...2 outlet box plus two 8 x 1 1 2 wood screws and washers available from any hardware store or electrical supply house 4 2 Orient the outlet box so that both the inner and outer holes in the box align with the joist or support brace 4 3 Drill pilot holes no larger than the minor diameter of the wood screws 5 64 through the inner holes of the outlet box 4 4 Attach the outlet box directly to the suppo...

Page 5: ...ontrol To install and use the accessories follow the instructions included with each product For quiet and optimum performance of your Hunter fan use only Hunter speed controls For ceilings higher than 8 feet you can purchase Hunter extension downrods All Hunter fans use sturdy 3 4 diameter pipe to assure stability and wobble free performance Standard Mounting hangs from the ceiling by a downrod i...

Page 6: ...2 outlet box Two 8 x 1 1 2 wood screws and washers Approved connector for electrical wire Standard screwdriver magnetic tip recommended Phillips head screwdriver magnetic tip recommended Wrench or pliers Ladder height dependent upon installation site CheckingYourFanParts Carefully unpack your fan to avoid damage to the fan parts Refer to the included Parts Guide Check for any shipping damage to th...

Page 7: ...all four isolators are in place and were not removed during shipment 2 3 Place a flat washer on each of the two 3 wood screws 2 4 Thread the supply wires from the outlet box in the ceiling through the hole in the center of the ceiling plate 2 5 Align the slotted holes in the ceiling plate with the pilot holes you drilled in the wood support structure For proper alignment use slotted holes directly...

Page 8: ...through the canopy and canopy trim ring Feed the wires from the fan through the downrod on one side of the pin in the ball 3 7 Loosen the square head setscrew on the adapter to install the pipe and ball assembly Note When the pipe and ball assembly is fully installed 2 3 threads on the pipe will still be visible this is normal Securely retighten the setscrew with a wrench or pliers CAUTION The ada...

Page 9: ...ough the downrod on one side of the pin in the ball 4 3 Loosen the square head setscrew on the adapter to install the pipe and ball assembly Note When the pipe and ball assembly is fully installed 2 3 threads on the pipe will still be visible this is normal Securely retighten the setscrew with a wrench or pliers CAUTION The adapter has a special coating on the threads Do not remove this coating th...

Page 10: ...nd wire grounding from the fan 5 4 Connect the white wire grounded from the ceiling to the white wire grounded from the fan 5 5 Connect the remaining wires as follows Dual Switch Wiring The black wire ungrounded from the ceiling to the black wire ungrounded from the fan The black wire with a white stripe ungrounded from the fan to the wire ungrounded for the wall switch Single Switch Wiring The bl...

Page 11: ...nstall two canopy screws into the holes opposite the ceiling plate tabs 6 4 Partially install a canopy screw between the slots in the canopy When all the holes are properly aligned securely tighten all three canopy screws 6 5 Verify that the tabs in the canopy are still in the grooves of the hanger ball 6 6 Align the tabs on the trim ring opposite the grooves in the hanger ball Using both hands pu...

Page 12: ...s 7 2 and 7 3 for the remaining two blades Grommet Threaded Hole Hole in Blade Hole in Blade Blade Assembly Screw Blade Assembly Screw Note The blades on this fan have been treated with Hunter s Dust Armor protection making the blades less likely to attract dust and dirt Use a dry or slightly damp lint free cloth to clean the blades Do not use a furniture polish or any other cleaners that leave an...

Page 13: ...ED light fixture by plugging the two single molex plug connectors together 8 2 Attach the LED light fixture to the bottom of the switch housing with the four housing assembly screws 8 3 Align the tabs in the glass bowl with the grooves on the bottom of the fan Turn the glass bowl clockwise until it locks into place Housing Assembly Screw Step 8 3 Tab Groove Step 8 1 8 Completing Your Installation ...

Page 14: ...with the light pendant attached to the chain on the right side of the Hunter logo on the body of the fan Attach the pull chain with the fan pendant to the chain on the left side of the Hunter logo CAUTION Make sure the light fixture is securely attached to the switch housing Failure to properly attach and tighten all four assembly screws could result in the switch housing and light fixture falling...

Page 15: ...t The pull chain has two settings On and Off 9 4 Ceiling fans work best by blowing air downward counterclockwise blade rotation in warm weather to cool the room with a direct breeze In winter having the fan draw air upward clockwise blade rotation will distribute the warmer air trapped at the ceiling around the room without causing a draft 9 5 The blades on this fan have been treated with Hunter s...

Page 16: ...ancing kit and instructions to balance the fan 2 Tighten all blade iron screws 3 Turn power off support fan very carefully and check that the hanger ball is properly seated Problem Lights shut off suddenly but fan is still operating 1 Check to make sure the wattage and type of the light bulbs that are installed meet the specifications on the light socket 2 Turn the power to the fan off at the wall...

Reviews: