background image

How To Operate Your Vehicle

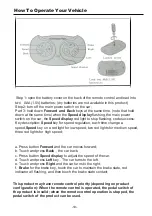
Step 1: open the battery cover on the back of the remote control and load into  

two   AAA(1.5V) batteries; (dry batteries are not available in this product)

Step 2: turn off the main power switch on the car;

Part 3: hold down 

Forward  and Back

 keys at the same time, (note that hold 

down at the same time) when the 

Speed display 

flashing, the main power 

switch on the car, the 

Speed display

 red light to stop flashing, code success;

Key description:

 Speed 

key for speed regulation, each time change a 

speed,

Speed

 key on a red light for low speed, two red lights for medium speed, 

three red lights for high speed;

a. Press button 

Forward

 and the car moves forward;

b. Touch and press 

Back

  , the car back;

c. Press button 

Speed display 

to adjust the speed of the car.

d. Touch and press

 Left 

key . The car turns to the left.

e. Touch and press 

Right

 and the car turns to the right;

f.

Brake 

for the brake key, touch the car to maintain the brake state, red

indicator all flashing, and then touch the brake state contact;

This product may have remote control priority (depending on product 

configuration): When the remote control is operated, the pedal switch of 

the product is invalid; when the remote control operation is stopped, the 

pedal switch of the product can be used.      

-

10

-

Summary of Contents for BBH-1588

Page 1: ...required 5 Warning Protective equipment should be worn 6 This toy has no brake 7 8 This toy contains batteries that are non replaceable This toy is unsuitable for children under 3 years due to its ma...

Page 2: ...rning sun DC 12V 4 5 AH 1 Input 100 240V 50 60Hz 0 2A 3 years Under 30Kg PP Suitable age Load Capacity Material Charger Battery Optimum Temperature Charging time Fuse Output 15V 500mA 8 12 hours at mo...

Page 3: ...2 Rearvie w mirror 2 2 Placed vehicle body Charger 1 Left Right M5 Nut MP3 Line 1 M4X12 M4X16 screw 4 Stuck on the wheel Installe d on the car body 2 2 14...

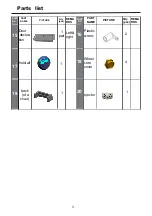
Page 4: ...T NAME PICTURE Qty pcs REMA RKS PART NAME PICTURE Qty pcs REMA RKS PART NO PART ON 15 16 17 18 19 20 Plastic wrenc h 2 Door decora tion hold all 1 pair Left right Wheel core cover 4 1 1 back of a chai...

Page 5: ...4...

Page 6: ...ore cover Turn the car upside down Load a 12 gasket on the front axle Load a front wheel on the front axle Load a 10 gasket on the rear shaft Tighten 8 nuts with a plastic wrench Add a plastic core co...

Page 7: ...hair Place the backrest clip on the car body and fix it with 2pcs M4X12mm screws Place the seat on the car body and fix it with 2pcs M4X12mm screws Remarks Dock the docking plug before installing the...

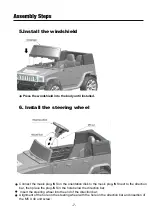
Page 8: ...plug INS on the orientation disk to the music plug INS next to the direction bar then place the plug INS in the hole below the direction bar Insert the steering wheel into the end of the direction ba...

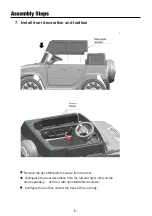
Page 9: ...toolbox Remove the 3pcs M4X20mm screws from the door Distinguish the door decoration from the left and right clip it on the door separately and fix it with 3pcs M4X20mm screws Configure the tool box...

Page 10: ...eries can not be recharged Batteries can only be recharged under adult supervision Rechargeable batteries should be removed from toys before charging Different types of batteries or old and new batter...

Page 11: ...red light for low speed two red lights for medium speed three red lights for high speed a Press button Forward and the car moves forward b Touch and press Back the car back c Press button Speed displ...

Page 12: ...11 30...

Page 13: ...12 USB player powre switch foot pedal Forward and backward switch...

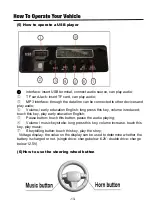
Page 14: ...his key volume is reduced touch this key play early education English Pause button touch this button pause the audio playing Volume music keystroke long press this key volume increase touch this key p...

Page 15: ...6A Battery 12V Motor D Power Switch Pedal Switch Forward Reverse Switch Charging Socket 14...

Page 16: ...15...

Page 17: ...16...

Page 18: ...17...

Page 19: ...18...

Reviews: