background image

3


Chapter


I


Introduction


1.1


Highlights


of


your


new


Pan/Tilt


IP


Camera


Congratulates


on


purchasing


this


high

resolution


3Mega


pixels


Pan/Tilt


IP


Camera!


This


IP


Camera


provides


3Mega


pixels


high

resolution


video


quality,


with


the


advanced


megapixel


lens,


you


can


view


images


remotely


in


more


detail


than


conventional


close

circuit


cameras.


Other


highlights


of


this


Pan/Tilt


IP


Camera


include:


Ultra

high


resolution


5Mega


pixel


CMOS


image


sensor.


Full


Pan


/


Tilt


Control.


Digital


input


/


output


interface


lets


you


connect


peripherals


such


as


external


alarm,


sensor,


etc.


Audio


input


/


output


interface,


you


can


listen


to


voices


in


remote


place,


and


speak


to


person


in


remote


place.


Built

in


SD

card


slot


for


local


storage,


which


can


act


like


a


stand

alone


DVR.


Two


Way


audio.


3GPP


Mobile


Surveillance


Supported.


ONVIF


Compliant.


Support


IEEE802.3af


Power


over


Ethernet


(PoE)


standard.


Summary of Contents for HTP-T3MPT

Page 1: ...3 MP Pan Tilt PoE IP Camera User Manual Release 17 March 2012...

Page 2: ...face 15 2 1 Locate the IP address of Network Pan Tilt IP Camera 15 2 2 Connect to IP Camera s Web User Interface and Install ActiveX Plugin 17 2 3 Viewing Live Video 21 2 4 Client Settings 24 Chapter...

Page 3: ...2 3 9 Event 51 3 9 1 Settings 52 3 9 2 Media 54 3 9 3 Event Server 55 3 10 Recording to SD Card 60 3 11 Log 61 3 12 Device Info 62 3 13 Maintenance 63 3 14 Language 65 Chapter IV Troubleshooting 66...

Page 4: ...cameras Other highlights of this Pan Tilt IP Camera include Ultra high resolution 5Mega pixel CMOS image sensor Full Pan Tilt Control Digital input output interface lets you connect peripherals such a...

Page 5: ...IP Camera into your body Make sure lens set is secured when you re using this IP Camera lens set may fall down if it s not properly secured and cause damage to human and itself If you want to use thi...

Page 6: ...twork Pan Tilt IP Camera when you unpack the package If any item is missing please contact your dealer of purchase for help Item No Description Quantity 1 Network Pan Tilt IP Camera 1 2 DC power adapt...

Page 7: ...ocus ring If the image looks fuzzy try to turn this focus ring clockwise or counter clockwise to adjust focus until the image looks clear 4 Microphone Receives voice 5 LED indicators There are 2 LED l...

Page 8: ...don t want other people to know the operation status of this IP camera Back Item Description 1 Audio out Connects to external audio amplifier to output voice Use 3 5mm audio cable 2 DC12V Connect to...

Page 9: ...WERED CABLE 5 ETHERNET PoE support Connect to your local area network by Ethernet cable Getting power from this Ethernet port if this device connects to PoE switch 6 SD card slot Inserts SD card for v...

Page 10: ...setup your new IP camera Please note If you wish to place this IP camera on the table please skip step 1 to 5 1 Secure the wall mounting metal plate A on the wall secure it by 4 screws at the screw h...

Page 11: ...10 2 Insert wall mounting metal plate B into the slot at the bottom of this IP camera by the direction indicated by black arrow 3 Secure wall mounting metal plate B by 2 screws...

Page 12: ...unting metal plate B installed into wall mounting metal plate A which is already secured on the wall 5 Secure the IP camera on the wall by securing wall mounting metal plate A and B together by screw...

Page 13: ...al plate A as indicated by the picture below 6 Insert Ethernet cable to the Ethernet port of this IP camera If the other terminal of the cable is connected to a PoE switch then the device will get pow...

Page 14: ...13 7 Insert DI DO signal cable s into DI DO port of this IP camera If you don t have DI DO accessories you can skip this step...

Page 15: ...V port of this IP camera The LED lights should light up after few seconds and the IP camera will test its Pan Tilt motor within 1 minute Do not disturb IP camera at this stage Please refer to followin...

Page 16: ...twork to obtain an IP address automatically by default So you can check your DHCP server s IP address lease table to find the IP address of IP Camera You can also use the utility named IPFinder exe to...

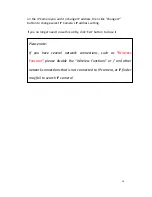
Page 17: ...dress setting If you no longer need to use this utility click Exit button to close it Please note If you have several network connections such as Wireless Function please disable the Wireless Function...

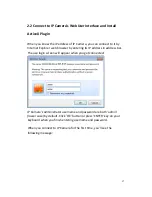
Page 18: ...wser by entering its IP address in address bar The use login screen will appear when you get connected IP Camera s administrator username and password are both admin lower case by default Click OK but...

Page 19: ...ore you can see the video from IP Camera For IE 8 and earlier version Right click the indication bar and click Install This Add on for All Users on This Computer to install ActiveX plugin For IE 9 Cli...

Page 20: ...e features of this program Click Allow access or IP Camera will not be able to function properly When you re installing Internet Explorer plugin you may also be prompted that if you want to allow chan...

Page 21: ...should be able to see the video stream from camera NOTE If this is the first time you use this IP Camera you can jump to chapter 2 4 for instructions on Setup Wizard which will guide you to complete...

Page 22: ...isible in all setup pages of IP camera and you can go back to live video view by clicking this button when you re in other page Stream Select video stream type H 264 or MJPEG H 264 required less netwo...

Page 23: ...w switch to fit screen and image size will adjust automatically Connect button Start live video view Disconnect button Stop live video view Snapshot button Take a snapshot or camera video and save ima...

Page 24: ...ic objects in video view please use optical zoom ring on lens set of IP camera Enable Disable mute button When mute is enabled you will not hear the voice from IP camera If you want to hear voice from...

Page 25: ...s In Client Settings menu you configure basic IP camera settings like data transfer protocol and data storage folder To access Client Settings menu click Client Settings button on the left The followi...

Page 26: ...eo Click Browse button and you ll be prompted to select a folder Prefix When saving video files the characters you typed in Prefix field will be used as leading characters of video file s name For exa...

Page 27: ...camera s settings you can access IP camera s Configuration menu which provides various kinds of system setting To access configuration menu click Configuration button on the left The Configuration su...

Page 28: ...will help you to identify this IP camera You can use IP camera s installation location as host name and this will help you to identify IP camera when you have many IP cameras installed Indicator LED...

Page 29: ...elect this item and IP camera will use your computer s time as its time Synchronize with NTP Server Select this item and IP camera will keep its date and time setting synchronized with specified time...

Page 30: ...Can view IP camera s video and make changes of camera setting User Can view IP camera s video and see settings but can t make any change Guest Can view IP camera s video only There can be multiple use...

Page 31: ...ed Account List Here lists all users existed in IP camera If you want to remove one user click it in the list and then click Remove button If no user is existed New Account message will be shown here...

Page 32: ...ere 3 3 1 General Setup Page Setup IP address for this IP camera This IP camera supports both IPv4 and IPv6 IP address Here are the descriptions of every setup item Item Description LAN Select this op...

Page 33: ...put DNS server s IP address Secondary DNS Input backup DNS server s IP address you can leave this field blank You can leave this field blank if you only wish to use IPv4 or IPv6 IP address Enable UPnP...

Page 34: ...corresponding settings in external network devices NVR or CMS software so they can receive this IP camera s video RTP Data Port Input RTP data port number here When you finish with above settings cli...

Page 35: ...ou have Bonjour installed you can use it to discover this IP camera QoS Enable QoS to improve the data transfer priority of this IP camera Your local area network must support QoS You can select Video...

Page 36: ...Enable HTTPS box to enable HTTPS channel to encrypt transferred data You can also define HTTPS port number in HTTPS Port field if you don t want to use default value 443 When you finish click Apply t...

Page 37: ...kers Here are the descriptions of every setup item Item Description Enable Filter Check this box to enable IP address filter uncheck this Box to disable this function Accepted IP list Here lists all I...

Page 38: ...uild connections to this IP camera If you want to remove a set of IP address from the list click on the IP address and click Remove button IP Address Accepted IP list Input the starting and ending IP...

Page 39: ...You can adjust the image of the IP camera in this menu There are 3 sub menus in this menu Image Setting Video Setting and Overlay which can be accessed by tabs on the top Image Setting Video Setting...

Page 40: ...all above values to default value 128 Mirror Check Vertical or Horizontal box to flip the image vertically or horizontally this will help to correct the orientation of image when IP camera is hanged...

Page 41: ...40 changes...

Page 42: ...e descriptions of every setup item Item Description H 264 MPEG4 Select the compression of main stream H 264 MPEG4 Video Resolution Select video resolution H 264 2048x1536 QXGA 1920x1080 1080p 1280x960...

Page 43: ...4 When network speed is insufficient select a lower frame rate will help Rate Control Select video bit rate You can control bit rate by both Video quality and Bitrate Video quality There are 5 levels...

Page 44: ...e stamp s background color You may find this will help the readability of time stamp text in some cases Enable Text Display Check this box to display certain text on video this will help when you need...

Page 45: ...owse button to pick a picture on your computer then click Update button to use the picture Please note that there are certain restrictions Select bmp jpg jpeg image files only Image s resolution shoul...

Page 46: ...e Gain If the voice received by microphone is too loud or silent you can use this function to improve voice volume so you can hear voice from IP camera more clearly Select 0 dB and IP camera will do n...

Page 47: ...to 3 motion detection areas Here are the descriptions of every setup item Item Description Enable Motion Detection Check this box to enable motion detection Enable Window 1 to Window 3 Check this box...

Page 48: ...s title text so you can identify it Please note that you have to click Apply button and the text will change Percentage Select the percentage of pixel change that will trigger motion detection alert...

Page 49: ...48 3 8 PTZ Control In this page you can setup PTZ Control settings like auto pan tilt control and patrol...

Page 50: ...faster Tilt speed Adjust the tilt speed It should be an integer between 1 slower to 10 faster Set home Click this button to set current position as home position Calibration To calibration its directi...

Page 51: ...k GO Preset button to move camera to preset point or click Remove to clear this preset point setting Patrol Setting When you have 2 or more preset points you can make camera to move between these poin...

Page 52: ...l or trigger digital output to activate external alarm There are three setup pages 1 Setting Define a new event and manage events 2 Media Define what kind of media file should be saved on designate me...

Page 53: ...1 Settings This page lists all existing events You can click Modify button to edit an existing event or Remove to delete an existing event To create a new even just click New button to add an Event s...

Page 54: ...me is reached You also have to check weekday box and select time from dropdown list If you select Always as time this event will be activated during all the day Enable FTP Check this box and IP camera...

Page 55: ...length before and or after the time when event is triggered in Pre Event and Post Event For example if you set Pre Event to 10 and Post Event to 5 and an event is triggered at 14 10 30 then the video...

Page 56: ...e A Samba server can be any computer running windows operating system with network neighbor function enabled Many stand alone network file server also support samba server function Here are the descri...

Page 57: ...ere you want to save file on FTP server like upload record If you want to save file on this FTP user s home directory you can leave this field blank Enable Passive Mode Check this box to force IP came...

Page 58: ...u to identify the Email sent by this IP camera and may help when you have anti spam software installed you can set this Email address to White List in your anti spam software Receiver 1 Email Address...

Page 59: ...d STARTTLS If your Email server required STARTTLS encryption check this box Please note that some Email server uses different port number than standard port 25 when STARTTLS encryption is used Test SM...

Page 60: ...n to test Samba server settings above immediately Tips Some samba server does not have username and password check you can just input samba server address and path to access the file storage space Whe...

Page 61: ...em Item Description Enable External storage Recording Check this box to record video on SD card Maximum Size of Each File Input the maximum size of every video file from 1MB to 50MB IP camera will sta...

Page 62: ...k the usage log of IP camera here In this page you can click 1 First page Final page Jump to first final page of log 2 Previous Next Jump to previous or next page of log 3 Remove Clear log You ll be p...

Page 63: ...Info You can check the information and network settings of this IP camera These information are very useful when you need to repair or fix the problem of this IP camera An example of device info page...

Page 64: ...his function is useful when you find IP camera is not working properly Reset Clear all settings of IP camera and reset to factory default setting Backup Backup IP camera s setting and save it on your...

Page 65: ...o select a file on your computer first then click Restore button Restore from SD card device Restore IP camera s configuration which is previously saved on SD card Upgrade Upgrade IP camera s firmware...

Page 66: ...65 3 14 Language You can change the display language of web interface Click Language button and select one language More languages may available in latest firmware file...

Page 67: ...ease make sure power cable is correctly connected to IP Camera 4 Please make sure IP Camera is switched on the LED lights on IP Camera will light up No IP Camera found 1 Auto search function only work...

Reviews: