Hunt Electronic HVR-08 Installation Manual Download Page 51


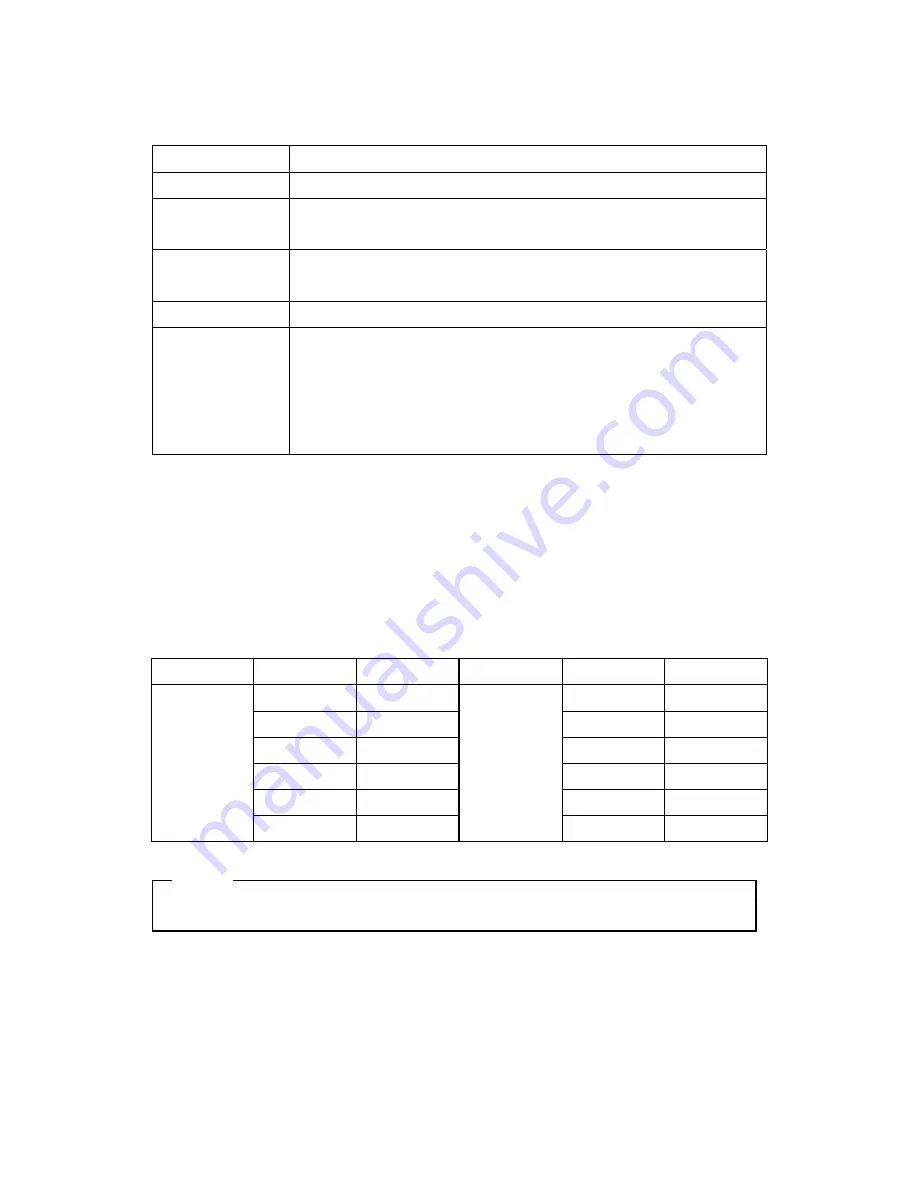
(3) HDD Managing Command 

Format 

Format as HVR-08’s file system. Not available to PC file system. 

Add 

Add HDD for recording. Need to format. 

Add Used 

Add a HDD that has been used and formatted. There is no need to reformat. It is 

possble only when HDD is added as Primary Disk. 

Remove 

Remove current HDD. HDD can be reused without data loss by the ‘Add Used’ 

command. 

Confirm Removed 

Used when a removed HDD is still listed. ALL DATA WILL BE LOST! 

FAT32 Format 

: Use when connect to the external HDD 

Format the partition of below 250GB to copy/backup by FAT32 file system. 

 It is necessary to create partition by using Disk manager on PC for this work. 

 In case the size is over 250GB, format each partition by FAT32 file system after 

creating multiple partitions smaller than 250GB. 


#1.2. Installing  HDD 


Compatible HDD 

It is recommended to use the following HDD models with the HVR-08. If a non-recommended HDD is 

used, HUNT ELECTRONIC Inc. will not guarantee the warranty. 


Manufacturer : MAXTOR


Series Model 

No. 

Size  Series Model 

No. 

Size 

6Y060L0 60GB 

4R060L0 60GB 

6Y080L(P)0 80GB 

4R080L0 

80GB 

6Y120L(P)0 120GB 

4R120L0 

120GB 

6Y160L(P)0 160GB 

4R160L0 

160GB 

6Y200P0 200GB 


DiamondMax 

Plus 9 

(7200rpm) 

DiamondMax 

16 

(5400rpm) 

6Y250P0 250GB 


<Note> 


L series of DiamondMax Plus 9 has 2MB buffer memory, while P model has 8MB


51


Summary of Contents for HVR-08

Page 1: ...HVR 08 Installation Guide v 3 1 ...

Page 2: ...t occur in a particular installation If this equipment does cause harmful interference to radio or television reception which can be determined by turning the equipment off and on the user is encouraged to try to correct the interference by one or more of the following measures Reorient or relocate the receiving antenna Increase the separation between the equipment and receiver Connect the equipme...

Page 3: ... 4 Be careful not to drop the HVR 08 Physical shocks may harm the product In addition be sure the HVR 08 is secured after installation 5 HVR 08 is made of metal Therefore you can hurt human beings if yu throw it to them or hit on them When installing HVR 08 be cautious to locate on safe places where children are unreachable 6 If HVR 08 does not operate properly please contact the closest HUNT ELEC...

Page 4: ...ontroller 18 6 1 Setting remote control DIP switch 18 6 2 Setting ID of HVR 08 18 6 3 Selecting HVR 08 19 6 4 Operable range of remote controller 19 6 5 Loading the batteries into remote controller 20 7 HVR 08 configuration 21 7 1 Basic configuration 21 7 2 Advanced configuration 21 7 3 External storage Backup configuration 22 7 4 Internet Intranet configuration 22 8 HVR 08 basic setting 23 8 1 Vi...

Page 5: ...y out 31 11 Connecting external device with serial port 32 11 1 Connecting text Input device ATM POS Access control 32 12 Connecting configuring serial ports for Pan Tilt Zoom 33 12 1 Connecting serial port 33 12 1 1 Connecting RS232 33 12 1 2 Connecting RS485 33 12 1 3 Connecting RS422 33 12 2 Configuring serial port 34 13 Connecting USB device 36 14 Connecting eternal sorage 38 14 1 IEEE1394 prt...

Page 6: ...ager 43 16 3 Uninstalling DVR manager 45 16 4 Configstation 46 16 5 Monitor 46 16 6 Playback 47 APPENDIX 48 1 HDD 49 1 1 Fundamental notions terms 49 1 2 Installing HDD 51 1 3 Replacing HDD 62 1 4 Keeping data 63 1 5 Caution in using HDD 64 2 Using CD ROM 65 3 Specification 66 6 ...

Page 7: ...ity IEEE 1394 for external HDD ATM POS transaction information text recording and search with corresponding video 4 pairs of sensor inputs and alarm outputs Built in hardware motion detection with search function 64 division comparison Various efficient back up methods IEEE 1394 FiWi Ethernet PTZ Control Preset support via RS 232 and RS 485 RS422 User friendly 32bit True colored Graphic OSD Menu D...

Page 8: ...ccessories Unpack and check all the items as below 1 HVR 08 1 2 DC Power Supply 1 110V 220V 3 AC Power Cord 1 4 CD ROM Including DVR manager 1 5 Remote Controller 1 6 Guide 2 7 Plug Bracket 1 8 HDD Fixing Screw 8 8 ...

Page 9: ...3 Description Function HVR 08 front 1 LED 2 IEEE1394 connecter 3 Remote controller receiver 4 USB connecter 5 Function buttons 6 Bracket fixing hole for rack mount 9 ...

Page 10: ...output 11 RS232 connecter 9Pin D Sub 12 Terminal block for RS232 422 485 13 Terminal block for Sensor input 14 Terminal block for Relay output 15 Video output for MONITOR or VCR 16 Video input type impedance select remote controller switch 17 IEEE1394 connecter 18 USB connecter 19 Power connector DC12V 20 GND 10 ...

Page 11: ...with BNC cable as shown below Note The video type for all channels should be either NTSC or PAL NTSC is the standard used in North America 4 2 Connecting monitor 1 Connect CCTV monitor to HVR 08 with BNC cable as shown below Note HVR 08 has two video output ports for Monitor and VCR The output signals from the two ports are same and either port may be used 11 ...

Page 12: ...4 3 Connecting audio 1 Connect audio signal to HVR 08 12 ...

Page 13: ...4 4 Supplying power 1 Connect power cable to HVR 08 2 Turn on the power switch located on the HVR 08 rear panel 13 ...

Page 14: ...e Use the plug bracket to secure the power cable if needed Note To connect EARTH refer to the following picture 5 Running OSD menu 5 1 Using menu Press the MENU button to open the OSD Configuration Menu 14 ...

Page 15: ... To move to the setting page press the ENTER button To exit the setting page press the EXIT button 3 Setting Page The selected item is shown in gray To move within each page use the or arrow buttons Press the ENTER button to change the value of a setting When the setting value is a word a dialogue box to edit the word will open When setting value is a number it should be set with using the or arro...

Page 16: ...er of horizontal vertical For example in order to select C press 3 and 2 buttons 2 Using arrow button Select a value using the or buttons The intersection of the horizontal and vertical bar is selected value Press the button to confirm the selected value 16 ...

Page 17: ... 3 Function word The following symbols are for executing specific functions 9 1 2 1 Enter Back Space delete Space Move to left Move to right Previous Code Page Next Code Page 17 ...

Page 18: ...IP switch Set the remote control DIP switch to ON 6 2 Setting ID of HVR 08 When controlling several HVR 08s with one remote controller set Remote Control ID as follows 1 Press the MENU button 2 Select System with using button and press the ENETR or button 18 ...

Page 19: ...nitor mode Note Remote Control ID Up to 16 HVR 08s can be controlled with a single remote controller 6 3 Selecting HVR 08 If several HVR 08s are set with unique ID numbers they can be controlled with one remote controller To select a specific HVR 08 press the ID button of remote controller until the 8 LEDs on the front of the HVR 08 light up and a buzzer sounds Note Because remote controller ID is...

Page 20: ...emote controller Remote controller requires two AAA type batteries 1 Remove the battery cover 2 Taking care that the poles are correctly positioned 3 Replace the battery cover Note Batteries are not included as a packing accessory 20 ...

Page 21: ...7 HVR 08 configuration 7 1 Basic configuration 7 2 Advanced configuration 21 ...

Page 22: ...7 3 External storage Backup configuration 7 4 Internet Intranet configuration 22 ...

Page 23: ...8 HVR 08 basic setting 8 1 Viewing image After initial start up images from Ch 1 4 are displayed in a quad split screen Note If user password is set a prompt for entering the password will appear 23 ...

Page 24: ...when finished 8 2 2 Daylight saving 1 Daylight Saving Time is only activated for time zones that use Daylight Savings If activated press ENTER to enter a new value 2 Select On Off using the button and press the EXIT button when finished 8 2 3 Sync with NTP In order to synchronize time with NTP Network Time Protocol server select On 1 Select Sync with NTP using the or the buttons and press ENTER bu...

Page 25: ...e using the or the buttons and press ENTER 2 Select HH MM using the buttons and select the value using the buttons 3 Press the EXIT button when finished 8 2 7 Apply Date Time Most setting values are applied automatically when exiting from the related menu page But Date Time settings are not applied automatically because they may critically affect the file system of the recorded HDD To apply Date T...

Page 26: ...nu by pressing ENTER or the button 3 Select Recording using the buttons and press the ENTER button 8 3 1 Configuration status Displays the recording configuration status When setting up through the Quick Setup menu Quick Setup will be shown When setting up through Normal Rec or Alarm Rec Custom Setup will be shown Note Only when all the 16 channels normal recording conditions are set through Macro...

Page 27: ...ed ips When Recording Speed Quality is set as Custom values can be set manually 1 Select Speed using buttons and press the ENTER button 2 Select a value using the button Press the EXIT button when finished 8 3 5 Quality When Recording Speed Quality is set as Custom values can be set manually 1 Select Quality using buttons and press the ENTER button 2 Select a value using the button Press the EXIT ...

Page 28: ...sor input To connect a sensor to S1 fix the wire to S1 and G If you connect wire please refer to the 34Page Note Devices connected to the sensor input should have Dry contact The following diagram is of an electric circuit with approximately 12mA flows 28 ...

Page 29: ...elect the sensor number S1 S2 etc and press the Enter button to configure Use the buttons to select On or Off Press EXIT when finished 3 When activated the Pre Post Alarm function will cause the HVR 08 to record images at the specified Speed and Quality for a length of time before and or after the sensor is triggered 29 ...

Page 30: ... has total four ports of Relay Out To connect a device to O1 connect the wires to two O1 s Note The rated voltage and current of Relay Out are as follows Do not exceed the rated values 24V DC 1 25A 30W 125V DC 0 24A 30W Maximum Switching Capacity 125V AC 0 5A 62 5VA 30 ...

Page 31: ...h motion detection for each of the four time schedules Weekday Day Weekday Night Weekend Day Weekend Night Relays can also be controlled locally by pressing the SEARCH RELAY button followed by the relay number 1 4 Relays can also be controlled remotely through the HVR 08 Manager S W 31 ...

Page 32: ...rt Connect RS232 to 9pin D sub of HVR 08 and configure the Text sub menu under the System tab Set Serial Setup under the System menu tab to RS232 and Device to Text The baud rate may differ for each device consult the device manual for more information Note Before installing any external device consult with the local HUNT ELECTRONIC distributor Some external devices may not be compatible with the ...

Page 33: ...ntrolled using the Transparent Protocol For a list of supported protocols refer to the list on the OSD Configuration menu 12 1 1 Connecting RS232 Fix the wire to 1 3 pins RX TX GND Please refer to the Page 34 12 1 2 Connecting RS485 Fix the wire to 4 5 pins and 8 pin R R GND Please refer to the Page 34 12 1 3 Connecting RS422 Fix the wire to 4 8 pins R R T T GND Please refer to the Page 34 33 ...

Page 34: ... and available modes at System Serial Setup After completing serial setup cofigure base address and port for each channel under the Camera menu tab When connecting PTZ devices to several cameras be sure the base address matches the address for the camera 34 ...

Page 35: ...al block follow the instructions below Note the different types of wire that can be used Stranded Wire Peel off the wiring cover 8 10mm and solder it Wire gage should be AWG 22 26 Solid Wire Peel off the wiring cover 8 10mm and solder it Wire gage should be AWG 20 26 35 ...

Page 36: ...ting USB device do not exceed the rated values of USB device USB Spec Ver 1 1 Max 12M bps Available Device USB Memory Stick Output Voltage Current Max 200mA per DC 5V Port Note The disk should be formatted with FAT32 type If properly connected the disk is recognized automatically as in the following picture To copy images the process is as follows Set copy range up to 1 minute Æ Select drive Æ Cop...

Page 37: ... Note USB Flash products that require a Windows program to operate may not be recognized by the HVR 08 37 ...

Page 38: ...tor 14 2 Connecting IEEE1394 Device When using FireWire supported external HDD hard drive bays can be connected to 1 port in the front panel or 1 port in the rear panel The HVR 08 does not supply power to the hard drive bay therefore only bays that use external power can be used Note HVR 08 detects external HDD even though HVR 08 runs If not it is recommended to connect as follows 1 Power off HVR ...

Page 39: ... 60GB 6Y080L P 0 80GB 4R080L0 80GB 6Y120L P 0 120GB 4R120L0 120GB 6Y160L P 0 160GB 4R160L0 160GB 6Y200P0 200GB DiamondMax Plus 9 7200rpm DiamondMax 16 5400rpm 6Y250P0 250GB Note Buffer for DiamondMax Plus 9 s model L is 3MB for model P the buffer is 8MB 14 4 Registering Formatting HDD Disk Manager will automatically run on start up after installing a HDD If Disk Manager does not automatically run ...

Page 40: ... Add using button and press EXIT button 5 Select Apply using button and press EXIT button The HDD status is changed to 6 Select Action using button and press EXIT button 7 Select Format using button and press EXIT button 8 Select Apply using button and press EXIT button The HDD status is changed to R after formatting 9 Shut down Disk Manager by pressing EXIT button 40 ...

Page 41: ...necting Ethernet 1 Turn off HVR 08 s power switch 2 Connect HVR 08 to hub with Ethernet cable 3 Turn on HVR 08 s power switch Note 1 Supply power to HVR 08 after connecting Ethernet cable to protect against electrical damage to HVR 08 2 Check cable connection status 3 Check LED on HVR 08 s rear panel after supplying power 41 ...

Page 42: ... and press ENTER 4 Select IP Addr using the buttons and press ENTER 5 Press EXIT button after entering IP address in the dialogue box 6 Select Net Mask using the buttons and press ENTER 7 Press EXIT button after entering Net Mask in the dialogue box 8 Select Gateway using the buttons and press ENTER 9 Press EXIT button after entering Gateway in the dialogue box 10 Select DNS using the buttons and ...

Page 43: ...4 XP SP2 above Windows 2000 SP4 XP SP2 above Resolution 1024 X 768 pixels or above 1024 X 768 pixels or above Network 100 Base TX Fast Ethernet 100 Base TX Fast Ethernet 16 2 Installing DVR manager 1 Insert Setup CD ROM into CD ROM drive of administrator s PC 2 Doubleclick the DVR manager setup file Install Shield Wizard will be automatically installed 3 Slect Lnaguage and Click OK button 4 Click ...

Page 44: ... Select which 4 components to install and press the Next button 6 Browse and choose a directory if the default directory is not preferred Click the Install button after selecting a directory to install 44 ...

Page 45: ...n after DVR manager program is installed successfully 16 3 Uninstalling DVR manager 1 Click Windows Start Button 2 Select and Click Uninstall icon to run Uninstall Shield 3 DVR manager program will be automatically deleted 45 ...

Page 46: ...16 4 Configstation Click icon on desktop to run DVR manager Configstation program 16 5 Monitor Click the related icon and run the DVR manager Monitor program 46 ...

Page 47: ...16 6 Playback Click the related icon and run the DVR manager Playback program 47 ...

Page 48: ...APPENDIX APPENDIX 48 ...

Page 49: ...nnel can be connected to two devices Master Slave HDD CD ROM However HVR 08 supports 1 channel interface internally and total two HDDs In order to prevent confusing VFS2 s Primary Disk we will not use the terms Primary Secondary 4 Primary disk is composed of log partition normal partition and alarm partition and auxillary disk is composed of only normal partition So if primary disk has some proble...

Page 50: ...Manager R Available of recording V Connected and formatted as HVR 08 s file system If using Add used command it will be changed to R There is no need to reformat F Connected but not available file system After using Add need to format for making as R Connected and added using the ADD command If formatting it will be R If there is a disk of HVR will record nothing X HDD cable is not connected or ha...

Page 51: ...32 file system It is necessary to create partition by using Disk manager on PC for this work In case the size is over 250GB format each partition by FAT32 file system after creating multiple partitions smaller than 250GB 1 2 Installing HDD Compatible HDD It is recommended to use the following HDD models with the HVR 08 If a non recommended HDD is used HUNT ELECTRONIC Inc will not guarantee the war...

Page 52: ...ding or replacing HDD should follow below process 1 Turn off the power of HVR 08 2 Check whether the dip switches are set as illustrated below 3 Remove the 6 screws as illustrated below and pull up the cover from the rear part to open 52 ...

Page 53: ...single HDD Installing 2 HDDs Note Caution for HDD Management 1 Replacing SLAVE HDD of internal 2 HDDs causes permanent data loss in the SLAVE HDD 2 MASTER HDD has all the index of stored data including SLAVE HDD Corruption on MASTER HDD may cause total data loss Be careful when handling the main HDD 3 It is strongly recommended that all data within HDDs should be backed up before replacing 53 ...

Page 54: ... 6 Connect HDD power cable to main PCB ASS Y Secure the HDD with screws 7 Connect HDD cable s connector to HDD as in the following picture 8 Assemble the top cover 54 ...

Page 55: ... as F IntA Select it 3 Press the Apply button after selecting action as Add Then F is changed to 4 Press the Apply button after selecting action as Format and setting the size of alarm partition Then is changed to R Note Alarm partition can be set from 10 to 90 within the size of primary disk 4 Press the EXIT button to shut down Disk Manager If recording schedule is set HVR 08 will start recording...

Page 56: ... 5 Select a HDD for installing as auxiliary disk 6 Press the Apply button after selecting action as Add Then F is changed to 7 Select a primary disk and press the Apply button after selecting action as Format and setting the size of alarm partition Then is changed to R 8 Select an auxiliary disk and press the Apply button after selecting action as Format and setting the size of alarm partition The...

Page 57: ...EEE1394 HVR 08 supports upto 4TB storage Note 1 Some IEEE1394 ports may not be recognized by the HVR 08 Before purchasing consult the local HUNT ELECTRONIC distributor 2 External storage should use external power 3 For connection and setup of IEEE1394 please refer to the manual of related device Connect IEEE1394 interface cable as follows 57 ...

Page 58: ... 08 type will be indicated as V 3 Select a third HDD of F Ext Press the Apply button after selecting action as Add Then F is changed to 4 Select a fourth HDD of F Ext Press the Apply button after selecting action as Add Then F is changed to 5 Select a second HDD of Ext Press the Apply button after selecting action as Format Then is changed to R 6 Select a third HDD of Ext Press the Apply button af...

Page 59: ...ce 1 When external HDD RAID is connected to IEEE1394 port Disk Manager runs automatically If not run it manually in MenuÆUtilityÆDisk Manager 2 Select a second HDD of F Ext Press the Apply button after selecting action as Add Then F is changed to Note If connecting the device that is used in HVR 08 type will be indicated as V 3 Select a second HDD of Ext Press the Apply button after selecting acti...

Page 60: ... connecting the device that is used in HVR 08 type will be indicated as V 3 Select a second HDD of F Ext Press the Apply button after selecting action as Add Then F is changed to 4 Select a third HDD of F Ext Press the Apply button after selecting action as Add Then F is changed to 5 Select a fourth HDD of F Ext Press the Apply button after selecting action as Add Then F is changed to 6 Select a f...

Page 61: ...ilityÆDisk Manager 2 Select a first HDD of F Ext Press the Apply button after selecting action as Add Then F is changed to Note It is when ExtA is added as primary disk If connecting the device that is used in HVR 08 type will be indicated as V 3 Select a second HDD of F Ext Press the Apply button after selecting action as Add Then F is changed to 4 Select a first HDD of Ext Press the Apply button...

Page 62: ... playback range 2 When image searching per event is impossible 3 When recording is stopped and Disk Manager shows HDD type as X When primary disk is broken When primary disk is broken all of the connected HDD data can t be used So the broken HDD should be replaced and all connected HDDs should be reinstalled in Disk Manager Remove Add Format When auxiliary disk is broken The broken auxiliary disk ...

Page 63: ...et backup range and press the Start button after selecting backup HDD Note 1 Backup HDD should be formatted as FAT32 type 2 Backup data can be replayed with specific S W DVR manager or MiniPlayer 3 Backup data is made as re3 file If file size is over 2GB it may not be recognized normally 4 In course of backup Auto Delete function doesn t run If HDD is full recording ma be stopped instantly 5 For m...

Page 64: ...stead of internal HDD Namely connect only one external HDD and then keep it after data is full Note The preserved HDD s data is possible to replaying only when it is connected to HVR 08 1 5 Caution in using HDD For handling or guaranteeing HDD HUNT ELECTRONIC follows HDD guaranty condition HUNT ELECTRONIC doesn t bear the responsibility about data loss by user s mistake in operating 64 ...

Page 65: ...ogram Acrobat Reader Version 5 1 Preparation To read manual of CD ROM disc Adobe Acrobat 5 0 should be installed in client s PC Note If Adobe Acrobat Reader is not installed within client s PC use the Acrobat Reader program of CD ROM Reading manual of CD ROM Follow the steps to read user s guide 1 Insert the supplied CD ROM into CD ROM drive of PC 2 Open the user s guide PDF file 65 ...

Page 66: ...tem Image compression Differential Wavelet Technology 1 5KB Standard quality Average file size 5 Level Image quality level 20 1 500 1 Image compression rate 60 ips 50 ips NTSC PAL 7 5 ips 8ch or 30 ips 2ch Recording speed Network DVR manager Browser TCP IP ARP ICMP DHCP FTP PPPoE Protocol Connector 10 100Mbps Ethernet RJ 45 S W upgrade Firmware upgrade via Network Simultaneous users Monitoring Max...

Page 67: ...tion Operation humidity 93 below free of condensation Storage humidity Data Backup Expansion Copy IEEE1394 HDD expandable data backup VHS video output for VCR Analogue VCR Daily Weekly Monthly Backup reminder Data copy USB flash memory disk Input Output Video 1 Monitor output via BNC 1 Video output via BNC Audio 1 Input Line in 1 Vpp 20dB off 0 1 Vpp 1 Output Line out 1Vpp Level 7 8 16 Step record...

Page 68: ...tion or Sensor input Alarm data preservation Alarm triggered video data preservation Alarm log Log search Log monitoring via OSD Network Pre Post alarm Pre 1 10 seconds Post 1 60 seconds Schedule recording Daily Day Night Weekly Weekdays Weekends Conditions Normal Event POS ATM transaction information archived along with corresponding video data Text data recording English German French Italy Span...

Page 69: ...Mechanical 306 x 280 x 67 mm Dimension W x D x H 3 5Kg With one HDD Weight 69 ...

Page 70: ...70 ...

Page 71: ...Hunt Electronic USA 978 W 10th Street Azusa CA 91702 Tel 626 812 8868 Fax 626 812 8828 info huntcctv com www huntcctv com 71 ...

Reviews: