I-2
STEP 3: ASSEMBLE & MOUNT THE TRANSDUCER
1.
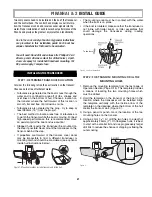
Attach the Transducer Body to the Bracket using the
hardware shown below.
2. Tighten the Pivot Bolt just enough so the transducer
can rotate, but remain in a place when released.
3. Apply silicone sealant into the drilled mounting holes.
4. Align the transducer with the mounting holes and
attach with Phillips screws provided.
5. Tighten the Mounting Screws just enough so the
transducer can move vertically, but remain in a place
when released.
Note:
A third mounting screw location is provided in the
mounting bracket. Drill and install this ONLY after final
testing and adjustments have been made.
STEP 4: ADJUST THE TRANSDUCER
Correct tr
ansducer height and running angle settings are
needed to ensure best performance at all boat speeds.
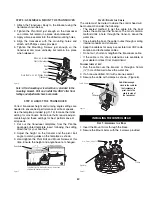
Use the template provided (pg. O-15) to make the initial
setting for most boats. Some boat hulls require adjust-
ments beyond these settings for best performance at
all speeds.
1. Cut out the transducer templates from the Piranha
package printed template insert following the cutting
directions for your boat hull.
2. Adjust the height on the transom and the pivot bolt
angle to match guides on the template as shown.
3. Hand tighten the Pivot Bolt and Mount Screws at this
time. Ensure the height and angle have not changed.
S
TEP
5: R
OUTE THE
C
ABLE
The cab
le must be routed to where the control head will
be mounted. Consider the following:
•
The easiest method to get the cable into the boat
routes the cable over the transom. The most common
method drills a hole through the transom, above the
water line.
•
Once inside the boat, the cable routes through or along
internal conduits and channels.
•
Keep the cable as far away as possible from VHF radio
antenna and tachometer cables.
•
Do not cut, shorten or lengthen the transducer cable.
•
If the cable is too short, extensions are available at
your dealer or direct from Humminbird.
F
OLLOW THESE STEPS
:
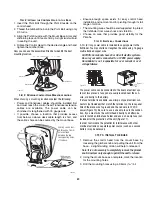
1.
Run the cable over the transom or through a 16mm
(
⁵⁄₈
") hole dr
illed well above the water line.
2. If a hole was drilled, fill it with silicone sealant.
3. Secure the cable with clamps as shown. (Figure 6).
INSTALLING THE CONTROL HEAD
S
TEP
1: A
SSEMBLE THE
B
ASE
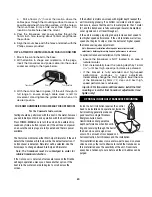
1.
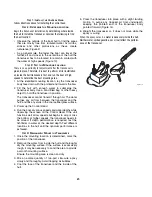
Insert the Mount Arms through the Base.
2. Secure the Mount Arms with the 4 screws provided.
Figure 4
Mounting Bracket
Star lock washers
Pivot
Nut
Cable
Pivot Bolt
¹⁄₄
-20,
#3 Phillips Drive
Transducer
Place on bottom of hull
Align with transom.
Cut and use for Fiberglass Hulls
Fiberglass
Aluminum
Tr
an
sd
uc
er
G
u
ide
Transducer bottom
Hull
Cut and use for Aluminum
Hulls
30mm
15mm
Figure 5
T
emplates supplied locating the transom bracket and
adjusting the transducer’s position.
Transducer
150mm
6"
Figure 6
Note:
Allow enough
slack in the cable for
the transducer to
pivot. Route the
cable to side of
the transducer.
Cable Clamps
Right
Arm
Arm Screws
, 4 #6 x
⁷⁄₁₆
"
Left
Arm
Figure 7

