


7/9
+XPD6FRSH
8VHU0DQXDO
5
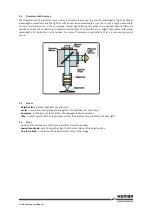
OPERATION
1. Screw the objectives into the threaded holes in the nosepiece in order of their magnification. Insert the oculars
into the inclined ocular tube.
2. Place a specimen slide on the stage. Adjust the stage so that the specimen is centred over the hole in the stage.
3. Using first the 10X objective, turn the coarse focussing knob to move the objective close to the specimen. Now
observe the image through ocular and turn the coarse focussing knob to lower the objective until the image
comes into approximate focus. Next, turn the fine focussing knob until the image is sharp. Thanks to the
instrument’s precise and reliable nosepiece, a clear focus is maintained even when switching objectives.
4. The specimen can also be observed by replacing the lower condenser with a plan-concave reflecting mirror.
6
STANDARD ACCESSORIES
ITEMS
CONTENTS
QUANTITY
1
Ocular WF10X, P16X
2PCS each
2
Objective 4X 10X 40X 100X
1PC each
3
Reflecting Mirror
1
4
Spare Lamp
1
5
Spare Fuse
1
6
Immersion Oil
1BOTTLE
7
User Manual
1
8
Blue Filter
1
9
Power Cable
1
10
Dust Cover HUMAN
1
7
CARE AND MAINTENANCE:
1. As with any other optical instrument, the microscope should be kept in a cool, dry, dust- and acid-free location.
The instrument should be covered with dust cover after use.
2. Never disassemble the lenses; these are precisely adjusted and glued in place at the factory. Stains can be
removed from the lens by wiping it carefully with a soft, clean cloth moistened with alcohol. Take care,
however, that alcohol does not seep it into the objectives to avoid dissolving the glue. Dust on the lens can be
removed using a clean lens brush.
3. The coarse and fine focussing assembly and nosepiece are precisely adjusted at the factory and should not be
dismantled.
4. When not in use, keep the objectives in the objective box and cover the ocular tube with the ocular-tube cover.
8
DISPOSAL MANAGEMENT CONCEPT:
The currently valid local regulations governing disposal must be observed. It is in the responsibility of the user to
arrange for proper disposal of the individual components.
All parts which have come into contact with potentially infectious materials must be disinfected using a valid
procedure (autoclaving, chemical treatment) prior to disposal. Applicable local regulations for disposal must be
carefully observed.
The instrument and electronic accessories (without batteries, power packs etc.) must be disposed of according to
regulations for the disposal of electronic components.
Batteries, power packs etc. must be separated from electric/electronic parts and disposed of in accordance with
applicable local regulations.