HULALA HOME TVSBSD0454 Manual Download Page 10

20

8

C*8

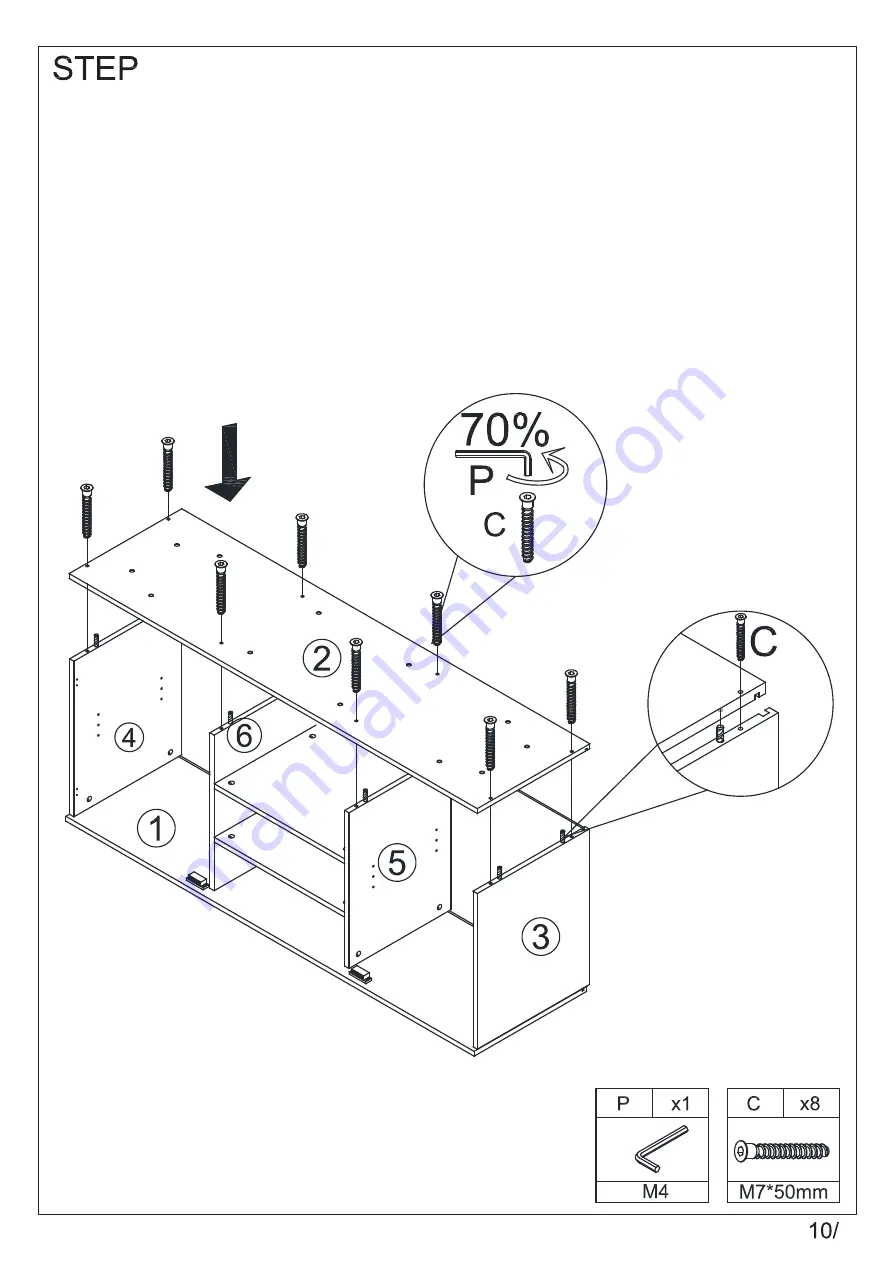
 Attach the part 2 to the finished part in step 7.

1) Align the hole in part 2,  insert the wooden dowel B in the part 3,4,5 and 6 into the part 2

2) Align the hole in part 2 to the hole in part 3,4,5 and 6, Screw in and tighten the screw C

    by Allenkey P as the picture show.

Summary of Contents for TVSBSD0454

Page 1: ...NOTE ITEM NO TVSBSD0454 This brochure contains IMPORTANT safty info Please read and keep for future reference 1 20...

Page 2: ...olor mild soap with warm water clean spills Mix 1 10 soap to water Do not place furniture under direct sunlight material will possibly fade over time Do not use on site dry Cleaning machine Children s...

Page 3: ...PARTS LIST 20...

Page 4: ...Explosive View 20...

Page 5: ...HARDWARE LIST Be sure to check all packing material carefully for small parts which may have come loose inside the carton during shipment 20 SPARE 78 X...

Page 6: ...screwdriver X 3 Attach the part G to the part 11 Align the hole in part G to the part 11 then screw in and tighten the screw H by screwdriver X 4 Attach the part N to the part 11 Align the hole in par...

Page 7: ...ow 2 Align the hole in part 3 and 4 insert the wooden dowel D and cam bolt A in part 1 into the part 3 and 4 then tighten the nut B by screwdriver X 3 Cover the nut by part O Prepare the part 5 and 6...

Page 8: ...the nut B by screwdriver X 3 Cover the nut B by part O Connect the part 5 and 6 to the part 1 1 Insert the nut B into the hole in part 5 6 as the picture show 2 Align the hole in the part 5 and 6 inse...

Page 9: ...9 20 Attach part 9 and 10 to finished part in step 6 1 Insert the part W into the part 9 and 10 bu hand 2 Slide the part 9 and 10 into the groove in part 1 3 4 5 and 6 4 6...

Page 10: ...shed part in step 7 1 Align the hole in part 2 insert the wooden dowel B in the part 3 4 5 and 6 into the part 2 2 Align the hole in part 2 to the hole in part 3 4 5 and 6 Screw in and tighten the scr...

Page 11: ...12 and 13 to the hole in part 2 screw in and tighten the screw J by allenkey P DO NOT FULLY TIGHTEN Attach the middle leg to the leg frame Align the hole in part 16 to the hole in part 12 screw in an...

Page 12: ...the part V to the leg frame 1 Insert the edge of part V into the space in part 12 and 13 2 Align the hole in part V to the hole in part 12 and 13 screw in and tighten the screw E by screwdriver X DO...

Page 13: ...2 V Assemble the legs 1 Align the hole in part 14 to the hole in part V screw in and tighten the screw L by allenkey P 2 After check the all screw in right position fully tighten the screws I J E in s...

Page 14: ...ook of anti collapse R as the picture show 1 Insert the part F into the space between the part 1 2 3 4 5 6 screw in screw E and tighten by screwdriver X 2 Align the hole in part R to the part 1 screw...

Page 15: ...15 20 14 Insert the part Q into the hole in part 3 4 5 6 by hand as the picture show U 2 E 4 Align the hole in part U screw in and tighten the screw E by screwdriver X...

Page 16: ...15 16 20 Install the part N on the part 3 and 4 as the picture show Align the hole in part N to the hole in part 3 and 4 screw in and tighten the screw E by screwdriver X N...

Page 17: ...Q Q 16 17 20 Insert the part 7 into the position above the part Q...

Page 18: ...Use the adjustable nail to keep the cabinet level in case the cabinet is wabbling Now your cabinet is ready to use 17 18 20...

Page 19: ...on of R where are on the back of panel 1 Drilled and insert the expandable screw T by hammer 2 Assemble the part R on the wall Align the hole in the part R to the expandable screw T screw in and tight...

Page 20: ...uality products and we also try our best to satisfy each and every customer that orders from us with product or service as needed We provide 30 days warranty starting from the time you receive the ite...

Reviews: