background image

HS611

103

ES

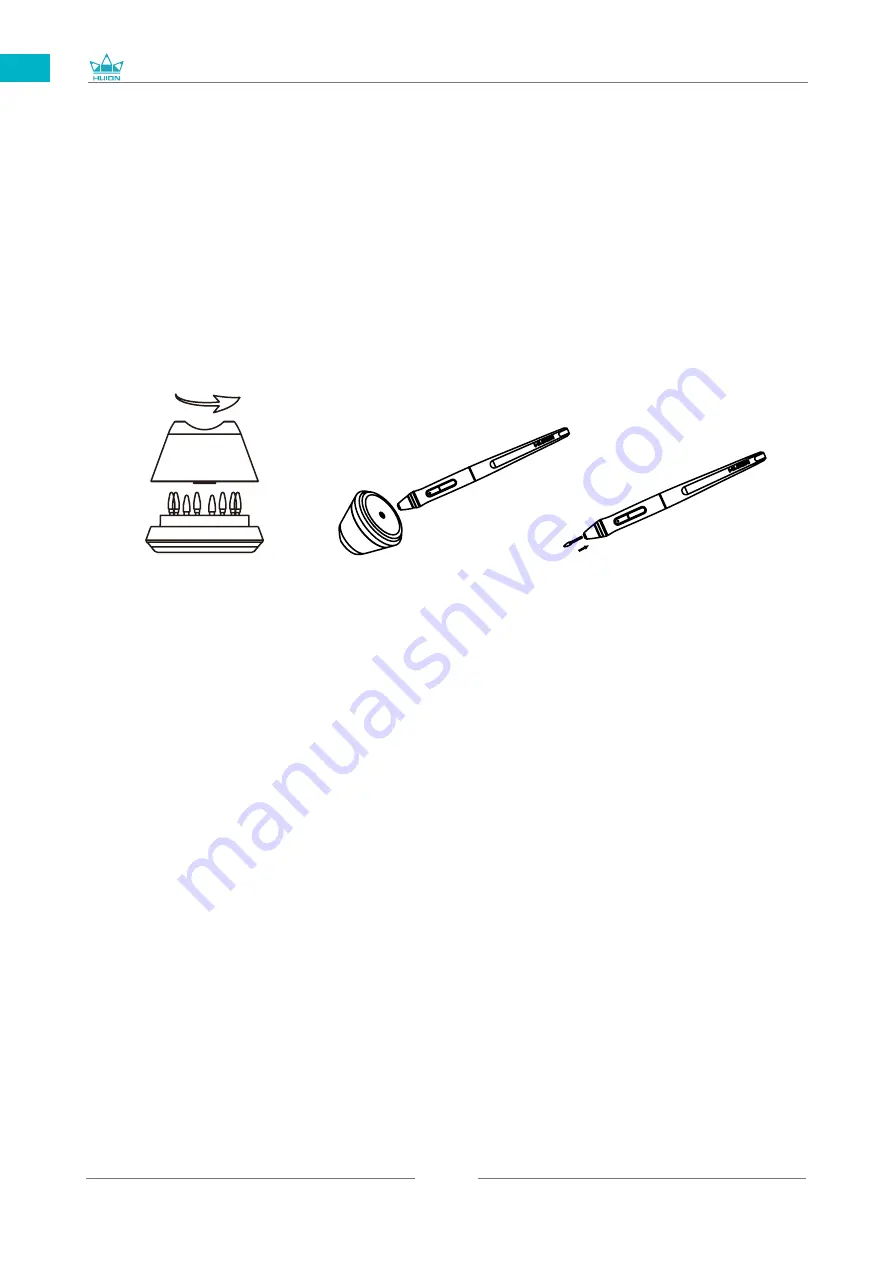
3.6 Cambiar la Punta del Lápiz

La punta se desgastará después de usarla durante mucho tiempo, luego deberá 

reemplazarla con una nueva punta.

[1] En sentido antihorario, gire el soporte del lápiz para abrir la tapa, saque una 

punta nueva.

[2] Inserte la punta de la pluma en el orificio de la parte inferior del soporte e 

incline la pluma para extraer la punta vieja.

[3] Inserta la punta nueva directamente en la pluma y empuja la punta lenta y 

firmemente hasta que se detenga.

Summary of Contents for INSPIROY HS611

Page 1: ...HS611 INSPIROY 2 23 41 59 77 95 User Manual Benutzerhandbuch Manuel d utilisateur ユーザーマニュアル Manuale d uso Manual de Usuario ...

Page 2: ...or 9 3 3 Click 10 3 4 Move 10 3 5 Use the Side Buttons 10 3 6 Pen Nib Replacement 11 4 Function Setting 12 4 1 Working Area Setting 12 4 2 Tablet Setting 13 4 3 Press Keys Function Setting 15 4 4 Pen Buttons Function Setting 17 4 5 Enable the Windows Ink Feature 17 4 6 Pressure Sensitivity Setting 18 4 7 Pen Pressure Testing 19 4 8 Pen Nib Activity Setting 19 4 9 Data Export and Import 20 5 Specif...

Page 3: ...onic devices is not allowed Because the tablet may cause other electronic devices to malfunction in some locations where when the use of electronic devices is not allowed such as within an airplane be sure to turn off the tablet Do not disassemble the tablet and pen Do not disassemble or otherwise modify the tablet or pen Such action may cause heat generation ignition electronic shock or other dam...

Page 4: ...l of fun You can freely painting and writing depicting different lines and colors just as the pen writes on the paper which brings you a real shock experience To give you a better understanding and using of your tablet please read this user manual carefully The user manual only shows the information under Windows unless otherwise specified this information applies to both Windows and Mac systems 2...

Page 5: ... Computer Connect the tablet to your computer with USB cable 1 Take out the Usb cable from the package then connect tablet to your computer 2 Open the driver interface the lower corner shows device connected indicating that the tablet is successfully connected to the computer You can start use the tablet Replacement Nibs inside the pen holder ...

Page 6: ...G Adapter from package which depends on USB port type of your phone then connect pen tablet to your phone following the illustrations below Notes 1 The pen tablet can works without installing any driver into your phone 2 Once connected the tablet will automatically enter phone mode in which the pen can only work in the left gray area 3 Please note that the press keys of pen tablet and digital pen ...

Page 7: ...uding the old driver of this product 2 Before installing please close all graphics software and anti virus software to avoid unnecessary mistake 2 4 Install Driver 2 4 1 OS Support Windows 7 or later macOS 10 12 or later 2 4 2 Install Driver Please download the driver from our website www huion com download After finishing installation you can find the driver icon in the system tray area which mea...

Page 8: ...he desk Do not place the pen on the surface of screen which may interfere with the use of other screen cursor positioning equipment may also cause your computer can not enter the sleep mode 3 2 Position the cursor Move the pen slightly above the active area without touching the screen surface the cursor will move to the new position accordingly Press the pen tip on the screen to make a selection T...

Page 9: ...o open it 3 4 Move Select the object then slide the pen tip across the screen to move it 3 5 Use the side buttons The buttons on the pen can be set to two different customizable functions You can use the buttons whenever the pen tip is within 10mm of the tablet active area You do not have to touch the pen tip to the tablet in order to use the switch ...

Page 10: ... need to replace a new nib 1 Anticlockwise rotate the pen holder to open the cover take a new nib out 2 Insert the pen nib into the hole on the bottom of the holder and tilt the pen to pull out the old nib 3 Insert the new nib straight into the pen and push the nib slowly and firmly until it stops ...

Page 11: ...nitor If more than one monitor is in use and you are in extended mode you need to choose the related monitor on the driver interface which you are going to map to 4 1 2 Working Area Setting Define the tablet area that will be mapped to the screen area 1 Full Area the entire active area of the tablet This is the default setting 2 Screen Ratio As a general rule be 16 9 3 Customized Area 1 Enter coor...

Page 12: ...the direction of the tablet to adapt to the left and right hand operation You can rotate the tablet by 0 90 180 or 270 4 2 Tablet Setting Click the in the upper right corner of the driver to set the Tablet including General settings Hotkeys and Updates ...

Page 13: ...programs When opening different programs the driver will automatically recognize that the shortcut function is the corresponding function set 4 2 2 Hotkeys settings Set the shortcut key to quickly open the driver interface The default value is Ctrl Alt H which can be set according to usage habits ...

Page 14: ...ult values Customized Setting Select the function to be achieved on the pop up dialog box then click Apply or OK to take effect Enable Disable Press Keys Check Uncheck Enable Press Keys 4 2 3 Updates You can view the driver version number click Check for Update view the latest driver version and update according to the system prompt ...

Page 15: ...n you can select one or more of them and you can arrange them in any combination Enter the corresponding Settings in the input box For example deselect ctrl D enter task manager ctrl Alt Delete etc Mouse Button Function click the box select the required function can be set to complete Switch function also click the box select the required function Run the program function click browse select the c...

Page 16: ...eved on the pop up dialog box then click Apply or OK to take effect 4 5 Enable the Windows Ink feature Microsoft Windows provides extensive support for pen input Pen features are supported in such as Microsoft Office Windows Whiteboard Adobe Photoshop CC SketchBook 6 and so on ...

Page 17: ... example apply N respectively the same pressure under different pressure coefficient produced different pressure effect According to their habit of holding the pen posture and the size of the hand for the appropriate pressure Settings Same press N Pressure 1 Same press N Pressure 2 N N Press Sensitivity Adjustment Press Sensitivity Adjustment 4 6 Pressure Sensitivity Setting The pressure sensitivi...

Page 18: ...utton to clear all the ink 4 8 Pen Nib Activity Setting The pen nibs can be set to be Active Inactive as needed Click the drop down option to select and click OK again to save the Settings In Active mode the digital pen can be used normally In Inactive mode the digital pen has cursor movement but cannot complete the specified action ...

Page 19: ...4 9 Data Export and Import The driver supports exporting and importing your custom configuration data of the product which is convenient for you to use different software and avoid the trouble of repeated settings ...

Page 20: ... 5mm Dimension 333 4 x 218 4 x 7 3mm Net Weight 550g Touch Resolution 5080LPI Report Rate 266PPS Pen Sensing Height 10mm Interface USB C Press Keys 10 Programmable Press Keys 8 Multimedia Keys OS Support Windows 7 or later macOS 10 12 or later Android 6 0 or later Digital Pen Model PW500 Dimension 163 7 x Φ14 3mm Weight 14g Pressure 8192Levels Accuracy 0 3mm ...

Page 21: ...sure you installed the driver correctly Press Keys does not work 1 Make sure the Press Keys function were enabled in the driver 2 Make sure you have correctly defined the Press Keys 3 Check if the press lock switch is on the unlock position The computer can t enter sleep mode When you are not using the tablet please do not put the pen on the tablet surface which will keep the computer awake The si...

Page 22: ...N HUION ANIMATION TECHNOLOGY CO LTD 86 755 32998548 www huion com www facebook com huion service huion com huion skype https twitter com HuionTab Bldg 28 Quarter 4 HuaiDeCuiGang Industrial Park Fuyong Street Bao an District Shenzhen 518106 China ...

Page 23: ... cursor 26 3 3 Klicken 27 3 4 Bewegung 27 3 5 Verwendung der Seitenschalter 27 3 6 Ersetzen von Stiftspiten 28 4 Funktionseinstellungen 29 4 1 Einstellungen zum Arbeitsbereich 29 4 2 Druckschalter Funktionseinstellungen 30 4 3 Einstellungen für die Funktionen der Stifttasten 32 4 4 Windows Ink aktivieren 32 4 5 Einstellungen zur Drucksensitivität 33 4 6 Stiftdrucktest 34 4 7 Enable the Windows Ink...

Page 24: ...e es außerhalb der Reichweite von Kindern Platzieren Sie das Tablet und den digitalen Stift nicht in der Nähe von magnetischen Feldern Im Falle eines Schadens versuchen Sie nicht das Gerät zu öffnen und selbst zu reparieren Wenden Sie sich an den Kundenservice für Reparatur und Wartung Wenn Komponenten ersetzt werden stellen Sie sicher dass ihr Servicetechniker Ersatzteile des Herstellers verwende...

Page 25: ...ch erhöhen kann und dazu auch einfach Spaß macht Sie können völlig frei zeichnen und schreiben in verschiedenen Farben wie mit einem Stift auf Papier Es ist eine erfrischende Erfahrung Bitte lesen Sie dieses Handbuch ausführlich um Ihr Tablet besser zu verstehen und verwenden zu können Diese Anleitung stellt die Anwendung unter Windows dar Sofern Unterschiede nicht explizit erwähnt werden gelten d...

Page 26: ...rbindung 2 3 1 Verbindung mit dem Computer Verbinden Sie das Tablet mit einem USB Kabel an Ihren Computer 1 Nehmen Sie das USB Kabel aus dem Paket dann schließen Sie Tablet an Ihren Computer 2 Öffnen Sie die Treiber Schnittstelle die untere Ecke zeigt Gerät verbunden dass das Tablet erfolgreich mit dem Computer verbunden ist Sie können das Tablet verwenden ...

Page 27: ...Wählen Sie den richtigen OTG Adapter aus dem Paket die vom USB Port Typ Hinweis 1 Das Stift Tablet kann funktionieren ohne einen Treiber in Ihr Telefon zu installieren 2 Sobald die Verbindung hergestellt ist wechselt das Tablet automatisch in den Telefonmodus in dem der Stift nur im linken grauen Bereich arbeiten kann 3 Bitte beachten Sie dass die Drucktasten des Stifttabletts und des digitalen St...

Page 28: ...eiber hat das Tablet erkannt und Sie können es jetzt verwenden 1 Vor der Installation müssen Sie andere Treiber ähnlicher Produkte deinstallieren das beinhaltet auch ältere Treiber dieses Produkts 2 Schließen Sie vor der Installation sämtliche Grafikprogramme und Antivirenprogramme um Konflikte zu vermeiden Hinweise 2 4 3 Treiberoberfläche Machen Sie nach dem erfolgreichen Download einen Doppelkli...

Page 29: ...dem Tisch Legen Sie den Stift nicht auf dem Bildschirm ab um Störungen mit dem Mauszeiger zu vermeiden Der Stift auf dem Tablet könnte auch Ihren Computer daran hindern den Schlafmodus zu aktivieren 3 2 ZeigerpositionierungPosition the cursor Bewegen Sie den Stift knapp über der Bildschirmoberfläche ohne sie zu berühren Der Mauszeiger folgt Ihren Bewegungen Berühren Sie mit der Spitze des Stifts d...

Page 30: ...was zu öffnen 3 4 Bewegung Wählen Sie ein Objekt aus und ziehen Sie die Stiftspitze über den Bildschirm um es zu bewegen 3 5 Verwendung der Seitenschalter Die Schalter auf dem Stift können zwei verschiedene Funktionen ausführen Sie können die Schaltflächen verwenden wenn sich die Stiftspitze innerhalb von 10mm zum Tablet befindet Sie müssen das Tablet nicht berühren um die Schaltflächen zu verwend...

Page 31: ...alter gegen den Uhrzeigersinn um ihn zu öffnen Nehmen Sie eine neue Stiftspitze heraus 2 Führen Sie die alte Stiftspitze in die Öffnung auf der Unterseite des Stifthalters ein und neigen Sie den Stift um die alte Spitze zu entfernen 3 Führen Sie die neue Stiftspitze direkt in den Stift ein und drücken Sie langsam bis sie sich nicht mehr bewegen lässt ...

Page 32: ...berfläche den Bildschirm auswählen auf dem Sie Ihre Zeigerbewegungen registrieren möchten Falls Sie Ihre Monitore spiegeln alle Monitore zeigen dasselbe Bild deckt das Tablet den gesamten Bereich auf jedem Monitor ab und der Mauszeiger wird auf jedem Monitor gleichzeitig angezeigt 4 1 2 Arbeitsbereichseinstellungen Definition der Tabletfläche die auf dem Bildschirm abgedeckt wird 1 Volle Abdeckung...

Page 33: ...hritten 0 90 180 oder 270 4 2 Druckschalter Funktionseinstellungen Standardeinstellung Platzieren Sie den Mauszeiger auf den Druckschalter oder klicken Sie den Druckschalter um die Standardwerte wiederherzustellen Benutzerdefinierte Einstellungen Wählen Sie die gewünschten Funktionen in der pop up Dialogbox klicken Sie dann Anwenden oder OK um die Änderungen anzuwenden ...

Page 34: ...det werden Tragen Sie die entsprechenden Einstellungen in das Eingabefeld ein Zum Beispiel Deselektieren Strg D Task Manager öffnen Strg Alt Entf Maustastenfunktionen Klicken Sie auf die Box wählen Sie die benötigte funktion Funktionen austauschen Klicken Sie auf die Box und wählen Sie die benötigte Funktion Programmausführungsfunktion Klicken Sie auf durchsuchen und wählen Sie die Verbindung um e...

Page 35: ...op up Dialogbox und klicken Sie auf Anwenden oder OK um sie zu übernehmen 4 4 Windows Ink aktivieren Microsoft Windows bietet erweiterte Unterstützung für Stift Input Ihr Stift wird in Programmen wie Microsoft Office Windows Journal Adobe Photoshop CC Sketch Book 6 und so weiter unterstützt Nützlich Nützlich ...

Page 36: ...t auch großer Druck verursacht nur geringen Druck Klicken Sie die Schaltfläche unten rechts in der Einstellungs Box um den Standardwert der Drucksensitivität wiederherzustellen Zum Beispiel Gleichbleibender physikalischer Druck mit dem Stift auf das Tablet wird je nach Einstellungen zu unterschiedlichen Druckintensitäten in der Software Die Drucksensitivität sollte anhand Ihrer Fingerhaltung und H...

Page 37: ... zu testen Klicken Sie auf die Schaltfläche um die Tinte zu entfernen 4 7 Exportieren und Importieren Der Treiber unterstützt das Exportieren und Importieren Ihrer benutzerdefinierten Konfigurationsdaten des Produkts was für Sie bequem ist um verschiedene Software zu verwenden und die Probleme wiederholter Einstellungen zu vermeiden ...

Page 38: ...ension 333 4 x 218 4 x 7 3mm Nettogewicht 550g Auflösung 5080LPI Erkennungsrate 266PPS Erkennungshöhe 10mm Schnittstelle USB C Schalter 10 benutzerdefinierbare Druckschalter OS Unterstützung Windows 7 oder neuer macOS 10 12 oder neuer Android 6 0 oder neuer Stift Modell PW500 Dimension 163 7 x Φ14 3mm Nettogewicht 14g Drucklevel 8192Levels Genauigkeit 0 3mm ...

Page 39: ...t dem Tablet geliefert wurde 2 Stellen Sie sicher dass die Treiber korrekt installiert sind Die Schalter funktionieren nicht 1 Stellen Sie sicher dass die Druckschalter Funktionen im Treiber aktiviert wurden 2 Stellen Sie sicher dass Sie die korrekten Funktionen definiert haben 3 Stellen Sie sicher dass der Sperrschalter auf der entsprerrten Position steht Der Computer kann nicht einschlafen Wenn ...

Page 40: ...HS611 40 DE After Service Kontakt 7 SHENZHEN HUION ANIMATION TECHNOLOGY CO LTD 86 755 32998548 www huion com www facebook com huion service huion com huion skype https twitter com HuionTab ...

Page 41: ...5 3 4 Mouvement 45 3 5 Utilisation des boutons latéraux 45 3 6 Remplacement de la point du stylet 46 4 Réglages des fonctions 47 4 1 Réglage de l espace de travail 47 4 2 Boutons de fonctions 48 4 3 Réglage du bouton du stylet 50 4 4 Activer la fonction Windows Ink 50 4 5 Réglage de la sensibilité de la pression 51 4 6 Test de la pression du stylet 52 4 7 Export et import des données 52 5 Caractér...

Page 42: ...fin qu ils puissent l atteindre facilement sans dangers Ne placez pas la tablette et le stylet près de sources magnétiques Utilisez uniquement le bloc d alimentation fournit avec l tablette Si vous avez des questions sur l alimentation merci de contacter le distributeur de votre tablette Assurez vous qu aucun corps étranger n obstrue les rainures et les éclaboussures de liquides sur l tablette afi...

Page 43: ...ous pourrez écrire et dessiner en utilisant les différents styles et couleurs de la même manière que si vous utilisiez un crayon sur du papier un réel choc pour cette nouvelle expérience Afin d utiliser au mieux votre KAMVAS veuillez lire le manuel d utilisation Celui ci utilise des impressions écrans sous Windows Sauf indication contraire ces informations sont valables aussi bien pour les système...

Page 44: ...g mit dem Computer Connectez la tablette à votre ordinateur avec un câble USB 1 Sortez le câble Usb de l emballage puis connectez la tablette à votre ordinateur 2 Ouvrez l interface du conducteur le coin inférieur montre l tablette connecté indiquant que la tablette est connectée avec succès à l ordinateur Vous pouvez commencer à utiliser la tablette ...

Page 45: ...u type de port USB de votre téléphone puis connectez tablette de stylo à votre téléphone en suivant les illustrations ci dessous Notes 1 La tablette de stylo peut travailler sans installer n importe quel conducteur dans votre téléphone 2 Une fois connectée la tablette entre automatiquement en mode téléphone dans lequel le stylo ne peut fonctionner que dans la zone grise gauche 3 Veuillez noter que...

Page 46: ...e a bien reconnu la tablette et que vous pouvez l utiliser 1 Avant l installation il faut désinstaller tout autre pilote de produits similaires ainsi que l ancien pilote de ce produit 2 Avant l installation fermez toutes les applications graphiques et anti virus pour éviter tout risque d erreur Notes 2 4 3 Page des pilotes Après avoir téléchargé avec succès les pilotes double cliquez pour lancer l...

Page 47: ...n utilisez pas le stylet rangez le dans son étui ou sur votre bureau Ne le laissez pas sur l écran cela pourrait perturber l utilisation Cela pourrait également empêcher le passage de votre ordinateur en mode veille 3 2 Position du curseur Déplacez le stylet légèrement au dessus de l écran sans le toucher Le curseur se déplacera en suivant votre mouvement Appuyez avec la pointe du stylet sur l écr...

Page 48: ...r l ouvrir 3 4 Mouvement Sélectionner un objet et glissez le à l écran en bougeant le stylet 3 5 Utilisation des boutons latéraux Les boutons latéraux du stylet peuvent être réglés avec 2 fonctions personnalisables Ils sont utilisables lorsque la pointe est à moins de 10mm de l écran Il n est pas nécessaire de toucher l écran pour utiliser les boutons ...

Page 49: ...urnez dans le sens inverse des aiguilles d une montre le couvercle du porte style pour l ouvrir et prenez une nouvelle pointe 2 Insérez la pointe du stylo dans le trou du bas du support et inclinez le stylo pour retirer l ancienne pointe 3 Insérez la nouvelle pointe dans le stylo en la poussant lentement et fermement jusqu à ce qu elle s arrête ...

Page 50: ...us êtes en mode étendu vous devez choisir le moniteur associé dans le paramétrage des pilotes Si vos écrans sont en mode miroir tous les écrans affichent la même chose l affichage correspond à tout l espace sur chacun des écrans et le curseurs s affichera simultanément sur chaque écran 4 1 2 Réglage de l espace de travail 5 1 2Définissez la zone qui sera affichée à l écran 1 Toute zone toute la zo...

Page 51: ...90 180 ou 270 rotieren 4 2 Boutons de fonctions Paramètre par défaut Placez le curseur sur le bouton ou cliquer sur l icône représentant le bouton afin de visualiser les valeurs par défaut Paramètre personnalisé Sélectionnez la fonction que vous souhaitez attribuer et valider par Appliquer ou par OK Activer Désactiver les boutons Cocher décocher Enable Press key ...

Page 52: ...ètres souhaités comme par exemple Pour désélectionner Ctrl D entrez dans le gestionnaire de taches Ctrl Alt Delete etc Fonction du bouton de souris cliquez sur la case et sélectionnez la fonction souhaitée Fonction de basculement Cliquez également sur la case et sélectionnez la fonction souhaitée E x é c u t e z la fonction du programme cliquez sur parcourir et sélectionnez la connexion à établir ...

Page 53: ...de la saisie au stylet Les fonctions de stylet sont supportées dans les logiciels tels que Microsoft Office Windows Journal Adobe Photoshop CC SketchBook 6 etc Active Active 4 3 Réglage du bouton du stylet Sélectionnez la fonction que vous souhaitez attribuer et valider par Appliquer ou par OK ...

Page 54: ...ssion Faire glisser vers le bas droite le changement de pression est faible beaucoup de pression produit moins de pression Cliquez le bouton en bas à droite dans la boite de dialogue pour remettre la sensibilité à sa valeur par défaut Par exemple appliquez N la même pression sous un coefficient de pression différent cela produit une pression différente En fonction des habitudes de tenue du stylet ...

Page 55: ...l import de vos paramétrages de l tablette Cela permet de conserver ces réglages et les rétablir facilement Active 4 6 Test de la pression du stylet Vous pourrez progressivement augmenter la pression sur le stylet pour tester son niveau de sensibilité Cliquez sur pour tout effacer ...

Page 56: ... x 161 5mm Dimension 333 4 x 218 4 x 7 3mm Poids 550g Résolution 5080LPI Taux de transfert 266PPS Hauteur de détection 10mm Interface USB C Boutons 10 boutons personnalisables Comptabilité logiciel Windows 7 ou plus macOS 10 12 ou plus Android 6 0 ou plus Stift Modèle PW500 Dimension 163 7 x Φ14 3mm Poids 14g Niveaux de pression 8192Levels Précision 0 3mm ...

Page 57: ... origine fourni avec la tablette 2 Assurez vous que le pilote est bien installé Les boutons ne fonctionnent pas 1 Assurez vous que les boutons sont bien activés dans le pilote 2 Assurez vous d avoir bien définit les boutons 3 Vérifier que le bouton de verrouillage soit en position déverrouillée L ordinateur ne bascule pas en mode veille Lorsque vous n utilisez pas la tablette ne laissez pas le sty...

Page 58: ...HS611 58 FR Contacts après vente 7 SHENZHEN HUION ANIMATION TECHNOLOGY CO LTD 86 755 32998548 www huion com www facebook com huion service huion com huion skype https twitter com HuionTab ...

Page 59: ... 60 3 ペンの基本操作 62 3 1 ペンの持ち方 62 3 2 カーソルの移動 62 3 3 クリック 63 3 4 アイテムの移動 63 3 5 サイドボタンを使用する 63 3 6 替え芯をセットする 64 4 機能設定 65 4 1 作業領域の設定 65 4 2 ショートカットキー設定 66 4 3 ペンのサイドボタン設定 68 4 4 Windows Ink 機能を有効にする 68 4 5 筆圧感度を設定する 69 4 6 筆圧感度のテスト 70 4 7 設定データのインポート エクスポート 70 5 製品の仕様 71 6 トラブルシューティング 72 7 お客さまご相談窓口 73 目次 ...

Page 60: ...水に濡らしたり 接続端子やすき間から内部に異物や液体を入 れないでください ショートによる故障だけでなく 火災や感電の原因となります 浴槽 洗面台 流し台 洗濯機の近く 湿気の多い地下室やプールなど 水の近くに置かない でください 火災 感電の原因となります タブレットイとデジタルペンを磁場の近くに置かないでください 不安定な場所や幼児やお子さまの手の届く範囲に置かないでください 落ちたり倒れたりして けがや故障の原因となります 万一 落としたり破損した場合は電源を切り お買い上げの販売 店にご連絡ください そのまま使用されますと火災感電 故障の原因となります 背面の溝と穴はモニターが過熱しないよう 排熱のためにもうけられていますのでタブレット イをベッドやソファー カーペットの上や組み込み機器内に置かないでください 動作不良や故 障の原因となります 上記の処置の後 煙が出なくなったことな...

Page 61: ...レットーをお買い上げい ただき誠にありがとうございます 本機は描画性能と携帯性を兼ね備えた新世代のプロフ ェッショナルペンタブレットイです まるで紙に描いているかのような自然な描き心地で 思いのままに作業できることを目指しました 製品を正しくお使いいただくために 本書をよくお読みいただき使用上の注意に従って正 しくお使いください 本書では Windows での使用について記載しています 特に指定が ない限り 本書の内容は Windows および MacOS の両方に適用されます 2 2 各部のなまえとはたらき 前書き 2 ...

Page 62: ...HS611 62 JP デジタルペン ペンホルダー USB ケーブル クイックスタートガイド 保証書 交換用ペン先 ペンホルダー内蔵 2 3 タブレットイを接続する 2 3 タブレットイを接続する 2 3 1 有線接続モード 1 パッケージから USB ケーブルを取り出し ペンタブレットをコンピュータに接続し ます 2 有線接続モードで 電源ボタンを押す必要はありません ...

Page 63: ... してください 3 一部のモデルでは スマフォン タブレットの 設定 に移動してから OTG 機能 を有効にする必要があります 4 攜帯電話 タブレットの USB ポートの種類に応じて パッケージから適切な OTG ア ダプタを選択し 以下の図に従ってペンタブレットを攜帯電話に接続します ご注意 1 ペンタブレットはあなたの攜帯電話 タブレットにドライバをインストールせずに動 作することができます 2 一応連結されたら タブレットは自動的に携帯モードに入り ペンは左側の灰色のゾ ン 166 7 x 10⁴ 2mm のみで動作できます 3 ペンタブレットとデジタルペンのプレスキーは 電話モードではサポートされていま せんので 注意してください ...

Page 64: ...ライバーをお使いの機器にインストールします インストールが完 了するとタスクバー内の通知領域にドライバーアイコン が表示されます ペンタブレットイを接続するとアイコンの色が に変わります 2 4 3 ドライバーの設定 インストール完了後 アイコンをダブルクリックしてドライバーソフト Huion Tablet を起動し付属のケーブルでペンタブレットイを接続します ペンタブレットイを接続すると ウインドウ左下のメッセージが 未接続 から 接続済み に変わります ペンタブレットイの LED ライトが点灯します 1 インストールの前に 古いバージョンのドライバーや他のグラフィックタブレット等 のドライバーを削除してください 2 インストールの前に すべてのグラフィックソフトウエアおよびセキュリティソフト ウエアを閉じてください ご注意 ...

Page 65: ...い 使用中に不用意にスイッチを押さないようご注意くださ い ご注意 使用しないときはペンをペンホルダーに置くか ペンタブレットイから離してください スクリーン上に置いたり近づけたままにしておくと 他のポインターデバイスの誤作動の 原因になります またスリープモードへの移行ができない場合があります 3 2 カーソルの移動 スクリーンに触れないよう ペン先を少し浮かせたままアクティブエリア上を移動させる と カーソルはペンの動きに合わせて移動します ツールやアイテムを選ぶにはペン先で画面を1回タップするか スクリーンを強めに押し て選択します ペンの基本操作 ...

Page 66: ... ペン先で画面を1回タップするとクリック操作を行います アイテムをハイライトまた は選択して ダブルタップしてアイテムを開きます 3 4 アイテムの移動 アイテムを選択したままペン先を移動させます 3 5 サイドボタンを使用する サイドボタンには2つの異なる機能を割り当てることができます 割り当てた機能を使うには ペン先をスクリーンから 10mm 以内に保持した状態でサイ ドボタンを押します ペン先がスクリーンに触れていない状態で使用します ...

Page 67: ...HS611 67 JP 3 6 替え芯をセットする ペン先は長期間使用すると摩耗します 傷んできたら替え芯を新しいものに交換して ください 1 ペンホルダーを反時計回りに回転させてカバーを開き 新しい替え芯を取り出しま す 2 替え芯をホルダーの底の穴に挿し込み ペンを傾けて古い芯を抜きます 3 新しい替え芯にペンを挿し込み 止まるまでゆっくりとしっかりと押し込みます ...

Page 68: ...デフォルトでは タブレットイのアクティブエリア全体がモニター全体に割り当てられて います マルチモニター使用時で拡張モードの場合 連動するモニターを選択する必要が あります モニターが複製モードの場合 すべてのモニターに同じ映像を表示 タブレットイは各 モニターと連動し カーソルを各モニターに表示します 4 1 2 作業領域の設定 画面に対する作業領域を定義します 1 全ての領域 タブレットイのアクティブエリア全体を使用します デフォルト設定です 2 画面比率 原則として 16 9 に設定します 3 カスタム領域 1 座標値を入力します 2 枠の角をドラッグして任意の領域に設定します ...

Page 69: ...利き手や環境に合わせて変更します 回転角度を 0 90 180 または 270 から選びます 4 2 ショートカットキー設定 デフォルト設定 カーソルをキーに移動させ選択するか ショートカットキーを押してデ フォルト値に設定します カスタマイズ設定 ポップアップダイアログボックスから使用する機能を選択し 適用 または 確認 をクリックして有効にします ショートカットキーを有効 無効にする ショートカットキーを起動 にチェックを入 れます 無効にするにはチェックを外します ...

Page 70: ...キーの組み合わせ Ctrl Shift Alt Win キーと任意のキーを組み合わせて設定します 設定の際は Ctrl Shift Alt Win キーと1つ以上のキーを組み合わせてください 例 選択解除 Ctrl D タスクマネージャー Ctrl Alt Delete のように入力します マウスボタンの機能 ボックスをチェックを入れ 使いたい機能を選択します 切り替え機能 ボックスにチェックを入れ 使いたい機能を選択します プログラム機能を実行します 参照 をクリックし 接続を選択して 最もよく使用 されるプログラムにすばやくアクセスします ...

Page 71: ...3 ペンのサイドボタン設定 ポップアップダイアログボックスから使用する機能を選択し 適用 または 確認 をク リックして有効にします 4 4 Windows Ink 機能を有効にする Microsoft Windows ではペン入力を広くサポートしています 各機能は Microsoft Office Windows Journal Adobe Photoshop CC Sketch Book 6 等に対応しています 有効 有効 ...

Page 72: ...を小さくすると感度が高くなりま す 感度が高すぎる場合は値を大きくしてください 上方向にドラッグ 左 筆圧の変化が大きくなります 柔らかい線を描くのに向いてい ます 下方向にドラッグ 右 筆圧の変化が小さくなります シャープでな線を描くのに向い ています 筆圧感度を初期設定に戻すには設定内の をタップします 例 同じ圧力を掛けた場合でも 筆圧感度が高めでは変化率が大きくなり 左図 筆圧 感度が低めだと変化率は小さくなっています 右図 同じ圧力 N 筆圧感度 1 N N 同じ圧力 N 筆圧感度 2 有効 ...

Page 73: ...HS611 73 JP 4 6 筆圧感度のテスト 圧力テストの開始 をクリックし ペンに圧力を徐々に加えてレベルを確認します 筆跡を消去するには クリア をクリックします 4 7 設定データのインポート エクスポート 設定したデータのエクスポートとインポートができます これは さまざまなソフトウェアを使用して 繰り返し設定の問題を回避するのに便利で す 有効 ...

Page 74: ...ア Computer 258 4 161 5mm Android 90 1 x 161 5mm 外形寸法 333 4 x 218 4 x 7 3mm 質量 550g 読取り解像度 5080LPI 読取り速度 266PPS 読取り高さ 10mm インターフェース USB C ショートカットキー 10 個 カスタマイズ可 対応 OS Windows 7 以降 macOS 10 12 以降 ペン モデル PW500 外形寸法 163 7 x Φ14 3mm 質量 14g 読取り解像度 8192 精度 0 3mm ...

Page 75: ...ル後はコンピューターを再起動してください ペンが機能しない 1 本機に付属していたペンであることを確認してください 2 ドライバーを正しいて順でインストールしたことを確認してくだ さい キーを押しても反応がない 1 ドライバーでショートカットキーが有効になっていることを確認 してください 2 キーが正しく定義されていることを確認してください 3 ロックスイッチが解除位置にあることを確認します コンピューターのスリープ モードが動作しない タブレットイを使用していないときは タブレットイの上にペンを 置かないでください スリープモードの妨げとなります ペンのサイドボタンが機能 しない サイドボタンを使用するときは ペン先がタブレットイに触れてお らず ペン先とタブレットイとの距離を 10mm 以内に保持してく ださい ペン先とカーソルがずれて います ペンのキャリブレーションしてみてください...

Page 76: ...HS611 76 JP お客さまご相談窓口 7 SHENZHEN HUION ANIMATION TECHNOLOGY CO LTD 86 755 32998548 www huion com www facebook com huion service huion com huion skype https twitter com HuionTab ...

Page 77: ...are 81 3 5 Utilizzare i pulsanti laterali 81 3 6 Sostituzione del pennino 82 4 Impostazione di Funzione 83 4 1 Impostazione Area di Lavoro 83 4 2 Impostazione Funzione dei tasti a pressione 84 4 3 Impostazione funzioni tasti della penna 86 4 4 Abilitare la funzione Windows Ink 86 4 5 Impostazione Sensibilità di pressione 87 4 6 Test di pressione della penna 88 4 7 Esportazione e importazione dei d...

Page 78: ...mpo magnetico Il Tavoletta può utilizzare solo gli alimentatori indicati sulla targhetta In caso di dubbi sull alimentatore in uso consultare il distributore del Tavoletta Accertarsi che nessun corpo estraneo penetri all interno del monitor attraverso le scanalature e che non venga schizzato del liquido sul Tavoletta per evitare cortocircuiti o incendi Se il Tavoletta presenta un guasto non aprire...

Page 79: ...ittura e creazione in modo divertente Puoi dipingere e scrivere liberamente tracciando linee di colori diversi proprio come la penna scrive sul foglio per un esperienza davvero sconvolgente Per una migliore comprensione e utilizzo del Tavoletta leggere attentamente questo manuale d uso Il manuale d uso riporta le informazioni per Windows e se non diversamente specificato queste informazioni si app...

Page 80: ...tivi dentro il porta penna 2 2 Contenuto della confezion 2 3 Connessione del Tavoletta 2 3 1 Conexión al ordenador 1 Estrarre il cavo USB dalla confezione quindi collegare la tavoletta al proprio computer 2 Non utilizzare il tasto di accensione quando si utilizza la odalità di accesso tramite cavo ...

Page 81: ...el paquete que depende del tipo de puerto USB de su teléfono a continuación conecte la pen tablet a su teléfono siguiendo las siguientes ilustraciones Gli appunti 1 La tavoletta grafica può funzionare senza installare alcun driver nel telefono tablet 2 Una volta connesso il tablet entrerà automaticamente in modalità telefono in cui la penna può funzionare solo nell area grigia 166 7 x 10⁴ 2mm a si...

Page 82: ...gnifica che il driver ha riconosciuto il Tavoletta e ora si può iniziare a usarlo ora 1 Prima dell installazione è necessario disinstallare i driver di altri prodotti simili incluso il vecchio driver di questo prodotto 2 Prima dell installazione chiudere tutti i software di grafica e i software antivirus per evitare segnalazioni di errore Note 2 4 3 Pagina del Driver Al termine del download fare d...

Page 83: ...osizionare la penna sulla superficie dello schermo perché potrebbe interferire con il posizionamento del cursore dello schermo e inoltre il computer potrebbe non essere in modalità sospensione 3 2 Posizionare il cursore Spostare la penna leggermente sopra l area attiva senza toccare la superficie dello schermo il cursore si sposterà di conseguenza nella nuova posizione Premere la punta della penna...

Page 84: ...zionare l oggetto quindi fare scorrere la punta della penna sullo schermo per spostarlo 3 5 Utilizzare i pulsanti laterali I pulsanti sulla penna possono essere impostati su due diverse funzioni personalizzabili È possibile utilizzare i pulsanti ogni volta che la punta della penna si trova entro 10 mm dall area attiva del Tavoletta Non è necessario poggiare la punta della penna sul Tavoletta per u...

Page 85: ... Ruotare in senso antiorario il portapenne per aprire il coperchio estrarre un nuovo pennino 2 Inserire il pennino nel foro nella parte inferiore del supporto e inclinare la penna per estrarre il pennino vecchio 3 Inserire il nuovo pennino direttamente nella penna e spingere il pennino lentamente e con fermezza fino a quando si blocca ...

Page 86: ...o monitor sull interfaccia del driver su cui si desidera mappare Se i monitor sono in modalità mirror tutti i monitor visualizzano lo stesso contenuto la visualizzazione viene mappata nell intero spazio di ciascun monitor e il cursore viene visualizzato contemporaneamente su ogni monitor 4 1 2 Impostazione dell Area di Lavoro Definire l area di visualizzazione che verrà mappata sull area dello sch...

Page 87: ...tta di 0 90 180 o 270 4 2 Impostazione Funzione dei tasti a pressione Impostazioni di default Posizionare il cursore sul tasto a pressione o fare clic sul tasto a pressione per trovare i valori predefiniti Impostazioni personalizzate Selezionare la funzione da eseguire nella finestra di dialogo a comparsa quindi fare clic su Conferma o OK per renderla effettiva ...

Page 88: ...qualsiasi combinazione Immettere le impostazioni corrispondenti nella casella di input Ad esempio deselezionare Ctrl D accedere a task manager Ctrl Alt Canc ecc Funzioni del mouse fare clic sulla casella selezionare la funzione richiesta Cambiare funzione fare clic sulla casella selezionare la funzione richiesta Eseguire la funzione del programma fare clic su Sfoglia selezionare la connessione per...

Page 89: ... funzionalità della penna sono supportate in Microsoft Office Windows Journal Adobe Photoshop CC Sketch Book 6 e così via Efficace Efficace 4 3 Impostazione funzioni tasti della penna Selezionare la funzione da eseguire nella finestra di dialogo a comparsa quindi fare clic su Conferma o OK per renderla effettiva ...

Page 90: ...l cambiamento di pressione è debole molta pressione produce meno pressione Cliccare il pulsante in basso a destra nella casella delle impostazioni per ripristinare la sensibilità della pressione allo stato predefinito Per esempio applicare N rispettivamente la stessa pressione con un coefficiente di pressione diverso produce un effetto di pressione diverso In base alla propria abitudine di mantene...

Page 91: ...configurazione del prodotto vantaggiosa per utilizzare software diversi evitand o di dover ripetere la configurazione delle impostazioni Efficace 4 6 Test di pressione della penna è possibile applicare gradualmente la pressione allo stilo sullo schermo per testare il livello di pressione Fare clic sul pulsante per cancellare tutto l inchiostro ...

Page 92: ... 5mm Dimensioni 333 4 x 218 4 x 7 3mm Peso netto 550g Risoluzione 5080LPI Rapporto 266PPS Altezza di sensore 10mm Interfaccia USB C Tasto a pressione 10 tasti a pressione personalizzati Supporto OS Windows 7 o successivo mac OS 10 12 o successivo Penna Modello PW500 Dimensioni 163 7 x Φ14 3mm Peso netto 14g Livello di pressione 8192 Accuratezza 0 3mm ...

Page 93: ... Assicurarsi di aver installato il driver correttamente I tasti a pressione non funzionano 1 Make sure the Press Keys function were enabled in the driver 2 Make sure you have correctly defined the Press Keys Check if the press lock switch is on the unlock position Il computer non è in grado di accedere alla funzione di sospensione Quando non si utilizza il Tavoletta non posizionare la penna sulla ...

Page 94: ...HS611 94 IT Contatti di Servizio di Assistenza 7 SHENZHEN HUION ANIMATION TECHNOLOGY CO LTD 86 755 32998548 www huion com www facebook com huion service huion com huion skype https twitter com HuionTab ...

Page 95: ...nto 99 3 5 Uso de los botones Laterales 99 3 6 Cambiar la Punta del Lápiz 100 4 Configuración de Funciones 101 4 1 Configuración del Área de Trabajo 101 4 2 Configuración de las Teclas Presionables 102 4 3 Configuración de los botones del lápiz 104 4 4 Habilitar la función de Windows Ink 104 4 5 Ajuste de sensibilidad de presión 105 4 6 Prueba de presión del lápiz 106 4 7 Exportación e importación...

Page 96: ...i tappeti o incorporato in un dispositivo Il display può utilizzare solo gli alimentatori indicati sulla targhetta In caso di dubbi sull alimentatore in uso consultare il distributore del display Per proteggere il display si prega di spegnere l alimentazione quando non è in uso In caso di blackout o mancato utilizzo per un lungo periodo scollegare il display dalla presa Accertarsi che nessun corpo...

Page 97: ...bién llenarlo de diversión Puede pintar y escribir libremente representando diferentes líneas y colores tal y como el bolígrafo escribe en el papel por lo que proporciona una experiencia de shock real Para tener una mejor comprensión acerca del uso de su Tableta es conveniente leer detenidamente este manual del usuario El manual del usuario solo muestra la información para Windows A menos que se e...

Page 98: ...ón de la Tableta 2 3 1 Conexión al ordenador Conecte la tableta al ordenador con un cable USB 1 Saque el cable Usb del paquete y a continuación conecte la tableta al ordenador 2 Abra la interfaz del controlador la esquina inferior muestra el dispositivo conectado lo que indica que la tableta está conectada correctamente al ordenador Puede empezara usar la tableta ...

Page 99: ...te que depende del tipo de puerto USB de su teléfono a continuación conecte la pen tablet a su teléfono siguiendo las siguientes ilustraciones Notas 1 La pen tablet puede funcionar sin instalar ningún controlador en su teléfono 2 Una vez conectada la tableta entrará automáticamente en modo de teléfono en el que la pluma sólo puede trabajar en el área gris izquierda 3 Tenga en cuenta que las teclas...

Page 100: ...ifica que el controlador ya ha reconocido la Tableta y puede comenzar a usarla ahora 1 Antes de instalar debe desinstalar otro controlador de productos similares incluyendo controladores antiguos de este producto 2 Antes de instalar cierre todo el software de gráficos y el software antivirus para evitar errores innecesarios Notas 2 4 3 Pagina del Controlador Después de que la descarga sea exitosa ...

Page 101: ...piz sobre la superficie de la Tableta ya que puede interferir con el uso de otro equipo de posicionamiento del cursor de la Tableta también puede causar que su computadora no pueda ingresar al modo de suspensión 3 2 Posición del cursor Mueva el lápiz ligeramente por encima del área activa sin tocar la superficie de la Tableta el cursor se moverá a la nueva posición en consecuencia Presione la punt...

Page 102: ...y haga doble clic para abrirlo 3 4 Movimiento Seleccione el objeto luego deslice la punta del lápiz por la Tableta para moverlo 3 5 Uso de los botones Laterales Los botones en el lápiz se pueden configurar en dos funciones personalizables diferentes Puede usar los botones siempre que la punta del lápiz se encuentre a menos de 10 mm del área activa de la Tableta ...

Page 103: ...a nueva punta 1 En sentido antihorario gire el soporte del lápiz para abrir la tapa saque una punta nueva 2 Inserte la punta de la pluma en el orificio de la parte inferior del soporte e incline la pluma para extraer la punta vieja 3 Inserta la punta nueva directamente en la pluma y empuja la punta lenta y firmemente hasta que se detenga ...

Page 104: ...onado en la interfaz del controlador al que va a asignar Si sus monitores están en modo espejo todos los monitores muestran el mismo contenido la Tableta se asigna a todo el espacio en cada monitor y el cursor de la Tableta se muestra en cada monitor simultáneamente 4 1 2 Configuración del Área de trabajo Defina el área de visualización que se asignará al área de Tableta 1 Área completa el área ac...

Page 105: ...ate the display by 0 90 180 or 270 4 2 Configuración de las Teclas Presionables Configuración predeterminada coloque el cursor en el botón presionable o haga clic en éste para encontrar los valores predeterminados Configuración personalizada seleccione la función deseada en el cuadro de diálogo emergente luego haga clic en Aplicar u Aceptar para que tenga efecto ...

Page 106: ...más de ellas y puede organizarlas en cualquier combinación Ingrese la Configuración correspondiente en el cuadro de entrada Por ejemplo Función del botón del mouse haga clic en el cuadro seleccione la función requerida cambiar función también haga clic en el cuadro seleccione la función requerida Ejecute la función del programa haga clic en Examinar seleccione la conexión para crear un acceso rápi...

Page 107: ...del lápiz Las características del lápiz son compatibles con Microsoft Office Windows Journal Adobe Photoshop CC Sketch Book 6 etc Activo Activo 4 3 Configuración de los botones del lápiz Seleccione la función que se desea realizar en el cuadro de diálogo emergente luego haga clic en Aceptar u Aplicar para que tenga efecto ...

Page 108: ...ia abajo derecha el cambio de presión es débil mucha presión produce menos presión Haga clic en el botón en la parte inferior derecha del cuadro de configuración para restablecer la sensibilidad a la presión al estado predeterminado Por ejemplo aplique N respectivamente la misma presión bajo diferentes coeficientes de presión producidos diferentes efectos de presión Según sus hábitos sobre como so...

Page 109: ...ración personalizados para el producto lo que es conveniente para facilitar el uso de diferentes programas y evitar el tener configuraciones repetidas Activo 4 6 Prueba de presión del lápiz Puede aplicar presión gradualmente al lápiz en la Pantalla para probar el nivel de presión Haga clic en el botón para borrar toda la tinta ...

Page 110: ...61 5mm Dimensiones 333 4 x 218 4 x 7 3mm Peso neto 550g Resolución 5080LPI Tasa de informe 266PPS Altura de detección 10mm Interface USB C Botones 10 boutons personnalisables SO Compatibles Windows 7 ou plus macOS 10 12 ou plus Android 6 0 ou plus Lápiz Modelo PW500 Dimensiones 163 7 x Φ14 3mm Peso neto 14g Niveles de Presión 8192Levels Precisión 0 3mm ...

Page 111: ...er instalado el controlador correctamente Los botones presionables no funcionan 1 Asegúrese de que la función Presionar teclas esté habilitada en el controlador 2 Asegúrese de haber definido correctamente los botones presionables 3 Compruebe si el interruptor de bloqueo de presión está en la posición de desbloqueo El ordenador no puede entrar al modo de suspensión Cuando no esté utilizando la Tabl...

Page 112: ...HS611 112 ES Contacto después del servicio 7 SHENZHEN HUION ANIMATION TECHNOLOGY CO LTD 86 755 32998548 www huion com www facebook com huion service huion com huion skype https twitter com HuionTab ...

Page 113: ......

Reviews: