background image


14 

Chapter 2 • Pointing the antenna by using the DAPT2 
1039429-0001 Revision D 


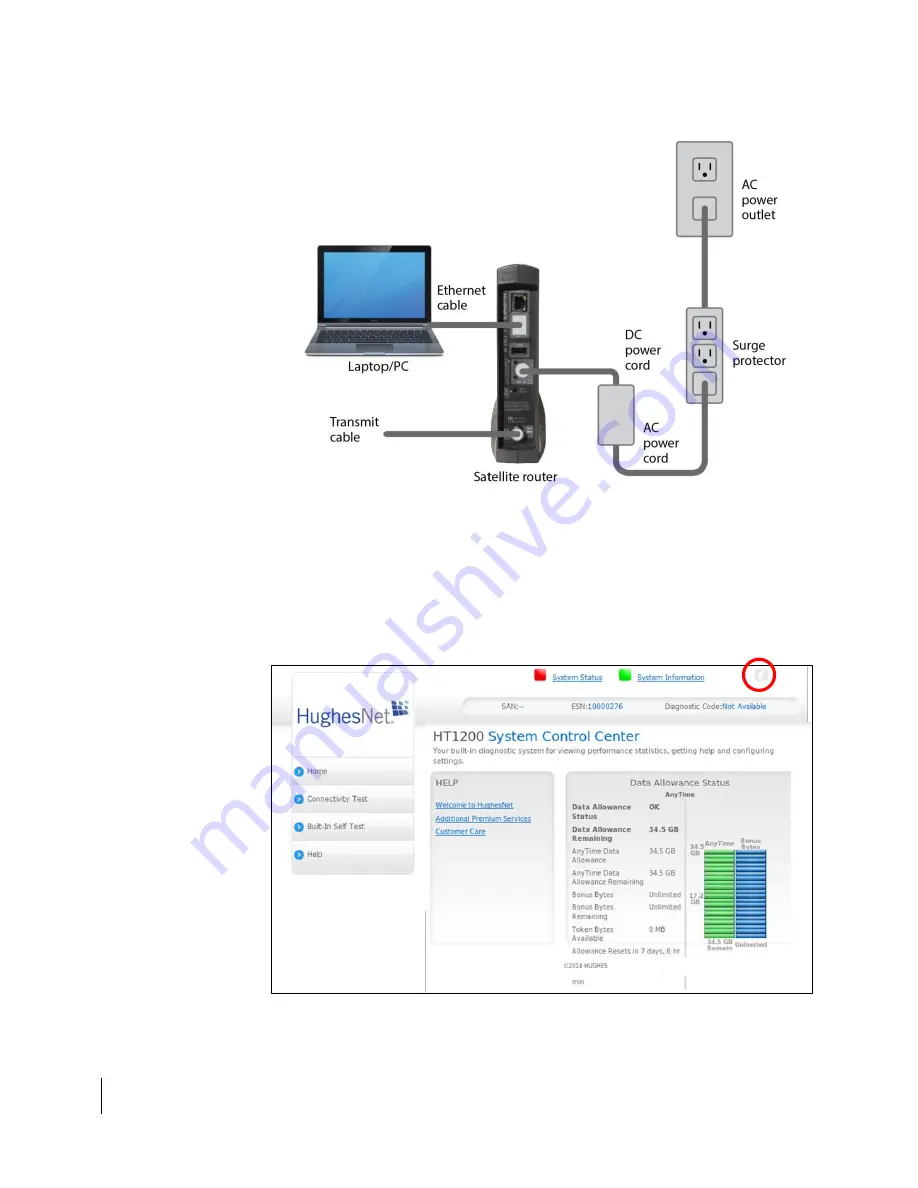
Figure 3: Connecting the installer laptop to the satellite modem (HT1200) 

3.


On your laptop, open an Internet browser. Supported browsers are listed in 

Local user interface (LUI)

 on page 8. 

4.


Type 

192.168.0.1

 in the browser address bar and press 

Enter

5.


At the LUI System Control Center home page, click the small icon near the 
upper right of the screen, as shown in 

Figure 4

 (grayed out letter “i”). 


Figure 4: Icon to Advanced Pages from System Control Center 

Summary of Contents for Jupiter

Page 1: ...Antenna Pointing Guide 1039429 0001 Revision D October 28 2015 11717 Exploration Lane Germantown MD 20876 Phone 301 428 5500 Fax 301 428 1868 2830 ...

Page 2: ...effort to ensure the correctness and completeness of the material in this document Hughes Network Systems LLC shall not be liable for errors contained herein The information in this document is subject to change without notice Hughes Network Systems LLC makes no warranty of any kind with regard to this material including but not limited to the implied warranties of merchantability and fitness for ...

Page 3: ...ith a smart device 10 Entering installation parameters with a wired laptop 11 Chapter 2 Pointing the antenna by using the DAPT2 13 Prerequisites 13 Entering installation parameters 13 Pointing 17 Registration 19 Troubleshooting 22 Chapter 3 Pointing the antenna by using the DAPT3 25 Prerequisites 25 Entering installation parameters 25 Pointing 29 Registration 32 Troubleshooting 36 Chapter 4 Pointi...

Page 4: ......

Page 5: ...hat could result in personal injury or in some cases death as explained below Each of these signal words indicates the severity of the potential hazard DANGER indicates a potentially hazardous situation which if not avoided will result in death or serious injury WARNING indicates a potentially hazardous situation which if not avoided could result in death or serious injury CAUTION indicates a pote...

Page 6: ...dicate a specific type of hazard for example fire or electric shock If other hazard symbols are used in this document they are identified in this section Additional symbols This document uses the following hazard symbols Indicates a safety message that concerns a potential electric shock hazard Indicates a safety message that concerns a potentially hazardous situation in which you could fall Indic...

Page 7: ...na installation process If the satellite antenna is not properly pointed toward the satellite it cannot communicate with the satellite to its full capacity resulting in degraded system performance The basic requirement when pointing a JUPITER antenna is to accurately aim the antenna at the satellite to within 0 2 dB maximum loss of reception and 0 45 dB maximum loss of transmission The JUPITER sys...

Page 8: ... If it cannot acquire them you will need to manually input them Make sure the GPS on your smart device meets the requirements explained in this subsection See Entering installation parameters with a smart device on page 10 for more information Use a GPS receiver not supplied to determine the exact latitude and longitude coordinates of the antenna site These coordinates are used to determine the co...

Page 9: ... 5 Pointing the antenna by using a wireless device DiSEqC Antenna Pointing Tool DAPT2 or DAPT3 Note The Pointing workflow in OASIS effectively replaces the DAPT units If you are using OASIS you do not need to use a DAPT See the OASIS User Guide 1040630 0001 The DAPT2 and DAPT3 are known as two way digital satellite equipment control DiSEqC tools They both have a large backlit display and three but...

Page 10: ...e modem via a wireless router by using the OASIS app The latitude and longitude of the antenna site and the satellite name will populate automatically as you proceed through OASIS step by step installation process When you reach the Pointing workflow in the app you will submit the aforementioned parameters and put the satellite modem into pointing mode See the OASIS User Guide 1040630 0001 Azimuth...

Page 11: ...nal level is peaked you lock the antenna in position Registration After the antenna has been pointed and peaked you complete the installation process by using the Registration workflow in OASIS to validate and record the pointing measurements See the OASIS User Guide 1040630 0001 Entering installation parameters with a wired laptop After completing physical installation of the satellite modem conn...

Page 12: ...tenna reflector to coarsely point the antenna but only if the Az El canister bolts are loose enough so that the reflector rotates easily When the demodulator locks onto the satellite beacon signal the SQF of the received SNR pointing signal appears on the DAPT2 display as a numerical value from 31 to 255 indicating you are locked onto the correct satellite This value is then used to find the peak ...

Page 13: ... one IFL cable Entering installation parameters This section explains how to obtain the proper azimuth and elevation coordinates at the customer location to point to the satellite using the LUI 1 Use your GPS receiver to determine the latitude and longitude of the installation site and record them Note Hughes IDU software does not use negative values to denote south or west You must specify the he...

Page 14: ...aptop open an Internet browser Supported browsers are listed in Local user interface LUI on page 8 4 Type 192 168 0 1 in the browser address bar and press Enter 5 At the LUI System Control Center home page click the small icon near the upper right of the screen as shown in Figure 4 grayed out letter i Figure 4 Icon to Advanced Pages from System Control Center ...

Page 15: ...igure 6 opens 8 Enter the site latitude and longitude obtained from your GPS Figure 6 Input parameters 9 Select EchoStar XVII from the drop down menu as shown in Figure 6 10 Click Submit The satellite modem saves the information and enters pointing mode 11 The Pointing Info screen appears on the installer laptop as shown in Figure 7 on page 16 Note If you modify any existing parameters the modem r...

Page 16: ...of the following values shown on this screen You will need this information to point the antenna and complete the installation Azimuth Elevation Antenna tilt 0 74 m antennas only ODU polarization setting LHCP RHCP HLP VLP Note This is the true polarization setting Ensure that the polarizer on the radio matches this setting ...

Page 17: ...ccordance with the connector labels on the DAPT2 rear panel not shown Figure 8 Installing the DAPT2 When connected properly the DAPT2 powers up automatically and the IFL voltage on the LCD display as shown below Note The voltage reading shown below is only an example Actual voltage may vary but should be greater than 40 VDC If the voltage is too low the IDU LUI will display a state code of 2 1 2 W...

Page 18: ...eater indicates acquisition of the correct satellite beacon 3 Wait for the SQF reading to settle on a value then use the appropriately sized wrench for the specific antenna to adjust the antenna azimuth and elevation See the guide specific to the antenna you are installing for in depth instructions about making these adjustments Continue until you achieve the highest possible SQF value Note The to...

Page 19: ...modem to crash 2 Press Advance 3 to save the pointing validation results or Back 1 to return to the previous state If you press Toggle 2 the DAPT2 display reads This indicates that you have completed the pointing process successfully The DAPT2 displays this message for approximately 10 seconds and then displays the IFL voltage to indicate that the pointing process has finished Note Do not disconne...

Page 20: ...herproofing for outdoor connections These connectors should be used in new installations upgrades and any repairs Outdoor connectors on radios and ground blocks that are in areas with corrosive environments e g salt air may need additional weatherproofing such as weatherproofing tape or a weather boot filled with dielectric grease Figure 9 Hughes approved IFL cable connector ...

Page 21: ...Chapter 2 Pointing the antenna by using the DAPT2 1039429 0001 Revision D 21 Figure 10 Hughes approved IFL cable connector with additional weatherproofing This completes the pointing process ...

Page 22: ... If the satellite modem is not in pointing mode repeat the process explained in Entering installation parameters on page 13 If the DAPT2 does not display the SQF reading SQF sqf after a few seconds press Advance Permanent Logging VoltMeas message Cables on the DAPT2 are not connected properly Reconnect the cables to the DAPT2 in accordance with the connector labels on the DAPT2 rear panel Permanen...

Page 23: ...were entered the modem could be installed in the wrong downlink cell Go to Modify Installation Parameters under Advanced Configuration and Statistics and use the Installation Reference Sheet to make the appropriate corrections SQF is between 0 29 Antenna not correctly pointed Repoint the antenna to achieve the highest SQF value SQF stuck at 30 Wrong carrier Choose the correct carrier on the IDU LU...

Page 24: ......

Page 25: ...2 Run the intra facility link IFL cable between the SAT connector on the satellite modem and the IFL connector on the antenna radio Entering installation parameters This section explains how to obtain the proper azimuth and elevation coordinates at the customer location to point to the satellite using the LUI 1 Use your GPS receiver to determine the latitude and longitude of the installation site ...

Page 26: ... laptop open a web browser Supported browsers are listed in Local user interface LUI on page 8 4 Type 192 168 0 1 in the browser address bar and press Enter 5 At the LUI System Control Center home page click the small icon near the upper right of the screen as shown in Figure 12 grayed out letter i Figure 12 Icon to Advanced Pages from System Control Center ...

Page 27: ...Configuration and Statistics screen appears as shown in Figure 13 Figure 13 Advanced Configuration and Statistics Installation screen 6 From the Advanced Menu in the left panel select Installation Install 7 The HT1300 Input Params screen opens shown in Figure 14 Figure 14 Input Params screen ...

Page 28: ...on and acquired the pointing parameters as described in the next section Pointing on page 29 you will need to return to the modem and reinstall with the TX voltage disabled leaving the Enable TX Voltage checkbox unchecked For the Calibration Type select Automatic or Manual 13 If you chose Automatic continue to step 17 If you chose Manual proceed to step 14 14 Type the cable loss measured in dBs in...

Page 29: ...on describes each phase of the pointing process and the messages that appear on the DAPT3 display screen during the procedure 1 You must connect the transmit IFL cable to the IDU side of the DAPT3 The LNB side should remain open Figure 16 Installing the DAPT3 2 When connected properly the DAPT3 powers up automatically and the IFL voltage on the LCD display as shown below Note The voltage reading s...

Page 30: ...T connected and need to connect the yellow DAPT3 If you have the correct DAPT you will not see this message 6 This message will display momentarily while the DAPT is measuring the cable loss 7 If this is the first time calibrating you will not see this CableCal Skipped message Go to step 9 8 If the calibration has been done previously this will display If you would like to calibrate the cable loss...

Page 31: ...re the cable you are using is the correct length 12 When the measure calibration loss is valid the screen will display CableCal Done 13 Logging VoltMeas will display momentarily while the voltage is recorded 14 After a few seconds the Logging Done message appears 15 Press the Advance 3 button When the satellite modem receives the voltage response message it advances to the pointing state during wh...

Page 32: ...l adjustments You may gently maneuver the antenna reflector to coarsely point the antenna but only if the Az El canister bolts are loose enough so that the reflector rotates easily 17 When the signals are peaked tighten the azimuth and elevation bolts completely Note Because slight movement of the antenna occurs during lockdown always measure the signal peak value after locking down the antenna Re...

Page 33: ...to indicate that the pointing process has finished Note Do not disconnect the DAPT3 until the IFL voltage disappears Disconnecting the DAPT3 prematurely could cause a loss of all stored data invalidating the entire process 3 Disconnect the DAPT3 4 Ensure the TX IFL Voltage field on the satellite modem s registration screen Figure 18 on page 33 displays the correct value either On or Off depending ...

Page 34: ...ectors should be used in new installations upgrades and any repairs You may further protect radio connectors by wrapping them with weatherproofing tape such as GB Electronics silicone tape or by covering them with a weather boot that has been filled with dielectric grease This extra weatherproofing may be needed in areas with high salt air exposure Figure 19 Hughes approved IFL cable connector ...

Page 35: ...Chapter 3 Pointing the antenna by using the DAPT3 1039429 0001 Revision D 35 Figure 20 Hughes approved IFL cable connector with additional weatherproofing This completes the pointing process ...

Page 36: ...eters on page 25 If the DAPT3 does not display the SQF reading SQF sqf after a few seconds press Advance Permanent Logging VoltMeas message Cables on the DAPT3 are not connected properly Reconnect the cables to the DAPT3 in accordance with the connector labels on the DAPT3 rear panel Permanent Switch IFL Cable message The satellite modem cable is connected to the LNB side of the DAPT3 Reconnect th...

Page 37: ...were entered the modem could be installed in the wrong downlink cell Go to Modify Installation Parameters under Advanced Configuration and Statistics and use the Installation Reference Sheet to make the appropriate corrections SQF is between 0 29 Antenna not correctly pointed Repoint the antenna to achieve the highest SQF value SQF stuck at 30 Wrong carrier Choose the correct carrier on the IDU LU...

Page 38: ......

Page 39: ...ccess the modem Hughes provides a list of recommended routers on the Installer Portal Perform the following steps to set up the wireless router to work with the satellite modem and a wireless laptop or smart mobile device Do not use the Netgear setup disk The initial setup must be performed on a computer with an Ethernet port so the wireless router can be wired to the computer This process only ne...

Page 40: ...ve and click OK 8 Disconnect the Ethernet cable from the laptop Point and activate terminal with wireless device 1 Plug the Ethernet cable from the satellite modem into the WAN port on wireless router as shown in Figure 22 Figure 22 Connecting the satellite modem and Wi Fi router 2 Plug in the power cord of the Wi Fi router 3 On your wireless device search for available Wi Fi signals 4 Continue wi...

Page 41: ...tenna by using a wireless device 1039429 0001 Revision D 41 Figure 23 Icon to installation screen from System Control Center 7 On Advanced Configuration and Statistics page click Installation Install Figure 24 Install menu item ...

Page 42: ...put Params tab 9 On the Pointing tab Figure 26 note the azimuth elevation and antenna tilt Confirm the uplink polarization Uplink Pol settings The screen shows the Max SQF on left and the Current SQF on right Figure 26 Pointing tab 10 Wait for the SQF reading to settle on a value then use the appropriate size wrench for the antenna to adjust the antenna azimuth and elevation Adjust until you achie...

Page 43: ...ions with dielectric grease Depending on your installation environment weatherproofing tape may also be needed as shown in Figure 28 on page 44 Note If you use any cable ties they must be resistant to ultraviolet rays Hughes connectors in conjunction with the dielectric grease provide weatherproofing for outdoor connections These connectors should be used in new installations upgrades and any repa...

Page 44: ...44 Chapter 4 Pointing the antenna by using a wireless device 1039429 0001 Revision D Figure 28 Hughes approved IFL cable connector with additional weatherproofing This completes the pointing process ...

Page 45: ...S Global positioning system I IDU Indoor unit IFL Intra facility link L LAN Local area network LCD Liquid crystal display LHCP Left hand circular polarization LUI Local user interface O OASIS Onsite Accelerated Service Installation System R RHCP Right hand circular polarization S SNR Signal to noise ratio SQF Signal quality factor W WAAS Wide area augmentation system ...

Page 46: ...r messages 22 36 installing 17 E Elevation adjusting 18 32 determining coordinates 13 25 F Filters pointing selecting 18 32 G GPS description 8 using 13 25 I IFL cables 13 19 25 33 voltage 17 29 Initial satellite acquisition 12 Installation parameters entering 11 13 25 See also LUI K Ka band antenna 7 L LUI accessing 13 25 description 8 display 14 16 14 16 P Pointing coarse 17 29 requirements 7 va...

Page 47: ...Index 1039429 0001 Revision D 47 V Validation 19 21 ...

Reviews: