background image

DIRECTV PLUS SYSTEM FROM HUGHES NETWORK SYSTEMS - OWNER’S MANUAL

P

AGE 

6-8

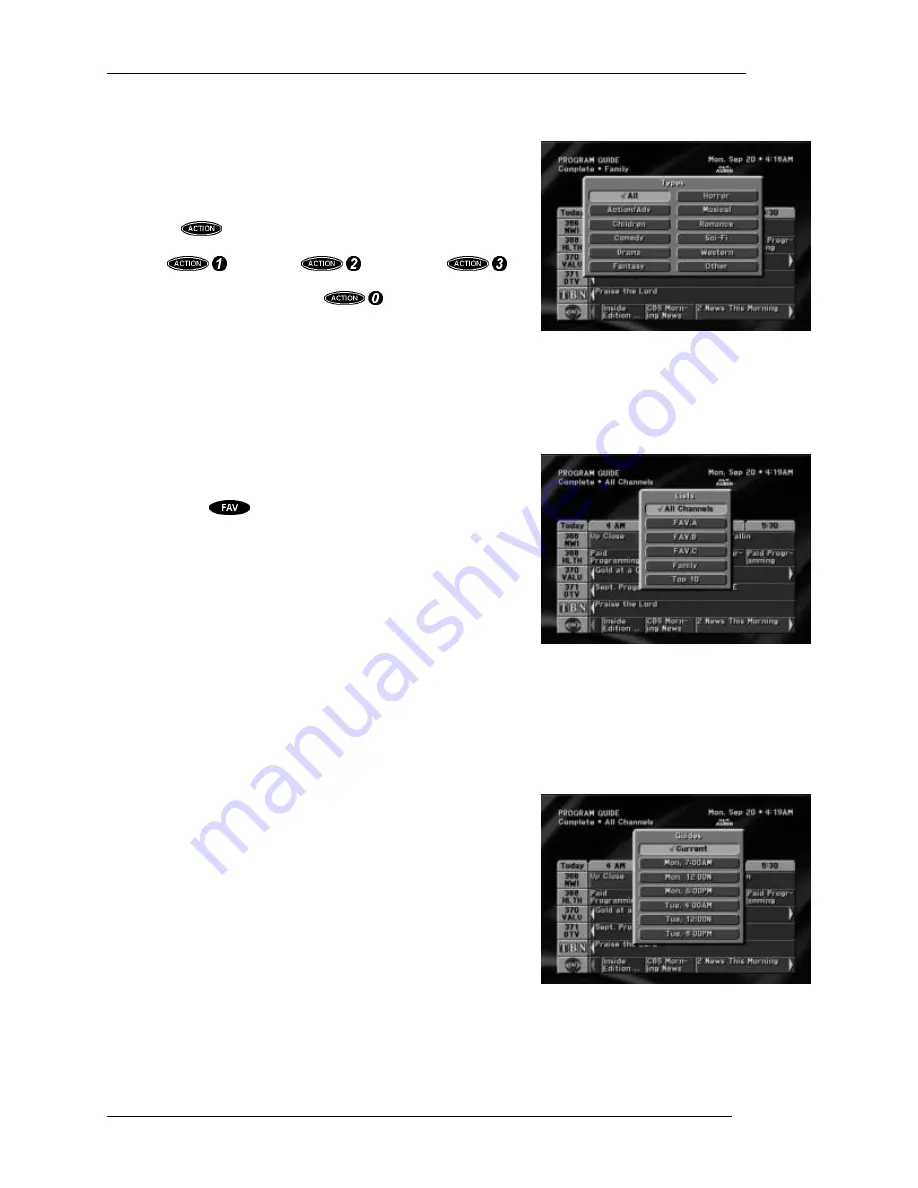
The Types pop-up menu allows you to break down your chosen theme by type. For example, if you
chose 

Movies

 for the category, you can now choose a type of movie

such as 

Comedy

Drama

Sci-Fi

, etc. After selecting one of these, the

guide will be further filtered to show only those channels offering
programs of the selected category and type.

Popular categories can be quickly selected from your remote control
by pressing 

 followed by a number key. You will see labels on

the remote control for filtering the guide to movies, sports, news, and
all. Press 

 for movies, 

 for sports, or  

for news and the guide will filter accordingly. Pressing the key
sequence a second time or pressing 

 will restore the guide

to show all themes.

Channel List

The Lists pop-up menu enables you to filter the guide to display only channels from the selected list. In
addition to 

All Channels

, you can choose one of your own defined

lists. See the “Fav. Lists” section of “The Digital Satellite Receiver’s
Menu System” to learn how to set your favorite lists.

You can use the 

 key to cycle through the lists at any time in

the on-screen guide without using the drop-down menu. The 

Top-10

list can only be selected via the drop-down menu.

The “Top 10” favorite list is automatically maintained by the digital
satellite receiver. The digital satellite receiver monitors the channels
viewed in your household and compiles the ten most watched
channels on the list. As viewing habits change, the list will update
itself accordingly.

It should be noted that all channel lists are maintained privately
within the digital satellite receiver for your use only.

Guide Times

The 

Guides

 pop-up menu ordinarily provides easy access to future programming information. Simply

select one of the hour offsets from the current time. After a few
seconds, the selected guide will appear.

Another type of guide that may be offered is a list-type guide. These
guides do not represent channels and time, but rather a list of
possible options. These guide types are very rare.

The Types pop-up menu

The Lists pop-up menu

The Guide Times pop-up menu

Summary of Contents for DirecTV HIRD-E11

Page 1: ...Model HIRD E11 HIRD E25 Digital Satellite Receiver Owner s Manual ...

Page 2: ...6 121 5 151 789 5 335 277 5 353 121 5 479 266 5 479 268 and 5 532 754 Use rights reserved Macrovision Information This device incorporates an anticopy process technology that is protected by U S patents and other intellectual property rights The anticopy process is licensed for noncommercial home use only Reverse engineering or disassembly is prohibited Note on Recording Programming Most televisio...

Page 3: ...o install the satellite dish antenna near power lines You can be killed if the satellite dish antenna comes into contact with electric power lines Do not contact overhead power lines Check the distance to any nearby power lines before starting installation Stay at least 20 feet away from all power lines If any part of the satellite dish antenna or mast assembly comes into contact with a power line...

Page 4: ...able used to connect the satellite dish antenna to the indoor receiving unit are required to comply with local installation codes and the appropriate sections of the National Electric Code NEC and in particular Article 810 15 which covers proper installation and grounding of television receiving equipment as well as to Article 820 33 which specifies that the satellite dish antenna cable ground sha...

Page 5: ... no user serviceable parts inside Refer all servicing to qualified service personnel Conditions Requiring Service Unplug this DIRECTV PLUS System from the wall outlet and refer servicing to qualified personnel under the following conditions When the power supply cord or plug is damaged If liquid has been spilled on or objects have fallen into the DIRECTV PLUS System or it has been exposed to water...

Page 6: ...ting Office Washington DC To meet FCC requirements only peripherals computer input output devices terminals printers etc certified to comply with the Class B limits may be attached to this device Operation with non certified peripherals is likely to result in interference to radio and TV reception To meet FCC requirements shielded cables are required to connect the device to a personal computer pe...

Page 7: ... ONTO A METAL POLE 4 12 ATTACHING THE REFLECTOR ONTO THE LNB SUPPORT ARM 4 13 Assembling the Satellite Dish Antenna 4 13 ATTACHING THE SATELLITE DISH ANTENNA ASSEMBLY TO THE MAST OR POLE 4 14 GROUNDING THEMETAL POLE MOUNT 4 14 GROUNDING THE BASE PLATE 4 15 INSTALLING AND ROUTING THE LNB COAXIAL CABLE 4 16 CONNECTING THE COAXIAL CABLE TO THE LNB 4 17 Installation Procedure 4 17 ATTACHING THE LNB TO...

Page 8: ... defined Filters 7 8 ADVANCED PREFERENCES 7 9 Receiver ID 7 9 Phone Prefix Error Bookmark not defined Screen Ratio 7 9 Channel Lock 7 9 Input Key 7 9 Demo Mode 7 10 Factory Defaults 7 10 LIMITS 7 10 TV Timer 7 10 Max Rating 7 11 Max Spending 7 11 CHANNEL LISTS 7 11 Rename 7 12 Auto Set 7 12 Clear 7 12 Set 7 12 Tag Boxes 7 12 TURBOTUNE 7 13 Set Channel 7 13 INSTALLATION 7 13 System Test 7 13 New Ca...

Page 9: ...nsmits the signals 22 300 miles into space to a grouping of high powered satellites 3 built by Hughes Electronics These satellites are located in geostationary orbit This means that after installation of the DIRECTV PLUS System which includes aiming the satellite dish antenna at the satellites no adjustment will be necessary to change channels because everything comes from the same locations in th...

Page 10: ... This digital satellite receiver is one of the most compact available today The basic features for setup installation and viewing programming can be accessed from the front panel keys Your access card is located behind the door on the right side of the digital satellite receiver This special card contains information about your level of service and holds pay per view purchase activity This card sh...

Page 11: ...and color coded L is white R is red to indicate left and right can be used for connection to your TV VCR or audio system The phono type composite VIDEO output jack is color coded yellow You may use this jack for connection to your TV or VCR The multiple pin S VIDEO jack is for high quality output of DIRECTV PLUS System video Use this jack to achieve the clearest picture for your TV or VCR Only new...

Page 12: ... the highlighted item The arch of keys below the power and mode keys control frequently used functions These include special action information guide exit and favorite keys The key is unique because it does nothing by itself Pressing it displays the action icon in the upper left corner of your screen for a few seconds During that time other keys may be pressed to access special functions indicated...

Page 13: ...ng or damaged Please save all packing materials until the installation of your system is complete in case anything needs to be returned You now need to decide where you want to place the digital satellite receiver Choose a location near your TV where the power cord or cables will not be inadvertently disconnected The location should also be well ventilated Do not set electronic components or other...

Page 14: ...put receptacles their shapes and how they are labeled Then read through the rest of this hookup section before going ahead with actual hookup Do not turn on the power yet For your safety make sure the digital satellite receiver TV VCR and any other devices to be connected are unplugged from the wall outlet while hooking them up Hook Up the Audio S video Signals Only the newest high end TVs and VCR...

Page 15: ...S System programming and local broadcast simultaneously on TVs that offer a picture in picture PIP feature When using this hookup you cannot use the digital satellite receiver as a switch to choose between DIRECTV PLUS System programming and local broadcasts Instead you will use the input selection that your TV and or VCR offer to select the source If your VCR has a video input use an audio video ...

Page 16: ...eo system you may be able to achieve big speaker sound See the Hook Up to a Stereo System section for the necessary connections If your hookup is complete move on to the Finishing Up section Hook Up to a Stereo System To achieve high quality sound from the digital satellite receiver through a stereo system simply connect the AUDIO outputs Left and Right to an available input on your audio system F...

Page 17: ...nce your VCR responds to your pressing the remote control power note the position This should be the location of your VCR IR sensor Once the sensor position has been determined temporarily attach the emitter to the area with a piece of tape until the system can be tested Refer to the VCR Setup section in the chapter The Digital Satellite Receiver s Menu System to program and test the VCR Control f...

Page 18: ...DIRECTV PLUS SYSTEM FROM HUGHES NETWORK SYSTEMS OWNER S MANUAL PAGE 2 6 ...

Page 19: ... digital satellite receiver Most of the remote control keys can also be used to control other components in your entertainment system For this reason you must remember to press the key putting the remote control in digital satellite receiver mode when you want to control the digital satellite receiver Basic Navigation Two distinct keys on the digital satellite receiver front panel represent the an...

Page 20: ...r you have established favorite channel lists as described in the chapter The Digital Satellite Receiver s Menu System you will want to cycle through them quickly and easily Do so by pressing the key Each press will advance to the next list of channels After stepping through the favorite lists it will cycle back to All Channels At any time you can exit the on screen guide by selecting Video in the...

Page 21: ...ectrical Code by the National Fire Protection Association Batterymarch Park Quincy MA 02269 If you are unsure about your ability to perform these tasks or comply with installation requirements contact your DIRECTV PLUS System dealer for information regarding professional installation Successfully installing and obtaining the satellite signals can be a time consuming and tedious task For that reaso...

Page 22: ...creen to display the MAIN MENU or to move the highlight over theSetup Menu button to display theSETUP MENU or to move the highlight over the Installation button to display the INSTALLATIONscreen Determine Where to Point Your Satellite Dish Antenna The INSTALLATION screen When you press you will see a screen that assists you with the satellite dish antenna pointing and signal strength utilities Mov...

Page 23: ...ess the key followed by the five appropriate digits From the remote control or receiver front panel you can also use the or keys to increase or decrease the highlighted digit value and the key to advance to the next digit Use the key on the remote control to back up to correct any mistakes When you are finished highlight the OK button and press to continue ALIGNMENT RESULT Pop up Panel The ALIGNME...

Page 24: ...the needle The compass is now aligned with magnetic north Note Large metal structures such as air conditioning units and steel beams near the compass may greatly reduce its accuracy If you are near such structures move several feet away and repeat the measurement to verify the readings 3 Draw an imaginary line from the center of the compass to the azimuth value you recorded above This is the direc...

Page 25: ...NEC 820 33 Note If you will be installing the satellite dish antenna base plate and mast using a mounting configuration other than the ones recommended here do so as follows 1 Install the base plate and mast 2 Verify that the mast is level 3 Go to the section titled Attaching the Reflector Onto the LNB Support Arm Installing the satellite dish antenna on the side of your house Do not install on vi...

Page 26: ...nter s level Pencil or chalk Electric drill Siliconesealant Washers 5 16 inch Qty 4 Wrenches 3 8 inch 7 16 inch Lag screws 3 inch x inch Qty 2 2 inch x 5 16 inch Qty 4 Installation Procedure 1 Select a secure site to install the satellite dish antenna base plate On the side of your house Locate a wall stud onto which you can install the antenna base plate as shown Wall studs can most easily be fou...

Page 27: ...t the mast is still plumb and adjust if necessary 8 Mark the locations of the outside holes and remaining center hole on the mounting surface 9 Remove the base plate from the mounting surface 10 Drill a 1 8 inch x 3 inch pilot hole for the lower center hole 11 Drill four 1 8 inch x 2 inch pilot holes for the outside holes 12 While holding the base plate in place apply silicone sealant onto the six...

Page 28: ...brick surfaces Do not drill into the mortar between the bricks 3 Using a carpenter s level plumb the satellite dish antenna mast in at least two different locations on the side of the mast as shown These two measurements should be at right angles to each other If the mast is plumb aligned vertically with the bubble level go to step 5 Otherwise loosen the pivot bolt and adjustment nuts see diagram ...

Page 29: ...Installing the Satellite Dish Antenna onto a Cinder Block Surface The satellite dish antenna can be installed onto cinder block surfaces This section describes installing the satellite dish antenna base plate and mast onto a cinder block or masonry surface Have the following tools and materials handy during this process Items marked with a asterisk indicate that they are included in the Do It Your...

Page 30: ...feel the channel open inside the hollow core of the cinder block Rotate the toggler and gently pull the ring to ensure the metal channel is flat against the inside of the cinder block While pulling the toggler toward you to apply tension slide the push cap until it is snug against the cinder block Break the ring along the center perforation and bend the two straps away from each other until they b...

Page 31: ...rost line goes deeper than 30 inches dig the hole at least 6 inches deeper than the frost line 3 Place the pole into the hole and place rocks for example around the pole to stabilize it in a vertical position 4 Fill the hole with prepared quick drying cement Shape the top of the concrete with a slope to improve drainage 5 Using a carpenter s level plumb the pole in at least two different locations...

Page 32: ...st or Pole Now that you have assembled the satellite dish antenna you are ready to mount it on your previously installed mast or pole While the diagrams may show a satellite dish antenna model that differs from the one you have the same procedures apply 1 If necessary slightly loosen the azimuth nuts on the LNB support arm 2 Slide the satellite dish antenna assembly onto the mast or pole until the...

Page 33: ...ammer to drive the ground rod 8 feet into the ground 2 Install the grounding clamp approximately 1 foot from the base of the pole 3 Install the 8 aluminum grounding wire onto the ground clamp in accordance with National Electric Code 810 15 4 Route the ground wire from the clamp to the ground rod Use the ground rod clamp to attach the grounding wire to the ground rod 5 Secure the ground wire to th...

Page 34: ...shortened Cables that are suitable for burial use a special outer cover that resists breakdown Some of these cables also have a special coating on their ground shields This coating resists corrosion if water gets into the cable Anytime the coaxial cable is buried use cable that is suitable for burial Doing so will help prevent problems in the future An important goal of your cable installation is ...

Page 35: ...onnecting the Coaxial Cable to the LNB Installation Procedure 1 Make sure your satellite receiver is unplugged Connecting the LNB cable to the LNB while the satellite receiver is plugged in could permanently damage your LNB 2 If you installed the satellite dish antenna assembly onto a metal pole go to step 3 Otherwise route the coaxial cable s through the mast and LNB support arm and then continue...

Page 36: ...e the drip loop s and cable s to the wall with cable clips 5 Inside the building route the cable s to where the satellite receiver s are located Depending on the installation site this could be through a floor or wall directly to the rear of the satellite receiver If the cable goes straight through a wall you can use a wall plate at the access point 6 Seal the access point into the building with s...

Page 37: ...INSTALLATION screen You should see a meter displaying your signal strength The INSTALLATION Screen The INSTALLATION screen shows the quality of the signal that you are receiving Because you have not adjusted the direction of your satellite dish antenna you probably have a signal strength of 0 To let you know that it is looking you should hear a short beep every few seconds Even though a signal str...

Page 38: ... just enough so that you can easily tilt the reflector up and down Next line up the elevation indicator with the tick mark corresponding to the elevation calculated earlier result minus 4 degrees This indicator is the leading edge of the metal just to the left of the bolt It is recessed inside the slot Do not use the bolt or nut as a point of reference Finish adjusting the elevation by lightly tig...

Page 39: ... last viewed program or 02 if no program has been viewed By moving the highlight to the transponder area you can enter a number from 01 to 32 Different transponders may show varying signal strengths This is not indicative of any problem unless the variations are extreme such as 40 and 90 In the event of signal reception problems customer service representatives may ask for information such as sign...

Page 40: ......

Page 41: ...f the screen You can also display the Channel Banner any time by pressing the key The key on the front panel of the digital satellite receiver will also provide this functionality if there are no other messages indicating otherwise Pressing will remove the banner immediately This banner contains information about the program including the program start and end times title rating channel call sign ...

Page 42: ... highlighted channel tag You can choose one of the nine by moving the highlight over the desired channel and pressing A shortcut to moving the highlight is to press the remote control numbers that corresponds with the on screen position of the desired channel In the example on the right press 7 for CNN AlphaTune AlphaTune enables you to tune to a channel by spelling a channel s call sign rather th...

Page 43: ...nd select the Alt Audio to temporarily change the audio language Alt Audio Once you have selected the Alt Audio button you can use the and keys to step through the audio tracks offered for the current program To choose the highlighted language press On occasion an audio track may be offered that is not being broadcast If this is the case for the selected track the audio you hear will either be unc...

Page 44: ......

Page 45: ...ngs such as Guide Times and Classes may be specified to determine the guide content A full description of the filtering options can be found later in this chapter Choosing the Guide Style To display on screen guides press the key Press the key again to display or remove the guide pop up menu The guide menu provides buttons to access the MAIN MENU exit to Video ways to narrow your search and Guide ...

Page 46: ...arious guide styles to suit various tastes and needs Descriptions One guide option is to automatically display descriptions for highlighted program titles The descriptions usually provide information such as actors names a program synopsis and additional rating information Sometimes the description may be only a message describing what type of program is highlighted such as Current News This optio...

Page 47: ...g the Schedule To Tape feature the following steps must be completed for the digital satellite receiver to perform unattended recording Attach the VCR Control cable see chapter Setting Up Your DIRECTV PLUS System Use the VCR SETUP screen see chapter Your Digital Satellite Receiver s Menu System Set your VCR to match the output of the digital satellite receiver This could be either RF channel 3 or ...

Page 48: ... s PREFERENCES screen described in The Digital Satellite Receiver s Menu System the tags may display the channel numbers or call signs This will dictate whether the channels are listed by channel number or alphabetically by call sign To navigate the guide use the and keys You can continue to press the or keys to scroll more program offerings onto the screen Pressing on any title will direct you to...

Page 49: ...er s Menu System the tags may display the channel numbers and call signs or network logos Also the Channel Sort Name or Number option specified in the system s PREFERENCES screen will dictate whether the channels are listed by channel number or alphabetically by call sign To navigate the guide use the and keys You can continue to press the or keys to scroll more program offerings onto the screen P...

Page 50: ...rent channels the word Multiple will appear in this column Pressing on any title will direct you to the INFORMATION screen where you can select Show Times to determine which showings best suit you To move around the guide use the or keys You can continue to press the or keys to scroll more program offerings onto the screen To speed up the process of reviewing the guide you can use or to page throu...

Page 51: ...gram The third column indicates the channel that the program is or will be airing on The fourth and final column indicates the keyword that was found in the program title Pressing on any title will direct you to the INFORMATION screen To speed up the process of reviewing the guide you can use or to page through the guide entries a full page at a time Filtering the Guides Searching through hundreds...

Page 52: ...ts See the Fav Lists section of The Digital Satellite Receiver s Menu System to learn how to set your favorite lists You can use the key to cycle through the lists at any time in the on screen guide without using the drop down menu The Top 10 list can only be selected via the drop down menu The Top 10 favorite list is automatically maintained by the digital satellite receiver The digital satellite...

Page 53: ...d with the selected program Many variations of button combinations exist The button on the left side of the Things to Do area could be View PreSelect or DeSelect Another button that could appear refers to pay per view programs only Unless your receiver is authorized to make such purchases this button will not be displayed It could be Buy Cancel Purchase or Buy Options The following buttons may be ...

Page 54: ...Set your VCR to match the output of the digital satellite receiver This could be either RF channel 3 or 4 or A V phono or S video Insert a recordable videotape of sufficient length in the VCR Leave the VCR turned ON Don t Schedule is used if you initiate the drop down menu and then choose not to schedule anything PreSelect To View The PreSelect To View option appears when the unattended recording ...

Page 55: ...ther purchase option is of interest to you highlight Don t Purchase and press Cancel Purchase Some events may allow cancellation after they have been purchased depending on the event type and whether the event has been viewed Unviewed purchases can usually be canceled If the Cancel Purchase button is displayed you are allowed to cancel the previous purchase If this button is not offered then most ...

Page 56: ......

Page 57: ...bottom of the screen you will see an area that is dedicated to providing a brief explanation of the currently highlighted on screen button Places to go Down the left hand edge of the screen is a variety of buttons These buttons usually navigate you to different screens The top two buttons on the list are always Done and Video The Done button will take you back one level The Video button will retur...

Page 58: ... detail in this chapter Setup The Setup button will take you to the SETUP MENU which provides access to infrequently changed setup options of the digital satellite receiver Scheduler The Scheduler button takes you to the SCHEDULER screen where you can program and edit automated channel changing events Events can be programmed to occur either once or multiple times Check Mail The Check Mail button ...

Page 59: ...E SETUP screen from which you may set the channels associated with the TurboTune feature See the chapter Watching DIRECTV PLUS System Programming for more information on using TurboTune Refer to the TurboTune section later in this chapter for information about programming the TurboTune feature Installation The Installation button takes you to the INSTALLATION screen which contains utilities to fac...

Page 60: ... or S video Insert a recordable videotape of sufficient length in the VCR Leave the VCR turned ON Things to do in the SCHEDULER screen The EVENT TIMER screen displays up to seven rows of events You can use the key to scroll through the events There are multiple settings for the On column a check mark ü for viewing only or on the HIRD E2 model a videotape symbol for taping Editing an event The Even...

Page 61: ...K Otherwise choose Cancel to delete the edits made to this event Check Mail The CHECK MAIL feature of the digital satellite receiver enables DIRECTV to notify you about important information upcoming special events offers and other promotional programming When new messages are received a new mail icon appears at the top of all menu screens This indicator will remain on the menus until you have rea...

Page 62: ... not appear on this list You cannot remove events from this list Reported events will disappear from this list as the digital satellite receiver needs space to log more recent purchases You will see the event channel title the start date and time and the cost for each purchase There may be more events than can fit on the screen You can access these by using the key or key If you need to discuss an...

Page 63: ...ellite receiver is locked Unlocking Procedure To remove the lock and its restrictions highlight the Unlock button and press the key When the SYSTEM UNLOCK pop up panel appears you can use the and keys or the remote control number keys to enter the four digit passcode that you used to lock the digital satellite receiver earlier If you enter the code using the number keys you will not see the number...

Page 64: ...nd and news on a brown background All other program categories will continue to appear on a blue background Chan Tags The Chan Tags option will influence only the appearance of the PROGRAM GUIDEstyles With this control you may choose whether the channel tags will appear as channel numbers and call signs or as network logos Chan Sort By default Channel Sort Option is set to Number This numerically ...

Page 65: ...en signals To avoid this cross talk simply highlight the Receiver ID button and press on the remote control to be used for that specific digital satellite receiver Remember to set your remote control to the desired code first For information regarding changing the remote control code see the chapter Programming Your Remote Control Screen Ratio Screen Ratio should be set to 4 3 for most televisions...

Page 66: ...ettings to help you control the viewing restrictions of satellite programming These limits when accompanied by the CHANNEL LISTS put a great degree of control in your hands For the TV Timer Rating and Spending limits to be enforced the digital satellite receiver must be locked as described earlier in this chapter Places to go from the LIMITS screen TV Timer The TV Timer is only available on the HI...

Page 67: ...G LIMIT pop up panel When the digital satellite receiver is locked the passcode will be needed to change the ratings limit Use the number keys on the remote control to set the limit or use the and keys to increase or decrease each digit Use the and keys to highlight the digit that you want to change The maximum limit is 655 per event Highlight OK and press to confirm the entered amount Channel Lis...

Page 68: ... You may decide to remove all channels from a particular list later on Selecting Clear will allow you to clear all channels from a chosen list You may then add channels back in Set If you decide to include all channels in a particular list selecting Set will allow you to specify the list You may then remove channels from this list if you so choose Things to do in the CHANNEL LISTS screen Tag Boxes...

Page 69: ... old access card will no longer allow viewing You should not interrupt the process once it has begun An interruption could cause both the old and the new card to become invalid When the process is complete your new access card will be usable while the old card will no longer be valid Satellite This button only applies for oval dishes that are equipped with LNBs that receive signals from 101 119 an...

Page 70: ...d with two LNBs in the positions marked SAT A 101 and SAT B 119 Each LNB will have one or two outputs TRIPLE Refers to the larger oval multi LNB satellite dish This dish will be configured with three LNBs in the positions marked SAT A 101 SAT B 119 and SAT C 110 Each LNB will have one of two outputs Note When Satellite 1 is used in reference this is equivalent to SAT A Likewise Satellite 2 equates...

Page 71: ...use of the problem Otherwise you may simply find this test to be a convenient way to analyze your signal quality VCR Setup The VCR SETUP screen on the HIRD E2 model digital satellite receiver provides access to the settings that will allow the digital satellite receiver to communicate the record and stop commands to your VCR Things to do in the VCR SETUP screen Brand Search through the various bra...

Page 72: ...ide Note For the WatchWord Guide to have the opportunity to find programs with matching words your digital satellite receiver must be turned off for a period of time It is recommended that you allow your system to look for your words while you sleep or when you are at work It cannot search for words while it is turned on Things to do in the WATCHWORD screen WatchWord Highlighting one of the eight ...

Page 73: ... either the code scan or code entry method Code Scan Once you are in programming mode repeatedly tap the key to step through the codes sending out the power command This could take some time since there are could be many for each type of device When your device shuts off you have found the code If you inadvertently go past a code that responded or realized that you may not have been aiming the rem...

Page 74: ...47 Runco 072 130 Sampo 070 004 058 Samsung 101 004 050 089 105 160 127 143 133 Sanyo 007 020 053 057 082 Scott 004 028 043 048 143 Sears 015 030 028 094 004 007 057 082 143 160 167 Sharp 081 004 014 019 022 028 143 029 Siemens 088 Signature 072 Sony 001 085 126 166 079 Soundesign 028 003 004 043 Spectricon 112 SSS 004 043 Supre Macy 002 Sylvania 070 003 059 060 063 064 127 160 164 044 Sylvester 91...

Page 75: ...8 139 155 162 164 186 232 McIntosh 251 Mondial 069 070 077 225 226 MCS 108 178 Mitsubishi 253 Merldian 013 067 NAD 128 Aux CODE NUMBER Nakamichi 072 212 234 235 Niles 236 Onkyo 079 094 115 116 207 209 211 255 Optimus 121 125 140 181 Panasonic 131 144 187 200 Parasound 085 086 090 Philips 136 186 126 197 Pioneer 087 093 132 138 210 165 168 189 195 201 081 230 Quasar 131 187 RCA 109 213 166 Realisti...

Page 76: ...ou haven t missed the code In order to lock in the code press the SAT key again The remote will remember the code until you reprogram it Identifying Codes that Have Been Stored You can determine the codes that are stored in your remote control This may be useful for reprogramming additional remote controls later on 1 Press the device key and the Mute key simultaneously 2 Press the key and count th...

Page 77: ...n a component to a mode key that has a different label For example you can assign a second TV to the AUX key 1 Begin the programming process as described earlier i e Press and hold the AUX key and then press the Mute key Then release both keys 2 Press the device key associated with the type of device you wish to assign to the AUX key 3 Establish the correct code either by scanning or direct code e...

Page 78: ......

Page 79: ...d Q My digital satellite receiver does not respond when I press keys What s wrong A Most likely if the front panel keys work but the remote control doesn t work try pressing the SAT key before trying to control the digital satellite receiver If that doesn t work press the SAT and Mute keys together and try again If that doesn t work or if the front panel keys don t work either unplug your digital ...

Page 80: ...rogram guide just as any other channel For options 2 or 3 connect the local signal to the IN FROM ANTENNA on the back of your digital satellite receiver Use the key to switch between satellite programming and local programming provided on the OUT TO TV connector Q If I have questions about my DIRECTV PLUS System or need to have it serviced who should I call A For issues regarding your equipment co...

Page 81: ...s of programming damage due to lightning for example power surges nearby strikes acts of God cost of shipping to HNS batteries or cables after installation This limited warranty is not transferable and is valid only in the United States SERVICE If you have any questions or encounter any problems you may contact your authorized HNS dealer or call our Customer Care Center at 1 800 274 8995 To ensure...

Page 82: ...Part 1028088 0001 Revision A ...

Reviews: