Page 2
Kim Lighting • 16555 E. Gale Ave. • P.O. Box 60080 • City of Industry, CA 91716-0080 • 626/968-5666 • FAX 626/330-3861
NEO SPHERE
®
- NS
Installation Instructions
MAINTENANCE INSTRUCTIONS:
Make certain electrical supply is
OFF
before beginning maintenance procedures.
Fixture Opening:
Loosen the self retained
J
-
20 screw located in the lens frame, (opposite hinge area), and open
fixture until the stop arm prevents further movement.
Reflector and Lens Cleaning:
A regularly scheduled maintenance program should be followed to retain optimum
light output and reduce heat retention. Dusting with a soft, clean dry cloth is normally sufficient for the reflector. Any
accumulation of dust or dirt should be removed regularly from both sides of the lens during relamping (using ammonia
water).
Do not
use alkaline or acid on reflector surfaces.
!
REMOVING REFLECTOR ASSEMPLY:
Vertical Lamp Reflector:
Loosen (
Do Not Remove
) the four 10-32 screws located at the top of the reflector
assembly. Slightly turn reflector bracket to release screws through key-hole slots. Lower reflector assembly and
unplug nylon wire connector.
Horizontal Lamp Reflector:
Pull reflector assembly down to release assembly from reflector bracket. Unplug nylon
wire connector and remove reflector. Loosen (
Do Not Remove
) the four 10-32 screws holding the reflector bracket in
place. Rotate reflector to release screws through key-hole slots.
REMOVING THE BALLAST ASSEMBLY:
In the event that the ballast should require inspection or service, this assembly is located behind the reflector.
Unplug nylon wire connector between the power lead-in and ballast assembly. Loosen (
Do Not Remove
) the four 10-
32 screws at the outside edges of the ballast assembly. Slightly lift assembly to release screws through key hole
slots.
WARNING:
This H.I.D. / Fluorescent fixture utilizes a lamp that
may contain mercury. For information on disposal of
lamp go to website:
www.lamprecycle.org
LAMP INSTALLATION:
Tighten lamp sufficiently to ensure a vibration-safe installation.
After tightening (if necessary), gently center lamp in reflector
for optimum performance.
Spreader Mount:
1. Make sure fixture is square on pole.
2. Using a ratchet wrench and a
N
” socket, tighten the center bolt to 25 foot-pounds torque.
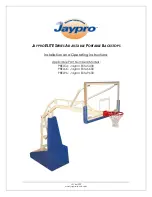
Tenon Mount:
1. Make sure fixture is square on pole.
2. Using a
F
" hex wrench, tighten the four set screws provided on the slipfitter. Remove one set screw, drill
recess in tenon for screw point, and replace set screw.
4. Connect field wire to fixture leads observing polarity, i.e., green-to-ground, white-to-common, and black-to-voltage.
Push the connected wire ends into the wire chamber and replace splice cover.
5. Screw proper lamp (as per fixture label) into socket and tighten lamp sufficiently to ensure a vibration-safe
Slipfitter or Direct Mount
(See Detail At Right)
Pole Tenon
Slipfitter or
Direct Mount
Pole (Shown for
direct mounting)
Remove One Screw, Drill
Recess For Screw Point
& Replace Screw