NEO SPHERE - NS
Installation Instructions
P.O. Box 60080 • 16555 East Gale Ave.
City of Industry, California 91716-0080
626/968-5666 • FAX 626/330-3861
Revised 7/16/10 EC
100715008
Status 11
Part No. 95558
Tools Required
:
F
” Hex Wrench
Phillips Screwdriver
Flat Blade Screwdriver
Drill with
F
” Drill Bit (Tenon Mount Only)
Ratchet and
N
” Socket (Spreader Mount Only)
Attention!
If your fixture is equipped with a multi-tap ballast and if no voltage was specified on the purchase order,
the ballast has been wired for operation on a 277 volt circuit (347v in Canada). If other than 277 volts is required, i.e.
120v, 208v, 240v, connect incoming voltage lead to selected voltage lead on ballast. Cap off all unused voltage leads.
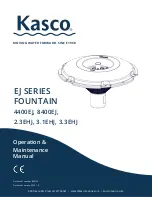
Vertical
Reflector
Horizontal Reflector
Ballast Assembly
Splice Cover
and Gasket
Open Fixture
4” Pole
Self
Retained Screw
WARNING: Fixtures must be grounded in accordance with local codes or the National Electrical Code.
Failure to do so may result in serious personal injury.
MAINTENANCE: A regularly scheduled maintenance program should be established to retain optimum light
output and reduce heat retention.
CAUTION: All wiring must be done by a qualified electrician. KEEP THIS SHEET FOR FUTURE REFERENCE.
®
!
INSTALLATION INSTRUCTIONS:
Make certain electricity is
OFF
before starting installation.
1. Open fixture by loosening self-retained
J
-20 screw opposite hinge. Swing lens frame open until stop arm prevents
further movement. Loosen self-retained 10-32 screw and remove splice cover at inside base of fixture.
2. Lay pole horizontally on padded supports to protect finish. Pull field wires through pole and out pole top. Wire leads
need to extend 10” beyond pole top.
3. Feed field wires going inside the spreader retainer springs (if fixture is equipped with a spreader) and up through the
holes into the wire chamber. Keeping light tension on these leads so they won’t be caught or pinched, slide fixture
onto pole top, orient fixture to desired direction according to light pattern label on reflector.
installation (continued on page 2).
!
Neo Sphere
®


