background image

VS-EC-H24R&H28R&H29R 
User Guide 

7 Backup 


Issue 04 (2013-06-15) 

Huawei Proprietary and Confidential                                     

Copyright © Huawei Technologies Co., Ltd. 

115 


Backup 

7.1 Backing up Record Files 

7.1.1 Quick Export 

Export record files to backup device(s) quickly. 

Step 1


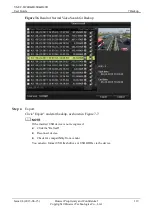
Enter Video Export interface. 

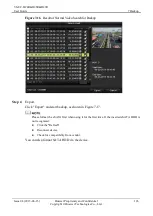
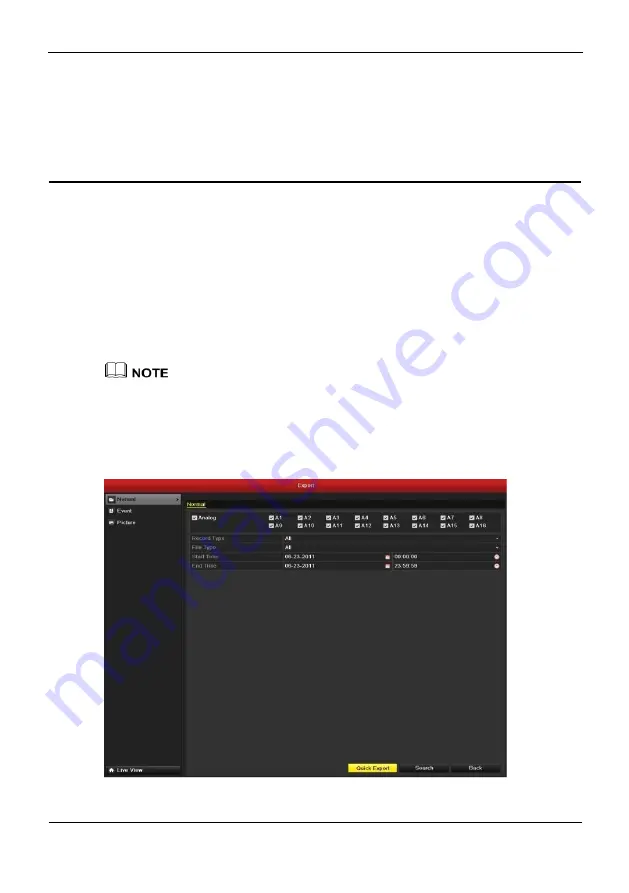
Choose the channel(s) you want to back up and press


"Quick Export", as shown in 

Figure 7-1. 


The time duration of record files on a specified channel cannot exceed one day. 
Otherwise, the message box "Max. 24 hours are allowed for quick export." will pop up. 


The number of channels for synchronous export cannot exceed 4. Otherwise, the 
message box "Max. 4 channels are allowed for synchronous quick export." will pop up. 

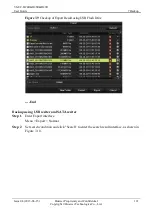
Figure 7-1


Quick Export Interface 


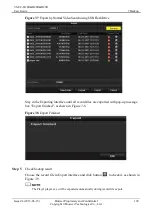
Step 2


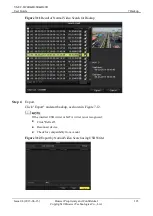
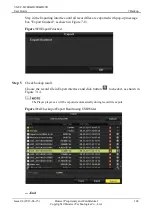
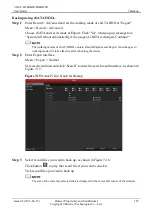
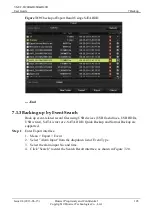
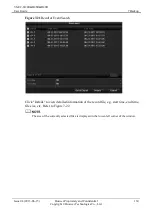
Export. 

Summary of Contents for VS-EC-H24R

Page 1: ...VS EC H24R H28R H29R User Guide Issue 04 Date 2013 06 15 HUAWEI TECHNOLOGIES CO LTD ...

Page 2: ...i and the customer All or part of the products services and features described in this document may not be within the purchase scope or the usage scope Unless otherwise specified in the contract all statements information and recommendations in this document are provided AS IS without warranties guarantees or representations of any kind either express or implied The information in this document is...

Page 3: ...er Symbol Conventions The symbols that may be found in this document are defined as follows Symbol Description Indicates a hazard with a high level or medium level of risk which if not avoided could result in death or serious injury Indicates a hazard with a low level of risk which if not avoided could result in minor or moderate injury Indicates a potentially hazardous situation that if not avoid...

Page 4: ...rity features Updates in Issue 02 2012 10 31 This issue is the second official release which incorporates the following changes Chapter 2 Getting Started Added the description about password complexity Chapter 12 DVR Management and Maintenance Added description about the upgrade in FTP mode Chapter 13 Others Updated the device shutdown page and description Issue 01 2011 10 30 This issue is the fir...

Page 5: ...ew 22 3 1 Introduction of Live View 22 3 2 Operations in Live View Mode 22 3 2 1 Front Panel Operation 23 3 2 2 Using the Mouse in Live View 23 3 2 3 Using an Auxiliary Monitor 25 3 2 4 Quick Setting Toolbar in Live View Mode 25 3 3 Adjusting Live View Settings 27 3 4 Channel zero Encoding 29 3 5 Logout Shutdown and Reboot 30 4 PTZ Controls 32 4 1 Configuring PTZ Settings 32 4 2 Setting PTZ Preset...

Page 6: ...pture 75 5 10 Files Protection 76 6 Playback 81 6 1 Playing Back Record Files 81 6 1 1 Playing Back by Channel 81 6 1 2 Playing Back by Time 85 6 1 3 Playing Back by Normal Video Search 87 6 1 4 Playing Back by Event Search 92 6 1 5 Playing Back by Tag 97 6 1 6 Playing Back by System Log 104 6 2 Auxiliary Functions of Playback 106 6 2 1 Playing Back Frame by Frame 106 6 2 2 Smart Search 106 6 2 3 ...

Page 7: ...emote Alarm Host 177 9 2 7 Configuring Multicast 178 9 2 8 Configuring RTSP 179 9 2 9 Configuring Server and HTTP Ports 180 9 2 10 Configuring Email 181 9 3 Checking Network Traffic 183 9 4 Configuring Network Detection 184 9 4 1 Testing Network Delay and Packet Loss 184 9 4 2 Exporting Network Packet 185 9 4 3 Checking Network Statistics 187 10 HDD Management 188 10 1 Initializing HDDs 188 10 2 M...

Page 8: ...rmation 215 12 1 6 Viewing HDD Information 216 12 2 Searching Export Log Files 217 12 3 Importing Exporting Configuration Files 220 12 4 Upgrading System 221 12 4 1 Upgrading by Local Backup Device 221 12 4 2 Upgrading by FTP 222 12 5 Restoring Default Settings 223 13 Others 225 13 1 RS 232 225 13 2 Configuring DST Settings 226 13 3 Configuring General Settings 227 13 4 Configuring More Settings 2...

Page 9: ...t board the connector the chassis and the fan Improper use or replacement of the battery may result in hazard of explosion Replace with the same or equivalent type only Dispose of used batteries according to the instructions provided by the battery manufacturer 1 2 Key Features Compression PAL NTSC adaptive video inputs H 264 video compression with high reliability and superior definition Each cha...

Page 10: ...tracing by dragging mouse HDD Management Up to 8 SATA hard disks 8 network disks 8 NAS disks or 7 NAS disks 1 IP SAN disk and 1 eSATA disk can be connected each disk with a maximum of 4TB storage capacity Support eSATA disk for recording or backup HDD group management Support HDD standby function HDD property redundancy read only read write R W HDD quota management different capacity can be assign...

Page 11: ...re HDD error and HDD full etc Alarm triggers full screen monitoring audio alarm notifying surveillance center sending email and alarm output Automatic restore when system is abnormal Other Local Functions Users can operate by front panel mouse remote control and control keyboard Three level user management admin user is allowed to create many operating accounts and define their operating permissio...

Page 12: ...cation software for demo Development support and training for application system Security Features HTTPS in used for logging in to web pages and the Telnet and FTP protocols are replaced by the SSH protocol which ensures the network data transmission security Authenticates all login interfaces including the web page serial port and SSH Empowers users to set strong passwords Encrypts all passwords ...

Page 13: ...de The light of the button is green when the corresponding channel is recording it is red when the channel is in network transmission status it is pink when the channel is recording and transmitting 5 DIRECTION ENTER The DIRECTION buttons are used to navigate between different fields and items in menus In Playback mode the Up and Down button is used to speed up and slow down recorded video The Lef...

Page 14: ...h between input methods upper and lowercase alphabet symbols and numeric input It can also be used to clear entire masked areas such as in the Motion Detection and Privacy Mask menus EDIT IRIS The EDIT IRIS button is used to edit text fields When editing text fields it will also function as a Backspace button to delete the character in front of the cursor On checkbox fields pressing the EDIT IRIS ...

Page 15: ...S The PTZ IRIS button is used to enter the PTZ Control mode When in the PTZ Control mode it is used to close the iris of the PTZ camera 7 IR Receiver Receiver for IR remote 8 JOG SHUTTLE Control The JOG SHUTTLE control can be used to move the active selection in a menu It will move the selection up and down In the Playback mode the ring is used to jump 30s forward backward in video files In Live V...

Page 16: ... seconds in live view mode NOTE If GUARD indicator is green default all alarm event and exception settings are valid Otherwise alarm event and exception settings will be invalid but normal recording will still be available It is important to note that you must click the EDIT button on either the remote or front panel on a text field before you re able to edit its content After you re done entering...

Page 17: ...he IR Remote Control Buttons No Name Description 1 POWER Power on off the device 2 DEV Enables Disables Remote Control 3 Alphanumeric Buttons Same as Alphanumeric buttons on front panel 4 EDIT Button Same as EDIT IRIS button on front panel 5 A Button Same as A FOCUS button on front panel 6 REC Button Same as REC SHOT button on front panel 7 PLAY Button Same as the PLAY AUTO button on front panel 8...

Page 18: ...u have to aim the remote control at the IR receiver in the front panel If there is no response after you press any button on the remote follow the procedure below to troubleshoot Steps Step 1 Go into Menu Settings General More Settings by operating the front control panel or the mouse Step 2 Check and remember DVR ID The default ID is 255 This ID is valid for all IR remote controls Step 3 Press th...

Page 19: ... from your provider End The operation of the mouse is listed in Table 1 3 Table 1 3 Description of the Mouse Control Name Action Description Left Click Single Click Live view Select channel and show the quick set menu Menu Select and enter Double Click Live view Switch between single screen and multi screen Click and Drag PTZ control Wheeling Tamper proof privacy mask and motion detection Select t...

Page 20: ...e buttons on the soft keyboard is listed in Table 1 4 Table 1 4 Description of the Soft Keyboard Icons Icons Description Icons Description English Capital English Numbers Symbols Lowercase Uppercase Backspace Space Enter Exit N A 1 7 Rear Panel Figure 1 4 shows the appearance of rear panel and Table 1 5 lists the items of it Figure 1 4 Rear Panel 1 2 3 4 5 6 7 8 9 10 11 13 12 14 15 16 ...

Page 21: ...tput This connector is synchronized with VIDEO OUT 6 LINE IN BNC connector for audio input 7 RS 232 Interface Connector for RS 232 devices 8 VGA DB9 connector for VGA output Display local video output and menu 9 HDMI HDMI video output connector 10 eSATA Optional Connects external SATA HDD CD DVD RM 11 LAN Interface Connector for LAN Local Area Network 12 Termination Switch RS 485 termination switc...

Page 22: ... device The Power indicator LED on the front panel should be red indicating the device gets the power supply Step 2 Press the POWER button on the front panel The Power indicator LED should turn green indicating that the unit begins to start up Step 3 After startup the Power indicator LED remains green A splash screen with the status of the DSP and HDD appears on the monitor The first row of icons ...

Page 23: ... and hold the POWER button on the front panel for 3 seconds Step 2 Enter the administrator s username and password in the dialog box for authentication Step 3 Press the Yes button Do not press the POWER button again when the system is shutting down End Rebooting the DVR While in the Shutdown menu Figure 1 5 you can also reboot the DVR Steps Step 1 Enter the Shutdown menu by clicking Menu clicking ...

Page 24: ...igure 2 1 Figure 2 1 Start Wizard Interface Operating the Setup Wizard Step 1 The Setup Wizard can walk you through some important settings of the DVR If you don t want to use the Setup Wizard at this time click the Cancel You can also choose to use the Setup Wizard next time by leaving the Start wizard when DVR starts checkbox in checked status Step 2 Click Next button on the Wizard window to ent...

Page 25: ...123 To ensure system security change and save the password at first login A password must contain at least eight upper case letters lower case letters and digits If you do not want to change the administrator password clear New Admin Password and click Next Step 3 Enter the new password and confirm the password in the given fields Step 4 Click the Next to enter the date and time settings window as...

Page 26: ...ssue 04 2013 06 15 Huawei Proprietary and Confidential Copyright Huawei Technologies Co Ltd 18 Figure 2 3 Date and Time Settings Step 5 After the time settings click Next which will take you back to the Network Setup Wizard window as shown in Figure 2 4 ...

Page 27: ...13 06 15 Huawei Proprietary and Confidential Copyright Huawei Technologies Co Ltd 19 Figure 2 4 Network Configuration Step 6 Click Next button after you having configured the network parameters which will take you to the HDD Management window shown in Figure 2 5 ...

Page 28: ...nologies Co Ltd 20 Figure 2 5 HDD Management Step 7 To initialize the HDD click the Init Initialization will remove all the data saved in the HDD Step 8 Click Next to enter the Record Settings window as shown in Figure 2 6 Figure 2 6 Record Settings Step 9 Click Copy to copy the settings to other channels as shown in Figure 2 7 ...

Page 29: ...29R User Guide 2 Getting Started Issue 04 2013 06 15 Huawei Proprietary and Confidential Copyright Huawei Technologies Co Ltd 21 Figure 2 7 Copy Record Settings Step 10 Click OK to complete the startup Setup Wizard End ...

Page 30: ... are listed in Table 3 1 Table 3 1 Description of Live View Icons Icons Description Alarm video loss tampering motion detection or sensor alarm Record manual record schedule record motion detection or alarm triggered record Alarm Record 3 2 Operations in Live View Mode In live view mode there are many functions provided The functions are listed below Single Screen show only one screen on the monit...

Page 31: ...tion on the live view for the Aux output 3 2 1 Front Panel Operation The functions of front panel operation in live view are listed in Table 3 3 Table 3 3 Front Panel Operation in Live View Functions Front Panel Operation Show single screen Press the corresponding Alphanumeric button E g Press 2 to display only the screen for channel 2 Show multi screen Press the PREV FOCUS button Manually switch ...

Page 32: ...auto switch of the screens All day Playback Play back the video of the selected channel Aux Monitor Switch to the auxiliary output mode and the operation for the main output is disabled The dwell time of the live view configuration must be set before using Start Auto switch If you enter Aux monitor mode and the Aux monitor is not connected the mouse operation is disabled witch back to the Main out...

Page 33: ...Enter into Playback mode PTZ Enter PTZ Control mode Main Monitor Enter Main operation mode In the live view mode of the main output monitor the menu operation is not available while in Aux output mode 3 2 4 Quick Setting Toolbar in Live View Mode On the screen of each channel there is a quick setting toolbar which shows when you point the mouse to the bottom of the screen as shown in Figure 3 2 Re...

Page 34: ...in area as shown in Figure 3 3 Figure 3 3 Digital Zoom Image Settings icon can be selected to enter the Image Settings menu There are four preset modes for selection according to the real situation as shown in Figure 3 4 Below is the explanation for each mode Indoor the image is relatively smoother Dim Light the image is smoother than the other two modes Outdoor the image is relatively clearer and...

Page 35: ... Technologies Co Ltd 27 Figure 3 4 Image Settings Preset You can also choose the Customize mode to set the image parameters like brightness contrast saturation and hue as shown in Figure 3 5 Click the Restore to restore the previous settings Figure 3 5 Image Settings Customize 3 3 Adjusting Live View Settings Purpose ...

Page 36: ... Figure 3 6 Live View General The settings available in this menu include Video Output Interface Designates the output to configure the settings for Outputs include HDMI depends on the model VGA Main CVBS and Spot Output Live View Mode Specifies the display mode for Live View Dwell Time The time in seconds to dwell between switching of channels when enabling auto switch in Live View Enable Audio O...

Page 37: ...lay Setting an X means the channel will not be displayed Click the Apply button End 3 4 Channel zero Encoding Purpose Sometimes you need to get a remote view of many channels in real time from web browser or CMS Client Management System software in order to decrease the bandwidth requirement without affecting the image quality channel zero encoding is supported as an option for you Steps Step 1 En...

Page 38: ...ight Huawei Technologies Co Ltd 30 Figure 3 8 Live View Channel Zero Encoding Step 3 Check the checkbox after Enable Channel Zero Encoding Step 4 Configure the Frame Rate Max Bitrate Mode and Max Bitrate End 3 5 Logout Shutdown and Reboot Step 1 Enter the Shutdown menu as shown in Figure 3 9 Menu Shutdown ...

Page 39: ...3 06 15 Huawei Proprietary and Confidential Copyright Huawei Technologies Co Ltd 31 Figure 3 9 Shutdown Step 2 Click Logout After you log out of the system any click on the screen is invalid It is required a user name and password to log in to the system End ...

Page 40: ...rs should be done before you set the PTZ camera Before you start Check that the PTZ and the DVR are connected properly through RS 485 interface Steps Step 1 Enter the PTZ Settings interface as shown in Figure 4 1 Menu Camera PTZ Figure 4 1 PTZ General Step 2 Choose the camera for PTZ setting next to Camera label Step 3 Enter the parameters of the PTZ camera All the parameters should be exactly the...

Page 41: ... PTZ protocols 4 2 1 Customizing Presets Purpose Follow the steps to set the Preset location which you want the PTZ camera to point to when an event takes place Steps Step 1 Enter the PTZ Control interface as shown in Figure 4 2 Menu Camera PTZ More Settings Figure 4 2 PTZ More Settings Step 2 Use the directional button to wheel the camera to the location where you want to set preset Step 3 Click ...

Page 42: ... is more than 17 you can click and choose the available numbers as shown in Figure 4 3 End Figure 4 3 More Presets 4 2 2 Calling Presets Purpose This feature enables the camera to point to a specified position such as a window when an event takes place Call preset in the PTZ setting interface Steps Step 1 Enter the PTZ Control interface Menu Camera PTZ More Settings Step 2 Check the round icon bef...

Page 43: ...yright Huawei Technologies Co Ltd 35 Figure 4 4 PTZ Call Preset Step 3 Choose the preset number End Call preset in live view mode Steps Step 1 Press the PTZ button on the front panel or click the PTZ Control icon in the quick setting bar to enter the PTZ setting menu in live view mode as shown in Figure 4 5 ...

Page 44: ...atrols Purpose Patrols can be set to move the PTZ to different key points and have it stay there for a set duration before moving on to the next key point The key points are corresponding to the presets The presets can be set following the steps above in Customizing Presets Steps Step 1 Enter the PTZ Control interface Menu Camera PTZ More Settings Step 2 Select patrol number Step 3 Select the unde...

Page 45: ...ed of patrol as shown in Figure 4 7 The key point is corresponding to the preset The Key Point No determines the order at which the PTZ will follow while cycling through the patrol The Duration refers to the time span to stay at the corresponding key point The Speed defines the speed at which the PTZ will move from one key point to the next Figure 4 7 Key point Configuration Step 5 Click OK to sav...

Page 46: ...e trash icon as shown in Figure 4 8 Figure 4 8 KeyPoints Deletion End 4 2 4 Calling Patrols Purpose Calling a patrol makes the PTZ to move according the predefined patrol path Calling patrol in the PTZ setting interface Steps Step 1 In the PTZ setting interface Menu Camera PTZ More Settings Step 2 Select the patrol number and then click to call the patrol Step 3 Click to stop it as shown in Figure...

Page 47: ...s Co Ltd 39 Figure 4 9 Calling Patrol End Calling preset in live view mode Steps Step 1 Press PTZ control on the front panel or on the remote or click PTZ Control icon on the quick setting toolbar to show the PTZ control toolbar as shown in Figure 4 10 Step 2 Choose Patrol on the control bar Step 3 Click the patrol you want to call ...

Page 48: ...e 4 10 PTZ Toolbar Patrol End 4 2 5 Customizing Patterns Purpose Patterns can be set by recording the movement of the PTZ You can call the pattern to make the PTZ movement according to the predefined path Steps Step 1 Enter the PTZ Control interface Menu Camera PTZ More Settings Step 2 Choose pattern number in the option box as shown in Figure 4 11 ...

Page 49: ...e to move the PTZ camera The movement of the PTZ is recorded as the pattern Step 4 Click to save the pattern Repeat the above steps to save more patterns End 4 2 6 Calling Patterns Purpose Follow the procedure to move the PTZ camera according to the predefined patterns Calling pattern in the PTZ setting interface Steps Step 1 Enter the PTZ Control interface Step 2 Select the pattern number Step 3 ...

Page 50: ... 42 Figure 4 12 Calling Pattern End Call pattern in live view mode Steps Step 1 In the live view mode press PTZ control on the front panel or on the remote control or click PTZ Control icon on the quick setting toolbar Step 2 And then choose Pattern on the control bar Step 3 Click the pattern number you want to call as shown in Figure 4 13 ...

Page 51: ...Huawei Technologies Co Ltd 43 Figure 4 13 PTZ Toolbar Pattern End 4 3 PTZ Control Toolbar In the Live View mode you can press the PTZ Control button on the front panel or on the remote control or choose the PTZ Control icon to enter the PTZ toolbar as shown in Figure 4 14 Refer to Table 4 1 Figure 4 14 PTZ Toolbar ...

Page 52: ...e 4 1 Description of the PTZ toolbar icons Icon Description Icon Description Direction button and the auto cycle button Zoom Focus Iris The speed of the PTZ movement Zoom Focus Iris Wiper on off Light on off Zoom Middle Preset Patrol Pattern Menu Previous item Next item Start pattern patrol Stop the patrol or pattern movement Minimize windows Exit ...

Page 53: ...If not please install a HDD and initialize it Menu HDD General as shown in Figure 5 1 Figure 5 1 HDD General Click Advance to check the storage mode of the HDD as shown in HDD Advanced as shown in Figure 5 2 If the HDD mode is Quota please set the maximum record capacity and maximum picture capacity For detailed information see 10 5 Configuring Quota Mode If the HDD mode is Group you should set th...

Page 54: ...ttings Issue 04 2013 06 15 Huawei Proprietary and Confidential Copyright Huawei Technologies Co Ltd 46 Figure 5 2 HDD Advanced Steps Step 1 Enter the Record settings interface to configure the encoding parameters as shown in Figure 5 3 Menu Record Encoding ...

Page 55: ...s 5 seconds the camera records it at 9 59 55 Post record The time you set to record after the event or the scheduled time For example when an alarm triggered the recording ends at 11 00 if you set the post record time as 5 seconds it records till 11 00 05 Expired Time The expired time is the longest time for a record file to be kept in the HDD if the deadline is reached the file will be deleted Yo...

Page 56: ...idential Copyright Huawei Technologies Co Ltd 48 Figure 5 4 Record Encoding More Step 5 Click Apply to save the settings Step 6 Click OK to back to the upper level menu Step 7 You can copy the settings to other channels by clicking Copy if the setting can also be used for other channels as shown in Figure 5 5 ...

Page 57: ...ure 5 5 Copy Camera Settings The redundant record capture is to decide whether you want the camera to save the record files or captured pictures in the redundant HDD You must configure the redundant HDD in HDD settings For detailed information see 10 4 2 Setting HDD Property Step 8 Encoding Parameters for Capture Step 9 Select the Capture as shown in Figure 5 6 ...

Page 58: ... click Copy to copy the settings to other channels The interval is the time period between two capturing actions You can configure all the parameters on this menu on your demand End 5 2 Configuring Record Capture Schedule Purpose Set the record schedule and then the camera will automatically start stop recording according to the configured schedule Steps Step 1 Enter the Record Schedule interface ...

Page 59: ... Co Ltd 51 Figure 5 7 Record Schedule Step 4 Choose the camera you want to configure Step 5 Select the check box after the Enable Schedule item Step 6 Click Edit Step 7 In the message box you can choose the day to which you want to set schedule Step 8 To schedule an all day recording check the checkbox after the All Day item as shown in Figure 5 8 ...

Page 60: ...hedule Step 9 To arrange other schedule leave the All Day checkbox blank and set the Start End time Up to 8 periods can be configured for each day And the time periods can t be overlapped each other Step 10 Repeat the above Step 5 to Step 7 to schedule recording capture for other days in the week If the schedule can also be set to other days click Copy as shown in Figure 5 9 ...

Page 61: ... Schedule to Other Days Step 11 Click OK to save setting and back to upper level menu Step 12 Click Apply in the Record Schedule interface to save the settings Step 13 You can repeat Step 5 to Step 8 to set schedule for other channels If the settings can also be used to other channels click Copy and then choose the channel to which you want to copy as shown in Figure 5 10 ...

Page 62: ...ture Purpose Follow the steps to set the motion detection parameters In the live view mode once a motion detection event takes place the video can analyze it and do many actions to handle it Enabling motion detection function can trigger certain channels to start recording or trigger full screen monitoring audio warning notify the surveillance center and so on Steps Step 1 Enter the Motion Detecti...

Page 63: ...otion Detection Step 2 Configure Motion Detection Step 3 Choose camera you want to configure Step 4 Check the checkbox after Enable Motion Detection Step 5 Drag and draw the area for motion detection by mouse If you want to set the motion detection for all the area shot by the camera click Full Screen To clear the motion detection area click Clear as shown in Figure 5 12 ...

Page 64: ...dential Copyright Huawei Technologies Co Ltd 56 Figure 5 12 Motion Detection Mask Step 6 Click Handling and the message box for channel information will pop up as shown in Figure 5 13 Figure 5 13 Motion Detection Handling Step 7 Select the channels which you want the motion detection event to trigger recording ...

Page 65: ...p 8 Click Apply to save the settings Step 9 Click OK to back to the upper level menu Step 10 Exit the Motion Detection menu Step 11 Enter Schedule settings interface as shown in Figure 5 14 Menu Record Schedule Record Capture Schedule Figure 5 14 Record Schedule Step 12 Check the checkbox after the Enable Schedule item Step 13 Click Edit as shown in Figure 5 15 ...

Page 66: ...dential Copyright Huawei Technologies Co Ltd 58 Figure 5 15 Edit Schedule Motion Detection Step 14 In the message box you can choose the day to which you want to set schedule Step 15 Set the Type as Motion Step 16 To schedule an all day recording check the checkbox after the All Day item as shown in Figure 5 16 ...

Page 67: ... Step 17 To arrange other schedule leave the All Day checkbox blank and set the Start End time Up to 8 periods can be configured for each day And the time periods can t be overlapped each other Step 18 Repeat the above Step 11 to Step 13 to schedule motion detection triggered recording capture for all the week If the schedule can also be set to other days click Copy as shown in Figure 5 17 ...

Page 68: ...right Huawei Technologies Co Ltd 60 Figure 5 17 Copy Schedule to Other Days Step 19 Click OK to back to upper level menu Step 20 You can repeat steps to set schedule for other channels if the settings can also be used to other channels click Copy and then choose the channel to which you want to copy as shown in Figure 5 18 ...

Page 69: ...al Copyright Huawei Technologies Co Ltd 61 Figure 5 18 Copy Schedule to Other Channels End 5 4 Configuring Alarm Triggered Record and Capture Purpose Follow the procedure to configure alarm triggered recording or capture Steps Step 1 Enter the Alarm setting interface as shown in Figure 5 19 Menu Configuration Alarm ...

Page 70: ... 04 2013 06 15 Huawei Proprietary and Confidential Copyright Huawei Technologies Co Ltd 62 Figure 5 19 Alarm Settings Step 2 Click Alarm Input as shown in Figure 5 20 Figure 5 20 Alarm Settings Alarm Input Step 3 Select Alarm Input number and configure alarm parameters ...

Page 71: ...ing Step 6 Click Handling as shown in Figure 5 21 Figure 5 21 Alarm Handling Step 7 Choose the alarm triggered recording channel Step 8 Check the checkbox to select channel Step 9 Click Apply to save settings Step 10 Click OK to back to the upper level menu Step 11 Repeat the above steps to configure other alarm input parameters Step 12 If the setting can also be applied to other alarm inputs clic...

Page 72: ... Proprietary and Confidential Copyright Huawei Technologies Co Ltd 64 Figure 5 22 CopyAlarm Input Step 13 Enter Record Capture Schedule setting interface Menu Record Schedule Step 14 Click Record Capture Schedule Step 15 Check the checkbox after the Enable Schedule as shown in Figure 5 23 ...

Page 73: ...l Day checkbox blank and set the Start End time Up to 8 periods can be configured for each day And the time periods can t be overlapped each other Repeat the above steps17 20 to schedule alarm triggered recording capture for all the week If the schedule can also be set to other days click Copy Step 21 Click OK to back to the upper level menu End 5 5 Manual Record and Continuous Capture Purpose Fol...

Page 74: ...front panel Figure 5 24 Manual Record Step 2 Enabling Manual Record Select Record on the left bar Click the status button before camera number to change to Step 3 Disable manual record Click the status button to change to After rebooting all the manual records enabled are canceled Step 4 Enabling and disabling the continuous capture Step 5 Select Continuous Capture on the left bar as shown in Figu...

Page 75: ...sable continuous capture Step 8 Click the status button to change to After rebooting all the continuous capture will be canceled End 5 6 Configuring Holiday Record and Capture Purpose Follow the steps to configure the record or capture schedule on holiday for that year You may want to have different plan for recording and capture on holiday Steps Step 1 Enter the Record setting interface Menu Reco...

Page 76: ...s Issue 04 2013 06 15 Huawei Proprietary and Confidential Copyright Huawei Technologies Co Ltd 68 Figure 5 26 Holiday Settings Step 3 Enable Edit Holiday schedule Step 4 Click to enter the Edit interface as shown in Figure 5 27 Figure 5 27 Edit Holiday Settings ...

Page 77: ...Enter Record Capture Schedule settings interface Menu Record Schedule Step 11 Select Record Capture Step 12 Check the checkbox after Enable Schedule Step 13 Click Edit Step 14 Select Holiday from the Schedule dropdown list as shown in Figure 5 28 Figure 5 28 Edit Schedule Holiday Step 15 Select Motion from the Type dropdown list Step 16 If you need all day recording check the All Day Otherwise lea...

Page 78: ...her recording and capture types refer to the Motion Alarm motion or alarm and Motion Alarm triggered recording and capture For motion detection and alarm recording and capture please refer to Chapter 5 3 and Chapter 5 4 In this chapter the configuration for Motion Alarm motion or alarm and Motion Alarm triggered recording and capture will be described only Steps Step 1 Enter the Record setting int...

Page 79: ...l Day item Step 9 To arrange other schedule leave the All Day checkbox blank and set the Start End time Up to 8 periods can be configured for each day And the time periods can t be overlapped each other Step 10 Repeat the above steps to schedule for all the week If the schedule can also be applied to other days click Copy Step 11 Click Apply to save settings Step 12 Click OK to back to the upper l...

Page 80: ...t recording and capture which means saving the record files and captured pictures not only in the R W HDD but also in the redundant HDD will effectively enhance the data safety and reliability Steps Step 1 Enter HDD Information interface as shown in Figure 5 31 Menu HDD Figure 5 31 HDD General Step 2 Select the HDD and click to enter the Local HDD Settings interface Step 3 Set the HDD property to ...

Page 81: ...ve the settings Step 5 Click OK to back to the upper level menu You must set the Storage mode in the HDD advanced settings to Group before you set the HDD property to Redundant For detailed information please refer to 10 4 Managing HDD Group There should be at least another HDD which is in Read Write status Step 6 Enter the Record setting interface Menu Record Encoding Step 7 Select Record as show...

Page 82: ...ttings Issue 04 2013 06 15 Huawei Proprietary and Confidential Copyright Huawei Technologies Co Ltd 74 Figure 5 33 Encoding Record Step 8 Select Camera you want to configure Step 9 Click More Settings as shown in Figure 5 34 Figure 5 34 Encoding Record More ...

Page 83: ...g other channels End 5 9 Configuring HDD Group for Recording and Capture Purpose You can group the HDDs and save the record files and captured pictures in certain HDD group Steps Step 1 Enter HDD setting interface as shown in Figure 5 35 Menu HDD Figure 5 35 HDD General Step 2 Select Advanced on the left bar Check whether the storage mode of the HDD is Group If not set it to Group For detailed inf...

Page 84: ...D groups Step 5 Choose the Channels which you want to save the record files and captured pictures in the HDD group Select Advanced on the left bar as shown in Figure 5 36 Figure 5 36 HDDAdvanced Choose Group number in the dropdown list of Record on HDD Group Check the channels you want to save in this group Click Apply to save settings After you have configured the HDD groups you can configure the...

Page 85: ...ty to Read only to protect the record files from being overwritten Protect file by locking the record files Steps Step 1 Enter Playback setting interface as shown in Figure 5 37 Menu Playback Figure 5 37 Playback Step 2 Select the channels you want to investigate by checking the checkbox to Step 3 Configure the record type file type start end time Step 4 Click Search to show the results as shown i...

Page 86: ...t Step 5 Protect the record files Find the record files you want to protect and then click the icon which will turn to indicating that the file is locked Only the record files with size bigger than 1GB can be locked otherwise it can t be protected by locking it Click to change it to to unlock the file and the file is not protected as shown in Figure 5 39 Figure 5 39 Unlocking Attention End ...

Page 87: ... Proprietary and Confidential Copyright Huawei Technologies Co Ltd 79 Protect file by setting HDD property to Read only Steps Step 1 Enter HDD setting interface as shown in Figure 5 40 Menu HDD Figure 5 40 HDD General Step 2 Click to edit the HDD you want to protect as shown in Figure 5 41 ...

Page 88: ...tep 3 Set the HDD to Read only Step 4 Click OK to save settings and back to the upper level menu You can t save any files in a Read only HDD If you want to save files in the HDD change the property to R W If there is only one HDD and is set to Read only the DVR can t record any files Only live view mode is available If you set the HDD to Read only when the DVR is saving files in it then the file w...

Page 89: ...w mode Channel switch is supported Instant playback by channel Choose a channel in live view mode using the mouse and click the button in the quick setting toolbar as shown in Figure 6 1 Only record files recorded during the last five minutes on this channel will be played back Figure 6 1 Instant Playback Interface All day Playback by channel Enter the All day Playback interface Mouse right click ...

Page 90: ...n to play back record files of the channel under single screen live view mode Under multi screen live view mode the recorded files of the top left channel will be played back Pressing numerical buttons will switch playback to the corresponding channels during playback process Playback management The toolbar in the bottom part of Playback interface can be used to control playing progress as shown i...

Page 91: ...ei Technologies Co Ltd 83 Figure 6 3 All day Playback Interface The channel and time selection menu displays by moving the mouse to the right of the playback interface Click the channel s if you want to switch playback to another channel or execute simultaneous playback of multiple channels as shown in Figure 6 4 ...

Page 92: ...n this day There is record file s in this day not current day Mouse cursor is located Figure 6 5 Toolbar of All day Playback Please refer to Table 6 1 for detailed explanation of all day playback toolbar Table 6 1 Detailed Explanation of All day playback Toolbar Butto n Operati on Button Operatio n Butto n Oper ation Butto n Operati on Audio on Mute Start Stop clipping 30s forwar d 30s reverse Add...

Page 93: ...ime bar N A Playback progress bar use the mouse to click any point of the progress bar or drag the progress bar to locate special frames About video type bar represents normal recording manual or schedule represents event recording motion alarm motion alarm motion alarm 6 1 2 Playing Back by Time Purpose Play back video files recorded in specified time duration Multi channel simultaneous playback ...

Page 94: ...rietary and Confidential Copyright Huawei Technologies Co Ltd 86 Figure 6 6 Video Search byTime In the Playback interface The toolbar in the bottom part of Playback interface can be used to control playing process as shown in Figure 6 7 Figure 6 7 Interface of Playback byTime ...

Page 95: ...ult tag Add customized tag Tag manag ement Speed down Pause reverse play Revers e play Single fram e reverse play Pause playing Pla y Single fram e play Stop Speed up Video search Exit Hide Progre ss bar Video type bar N A Playback progress bar use the mouse to click any point of the progress bar or drag the progress bar to locate special frames About video type bar represents normal recording man...

Page 96: ...File Search interface Menu Playback Step 2 Set search condition and press Search button to enter the Search Result interface as shown in Figure 6 9 Figure 6 9 Normal Video Search Step 3 Choose a record file you want to play back as shown in Figure 6 10 If there is only one channel in the search result clicking button takes you to Full screen Playback interface of this channel If more than one chan...

Page 97: ...for simultaneous playback as shown in Figure 6 11 Optional channels for simultaneous playback are the same as the channels chosen to search record files in step 1 And the channel with the recorded file selected in step 2 is the main channel during multi channel playback and it is displayed at the upper left corner 4 ch 8 ch and 16 ch devices support 4 ch 8 ch and 16 ch simultaneous playback respec...

Page 98: ...al Copyright Huawei Technologies Co Ltd 90 Figure 6 11 Select Channels for Synchronous Playback Step 5 Synchronous Playback interface as shown in Figure 6 12 The toolbar in the bottom part of Playback interface can be used to control playing process Figure 6 12 4 ch Synchronous Playback Interface ...

Page 99: ... 13 4 ch Synchronous Playback Interface with Video List Please refer to Figure 6 14 for toolbar of normal playback and Table 6 3 for detailed explanation of normal playback toolbar Figure 6 14 Toolbar of Normal Playback Table 6 3 Detailed Explanation of Normal playback Toolbar Butt on Operati on Butt on Operati on Butt on Operati on Butt on Operation Audio on Mute Start Sto p clipping 30s forward ...

Page 100: ...y point of the progress bar or drag the progress bar to locate special frames About video type bar represents normal recording manual or schedule represents event recording motion alarm motion alarm motion alarm End 6 1 4 Playing Back by Event Search Purpose Play back record files on one or several channels searched out by restricting event type e g alarm input and motion detection Channel switch ...

Page 101: ... Copyright Huawei Technologies Co Ltd 93 Figure 6 15 Video Search byAlarm Input If you want to play back recorded files associated with motion detection choose Motion as event type and click Search button to enter the Search Result interface as shown in Figure 6 16 Figure 6 16 Video Search by Motion ...

Page 102: ...y one channel is triggered by an alarm input clicking button takes you to Full screen Playback interface of this channel If several channels are triggered clicking button takes you to Step 6 and then Step 7 Pre play and post play can be configured Figure 6 17 Result of Video Search byAlarm Input Step 6 Click Details button to view detailed information of the record file e g start time end time fil...

Page 103: ...ry and Confidential Copyright Huawei Technologies Co Ltd 95 Figure 6 18 Event Details Interface Step 7 Playback interface as shown in Figure 6 19 The toolbar in the bottom part of Playback interface can be used to control playing process Figure 6 19 Interface of Playback by Event ...

Page 104: ... 6 20 Playback Interface with Alarm Input List Please refer to Figure 6 21 for toolbar of playback by event and Table 6 4 for detailed explanation of playback by event toolbar Figure 6 21 Toolbar of Playback by Event Table 6 4 Detailed Explanation of Playback by event Toolbar Butt on Operati on Butt on Operati on Butt on Operati on Butt on Operati on Audio on Mute Start Sto p clipping 30s forward ...

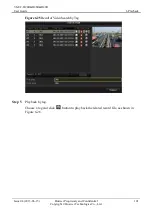
Page 105: ...ype bar N A Playback progress bar use the mouse to click any point of the progress bar or drag the progress bar to locate special frames About video type bar represents normal recording manual or schedule represents event recording motion alarm motion alarm motion alarm End 6 1 5 Playing Back by Tag Purpose Video tag allows you to record related information like people and location of a certain ti...

Page 106: ...pyright Huawei Technologies Co Ltd 98 Figure 6 22 Interface of Playback byTime Click button to add default tag Click button to add customized tag and input tag name Max 64 tags can be added to a single video file Step 2 Tag management as shown in Figure 6 23 Click button to check edit and delete tag s ...

Page 107: ...td 99 Figure 6 23 Tag Management Interface Step 3 Enter Playback interface Menu Playback Click Tag tab to enter Playback by Tag interface Choose channels tag type and time and press Search to enter Search Result interface as shown in Figure 6 24 Two tag types are selectable All and Tag Keyword Input keyword if you choose Tag Keyword ...

Page 108: ... 100 Figure 6 24 Video Search byTag Step 4 Set playback conditions and tag management Choose the tag name of the recorded file you want to play back it can be edited or deleted as shown in Figure 6 25 Pre play and post play time can be set according to actual needs Pre play time and post play time is added to the time point of the tag ...

Page 109: ...ue 04 2013 06 15 Huawei Proprietary and Confidential Copyright Huawei Technologies Co Ltd 101 Figure 6 25 Result of Video Search byTag Step 5 Playback by tag Choose a tag and click button to play back the related record file as shown in Figure 6 26 ...

Page 110: ...y and Confidential Copyright Huawei Technologies Co Ltd 102 Figure 6 26 Interface of Playback by Tag The hidden list of tags will be displayed by moving the mouse to the right of the playback interface as shown in Figure 6 27 Figure 6 27 Interface of Playback by Tag with Video List ...

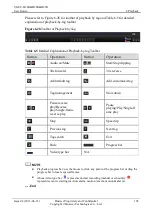
Page 111: ...utton Operation Audio on Mute Start Stop clipping 30s forward 30s reverse Add default tag Add customized tag Tag management Slow down Pause reverse play Reverse play Single frame reverse play Pause playing Play Single fr ame play Stop Speed up Previous tag Next tag Tag search Exit Hide Progress bar Video type bar N A Playback progress bar use the mouse to click any point of the progress bar or dra...

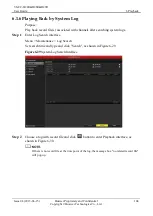
Page 112: ...th channels after searching system logs Step 1 Enter Log Search interface Menu Maintenance Log Search Set search time and type and click Search as shown in Figure 6 29 Figure 6 29 System Log Search Interface Step 2 Choose a log with record file and click button to enter Playback interface as shown in Figure 6 30 If there is no record file at the time point of the log the message box no related rec...

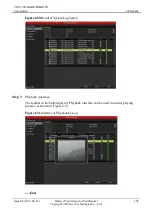
Page 113: ...and Confidential Copyright Huawei Technologies Co Ltd 105 Figure 6 30 Result of System Log Search Step 3 Playback interface The toolbar in the bottom part of Playback interface can be used to control playing process as shown in Figure 6 31 Figure 6 31 Interface of Playback by Log End ...

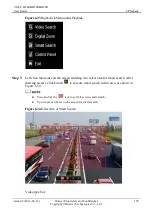
Page 114: ...e to use button in toolbar Using the Front Panel Rotate the inner control on Jog Shuttle counterclockwise or press the button to set the speed to Single frame One click on button represents playback or adverse playback of one frame 6 2 2 Smart Search In order to locate motion detection event easily and accurately in the playback progress bar you are allowed to analyze a certain area scene dynamica...

Page 115: ...k Menu under Playback Step 3 Left click the mouse on the screen and drag it to select area for smart search After drawing area s click button to execute smart search in this area as shown in Figure 6 34 You can click the icon to set full screen smart search Up to areas can be set on the screen for smart search Figure 6 34 DrawArea of Smart Search Video type bar ...

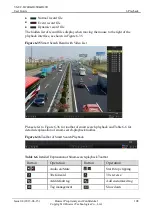
Page 116: ...back interface as shown in Figure 6 35 Figure 6 35 Smart Search Result with Video List Please refer to Figure 6 36 for toolbar of smart search playback and Table 6 6 for detailed explanation of smart search playback toolbar Figure 6 36 Toolbar of Smart Search Playback Table 6 6 Detailed Explanation of Smart search playback Toolbar Button Operation Button Operation Audio on Mute Start Stop clipping...

Page 117: ...eo search Exit Hide Progress bar Video type bar Smart search bar Playback progress bar use the mouse to click any point of the progress bar or drag the progress bar to locate special frames About video type bar represents normal recording manual or schedule represents event recording motion alarm motion alarm motion alarm End 6 2 3 Digital Zoom Right click the mouse on a channel under playback and...

Page 118: ...logies Co Ltd 110 Figure 6 37 DrawArea for Digital Zoom Please refer to Figure 6 38 for right click menu under playback and Table 6 7 for detailed explanation of right click menu under playback Figure 6 38 Right click Menu under Playback The right click menu This menu differs slightly from one playback interface to another ...

Page 119: ... Digital Zoom interface Motion Analysis against a specified area Show hide control interface Return to Playback interface 6 3 Picture Playback Search and view captured pictures stored in HDD Step 1 Enter Playback interface Step 2 Choose Picture tab Set channel picture type and time and click Search to enter Search Result interface as shown in Figure 6 39 Picture types include Normal Motion Alarm M...

Page 120: ...04 2013 06 15 Huawei Proprietary and Confidential Copyright Huawei Technologies Co Ltd 112 Figure 6 39 Picture Search Step 3 View pictures Choose a picture you want to view and click button as shown in Figure 6 40 Figure 6 40 Result of Picture Search ...

Page 121: ...Ltd 113 Step 4 Picture Playback interface The toolbar in the bottom part of Playback interface can be used to control playing process as shown in Figure 6 41 Figure 6 41 Picture Playback Interface The hidden list of captured pictures will be displayed by moving the mouse to the right of the playback interface as shown in Figure 6 42 ...

Page 122: ... Interface with Picture List Please refer to Figure 6 43 for picture playback toolbar and Table 6 8 for detailed explanation of picture playback toolbar Figure 6 43 Picture Playback Toolbar Table 6 8 Detailed Explanation of Picture playback Toolbar Button Function Button Function Play reverse Play Previous picture Next picture Picture search Hide Exit N A End ...

Page 123: ...port interface Choose the channel s you want to back up and press Quick Export as shown in Figure 7 1 The time duration of record files on a specified channel cannot exceed one day Otherwise the message box Max 24 hours are allowed for quick export will pop up The number of channels for synchronous export cannot exceed 4 Otherwise the message box Max 4 channels are allowed for synchronous quick ex...

Page 124: ... device and press Export to start exporting as shown in Figure 7 2 Here we use USB Flash Drive and please refer to the next section Normal Backup for more backup devices supported by the device Figure 7 2 Quick Export using USB1 1 Stay in the Exporting interface until all record files are exported as shown in Figure 7 3 Figure 7 3 Export Finished Step 3 Check backup result ...

Page 125: ...d automatically during record file export Figure 7 4 Checkup of Quick Export Result Using USB1 1 End 7 1 2 Backing up by Normal Video Search The record files can be backup to various devices such as USB devices USB flash drives USB HDDs USB writer SATA writer and e SATA HDD Backup using USB flash drives and USB HDDs Step 1 Enter Export interface Menu Export Normal Step 2 Set search condition and c...

Page 126: ...d 118 Figure 7 5 Normal Video Search for Backup Step 3 Select record files you want to back up as shown in Figure 7 6 Click button to play the record file if you want to check it Check the checkbox before the record files you want to back up The size of the currently selected files is displayed in the lower left corner of the window ...

Page 127: ...hnologies Co Ltd 119 Figure 7 6 Result of Normal Video Search for Backup Step 4 Export Click Export and start backup as shown in Figure 7 7 If the inserted USB device is not recognized Click the Refresh Reconnect device Check for compatibility from vendor You can also format USB flash drives or USB HDDs via the device ...

Page 128: ...using USB Flash Drive Stay in the Exporting interface until all record files are exported with pop up message box Export finished as shown in Figure 7 8 Figure 7 8 Export Finished Step 5 Check backup result Choose the record file in Export interface and click button to check it as shown in Figure 7 9 The Player player exe will be exported automatically during record file export ...

Page 129: ... Copyright Huawei Technologies Co Ltd 121 Figure 7 9 Checkup of Export Result using USB Flash Drive End Backup using USB writer and SATA writer Step 1 Enter Export interface Menu Export Normal Step 2 Set search condition and click Search to enter the search result interface as shown in Figure 7 10 ...

Page 130: ... 122 Figure 7 10 Normal Video Search for Backup Step 3 Select record files you want to back up as shown in Figure 7 11 Click button to play the record file if you want to check it Check the checkbox before the record files you want to back up The size of the currently selected files is displayed in the lower left corner of the window ...

Page 131: ...ogies Co Ltd 123 Figure 7 11 Result of Normal Video Search for Backup Step 4 Export Click Export and start backup as shown in Figure 7 12 If the inserted USB writer or SATA writer is not recognized Click Refresh Reconnect device Check for compatibility from vendor Figure 7 12 Export by Normal Video Search using USB Writer ...

Page 132: ...l record files are exported with pop up message box Export finished as shown in Figure 7 13 Figure 7 13 Export Finished Step 5 Check backup result Choose the record file in Export interface and click button to check it as shown in Figure 7 14 The Player player exe will be exported automatically during record file export Figure 7 14 Checkup of Export Result using USB Writer End ...

Page 133: ...Continue The working modes of eSATA HDD contain Record Capture and Export And changes in working mode will take effective after rebooting the device Step 2 Enter Export interface Menu Export Normal Set search condition and click Search to enter the search result interface as shown in Figure 7 15 Figure 7 15 Normal Video Search for Backup Step 3 Select record files you want to back up as shown in F...

Page 134: ...igure 7 16 Result of Normal Video Search for Backup Step 4 Export Click Export and start backup as shown in Figure 7 17 Please format the eSATA first when using it for the first time If the inserted eSATA HDD is not recognized Click the Refresh Reconnect device Check for compatibility from vendor You can also format SATA HDD via the device ...

Page 135: ...arch Using eSATAHDD Stay in the Exporting interface until all record files are exported with pop up message Export finished as shown in Figure 7 18 Figure 7 18 Export Finished Step 5 Check backup result Choose the record file in Export interface and click button to check it as shown in Figure 7 19 The Player player exe will be exported automatically during record file export ...

Page 136: ...king up by Event Search Back up event related record files using USB devices USB flash drives USB HDDs USB writer SATA writer or e SATA HDD Quick Backup and Normal Backup are supported Step 1 Enter Export interface 1 Menu Export Event 2 Select Alarm Input from the dropdown list of Event Type 3 Select the alarm input No and time 4 Click Search to enter the Search Result interface as shown in Figure...

Page 137: ... files to export Select an alarm input in the list and click Quick Export to enter Export interface Pressing Details will take you to the interface with detailed information of all channels triggered by the selected alarm input Event types contain Alarm Input and Motion Clicking Quick Export will export record files of all channels triggered by the selected alarm input as shown in Figure 7 21 ...

Page 138: ...tial Copyright Huawei Technologies Co Ltd 130 Figure 7 21 Result of Event Search Click Details to view detailed information of the record file e g start time end time file size etc Refer to Figure 7 22 The size of the currently selected files is displayed in the lower left corner of the window ...

Page 139: ...ei Technologies Co Ltd 131 Figure 7 22 Event Details Interface Step 3 Export Click the Export and start backup as shown in Figure 7 23 If the inserted USB device is not recognized Click the Refresh Reconnect device Check for compatibility from vendor You can also format USB flash drive or USB HDDs via the device ...

Page 140: ...2 Figure 7 23 Export by Event Using USB Flash Drive Stay in the Exporting interface until all record files are exported with pop up message Export finished as shown in Figure 7 24 Figure 7 24 Export Finished Step 4 Check backup result as shown in Figure 7 25 The Player player exe will be exported automatically during record file export ...

Page 141: ...lips to export directly during Playback using USB devices USB flash drives USB HDDs USB writer SATA writer or e SATA HDD Step 1 Enter Playback interface Please refer to 6 Playback Step 2 During playback use buttons and in the playback toolbar to start or stop clipping record file s as shown in Figure 7 26 Step 3 Quit Playback interface after finishing clipping and you will then be prompted to save...

Page 142: ...e video clips and enter Export interface or click No to quit and do not save video clips as shown in Figure 7 27 Figure 7 27 Attention to Video Clip Saving Step 5 Export Press Export and start back up as shown in Figure 7 28 If the inserted USB device is not recognized Click the Refresh Reconnect device Check for compatibility from vendor You can also format USB flash drive or USB HDDs via the dev...

Page 143: ... Figure 7 28 Export Video Clips Using USB Flash Drive Stay in the Exporting interface until all record files are exported with pop up message Export finished as shown in Figure 7 29 Figure 7 29 Export Finished Step 6 Check backup result as shown in Figure 7 30 The Player player exe will be exported automatically during record file export ...

Page 144: ...p of Video Clips Export Result Using USB Flash Drive End 7 2 Backing up Pictures Back up pictures using USB devices USB flash drives USB HDDs USB writer SATA writer or e SATA HDD Step 1 Enter Export interface Menu Export Picture Select channel s image type start time and end time and click Search to enter the Search Result interface as shown in Figure 7 31 ...

Page 145: ...ogies Co Ltd 137 Figure 7 31 Picture Search for Backup Step 2 Select pictures you want to back up Check the checkbox before the pictures you want to back up and click Export as shown in Figure 7 32 Here we take USB flash drive as an example For more backup devices please refer to 6 1 3 Playing Back by Normal Video Search ...

Page 146: ...e 04 2013 06 15 Huawei Proprietary and Confidential Copyright Huawei Technologies Co Ltd 138 Figure 7 32 Result of Picture Search Step 3 Export Press Export and start backup as shown in Figure 7 33 Figure 7 33 Export Pictures Using USB Flash Drive ...

Page 147: ...ntil all record files are exported with pop up message Export finished as shown in Figure 7 34 Figure 7 34 Export Finished Step 4 Check backup result as shown in Figure 7 35 Figure 7 35 Checkup of Picture Export Using USB Flash Drive End 7 3 Managing Backup Devices Management of USB flash drives USB HDDs and eSATA HDDs Step 1 Enter Search Result interface of record files ...

Page 148: ... Export Normal Set search condition and click Search to enter Search Result interface as shown in Figure 7 36 At least one channel shall be selected Figure 7 36 Normal Video Search for Backup Step 2 Select record files you want to back up Click Export to enter Export interface as shown in Figure 7 37 At least one record file shall be selected ...

Page 149: ...ent Click New Folder if you want to create a new folder in the backup device Select a record file or folder in the backup device and click button if you want to delete it Select a record file in the backup device and click button to play it Click Format to format the backup device as shown in Figure 7 38 If the inserted USB device is not recognized Click the Refresh Reconnect device Check for comp...

Page 150: ...Technologies Co Ltd 142 Figure 7 38 USB Flash Drive Management End Management of USB writers and SATA writers Step 1 Enter Search Result interface of record files Menu Export Normal Set search condition and press Search to enter Search Result interface as shown in Figure 7 39 At least one channel shall be selected ...

Page 151: ...uawei Technologies Co Ltd 143 Figure 7 39 Normal Video Search for Backup Step 2 Select record files you want to back up Click Export to enter Export interface as shown in Figure 7 40 At least one record file shall be selected Figure 7 40 Result of Normal Video Search for Backup Step 3 Backup device management ...

Page 152: ...td 144 Click Erase if you want to erase the files from a re writable CD DVD as shown in Figure 7 41 There must be a re writable CD DVD when you make this operation If the inserted USB writer or SATA writer is not recognized Click the Refresh Reconnect device Check for compatibility from vendor Figure 7 41 USB Writer Management End ...

Page 153: ...n Detection interface of Camera Management and choose a camera you want to set up motion detection as shown in Figure 8 1 Menu Camera Motion Figure 8 1 Motion Detection Setup Interface Step 2 Set up detection area and sensitivity Tick Enable Motion Detection use the mouse to draw detection area s and drag the sensitivity bar to set sensitivity Click Handling and set alarm response actions as shown...

Page 154: ...t Huawei Technologies Co Ltd 146 Figure 8 2 Set Detection Area and Sensitivity Step 3 Click Trigger Channel tab and select one or more channels which will start to record capture or become full screen monitoring when motion alarm is triggered as shown in Figure 8 3 Figure 8 3 Set Trigger Camera of Motion Detection ...

Page 155: ... periods can be set within each day as shown in Figure 8 4 Time periods shall not be repeated or overlapped Figure 8 4 Set Arming Schedule of Motion Detection Step 5 Click Handling tab to set up alarm response actions of motion alarm Step 6 For details see 8 6 Setting Alarm Response Actions Repeat the preceding steps to set alarm schedules for other days You can also click Copy to copy an alarm sc...

Page 156: ...ies Co Ltd 148 Figure 8 5 Copy Settings of Motion Detection End 8 2 Setting up Sensor Alarms Set up handling method of an external sensor alarm Step 1 Enter Alarm Settings of System Configuration and select an alarm input Menu Configuration Alarm Select Alarm Input tab to enter Alarm Input Settings interface as shown in Figure 8 6 ...

Page 157: ... Copyright Huawei Technologies Co Ltd 149 Figure 8 6 Alarm Status Interface of System Configuration Step 2 Set up the handling method of the selected alarm input Check the Setting checkbox and click Handling to set up its alarm response actions as shown in Figure 8 7 Figure 8 7 Alarm Input Setup Interface ...

Page 158: ...ab to set up alarm response actions of the alarm input please refer to 8 6 Setting Alarm Response Actions Repeat the above steps to set up arming schedule of other days of a week You can also use Copy to copy an arming schedule to other days as shown in Set Arming Schedule of Alarm Input as shown in Figure 8 8 Figure 8 8 Set Arming Schedule of Alarm Input Step 6 If necessary select PTZ Linking tab...

Page 159: ...nd Confidential Copyright Huawei Technologies Co Ltd 151 Figure 8 9 Set PTZ Linking ofAlarm Input Step 7 If you want to set handling method of another alarm input repeat the above steps or just copy the above settings to it as shown in Figure 8 10 Figure 8 10 Copy Settings ofAlarm Input End ...

Page 160: ... channel and take alarm response action s Step 1 Enter Video Loss interface of Camera Management and select a channel you want to detect as shown in Figure 8 11 Menu Camera Video Loss Figure 8 11 Video Loss Setup Interface Step 2 Set up handling method of video loss Check the checkbox of Enable Video Loss Alarm and click Handling to set up handling method of video loss as shown in Figure 8 12 ...

Page 161: ...nologies Co Ltd 153 Figure 8 12 Set Handling Method of Video Loss Step 3 Set up arming schedule of the channel Select Arming Schedule tab to set the channel s arming schedule Choose one day of a week and up to eight time periods can be set within each day as shown in Figure 8 13 Time periods shall not be repeated or overlapped ...

Page 162: ...peat the preceding steps to set alarm schedules for other days You can also click Copy to copy an alarm schedule to other days Step 5 Click OK to complete the video loss alarm settings End 8 4 Detecting Video Tampering Trigger alarm when the lens is covered and take alarm response action s Step 1 Enter Video Tampering interface of Camera Management and select a channel you want to detect video tam...

Page 163: ...8 14 Tamper proof Setup Interface Step 2 Set up the video tampering handling method of the channel Check the checkbox of Enable Video Tampering Drag the sensitivity bar and choose a proper sensitivity level Use the mouse to draw an area you want to detect video tampering Click Handling to set up handling method of video tampering as shown in Figure 8 15 ...

Page 164: ...gure 8 15 Set Detection Area and Sensitivity of Video Tampering Step 3 Set up arming schedule and alarm response action of the channel Press Arming Schedule tab to set the channel s arming schedule Choose one day of a week and Max eight time periods can be set within each day as shown in Figure 8 16 Time periods shall not be repeated or overlapped ...

Page 165: ...rm settings End 8 5 Handling Exceptions Exception settings refer to the handling method of various exceptions e g HDD Full The HDD is full HDD Error Writing HDD error or unformatted HDD Network Disconnected Disconnected network cable IP Conflicted Duplicated IP address Illegal Login Incorrect user ID or password Abnormal Video Signal Unstable video signal Input Output Video Standard Mismatch I O v...

Page 166: ...arning buzzer Notify Surveillance Center Upload Picture to FTP Trigger Alarm Output and Send Email Full Screen Monitoring When an alarm is triggered the local monitor VGA or BNC monitor display in full screen the video image from the alarming channel configured for full screen monitoring If alarms are triggered simultaneously in several channels their full screen images will be switched at an inte...

Page 167: ...iguring Remote Alarm Host for details of alarm host configuration Upload Captured Pictures to FTP Capture the image when an alarm is triggered and upload the picture to a FTP server Please set up FTP address and the remote FTP server first Email Linkage Send an email with alarm information to a user or users when an alarm is detected Please refer to 9 2 10 Configuring Email for details of Email co...

Page 168: ...Confidential Copyright Huawei Technologies Co Ltd 160 Figure 8 18 Alarm Output Setup Interface Step 2 Set up arming schedule of the alarm output Choose one day of a week and up to 8 time periods can be set within each day as shown in Figure 8 19 Time periods shall not be repeated or overlapped ...

Page 169: ...ure 8 19 Set Arming Schedule of Alarm Output Step 3 Repeat the above steps to set up arming schedule of other days of a week You can also use Copy to copy an arming schedule to other days Click the OK to complete the video tampering settings of the channel Step 4 You can also copy the above settings to another alarm output No as shown in Figure 8 20 ...

Page 170: ... If Manually Clear is selected in the dropdown list of dwell time of an alarm output the alarm can be cleared only by pressing Clear in the following interface Step 1 Select the alarm output you want to trigger or clear and make related operations Menu Manual Alarm Step 2 Click Trigger Clear if you want to trigger or clear an alarm output Step 3 Click Trigger All if you want to trigger all alarm o...

Page 171: ...VS EC H24R H28R H29R User Guide 8 Alarm Settings Issue 04 2013 06 15 Huawei Proprietary and Confidential Copyright Huawei Technologies Co Ltd 163 Figure 8 21 Clear or Trigger Alarm Output Manually End ...

Page 172: ...e General tab Step 3 In the General Settings interface you can configure the following settings Working Mode NIC Type IPv4 Address IPv4 Gateway MTU and DNS Server There are two 10M 100M 1000M NIC cards provided by the device and it allows the device to work in the Multi address Load Balance and Net fault Tolerance modes Multi address Mode The parameters of the two NIC cards can be configured indep...

Page 173: ...ds share the load of the total bandwidth which enables the system to provide two Gigabit network capacity If the DHCP server is available you can click the checkbox of DHCP to automatically obtain an IP address and other network settings from that server The valid value range of MTU is 500 9676 Step 4 After having configured the general settings click the Apply to save the settings End 9 2 Configu...

Page 174: ...awei Proprietary and Confidential Copyright Huawei Technologies Co Ltd 166 Figure 9 2 PPPoE Settings Interface Step 3 Select the Enable PPPoE check box Step 4 Set User Name Password and Confirm as shown in Figure 9 3 The User Name and Password should be assigned by your ISP ...

Page 175: ...ected after reboot You can choose Menu Maintenance System Info Network Interface to view the status of PPPoE connection For details see 12 1 Viewing System Information Viewing System Information for PPPoE status End 9 2 2 Configuring DDNS If your DVR is set to use PPPoE as its default network connection you may set Dynamic DNS DDNS to be used for network access Prior registration with your ISP is ...

Page 176: ...Confidential Copyright Huawei Technologies Co Ltd 168 Figure 9 4 DDNS Settings Interface Step 3 Select the Enable DDNS check box Step 4 Select a DDNS Type Step 5 DDNS types include IPServer DynDNS PeanutHull NO IP and EasyDDNS IPServer Enter the IP address of the IPServer as shown in Figure 9 5 ...

Page 177: ...uawei Technologies Co Ltd 169 Figure 9 5 IPServer Settings Interface DynDNS Enter for the IP address of the DynDNS server members dyndns org as shown in Figure 9 6 In the Device Domain Name text box enter the domain name obtained from the DynDNS website Enter the user name and password registered in the DynDNS website ...

Page 178: ...13 06 15 Huawei Proprietary and Confidential Copyright Huawei Technologies Co Ltd 170 Figure 9 6 DynDNS Settings Interface PeanutHull Enter User Name and Password obtained from the PeanutHull website as shown in Figure 9 7 Figure 9 7 Peanut Hull Settings Interface ...

Page 179: ...elds Refer to the DynDNS settings Enter Server Address for NO IP as shown in Figure 9 8 In the DVR Domain Name text field enter the domain obtained from the NO IP website www no ip com Enter the User Name and Password registered in the NO IP website Figure 9 8 NO IP Settings Interface EasyDDNS Set Server Address and Device Domain Name as shown in Figure 9 9 The Server Address is the EasyDDNS serve...

Page 180: ... 9 EasyDDNS settings Step 6 Click Apply to save the settings End 9 2 3 Configuring NTP Server A Network Time Protocol NTP Server can be configured on your DVR to ensure the accuracy of system date time Step 1 Enter the Network Settings interface Menu Configuration Network Step 2 Select the NTP tab to enter the NTP Settings interface as shown in Figure 9 10 ...

Page 181: ...ace The time synchronization interval can be set from 1 to 10080min and the default value is 60min If the DVR is connected to a public network you should use a NTP server that has a time synchronization function such as the server at the National Time Center IP Address 210 72 145 44 If the DVR is setup in a more customized network NTP software can be used to establish a NTP server used for time sy...

Page 182: ...Technologies Co Ltd 174 Step 2 Select the FTP tab to enter the FTP Settings interface as shown in Figure 9 11 Figure 9 11 FTP Settings Interface Step 3 Check the Enable FTP checkbox to enable this feature Step 4 Configure the NTP settings including FTP server port user name password and the directory as shown in Figure 9 12 ...

Page 183: ... No or Device IP for the name of the directory and the when the Secondary Directory is selected you can use the Camera Name or Camera No as the name of the directory Step 5 Click the Apply to save and exit the interface Please make sure the remote FTP server has been started up before setting the FTP parameters End 9 2 5 Configuring SNMP You can use SNMP protocol to get device status and parameter...

Page 184: ...06 15 Huawei Proprietary and Confidential Copyright Huawei Technologies Co Ltd 176 Figure 9 13 SNMP Settings Interface Step 3 Check the SNMP checkbox to enable this feature Step 4 Configure the SNMP settings as shown in Figure 9 14 Figure 9 14 Configure SNMP Settings ...

Page 185: ...e DVR will send the alarm event or exception message to the host when an alarm is triggered The remote alarm host must have the Network Video Surveillance software installed Step 1 Enter the Network Settings interface Menu Configuration Network Step 2 Select the More Settings tab to enter the More Settings interface as shown in Figure 9 15 Figure 9 15 More Settings Interface Step 3 Enter Alarm Hos...

Page 186: ...128 cameras through network A multicast address spans the Class D IP range of 224 0 0 0 to 239 255 255 255 It is recommended to use the IP address ranging from 239 252 0 0 to 239 255 255 255 Step 1 Enter the Network Settings interface Menu Configuration Network Step 2 Select the More Settings tab to enter the More Settings interface as shown in Figure 9 17 Step 3 Set Multicast IP as shown in Figur...

Page 187: ... Apply to save and exit the interface End 9 2 8 Configuring RTSP The RTSP Real Time Streaming Protocol is a network control protocol designed for use in entertainment and communications systems to control streaming media servers Step 1 Enter the Network Settings menu by clicking Menu Configuration Network Step 2 Select the More Settings tab to enter the More Settings menu as shown in Figure 9 18 ...

Page 188: ... can change it according to different requirements Step 4 Click the Apply to save and exit the menu End 9 2 9 Configuring Server and HTTP Ports You can change the server and HTTP ports in the Network Settings menu The default server port is 8000 and the default HTTP port is 80 Step 1 Enter the Network Settings interface Menu Configuration Network Step 2 Select the More Settings tab to enter the Mo...

Page 189: ...he system can be configured to send an Email notification to all designated users if an alarm event is detected etc an alarm or motion event is detected or the administrator password is changed Before configuring the Email settings the DVR must be connected to a local area network LAN that maintains an SMTP mail server The network must also be connected to either an intranet or the Internet depend...

Page 190: ...Proprietary and Confidential Copyright Huawei Technologies Co Ltd 182 Figure 9 20 Network Settings Interface Step 3 Click the Apply to save the settings Step 4 Select the Email tab to enter the Email Settings interface as shown in Figure 9 21 Figure 9 21 Email Settings Interface ...

Page 191: ...ers can be configured Receiver The name of user to be notified Receiver s Address The Email address of user to be notified Enable Attached Pictures Check the checkbox of Enable Attached Picture if you want to send email with attached alarm images The interval is the time of two adjacent alarm images You can also set SMTP port and enable SSL here Interval The interval refers to the time between two...

Page 192: ...ion on the interface The traffic data is refreshed every 1 second End 9 4 Configuring Network Detection You can obtain network connecting status of DVR through the network detection function including network delay packet loss etc 9 4 1 Testing Network Delay and Packet Loss Step 1 Enter the Network Traffic interface Menu Maintenance Net Detect Step 2 Click the Network Detection tab to enter the Ne...

Page 193: ...lick the Test to start testing network delay and packet loss The testing result pops up on the window If the testing is failed the error message box will pop up as well Refer to Figure 9 25 Figure 9 25 Testing Result of Network Delay and Packet Loss End 9 4 2 Exporting Network Packet By connecting the DVR to network the captured network data packet can be exported to USB flash disk SATA eSTATA CD ...

Page 194: ...he dropdown list of Device Name as shown in Figure 9 26 Click the Refresh if the connected local backup device cannot be displayed When it fails to detect the backup device please check whether it is compatible with the DVR You can format the backup device if the format is incorrect Figure 9 26 Export Network Packet Step 4 Click the Export to start exporting Step 5 After the exporting is complete ...

Page 195: ...heck the network statistics to obtain the real time information of the device Step 1 Enter the Network Statistics interface Menu Maintenance Net Detect Step 2 Click the Network Stat tab to enter the Network Statistics menu as shown in Figure 9 28 Figure 9 28 Network Statistics Step 3 View the bandwidth of Remote Live View bandwidth of Remote Playback and bandwidth of Net Total Idle Step 4 Click to...

Page 196: ...8 10 HDD Management 10 1 Initializing HDDs A newly installed hard disk drive HDD must be initialized before it can be used with your DVR Step 1 Enter the HDD Information interface as shown in Figure 10 1 Menu HDD General Figure 10 1 HDD Information Interface Step 2 Select HDD to be initialized Step 3 Click the Init button as shown in Figure 10 2 ...

Page 197: ... Copyright Huawei Technologies Co Ltd 189 Figure 10 2 Confirm Initialization Step 4 Select the OK to start initialization as shown in Figure 10 3 Figure 10 3 Start Initialization Step 5 After the HDD has been initialized the status of the HDD will change from Uninitialized to Normal as shown in Figure 10 4 ...

Page 198: ...t Huawei Technologies Co Ltd 190 Figure 10 4 HDD Status Changes to Normal Initializing the HDD will erase all data on it End 10 2 Managing Network HDD You can add the allocated NAS or disk of IP SAN to DVR and use it as network HDD Step 1 Enter the HDD Information interface as shown in Figure 10 5 Menu HDD General ...

Page 199: ...Issue 04 2013 06 15 Huawei Proprietary and Confidential Copyright Huawei Technologies Co Ltd 191 Figure 10 5 HDD Information Interface Step 2 Click the Add to enter the Add NetHDD interface as shown in Figure 10 6 Figure 10 6 HDD Information Interface ...

Page 200: ...in Figure 10 7 Add NAS disk Enter the NetHDD IP address in the text field Enter the NetHDD Directory in the text field Click the OK to add the configured NAS disk Up to 8 NAS disks can be added Figure 10 7 Add NAS Disk Add IP SAN Enter the NetHDD IP address in the text field as shown in Figure 10 8 Click the Search to the available IP SAN disks Select the IP SAN disk from the list shown below Clic...

Page 201: ...Huawei Technologies Co Ltd 193 Figure 10 8 Add IP SAN Disk Step 6 After having successfully added the NAS or IP SAN disk return to the HDD Information menu The added NetHDD will be displayed in the list as shown in Figure 10 9 If the added NetHDD is uninitialized please select it and click the Init for initialization ...

Page 202: ...gies Co Ltd 194 Figure 10 9 Initialize Added NetHDD End 10 3 Managing eSATA When there is an external eSATA device connected to DVR you can configure eSATA for the use of Record Capture or Export and you can manage the eSATA in the DVR Step 1 Enter the Advanced Record Settings interface as shown in Figure 10 10 Menu Record Advanced ...

Page 203: ... 2 Backing up by Normal Video Search for operating instructions Record Capture use the eSATA for record capture Refer to the following steps for operating instructions Step 3 When the eSATA type is selected to Record Capture enter the HDD Information interface Menu HDD General Step 4 Edit the property of the selected eSATA or initialize it is required as shown in Figure 10 11 Two storage modes can...

Page 204: ...d 196 Figure 10 11 Initialize Added NetHDD End 10 4 Managing HDD Group 10 4 1 Setting HDD Groups Multiple HDDs can be managed in groups Video from specified channels can be recorded onto a particular HDD group through HDD settings Step 1 Enter the Storage Mode interface Menu HDD Advanced Step 2 Set the Mode to Group as shown in Figure 10 12 ...

Page 205: ... 3 Click the Apply and the following Attention box will pop up as shown in Figure 10 13 Figure 10 13 Attention for Reboot Step 4 Click the Yes to reboot the device to activate the changes Step 5 After reboot of device enter the HDD Information interface Menu HDD General Step 6 Select HDD from the list and click the icon to enter the Local HDD Settings interface as shown in Figure 10 14 ...

Page 206: ...gies Co Ltd 198 Figure 10 14 Local HDD Settings Interface Step 7 Select the Group number for the current HDD The default group No for each HDD is 1 Step 8 Click the OK to confirm the settings as shown in Figure 10 15 Figure 10 15 Confirm HDD Group Settings Step 9 In the pop up Attention box click the Yes to finish the settings End ...

Page 207: ...perty is set to redundancy the video can be recorded both onto the redundancy HDD and the R W HDD simultaneously so as to ensure high security and reliability of video data Step 1 Enter the HDD Information interface Menu HDD General Step 2 Select HDD from the list and click the icon to enter the Local HDD Settings interface as shown in Figure 10 16 Figure 10 16 Set HDD Property Step 3 Set the HDD ...

Page 208: ...recorded files or captured pictures Step 1 Enter the Storage Mode interface Menu HDD Advanced Step 2 Set the Mode to Quota as shown in Figure 10 17 The DVR must be rebooted to enable the changes to take effect Figure 10 17 Storage Mode Settings Interface Step 3 Select a camera for which you want to configure quota Step 4 Enter the storage capacity in the text fields of Max Record Capacity GB and M...

Page 209: ...gure Record Picture Quota Step 5 You can copy the quota settings of the current camera to other cameras if required Click the Copy to enter the Copy Camera menu as shown in Figure 10 19 Figure 10 19 Copy Settings to Other Camera s Step 6 Select the camera s to be configured with the same quota settings You can also click the checkbox of Analog to select all cameras ...

Page 210: ...d 10 6 Checking HDD Status You may check the status of the installed HDDs on DVR so as to take immediate check and maintenance in case of HDD failure Checking HDD Status in HDD Information Interface Step 1 Enter the HDD Information interface Menu HDD General Step 2 Check the status of each HDD which is displayed on the list as shown in Figure 10 20 Figure 10 20 View HDD Status 1 If the status of H...

Page 211: ...of each HDD displayed on the list as shown in Figure 10 21 Figure 10 21 View HDD Status 2 End 10 7 Checking S M A R T Information The S M A R T Self Monitoring Analysis and Reporting Technology is a monitoring system for HDD to detect and report on various indicators of reliability in the hopes of anticipating failures Step 1 Enter the S M A R T Settings interface Menu HDD S M A R T Step 2 Check t...

Page 212: ...error alarms when the HDD status is Uninitialized or Abnormal Step 1 Enter the Exception interface Menu Configuration Exceptions Step 2 Select the Exception Type to HDD Error from the dropdown list Step 3 Click the checkbox s below to select the HDD error alarm type s as shown inFigure 10 23 The alarm type can be selected to Audio Warning Notify Surveillance Center Send Email and Trigger Alarm Out...

Page 213: ...Proprietary and Confidential Copyright Huawei Technologies Co Ltd 205 Figure 10 23 Configure HDD Error Alarm Step 4 When the Trigger Alarm Output is selected you can also select the alarm output to be triggered from the list below Step 5 Click the Apply to save the settings End ...

Page 214: ...p 1 Enter the OSD Configuration interface Menu Camera OSD Step 2 Select the camera to configure OSD settings Step 3 Edit the Camera Name in the text field Step 4 Configure the Display Name Display Date and Display Week by clicking the checkbox Step 5 Select the Date Format Time Format and Display Mode as shown in Figure 11 1 Figure 11 1 OSD Configuration Interface Step 6 You can use the mouse to c...

Page 215: ...igured with the same OSD settings You can also click the checkbox of Analog to select all cameras Step 10 Click the OK to finish the Copy settings and back to the OSD Configuration interface Step 11 Click the Apply to apply the settings End 11 2 Configuring Privacy Mask You are allowed to configure the four sided privacy mask zones that cannot be viewed by the operator Step 1 Enter the Privacy Mas...

Page 216: ...4 Use the mouse to draw a zone on the window The zones will be marked with different frame colors Up to 4 privacy mask zones can be configured and the size of each area can be adjusted Step 5 The configured privacy mask zones on the window can be cleared by clicking the corresponding Clear Zone1 4 icons on the right side of the window or click Clear All to clear all zones as shown in Figure 11 4 ...

Page 217: ...o Ltd 209 Figure 11 4 Set Privacy Mask Area Step 6 You can click the Copy to copy the privacy mask settings of the current camera to other cameras Please refer to 11 1 Step 7 Step 7 Click the Apply to save the settings End 11 3 Configuring Video Parameters Step 1 Enter the Image Settings interface as shown in Figure 11 5 Menu Camera Image ...

Page 218: ... 5 Image Settings Interface Step 2 Select the camera to set image parameters Step 3 Select the mode from the dropdown list of Mode Five modes are selectable Standard Indoor Dim Light Outdoor and Customize Step 4 When the mode is selected to Customize you can adjust the video parameters including Brightness Contrast Saturation and Hue as shown in Figure 11 6 ...

Page 219: ...nd Confidential Copyright Huawei Technologies Co Ltd 211 Figure 11 6 Configure Customized Image Settings Step 5 You can click the Copy to copy the image settings of the current camera to other cameras Please refer to 11 1Configuring OSD Settings Step 6 Click the Apply to save the settings End ...

Page 220: ...2 1 1 Viewing Device Information Step 1 Enter the System Information interface Menu Maintenance System Info Step 2 Click the Device Info tab to enter the Device Information menu to view the device name model serial No firmware version and encode version as shown in Figure 12 1 Figure 12 1 Device Information Interface End 12 1 2 Viewing Camera Information Step 1 Enter the System Information interfa...

Page 221: ...nter the Camera Information menu to view the status of each camera as shown in Figure 12 2 Figure 12 2 Camera Information Interface End 12 1 3 Viewing Record Information Step 1 Enter the System Information interface Menu Maintenance System Info Step 2 Click the Record tab to enter the Record Information menu to view the recording status encoding parameters of each camera as shown in Figure 12 3 ...

Page 222: ...ential Copyright Huawei Technologies Co Ltd 214 Figure 12 3 Record Information Interface End 12 1 4 Viewing Alarm Information Step 1 Enter the System Information interface Menu Maintenance System Info Step 2 Click the Alarm tab to enter the Alarm Information menu to view the alarm information as shown in Figure 12 4 ...

Page 223: ...al Copyright Huawei Technologies Co Ltd 215 Figure 12 4 Alarm Information Interface End 12 1 5 Viewing Network Information Step 1 Enter the System Information interface Menu Maintenance System Info Step 2 Click the Network tab to enter the Network Information menu to view the network information as shown in Figure 12 5 ...

Page 224: ... Copyright Huawei Technologies Co Ltd 216 Figure 12 5 Network Information Interface End 12 1 6 Viewing HDD Information Step 1 Enter the System Information interface Menu Maintenance System Info Step 2 Click the HDD tab to enter the HDD Information menu to view the HDD status free space property etc as shown in Figure 12 6 ...

Page 225: ...ight Huawei Technologies Co Ltd 217 Figure 12 6 HDD Information Interface End 12 2 Searching Export Log Files The operation alarm exception and information of the DVR can be stored in log files which can be viewed and exported at any time Step 1 Enter the Log Search interface as shown in Figure 12 7 Menu Maintenance Log Search ...

Page 226: ...o Ltd 218 Figure 12 7 Log Search Interface Step 2 Set the log search conditions to refine your search including the Start Time End Time Major Type and Minor Type Step 3 Click the Search to start search log files Step 4 The matched log files will be displayed on the list shown below as shown in Figure 12 8 Up to 2000 log files can be displayed each time ...

Page 227: ...nfidential Copyright Huawei Technologies Co Ltd 219 Figure 12 8 HDD Information Interface Step 5 You can click the button of each log or double click it to view its detailed information as shown in Figure 12 9 And you can also click the button to view the related video files if available Figure 12 9 Log Details ...

Page 228: ...he New Folder to create new folder in the backup device or click the Format to format the backup device before log export Please connect the backup device to DVR before operating log export The log files exported to the backup device are named by exporting time e g 20110514124841logBack txt End 12 3 Importing Exporting Configuration Files The configuration files of the DVR can be exported to local...

Page 229: ... and click the Import button After the import process is completed you must reboot the DVR After having finished the import of configuration files the device will reboot automatically End 12 4 Upgrading System The firmware on your DVR can be upgraded by local backup device or remote FTP server 12 4 1 Upgrading by Local Backup Device Step 1 Connect your DVR with a local backup device where the upda...

Page 230: ...e Upgrade to start upgrading Step 6 After the upgrading is complete reboot the DVR to activate the new firmware End 12 4 2 Upgrading by FTP Before you start configure PC running FTP server and DVR to the same Local Area Network Run the 3rd party TFTP software on the PC and copy the firmware into the root directory of TFTP Step 1 Enter the Upgrade interface Menu Maintenance Upgrade Step 2 Click the...

Page 231: ...ing the system The upgrade file is named as digicap mav which is not changeable and it should be located in the path entered here The upgrade file extension cannot be shown in Windows operating system After the upgrade is complete reboot the DVR to activate the new firmware If the upgrading is failed that causes the device unable to work normally after startup please contact with your supplier imm...

Page 232: ...al Copyright Huawei Technologies Co Ltd 224 Figure 12 14 Restore Factory Default Step 2 Click the OK to restore the default settings Except the network parameters including IP address subnet mask gateway MTU default route and server port all other parameters of the device will be restored to factory default settings End ...

Page 233: ...evice parameters can be configured by using software such as HyperTerminal The serial port parameters must be the same as the DVR s when connecting with the PC serial port Transparent Channel Connect a serial device directly to the DVR The serial device will be controlled remotely by the PC through the network and the protocol of the serial device Step 1 Enter the RS 232 Settings interface as show...

Page 234: ...top bit parity flow control and usage Step 3 Click the Apply to save the settings End 13 2 Configuring DST Settings Step 1 Enter the General Settings interface Menu Configuration General Step 2 Choose DST Settings tab Figure 13 2 DST Settings Step 3 You can check checkbox before the Auto DST Adjustment item Or you can manually check the Enable DST checkbox and then you choose the date of the DST p...

Page 235: ... 2 Select the General tab as shown in Figure 13 3 Figure 13 3 General Settings Interface Step 3 Configure the following settings Language The default language used is English CVBS Output Standard Select the CVBS output standard to NTSC or PAL which must be the same with the video input standard VGA Resolution Select the VGA output resolution which must be the same with the resolution of the monito...

Page 236: ... disable the use of the login password Step 4 Click the Apply to save the settings End 13 4 Configuring More Settings Step 1 Enter the General Settings interface Menu Configuration General Step 2 Click the More Settings tab to enter the More Settings interface as shown in Figure 13 4 Figure 13 4 More Settings Interface Step 3 Configure the following settings Device Name Edit the name of DVR Device...

Page 237: ...ive view screen after 5 minutes of menu inactivity Step 4 Click the Apply to save the settings End 13 5 Managing User Accounts There is a default account in the DVR Administrator The Administrator user name is admin and the password is HuaWei123 The Administrator has the permission to add and delete user and configure user parameters 13 5 1 Adding a User Step 1 Enter the User Management interface ...

Page 238: ...evel has permission of Two way Audio in Remote Configuration and all operating permission in Camera Configuration Guest The Guest user has no permission of Two way Audio in Remote Configuration and only has the local remote playback in the Camera Configuration User s MAC Address The MAC address of the remote PC which logs onto the DVR If it is configured and enabled it only allows the remote user ...

Page 239: ...onfidential Copyright Huawei Technologies Co Ltd 231 Figure 13 7 Added User Listed in User Management Interface Step 5 Select the user from the list and then click the button to enter the Permission settings interface as shown in Figure 13 8 Figure 13 8 User Permission Settings Interface ...

Page 240: ...ay radio between the remote client and the DVR Remote Alarm Control Remotely arming notify alarm and exception message to the remote client and controlling the alarm output Remote Advanced Operation Remotely operating HDD management initializing HDD setting HDD property upgrading system firmware clearing I O alarm output Remote Shutdown Reboot Remotely shutting down or rebooting the DVR Camera Con...

Page 241: ...r the User Management interface Menu Configuration User Step 2 Select the user to be deleted from the list as shown in Figure 13 9 Figure 13 9 Delete a User Step 3 Click the icon to delete the selected user End 13 5 3 Editing a User Step 1 Enter the User Management interface Menu Configuration User Step 2 Select the user to be edited from the list as shown in Figure 13 10 ...

Page 242: ...hers Issue 04 2013 06 15 Huawei Proprietary and Confidential Copyright Huawei Technologies Co Ltd 234 Figure 13 10 Edit a User Step 3 Click the icon to enter the Edit User interface as shown in Figure 13 11 Figure 13 11 Edit User Interface ...

Page 243: ...ord of Admin The password of the Admin user account can be changed in the User Management menu Step 1 Enter the User Management interface Menu Configuration User Step 2 Click the Change Password tab to enter the Change Password menu as shown in Figure 13 12 Figure 13 12 Change Password Step 3 Enter the old password new password and confirm password on the menu Click the Save to save the changes En...

Page 244: ...chnologies Co Ltd 236 Figure 13 13 Shutdown Menu Step 2 Click Logout to log out of the system click Shutdown to shut down the device or click the Reboot to reboot the device After you log out of the system the preview window is displayed You are required to enter the user name and password to log in to the system End ...

Page 245: ...r Ethernet is a network protocol for encapsulating Point to Point Protocol PPP frames inside Ethernet frames It is used mainly with ADSL services where individual users connect to the ADSL transceiver modem over Ethernet and in plain Metro Ethernet networks DDNS Dynamic DNS is a method protocol or network service that provides the capability for a networked device such as a router or computer syst...

Page 246: ...h the IR remote control Please check The batteries are installed correctly in the remote making sure that the polarities of the batteries are not reversed The batteries are fresh and are not out of power The remote has not been tampered with There are no fluorescent lamps in use nearby Why does the PTZ seem unresponsive If the PTZ seem unresponsive please check The RS 485 cable is properly connect...

Page 247: ...ere s a chance that the DVR and your USB device is not compatible Please refer to our company s website to view a list of compatible devices My DVR is in Live View mode and the menu does not show up It does not respond to the mouse the front panel the remote or keyboard Your DVR may be in auxiliary mode This occurs when the F1 is pressed on the front panel To return to the previous mode of operati...

Page 248: ......

Reviews: