background image

23

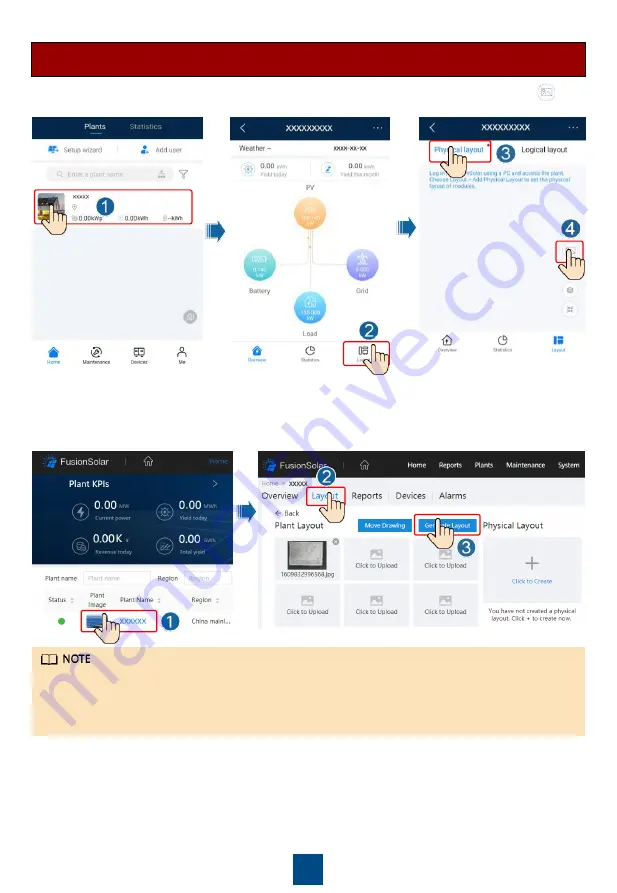
1. Tap the plant name on the 

Home

screen to access the plant screen. Select 

layout

, tap       

and upload the physical layout template photo of the PV plant as prompted.

Scenario 1: Setting on the FusionSolar Server Side (Solar Inverter Connected to 

the Management System)

2. Log in to https://intl.fusionsolar.huawei.com to access the WebUI of the FusionSolar Smart PV 

Management System. On the 

Home

page, click the plant name to go to the plant page. 

Select 

layout

. Choose 

Generate layout

, and create a physical layout as prompted. You can 

also manually create a physical location layout.

You can also upload the physical layout template photo on the WebUI as follows: Log in to 
https://intl.fusionsolar.huawei.com to access the WebUI of the PV Monitor Smart PV 
Management System. On the 

Home

page, click the plant name to go to the plant page. Select 

layout

. Choose 

Click to Upload

, and upload the physical layout template photo.

Summary of Contents for SUN2000-3KTL-10KTL-M1

Page 1: ...HUAWEI TECHNOLOGIES CO LTD SUN2000 3KTL 10KTL M1 Quick Guide Issue 03 Part Number 31500FKA Date 2022 03 08 ...

Page 2: ...2 PV2 13 DC input terminals PV1 PV1 14 DC switch DC SWITCH 15 Screw hole for the DC switch 2 Before installing the device read the user manual carefully to get familiar with product information and safety precautions 3 Only qualified and trained electrical technicians are allowed to operate the device Operation personnel should understand the composition and working principles of the grid tied PV ...

Page 3: ...2 Installation Requirements 2 1 Dimensions 2 Installing the Equipment Two M6 screw holes are reserved on both left and right sides of the inverter for installing an awning Space Angle ...

Page 4: ... are used for solid concrete walls For other types of walls prepare bolts by yourself and ensure that the wall meets the load bearing requirements of the inverter Loosen the nuts flat washers and spring washers of the two expansion bolts Level 2 Optional Install the screw for locking the DC switch The screws for DC switches are delivered with solar inverters According to Australian standards the s...

Page 5: ...pper cable Conductor cross sectional area 4 6 mm2 Cable outer diameter 10 21 mm 3 DC input power cable and optional battery cable Standard outdoor PV cable in the industry recommended model PV1 F Conductor cross sectional area 4 6 mm2 Cable outer diameter 5 5 9 mm 4 Optional RS485 communications cable used to cascade inverters or connect to the RS485 signal port on the SmartLogger Two core outdoor...

Page 6: ...It is recommended that silica gel or paint be used around the ground terminal after the PE cable is connected Installing the AC Output Power Cable 3 3 Ensure that the protection layer of the AC output power cable is inside the connector the core wires are totally inserted into the cable hole and the cable is connected securely Failing to do so may cause device malfunction or damage 1 Connect the A...

Page 7: ... core AC output power cable to an AC connector A three core AC output power cable can be connected similarly The three core cable L1 L2 and L3 is not connected to the neutral wire or PE wire A four core or five core AC output power cable can be connected similarly The four core cable L1 L2 L3 and PE is not connected to the N wire and the four core cable L1 L2 L3 and N is not connected to the PE wi...

Page 8: ...diately Failing to do so may cause device damage which is not covered under any warranty Wait until the night when solar irradiance declines and the PV string current drops to below 0 5 A Then set the DC switch to the OFF position remove the positive and negative connectors and correct the polarities of the DC input power cable 6 If the PV strings are configured with Smart PV Optimizers refer to t...

Page 9: ...tight caps Pull the battery cable back to ensure that it is connected securely Battery terminals BAT BAT Assemble the positive and negative connectors by following the instructions in section 3 4 Installing DC Input Power Cables Use insulated tools when connecting cables Connect battery cables with correct polarity If battery cables are reversely connected the solar inverter may be damaged Click ...

Page 10: ...mart Dongle SDongleA 05 The WLAN FE Smart Dongle is delivered with the SUN2000 If 4G communication is used install a 4G Smart Dongle SDongleA 03 You need to purchase the 4G Smart Dongle by yourself For details about how to operate the WLAN FE Smart Dongle SDongleA 05 see SDongleA 05 Quick Guide WLAN FE For details about how to operate the 4G Smart Dongle SDongleA 03 see SDongleA 03 Quick Guide 4G ...

Page 11: ...talling the Signal Cable 3 7 Not all inverter models are delivered with the signal cable connector When laying out the signal cable separate it from the power cable and keep it away from strong interference sources to avoid strong communication interference Ensure that the protection layer of the cable is inside the connector surplus core wires are cut off from the protection layer the exposed cor...

Page 12: ... as a port for the feedback signal of the Backup Box 9 485B2 RS485B RS485 differential signal 10 DIN2 Digital input signal 2 Dry contact for grid scheduling 11 EN Enabling signal Used to connect to the enable signal port on an energy storage device 12 DIN3 Digital input signal 3 13 GND GND Used to connect to the rapid shutdown DI signal port or serve as a port for the signal cable of the NS protec...

Page 13: ... In the Smart Dongle networking scenario the SmartLogger cannot be connected The Smart Power Sensor is necessary for export limitation Select the Smart Power Sensor according to the actual project A maximum of 10 devices can be connected to the WLAN FE and 4G Smart Dongles The Smart Power Sensors connected to the RS485A2 and RS485B2 ports are not included If a battery is connected a maximum of thr...

Page 14: ...nnect the signal cable to the signal cable connector Optional Installing the RS485 Communications Cable Inverter Cascading 2 Connect the signal cable connector to the communication port Communications port COM ...

Page 15: ...talling the RS485 Communications Cable Only Smart Power Sensor Connected 1 Connect the signal cable to the signal cable connector 2 Connect the signal cable connector to the communication port Communications port COM ...

Page 16: ...able to the signal cable connector 2 Connect the signal cable connector to the Communication port Optional Installing the RS485 Communications Cable Smart Power Sensor and Energy Storage Device Connected Communications port COM ...

Page 17: ...Connect the signal cable to the signal cable connector Optional Installing the Grid Scheduling Dry Contact Signal Cable 2 Connect the signal cable connector to the Communication port Communications port COM ...

Page 18: ...7 1 Connect the signal cable to the signal cable connector 2 Connect the signal cable connector to the Communication port Communications port COM Optional Installing Signal Cables for a Smart Backup Box ...

Page 19: ...the installation environment is clean and tidy 4 Verifying Installation 5 Powering On the System Before turning on the AC switch between the solar inverter and the power grid check that the AC voltage is within the specified range using a multimeter set to the AC position If the solar inverter is connected to an LG battery turn on the DC switch within 1 minute after turning on the AC switch If you...

Page 20: ... the AC is on Off Off Both the DC and AC are off Blinking red at short intervals N A There is a DC environmental alarm such as an alarm indicating that High String Input Voltage String Reverse Connection or Low Insulation Resistance N A Blinking red at short intervals There is an AC environmental alarm such as an alarm indicating Grid Undervoltage Grid Overvoltage Grid Overfrequency or Grid Underf...

Page 21: ...n Green Blinking at long intervals on for 1s and then off for 1s The dial up connection is set up successfully duration 30s Green Steady on Successfully connected to the management system Green Blinking at short intervals on for 0 2s and then off for 0 2s The inverter is communicating with the management system through the Dongle 4G Smart Dongle 6 Commissioning The screenshots are for reference on...

Page 22: ...i com using the mobile phone browser and download the latest installation package FusionSolar Method 3 Scan the following QR code and download the latest installation package If you already have an installer account skip this step Creating the first installer account will generate a domain named after the company Optional Registering an Installer Account 6 2 ...

Page 23: ...are correctly attached to the physical layout template Take and save a photo of the physical layout template Place the template on a flat surface Keep your phone parallel to the template and take a photo in landscape mode Ensure that the four positioning points in the corners are in the frame Ensure that each QR code is attached within the frame For details about the physical layout of Smart PV Op...

Page 24: ...rt PV Management System On the Home page click the plant name to go to the plant page Select layout Choose Generate layout and create a physical layout as prompted You can also manually create a physical location layout You can also upload the physical layout template photo on the WebUI as follows Log in to https intl fusionsolar huawei com to access the WebUI of the PV Monitor Smart PV Management...

Page 25: ...ntified need to be manually bound Method 2 Tap Add PV modules to manually add PV modules and bind the optimizers to the PV modules 1 If the solar inverter is not connected to the FusionSolar Smart PV Management System access the Device commissioning screen Refer to 7 1 Device Commissioning on the FusionSolar app to set the physical layout of Smart PV Optimizers Scenario 2 Setting on the Solar Inve...

Page 26: ... and choose My Device commissioning The Device commissioning screen Refer to 7 1 Device Commissioning is displayed 2 Choose Power adjustment Battery control and set battery parameters including Charge from grid Control mode Fully fed to grid TOU Time of use Maximum self consumption and so on 1 Access Device commissioning Device Commissioning 7 1 Scenario 1 Your phone is not connected to the Intern...

Page 27: ...itch and set the DC switch to OFF Wait until all LED indicators on the SUN2000 panel are off d Turn on the AC switch and set the DC switch to ON a Wait until the indicator blinks green at long intervals b Obtain the initial WLAN hotspot name SSID and initial password PSW from the label on the side of the SUN2000 and connect to the app c On the login screen set a new login password and log in to th...

Page 28: ...3 21686868 Japan Japan Japan_ESC ms huawei com 0120258367 India India indiaenterprise_TAC huawei com 1800 103 8009 Republic of Korea Republic of Korea Japan_ESC ms huawei com N A North America USA eu_inverter_support huawei com 1 877 948 2934 Canada eu_inverter_support huawei com 1 855 482 9343 Latin America Mexico la_inverter_support huawei com 018007703456 0052 442 4288288 Argentina 0 8009993456...

Page 29: ...Huawei Technologies Co Ltd Huawei Industrial Base Bantian Longgang Shenzhen 518129 People s Republic of China solar huawei com ...

Reviews: