Huawei SUN2000-12KTL Quick Manual Download Page 5

4

Installing SUN2000-(8KTL

20KTL)-M2

1.2

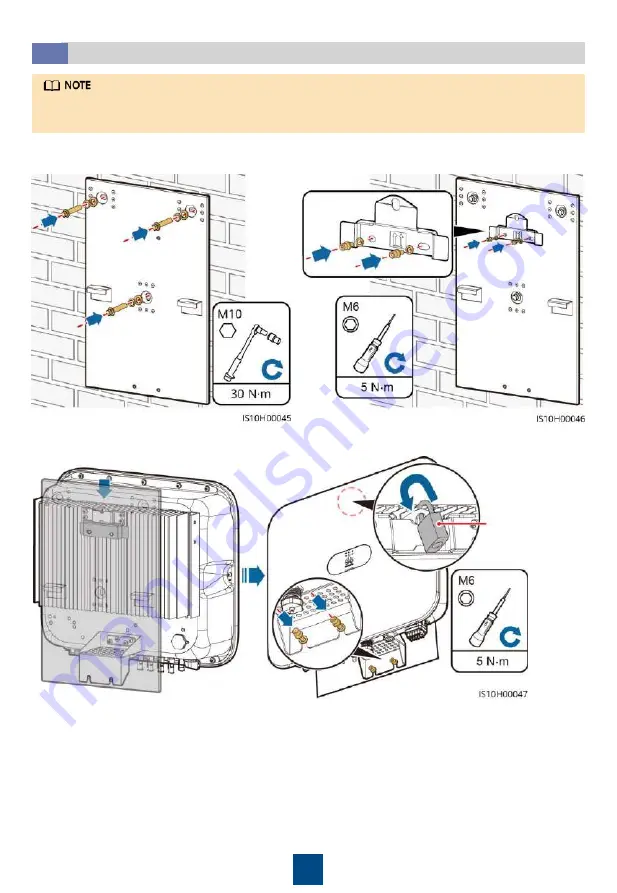
1. Install the new rear panel.

2. Install the mounting bracket.

The installation of the new rear panel is the same as that of the SUN2000-(8KTL

12KTL) rear 

panel. Align the mounting holes.

3. Install the SUN2000 onto the mounting bracket.

(Optional) 
Install an anti-
theft lock.

Summary of Contents for SUN2000-12KTL

Page 1: ...HUAWEI TECHNOLOGIES CO LTD Replacing SUN2000 8KTL 12KTL and SUN2000 12KTL 20KTL M0 with SUN2000 8KTL 20KTL M2 Quick Guide Issue 01 Part Number 31500EPF Date 2020 09 02 ...

Page 2: ... enough If not prepare appropriate cables 1 SUN2000 8KTL 12KTL Replacement Scenario Remove SUN2000 8KTL 12KTL Install SUN2000 8KTL 20KTL M2 Install the PE cable Before removing the original SUN2000 ensure that the DC switch on the SUN2000 and all the switches connected to the SUN2000 are set to OFF Otherwise the high voltage of the SUN2000 may result in electric shocks After the SUN2000 is powered...

Page 3: ...nals of SUN2000 8KTL 12KTL must be cut off If the DC connectors of SUN2000 8KTL 12KTL are directly connected to SUN2000 8KTL 12KTL M2 the SUN2000 may be burnt 4 Remove the RS485 communications cable and use a cable cutter to cut off the RJ45 connector Set the cable aside for future use 5 Remove the PE cable and remove the crimped OT terminal Set the cable aside for future use ...

Page 4: ... SUN2000 8KTL 12KTL 1 Optional Open the anti theft lock 2 Remove the two hexagonal screws 3 Remove the SUN2000 from the rear panel 4 Remove the nuts spring washers and flat washers and then remove the rear panel ...

Page 5: ...e new rear panel 2 Install the mounting bracket The installation of the new rear panel is the same as that of the SUN2000 8KTL 12KTL rear panel Align the mounting holes 3 Install the SUN2000 onto the mounting bracket Optional Install an anti theft lock ...

Page 6: ...th the SUN2000 and bound to the hanging kit at the bottom of the SUN2000 It is recommended that silica gel or paint be applied around the ground terminal after the PE cable is connected Installing the PE Cable for SUN2000 8KTL 20KTL M2 1 3 1 Connect the AC output power cable to the AC connector Before connecting cables ensure that the DC switch on the SUN2000 and all the switches connected to the ...

Page 7: ...core cable L1 L2 and L3 is not connected to the N terminal or PE terminal A four core AC output power cable can be connected similarly The four core cable L1 L2 L3 and PE is not connected to the N terminal and the four core cable L1 L2 L3 and N is not connected to the PE terminal Click 2 Connect the AC connector to the AC output port AC output port AC 3 Check the route of the AC output power cable...

Page 8: ... and negative connectors immediately Failing to do so may cause device damage which is not covered under warranty Wait until the night when solar irradiance declines and the PV string current drops to below 0 5 A Then set the DC switch to OFF remove the positive and negative connectors and correct the polarity of the DC input power cables 1 Assemble DC connectors Click Positive metal terminal Nega...

Page 9: ...ld layer 7 485A2 Reserved 8 9 485B2 Reserved 10 11 12 13 GND Reserved 14 15 DIN5 Reserved 16 Communications Port Signal Definitions for SUN2000 8KTL 20KTL M2 Installing the Signal Cable for SUN2000 8KTL 20KTL M2 1 6 Ensure that the protective layer of the cable is inside the connector that excess core wires are cut off from the protection layer that the exposed core wire is totally inserted into t...

Page 10: ...ations Cables SUN2000 Cascading 1 Connect the signal cable to the signal connector The figures show the RJ45 connector when the surface without the fastener faces upwards If the colors and functions of the wires are different connect the wires based on their functions ...

Page 11: ...tput power cable DC input power cables and signal cable are connected correctly and securely 8 Unused terminals and ports are locked by watertight caps 9 The installation space is proper and the installation environment is clean and tidy 1 Turn on the AC switch between the SUN2000 and the power grid 2 Turn on the DC switch if any between the PV string and the SUN2000 3 Turn on the DC switch at the...

Page 12: ...user installer to access the Device commissioning screen When your phone is connected to the Internet Device commissioning is not displayed after you tap on the screen 1 Use Huawei AppGallery to search for FusionSolar or scan the QR code to download the latest installation package FusionSolar Android The initial password is 00000a At the first login the Quick settings screen is displayed by defaul...

Page 13: ... Restore the SUN2000 8KTL 12KTL M2 protocol Select a model for device replacement set the grid code time zone time and communication address and complete the protocol replacement Default Settings of Device Replacement Model Selection for Device Replacement Before replacing SUN2000 8KTL 12KTL with SUN2000 8KTL 12KTL M2 you must replace the protocol Otherwise SUN2000 8KTL 12KTL M2 cannot connect to ...

Page 14: ...se a cable cutter to cut off the terminals of DC input power cables Set the cables aside for future use DC input terminals Before removing the original SUN2000 ensure that the DC switch on the SUN2000 and all the switches connected to the SUN2000 are set to OFF Otherwise the high voltage of the SUN2000 may result in electric shocks After the SUN2000 is powered off the remaining electricity and hea...

Page 15: ...osen the nuts flat washers and spring washers of the two expansion bolts below 6 Remove the PE cable and remove the crimped OT terminal Set the cable aside for future use 5 Remove the signal cable connector for future use This section describes how to remove a WLAN FE Smart Dongle The 4G Smart Dongle and WLAN Smart Dongle can be removed similarly Smart Dongle port GPRS 4G WLAN Expansion bolt ...

Page 16: ...und terminal after the PE cable is connected Performing SUN2000 8KTL 20KTL M2 Electrical Connections 1 3 Before connecting cables ensure that the DC switch on the SUN2000 and all the switches connected to the SUN2000 are set to OFF Otherwise the high voltage of the SUN2000 may result in electric shocks 1 Install the PE cable 2 Connect the AC connector to the AC output port AC output port AC ...

Page 17: ...o do so may cause device damage which is not covered under warranty Wait until the night when solar irradiance declines and the PV string current drops to below 0 5 A Then set the DC switch to OFF remove the positive and negative connectors and correct the polarity of the DC input power cables Click Positive metal terminal Negative metal terminal Ensure that the cable cannot be pulled out after be...

Page 18: ...tor to the communications port Communications port COM 4 Optional Install the Smart Dongle Smart Dongle port GPRS 4G WLAN If a Smart Dongle is configured it is recommended that you install it before connecting the signal cable This section describes how to install a WLAN FE Smart Dongle The 4G Smart Dongle and WLAN Smart Dongle can be installed similarly ...

Page 19: ...Criterion 1 The SUN2000 is installed correctly and securely 2 The cables are routed properly as required by the customer 3 The communications expansion module is installed correctly and securely 4 Cable ties are secured evenly and no burr exists 5 The PE cable is connected correctly and securely 6 The DC switch and all the switches connected to the SUN2000 are set to OFF 7 The AC output power cabl...

Page 20: ...ck settings screen is displayed by default Set the grid code time zone time and communication address The initial password is 00000a For details about how to cascade SUN2000s and set communication parameters see the FusionSolar App Quick Guide You can scan the QR code to download the document When connecting the Smart Dongle scan the QR code of the SUN2000 connected to the Smart Dongle ...

Page 21: ...20 4 Optional If you need to set other parameters tap Settings ...

Page 22: ...Huawei Technologies Co Ltd Huawei Industrial Base Bantian Longgang Shenzhen 518129 People s Republic of China solar huawei com ...

Reviews: