background image

Getting Started

12

4. Choose an unlock method, and configure the unlock 

settings. If face identification fails, unlock the phone 
using the alternative method you have selected.

5. Touch 

OK

.

To unlock your phone using the 

Face Unlock

 function, 

bring your face to the center of the screen. Your phone 
will identify your face and unlock.
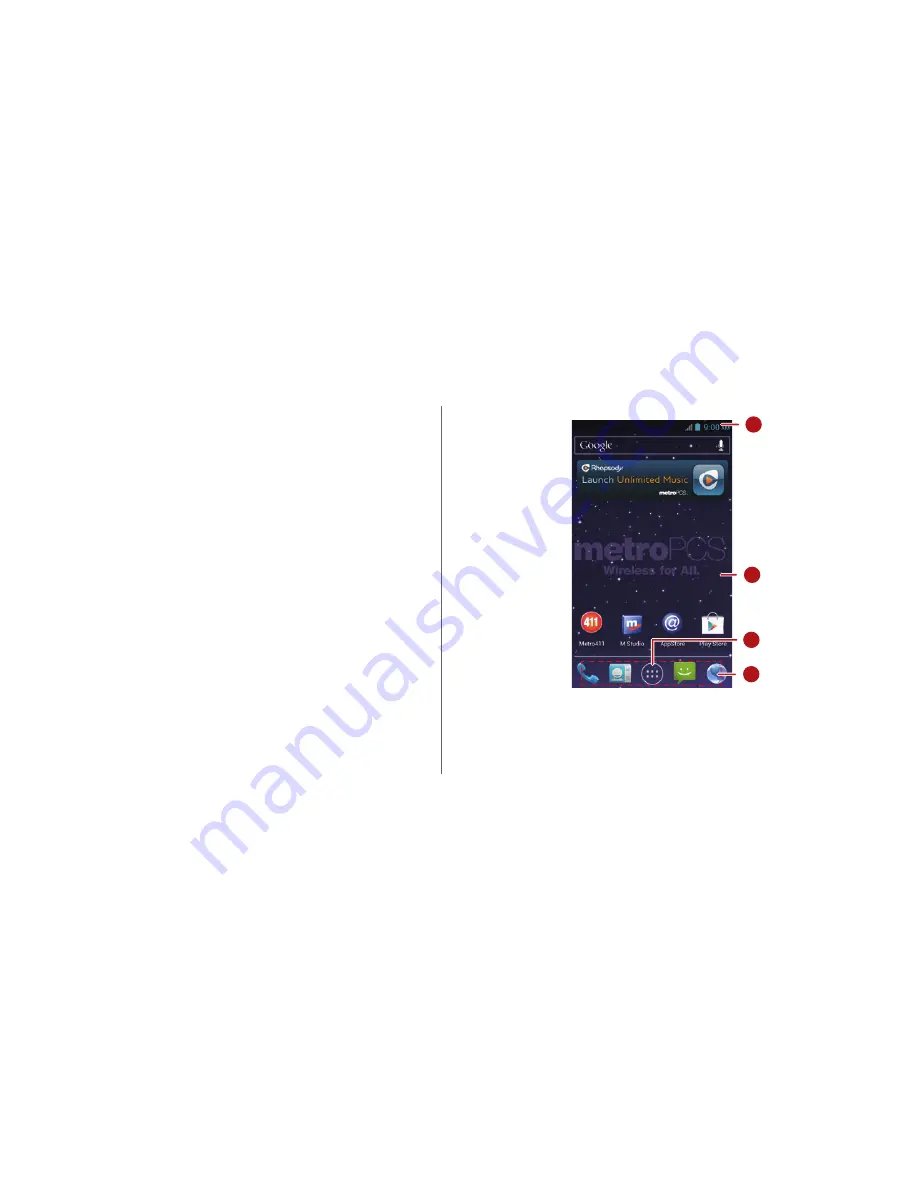
Home Screen

Your phone is preloaded with multiple themes. The 
screen layout varies depending on the theme. The 
default theme is used as an example in this section.

1

2

3

4

Summary of Contents for Premia 4G

Page 1: ...User Guide Welcome to HUAWEI HUAWEI Premia 4GTM ...

Page 2: ...en 10 Home Screen 12 ManagingtheNotificationPanel 16 Accessing Applications andWidgets 17 ManagingShortcuts andWidgets 18 ManagingFolders on the Home Screen 19 Calling 20 Making aCall 20 Answeringor Rejectinga Call 21 Operations Duringa Call 22 Switching BetweenCalls 23 Using the Voicemail Service 23 Contacts 24 Creating aContact 24 Communicatingwith aContact Quickly 24 Addinga Contact to Your Fav...

Page 3: ...ge 35 CustomizingMessageSettings 35 Settingthe MessageRingtone 35 Using Talk 36 DataConnection 38 Turning On Mobile Data Services 38 Using Wi Fi 38 SharingYour Phone s DataConnection 41 Bluetooth 42 DLNA 44 Email Gmail 45 Email 45 Gmail 48 Managing Applications 50 Using Play Store 50 Installingan Applicationfrom amicroSDCard 51 Viewing and Uninstalling Applications 52 Browser 53 Browsinga WebPage ...

Page 4: ...ng aPlaylist 67 Playing an Audio File 67 Copyingan Audio File 68 Accounts and Synchronization 70 AddinganAccount 70 Removing an Account 70 Synchronizing Data 71 Changing theAccount Synchronization Settings 71 More Applications 72 Calendar 72 ManagingFile Manager 73 AddinganAlarm 75 Using the Calculator 76 Using the Notes 76 Weather Clock 77 YouTube 79 ConfiguringPhone Settings 80 Setting the Date ...

Page 5: ...iv Restoring Factory Settings 83 Online Upgrade 84 FAQs 85 Appendix 88 Safety Precautions 88 Personal Informationand Data Security 90 Legal Notice 91 ...

Page 6: ... depend on the specific phone purchased Please visit www huaweidevice com worldwide support hotline for recently updated hotline and email address in your country or region Symbols and Definitions The following symbols are used in this document to highlight sections that require special attention Description Additional operation descriptions Tip Help you to solve a problem quickly and efficiently ...

Page 7: ...me key Back key Menu key Press and hold to power on your phone Press and hold to display the options menu from where you can power off the phone and perform some shortcut operations Press to lock the screen when your phone is active Touch to return to the previous screen or exit the currently running application Touch to hide the keyboard Touch to open the menu on an active screen ...

Page 8: ...ity can be expanded by installing a microSD card For installation instructions refer to the following diagram To remove the microSD card 1 On the Home screen touch Settings 2 Touch Storage Unmount SD card Touch to return to the Home screen Touch and hold to view the list of recently used applications 1 a b 2 3 4 The micro SD card is an optional accessory ...

Page 9: ...icator shows the battery level or charging status Steady green The phone is charging and the battery level is high or full Steady yellow The phone is charging and the battery level is higher than 10 Steady red The phone is charging and the battery level is low Blinking red The battery level is low and the phone needs to be charged When charging your phone while it is powered off the battery is ful...

Page 10: ... noticeably shorter after being fully charged replace the battery with a new one of the same type Using data services increases the phone s power consumption and will reduce battery life The time required to fully charge the battery depends on the ambient temperature and the age of the battery If your phone is very low on power it displays a message If your phone is extremely low on power it will ...

Page 11: ...Installation 6 Touch Display Brightness to lower the screen brightness and touch Sleep to shorten the period until the screen locks Close applications that are no longer in use Lower the volume ...

Page 12: ...When your phone is on press and hold to display the options menu Touch Power off Restarting Your Phone 1 Press and hold to display the options menu 2 Touch Restart OK to restart your phone Using the Touchscreen Touch Tap the screen once with your finger to select an item or open an application Touch and hold Touch and hold on the current screen or the input field to display the options menu ...

Page 13: ... your phone settings Flick Move your finger either vertically or horizontally across the screen Drag Touch and hold an item and then drag it to the desired location on the screen For example on the Home screen you can move an icon by dragging it to another location or remove an icon by dragging it to the trash can Pinch or spread To zoom in or out as desired while viewing photos web pages or maps ...

Page 14: ...account you can touch Sign in on the Make it Google screen and then enter your username and password If you do not already have a Google account you can follow prompt on the screen to create one To use another Google account go to the Accounts sync screen by touching Settings Accounts sync and then touch ADD ACCOUNT to select the account type you want to add Switching to Silent Mode or Airplane Mo...

Page 15: ...nlocking the Screen Locking the Screen To lock the screen when the phone is active press If the phone is idle for a specified period of time the phone automatically locks its screen On the Home screen touch Settings Security Screen lock to select a method for unlocking the screen Unlocking the Screen 1 If the screen is off press to turn it on 2 Follow the onscreen instructions and drag to the righ...

Page 16: ...ou can set your phone to unlock by recognizing your face To enable and configure the settings of the Face Unlock application 1 On the Home screen touch Settings Security Screen lock Face Unlock 2 Read the onscreen instructions and then touch Set it up Continue to take a photo 3 Ensure that your face is at the center of the capture screen and then wait for the phone to capture a photo After a photo...

Page 17: ... method you have selected 5 Touch OK To unlock your phone using the Face Unlock function bring your face to the center of the screen Your phone will identify your face and unlock Home Screen Your phone is preloaded with multiple themes The screen layout varies depending on the theme The default theme is used as an example in this section 1 2 3 4 ...

Page 18: ...ys notifications and status icons Flick the notification bar downwards to open the notification panel 2 Display area The main display area of your phone 3 Menu key Touch to open the application list 4 Shortcuts Touch to open the corresponding applications Signal strength No signal 4G network connected EVDO network in use CDMA 1X in use Airplane mode Roaming Receiving location data from GPS Bluetoo...

Page 19: ...attery full Missed calls Call in progress New mail in your Gmail account Call in progress using a Bluetooth headset Message not sent New message New email New chat message Connected to a PC New voicemail Upcoming event Open Wi Fi network available Downloading Uploading Sign in or synchronization problem talk ...

Page 20: ...e screen to switch between the Home screen and its extensions Phone memory full More undisplayed notifications Preparing the microSD card Synchronization failed Synchronizing data USB tethering Portable Wi Fi hotspot activated Headset plugged in Connected to a VPN Select input method SIM card not found ...

Page 21: ... Auto rotate Screen If your rotate your phone when browsing a web page viewing an image or composing a message the orientation of your screen will change to landscape or portrait view automatically On the Home screen touch Settings Display and then clear the Auto rotate screen check box to disable this function Managing the Notification Panel Using the notification panel you can check your network...

Page 22: ...Touch to turn GPS on or off Touch to switch to sound mode Touch to switch to airplane mode Accessing Applications and Widgets To access the application list on the Home screen touch From the application list you can Touch an icon to open an application Flick left or right across the screen to switch between application lists When you advance to the rightmost screen of the application list the widg...

Page 23: ...old a widget and then drag it to the Home screen To delete a shortcut icon or widget On the Home screen touch and hold a shortcut icon or widget and then drag it to the trash can To customize the size of a widget You can adjust the size of some widget icons To do so on the Home screen touch and hold a widget Four are displayed Adjust the widget s size by moving the To move a shortcut icon to the s...

Page 24: ... folder that contains both icons To rename a folder On the Home screen touch a folder and then touch the folder name field beneath it To delete a folder On the Home screen touch and hold a folder and then drag it to the trash can To move a folder to the shortcut bar On the Home screen touch and hold a folder and then drag it to the shortcut bar ...

Page 25: ... call To open Phone touch Phone Making a Call 1 On the Phone screen touch to switch to the dialer tab 2 Enter a phone number 3 Touch to make a call Be careful not to block the microphone or the speaker to avoid affecting the call quality Making a Call from Contacts 1 On the Phone screen touch to switch to the contacts tab 2 Touch a contact to place a call Making a Call from the Call Log 1 On the P...

Page 26: ...aling 1 On the Home screen touch Voice Dialer 2 Follow the onscreen instructions then say your command close to the microphone Your phone will identify the command and make a call When you use a Bluetooth headset pressing the talk button on the headset will start the voice dialer Answering or Rejecting a Call When a call comes in you can Answer the call Drag to the right Reject the call Drag to th...

Page 27: ...ns the dialer for you to enter another number Activates the speakers Mutes your microphone Places the current call on hold This function is network dependent To use this service contact your network operator Displays your contacts list for you to select a contact to add to the current call This function is network dependent To use this service contact your network operator Returns to the Home scre...

Page 28: ...e to forward unanswered calls to your voicemail inbox including unanswered calls when you are busy on other calls and calls received when your phone is powered off Contact your network operator to subscribe to the voicemail function and obtain your voicemail number If required enable the call forwarding function and set all incoming calls to be forwarded to your voicemail inbox To set your voicema...

Page 29: ...m your call log touch and hold the desired phone number to display the options menu and then touch Add to contacts Communicating with a Contact Quickly In the contacts list touch the contact s picture or picture frame if no picture is assigned to the contact and touch one of the displayed icons to select the method you want to use to communicate with the contact for example placing a call or sendi...

Page 30: ...st letters of the contact name in the search box Search results appear as you type To search for a contact quickly use the scroll bar on the right of the screen Editing a Contact 1 In the contacts list touch the contact you want to edit then 2 After changing contact information touch DONE to save the changes To discard the changes touch Cancel Deleting a Contact 1 In the contacts list select the c...

Page 31: ...ntact group at any time To update the information or members 1 Select a group and touch Edit 2 Make desired changes such as changing the group name and adding or deleting a contact 3 Touch DONE You can also edit a single contact in a group To do so select the contact you want to edit and then touch When your changes are complete touch DONE to save the changes To discard the changes touch Cancel Ad...

Page 32: ...n methods to the contact From the contacts list select a contact you want to separate touch Manage joined contacts to display the joined contacts list Touch the cross sign X next to a contact to separate the contact Sending a Contact You can send contacts as a vcf file via Bluetooth Email Messaging and more 1 In the contacts list touch a contact 2 Touch Share 3 Select your preferred method Bluetoo...

Page 33: ... phone s memory To change the default storage location go to Settings Storage Default storage location You can copy the vcf files on the microSD card to your computer in case data stored on the microSD card becomes damaged Contacts can also be restored to your phone To restore contacts in the contacts list touch Manage contacts Import from storage and then select one or multiple vcf files to resto...

Page 34: ...d To open the onscreen keyboard touch a text field To hide the onscreen keyboard touch Switching Between Text Input Methods 1 When the keyboard is displayed open the notification panel 2 Touch Select input method to select a desired input method You can also change the default input method To change the default input method on the Home screen touch Settings Language input Default and then select a...

Page 35: ...n the text entry method is for lower case letters touch to capitalize the next letter you enter or touch and hold to capitalize all letters you enter 2 In English input mode touch to switch to the emoticon keyboard 3 Touch and hold to change the input language 4 In English input mode touch to switch to the numbers and symbols keyboard To switch back to the QWERTY keyboard touch the ABC key ...

Page 36: ...e all the characters to the left of the cursor 1 2 3 5 4 6 2 Touch to enter a space Touch and hold to switch to another input method 3 Touch to switch to voice input 4 Touch and hold to go to the Input options screen 5 Touch to switch to the number and symbol keyboard To switch back to the QWERTY keyboard touch the ABC key ...

Page 37: ... voice typing Editing Text To edit text quickly touch and hold the text you have entered and choose the content you want to edit You can then edit the text quickly using icons in the upper right corner as follows Select all content Cut the selected content Touch and hold the text Drag the grab points to select the text you want to cut Then touch this button to cut the selected text After the text ...

Page 38: ...sition Touch this icon to replace the selected content with what you just cut or copied Using the Landscape Keyboard To use a wider keyboard turn your phone sideways Your phone will automatically display the keyboard in landscape mode To have the phone automatically change its screen orientation select Auto rotate screen Selecting an Input Method To customize the settings of the input method you s...

Page 39: ... the message After you add multimedia files the message automatically changes from a text message to a multimedia message Adding a Slideshow To attach more than one file to your message 1 On the message editing screen touch 2 Touch Slideshow to start editing the slideshow or add another presentation slide 3 When editing the slideshow you can Touch Preview to view the slides you have composed Touch...

Page 40: ...t to reply to 2 Compose your reply and touch to send the message Searching for a Message To find a message quickly On the messages list screen touch and enter the message content to search for Customizing Message Settings To customize settings such as text message settings multimedia message settings and message notification ringtones in the message list touch Settings Setting the Message Ringtone...

Page 41: ...iend 1 In your friends list touch 2 Enter the Gmail address of the friend you want to add 3 Touch DONE Accepting an Invitation 1 If you have invited someone to chat or if someone has invited you to chat the invitation message is displayed in the recipient s or your friends list 2 To accept an invitation touch a pending invitation and then touch Accept Starting a Chat 1 Touch a friend s name from y...

Page 42: ...fications Select the check box to display a notification icon on the notification bar when you receive an instant message Notification ringtone Touch to select a ringtone for new instant messages When you receive an instant message your phone plays the ringtone To disable the ringtone touch Silent Vibrate When the system set vibration first select the check box to set your phone to vibrate when yo...

Page 43: ... charges clear the Data enabled check box To turn data roaming on on the Mobile network settings screen select the Data roaming check box Accessing data services while roaming may incur additional charges Contact your network operator for details about data roaming charges Access point settings have been configured on your phone Note that changing these settings may prevent you from accessing the ...

Page 44: ...entially and switches to the mobile network when Wi Fi is unavailable To add a new Wi Fi hotspot Service Set Identifier SSID on the Wi Fi settings screen touch ADD NETWORK Obstacles such as walls may block Wi Fi signals and reduce the signal strength Connecting to Wi Fi Using WPS Wi Fi Protected Setup WPS is also called fast safe setup It simplifies the setup of Wi Fi connection Instead of complex...

Page 45: ... phone connects to the network WPS PIN Connection 1 Enable Wi Fi and then go to the Wi Fi screen In the Wi Fi network list touch the hotspot you want to connect to 2 In the displayed dialog box select the Show advanced options check box In the WPS section touch Off and then select PIN from access point Connect from the displayed options menu The selected Wi Fi access point will received a PIN 3 En...

Page 46: ...he PC If you are running an earlier version of Windows or another OS your PC will identify and install a driver automatically To use USB tethering with different OSs you may need to prepare your PC to establish a corresponding network connection You cannot share your phone s data connection via USB tethering and access its microSD card as a mass storage device at the same time Using USB tethering ...

Page 47: ... allows you to transfer data to and from paired Bluetooth devices When using Bluetooth stay within 10 meters 33 feet of other Bluetooth devices Note that obstacles such as walls or other electronic equipment may block or interfere with your Bluetooth connection Turning On Bluetooth 1 On the Home screen touch Settings 2 In the WIRELESS NETWORKS section touch the switch on the right of Bluetooth and...

Page 48: ...hone will then scan for other Bluetooth devices within range 4 From the list of the Bluetooth devices searched choose the device you want to connect and then follow the onscreen information to pair To disconnect from the Bluetooth device in the PAIRED DEVICES section touch Unpair Transferring a File via Bluetooth Share your pictures videos and songs in File Manager via Bluetooth 1 Touch and hold t...

Page 49: ...ore using the DLNA function ensure that your device and other DLNA devices have connected to the same Wi Fi network and DLNA is enabled on all devices Touch DLNA to display the DLNA screen You can then share pictures videos and audio files with other DLNA devices as well as view and download the multimedia files shared by other DLNA devices ...

Page 50: ...ail 2 Enter an email address and password then touch Next 3 Follow the onscreen instructions to configure the account settings Configure the email account based on the instructions provided by your email service provider For specific settings access the website of your email service provider 4 Touch Next and the Inbox of the newly configured email account will be displayed After creating your init...

Page 51: ...to finish configuring the account settings Switching Between Accounts On the Inbox screen touch the email address bar at the top of the screen and select an email account from the displayed email account list The selected account s Inbox is then displayed by default Creating and Sending an Email 1 On the Inbox screen touch 2 In the To field enter the recipient s email address 3 Enter the email sub...

Page 52: ...h SAVE to download the attachment By default downloaded files are saved to the Download folder in the phone memory To change the default storage location choose Settings Storage Default storage location Deleting an Email Account 1 On the Inbox screen touch Settings to display the account settings screen 2 Touch the account you want to delete 3 From the displayed menu choose Remove account OK Custo...

Page 53: ...e screen touch Gmail The email list is displayed Any emails you keep on your phone will be stored in your Inbox folder In the email list touch to change an email s label or touch to refresh your emails Switching Between Accounts 1 From the email list touch the current account name to display the account list 2 Touch the account that contains the email s you want to read Creating and Sending an Ema...

Page 54: ...ant to reply to or forward 2 Touch to reply You can also touch then Reply all or Forward 3 Do one of the following If you touched or selected Reply all add message content If you selected Forward enter the recipients email addresses and add message content as required 4 Touch to send or touch Save draft to save the email as a draft Searching for an Email 1 In the email list touch 2 Enter appropria...

Page 55: ...m Play Store 1 Open the Play Store application 2 Touch a category then the application you want to download 3 On the application details screen read any relevant information about the application including its cost rating and user comments 4 To install the application touch Install then Accept download 5 To check the progress of a download open the notification panel Most applications are installe...

Page 56: ...h Uninstall 3 When prompted touch OK to remove the application from your phone Installing an Application from a microSD Card Using File Manager you can install an application stored on a microSD card To install an application that was not downloaded from Android Play Store touch Settings Security from the Home screen and then select the Unknown sources check box before installation 1 From the Home...

Page 57: ...ps ALL to view the application list 2 Touch an application to view its details 3 Touch Not installed then select the application you want to install from the application list Note An application cannot be uninstalled when the Uninstall button is grayed out If the Disable button is available touching it will prevent the application from running but will not remove it In the application list touch S...

Page 58: ...ently open from where you can switch between pages Touch to open a new browser window Managing Bookmarks Adding a Bookmark 1 Launch the browser and go to the web page you want to save as a bookmark 2 Touch Save to bookmarks 3 Enter the bookmark name and then touch OK Opening a Bookmark 1 In a browser window touch in the upper right corner 2 Touch and select the bookmark of the web page you want to...

Page 59: ...SAVED PAGES tab to view saved pages Setting the Home Page 1 In a browser window touch Settings General Set homepage 2 Select one page from the list or touch other to enter the URL of the desired homepage and then touch OK Customizing Browser Settings To customize your browser setting in a browser window touch Settings ...

Page 60: ...service before using Maps to find your location or search for places of interest 1 On the Home screen touch Settings 2 Touch Location services 3 Select the Google s location service GPS satellites and Location Google search check boxes Opening Maps On the Home screen touch Maps Searching for Places of Interest 1 On the map touch 2 Enter appropriate keywords in the search box and then touch the sea...

Page 61: ... and your destination in the second 3 Touch the icon for driving public transit or walking directions 4 Touch GET DIRECTIONS Directions are displayed in a list 5 Touch a direction in the list to show it on the map 6 When you finish viewing or following the directions touch Directions to reset the map ...

Page 62: ...icture effects with which you can take a photo record a video and share the photos and videos Camera On the Home screen touch Camera to activate the camera You can then take a picture On the viewfinder screen touch to exit the camera Camera Mode 1 Switch between camera and video capture modes 7 1 2 3 4 5 6 ...

Page 63: ... or zoom out 3 Touch anywhere on the viewfinder screen to focus the camera 4 Touch to take a photo 2 Touch to take a photo Touch and hold to focus the camera and then release your finger to take a photo 3 Thumbnail of the previous shot Touch to view the photos you just took 4 Viewfinder screen Touch anywhere to focus the camera 5 Touch to display the options menu as follows Switch the picture mode...

Page 64: ...d more Touch Delete to delete the photo Flick left or right across the screen to scroll between photos in the gallery Enabling the GPS Tag Function To tag location information to your photos 1 On the viewfinder screen touch to display the camera settings screen 2 Select the GPS tag check box will be displayed on the viewfinder screen To save location information with your photos enable the GPS loc...

Page 65: ...ture screen touch to exit the camera Video Camera Mode 7 5 1 2 3 4 6 1 Switch between camera and video capture modes 2 Touch to start recording 3 Thumbnail of the previous recording Touch to view the video you just recorded 4 Viewfinder screen ...

Page 66: ...Touch to stop recording After recording a video the thumbnail of the video is displayed in the lower right corner of the capture screen Touch the thumbnail to view the video When playing a video you can Touch to enter the gallery Touch to send the video via a multimedia message an email Bluetooth and more 5 Touch to display the options menu as follows Set the video size Select a filtering mode Adj...

Page 67: ...Capturing Photos and Videos 62 Touch Delete to delete a video Flick left or right across the screen to switch between videos ...

Page 68: ...Viewing Photos or Videos 1 On the Home screen touch Gallery to open the media library In Gallery touch the desired folder to view its contents 2 Touch the photo or video you want to view Editing a Picture 1 When viewing a picture touch Edit 2 On the picture editing screen you can 1 2 3 4 5 6 ...

Page 69: ...Use the cropping tool as follows Drag the inside of the cropping tool to move it Drag of the cropping tool to resize the area to be cropped 1 Save the changes 2 Undo the last step or redo the canceled step 3 Crop or rotate the picture or remove red eye 4 Adjust the hue or saturation or set the picture to black and white 5 Change filtering effects such as Lomo Documentary or Vignette 6 Set exposure...

Page 70: ...Gallery 65 3 Touch SAVE or CANCEL to save or discard the changes ...

Page 71: ...s and Folders Flick left or right across the screen to display the content of each tab Adding an Audio File to a Playlist 1 Choose a tab from the media library 2 Touch and hold the audio file you want to add to a playlist and choose Add to playlist from the displayed options menu To add the audio file to a new playlist touch New playlist To add the audio file to an existing playlist touch the desi...

Page 72: ...ng a Playlist 1 On the media library screen touch the Playlists tab 2 Touch and hold the playlist you want to play 3 From the displayed menu touch Play Playing an Audio File 1 Select a tab on the media library screen 2 Select a playlist and touch the desired audio file to play When playing the music you can 1 Enter the media library 1 3 4 2 ...

Page 73: ...ing a USB connection Copying an Audio File Using MTP Media Transfer Protocol MTP is closely related to Windows Media Player Ensure that Windows Media Player 10 or a later version is installed on your PC 1 Use a USB cable to connect your phone to the PC 2 Open the notification panel touch Connected as an installer to display the USB computer connection screen and then select the Media device MTP ch...

Page 74: ...ion ensure that a microSD card is correctly installed 1 Use a USB cable to connect your phone to the PC 2 Open the notification panel touch Connected as an installer to display the USB computer connection screen and then select the Mass storage mode check box 3 The phone will now appear as a removable storage device in My Computer Locate and open the device 4 Create a folder in the root directory ...

Page 75: ...counts sync screen touch ADD ACCOUNT and then select the account type you want to add 2 Follow the onscreen instructions to enter account information 3 Configure the account and set the type of data you want to synchronize 4 When the configuration is complete the account is displayed on the Accounts sync screen The types of data you can set to synchronize to your phone vary according to the accoun...

Page 76: ... your data in the background automatically Changing the Account Synchronization Settings 1 On the Accounts sync screen choose the account whose synchronization settings you want to change 2 The displayed Accounts sync section shows a list of data that can synchronized 3 Select the items to be synchronized Your phone will start synchronization immediately ...

Page 77: ... an event on that date 2 Edit event details such as the event name time and location 3 Touch to save the event Viewing a Calendar Event On the Calendar screen you can touch any of the events you want to view To switch between the days weeks months and schedule views touch the time on the upper left corner of the screen Alternatively you can flick your finger left or right or flick up and down acro...

Page 78: ...splaying Calendar Events Calendar events in your accounts such as an email account on your phone can be synchronized to and displayed on the Calendar application 1 In any calendar view touch Calendars to display If you have an account to be synchronized to your phone the account will be displayed in the Calendars to display list 2 Touch Calendars to sync to enable or disable the synchronization fu...

Page 79: ... to Internal or SD card Touch Select item s to select multiple files and then touch to copy or cut the files Searching for a File 1 On the Internal or SD card screen touch 2 Enter part or all of the desired file name and then touch Go on the lower right corner of the keyboard note that Go may not be the word displayed on your keyboard depending on the input method you are using The phone will then...

Page 80: ...e file To compress multiple files touch Select item s and then Compress to compress the selected files Extracting a File 1 Touch and hold the compressed file you want to extract and then choose Extract from the displayed options menu 2 In the displayed dialog box edit the save path and name of the file extracted if necessary Touch OK to start extracting the file Checking the Memory Status On the F...

Page 81: ...te check box 6 To name the alarm touch Label 7 To save your alarm touch OK The alarms will ring even when your phone is powered off Customizing Alarm Settings On the alarms list screen touch Settings to customize the existing alarms Using the Calculator 1 On the Home screen touch Calculator 2 On the calculator screen flick your finger left or right across the screen to switch between theAdvanced p...

Page 82: ...r in any city and to share weather information with others On the Home screen touch Weather Clock Turn on the GPS and data service on your phone before using Weather Clock Setting the Default City On the Weather Clock screen flick your finger left or right across the screen to switch between cities To set a city as the default city touch Set as default city Adding a City On the Weather Clock scree...

Page 83: ...her Clock screen touch Refresh or to update the current city s weather You can also set your phone to update Weather Clock automatically 1 On the Weather Clock screen touch Settings 2 Select the Auto update check box 3 Touch Update interval to set the interval for weather updates Sharing Weather Information 1 On the Weather Clock screen touch Share weather 2 Enter a phone number in the To field or...

Page 84: ...uTube On the Home screen touch YouTube Searching for a Video 1 On the YouTube screen touch 2 Enter appropriate keywords in the search box and then touch the search icon 3 The search results are displayed Touch the video you want to watch Sharing a Video From the video list on the YouTube screen select a video clip and touch to share the videos ...

Page 85: ...omatic date time and Automatic time zone check boxes 3 Touch Set date then or to adjust the date Touch Set 4 Touch Set time then or to adjust the time Touch Set 5 Touch Select time zone and then select a desired time zone from the list Scroll down to view more time zones 6 Select or clear the Use 24 hour format check box to switch between 12 hour and 24 hour time formats 7 Touch Select date format...

Page 86: ...p period for your screen If no operation is performed on the phone within this period the screen turns off Font size Set the font size Adjusting the Volume To adjust the volume you can press the volume keys on the Home screen or most application screens for example the call music or video playback screens The volume can also be adjusted as follows 1 On the Settings screen touch Sound Volume 2 Drag...

Page 87: ...w the onscreen instructions to set a screen unlock pattern 3 Touch Continue 4 Draw the screen unlock pattern again and touch Confirm Remember your unlock pattern If you have set up a Google account unlock your screen as follows if you forget the screen unlock pattern If you incorrectly draw the unlock pattern five times a Forgot pattern button is displayed Touch this button to open the Google acco...

Page 88: ...Settings Restoring your phone to its factory settings erases all your personal data from the phone memory including information about your accounts your system and application settings and downloaded applications 1 On the Settings screen touch Backup reset Factory data reset 2 Touch Reset phone according to the onscreen instructions Touch Erase everything The phone is reset to its factory settings...

Page 89: ...nscreen instructions to upgrade online Back up your personal data before any upgrade After the upgrade all personal data will be erased If you have installed a microSD card the downloaded upgrade package will be stored in the root directory of the microSD card if no microSD card is available the upgrade package will be stored in the root directory of your phone memory Ensure that enough storage sp...

Page 90: ...er Phone Your phone supports only contact files in vcf format 1 Save the contacts you want to import as a vcf file and save the file to a microSD card 2 Insert the microSD card into your phone and find the vcf file using File Manager 3 Touch the vcf file The phone displays a message asking whether you want to import the contacts 4 Touch OK Compatibility problems may occur with vcf files created by...

Page 91: ...e People and follow the onscreen instructions to import contacts 7 Disconnect your phone from the PC after the contacts are imported How Do I Set a Song as a Call Ringtone In Music touch and hold the song you want to set as the ringtone and then choose Set as ringtone from the displayed options menu How Do I Disable the Auto rotate screen Function On the Home screen touch Settings Display and then...

Page 92: ...playing the song How Do I Return to the Call Screen Open the notifications panel and then touch the ongoing call How Do I Create an Application Shortcut on the Home Screen Touch and hold an application icon from the application list until the Home screen is displayed Then drag the icon to where you want to place it and release your finger How Do I Hide the Keyboard Touch to hide the keyboard How D...

Page 93: ...ng soaked or washed in liquid Do not switch on your mobile phone when it is prohibited to use phones or when the phone may cause interference or danger Do not use your mobile phone while driving Follow any rules or regulations in hospitals and health care facilities Switch off your mobile phone near medical apparatus Switch off your mobile phone in aircraft The phone may cause interference to cont...

Page 94: ...t put your mobile phone in a high temperature place or use it in a place with flammable gas such as a gas station Keep your mobile phone and its accessories away from children Do not allow children to use your mobile phone without guidance Use only approved batteries and chargers to avoid the risk of explosions Observe any laws or regulations on the use of wireless devices Respect others privacy a...

Page 95: ...formation kept on your SIM UIM card memory card or stored in your device memory If you change to a different device be sure to move or delete any personal information on your old device If you are worried about viruses when you receive messages or emails from a stranger you can delete them without opening them If you use your device to browse the Internet avoid websites that might pose a security ...

Page 96: ... services If you have concerns about the security of your personal information and data please contact mobile huawei com Legal Notice Copyright Huawei Technologies Co Ltd 2013 All rights reserved No part of this manual may be reproduced or transmitted in any form or by any means without prior written consent of Huawei Technologies Co Ltd and its affiliates Huawei The product described in this manu...

Page 97: ... of local network and therefore may not be activated or may be limited by local network operators or network service providers Thus the descriptions herein may not exactly match the product or its accessories which you purchase Huawei reserves the right to change or modify any information or specifications contained in this manual without prior notice and without any liability Third Party Software...

Page 98: ...installed on this product or for any uploaded or downloaded third party works in any form including but not limited texts images videos or software etc Customers shall bear the risk for any and all effects including incompatibility between the software and this product which result from installing software or uploading or downloading the third party works This product is based on the open source A...

Page 99: ...THIS LIMITATION SHALL NOT APPLY TO LIABILITY FOR PERSONAL INJURY TO THE EXTENT APPLICABLE LAW PROHIBITS SUCH A LIMITATION OF HUAWEI ARISING FROM THE USE OF THE PRODUCT DESCRIBED IN THIS MANUAL SHALL BE LIMITED TO THE AMOUNT PAID BY CUSTOMERS FOR THE PURCHASE OF THIS PRODUCT Import and Export Regulations Customers shall comply with all applicable export or import laws and regulations and be respons...

Page 100: ...45 Adding More Email Account 45 Adjusting the Volume 81 Answering a Call 21 Backing Up Your Contacts 27 Battery Saving Tips 5 Calendar 72 Changing a City 78 Changing the Account Synchronization Settings 71 Changing the Theme 16 Changing the Wallpaper 16 Charging the Battery 4 Checking the Memory Status 75 Compressing a File 75 Configuring the Display Settings 80 Configuring Your Phone for the Firs...

Page 101: ...26 Editing a Contact 25 Editing a Picture 63 Editing Text 32 Enabling the Location Service 55 export regulations 94 Extracting a File 75 Face Unlock 11 Forwarding an Email 49 Freeing Up the Phone Memory 85 Getting Directions 56 Import Regulations 94 Important Information About the Battery 5 Installing a microSD Card 3 Installing a SIM Card 3 Installing an Application from a microSD Card 51 Install...

Page 102: ...h Another Bluetooth Device 43 permissions 92 Playing a Playlist 67 playing a video 61 Playing an Audio File 67 Portable Wi Fi Hotspot 42 Powering Your Phone Off 7 Powering Your Phone On 7 Privacy Policy 94 Recording a Video 61 Rejecting a call and sending a message to the caller 21 Rejecting a Call 21 Removing an Account 70 Removing the microSD Card 3 Replying to a Message 35 Replying to an Email ...

Page 103: ... Data Connection via USB Tethering 41 Sharing Weather Information 78 Starting a Chat 36 Switching Between Accounts 46 Switching Between Accounts 48 Switching Between Calls 23 Switching Between Text Input Methods 29 Switching to the Advanced Panel 76 Taking a Photo 58 Third party Software Statement 92 Touchscreen Actions 7 Trademarks 92 Transferring a File via Bluetooth 43 Turning On Bluetooth 42 T...

Page 104: ...ng the Screen 10 Voice Dialing 21 WPS PIN Connection 40 WPS 39 Using Auto rotate Screen 16 Using Bluetooth 42 Using Shortcuts 17 Using the Android Keyboard 31 Using the Huawei Keyboard 30 Using the Landscape Keyboard 33 Using the Onscreen Keyboard 29 Using the Voicemail Service 23 Using the WPS Button 40 ...

Page 105: ...dated hotline and email address in your country or region Model M931 Manufactured under license from DTS Licensing Limited DTS the Symbol DTS and the Symbol together are registered trademarks DTS Envelo Headphone is a trademark of DTS Inc Product includes software DTS Inc All Rights Reserved ...

Reviews: