


3.3
Configuring the Wireless Network
Connection
The HG532c provides the WLAN function on a Local Area Network (LAN). If a
wireless network adapter is installed on your computer, you can connect your computer
to the HG532c through a wireless connection.
The hardware installation methods and driver installation methods of wireless network
adapters provided by different companies vary from each other. For details, see the
installation guide provided by the wireless network adapter provider.
To set up a wireless connection, use either of the following methods:
z
Setting Up a Wireless Connection Through the WPS Button
z
Setting Up a Wireless Connection Manually
Setting Up a Wireless Connection Through the WPS
Button
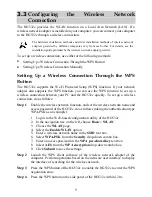
The HG532c supports the Wi-Fi Protected Setup (WPS) function. If your network
adapter also supports the WPS function, you can use the WPS function to set up a
wireless connection between your PC and the HG532c quickly. To set up a wireless
connection, do as follows:
Step 1
Enable the wireless network function, and set the wireless network name and
access password of the HG532c, do as follows (taking the authentication type
WPA-PSK as an example):
1.
Log in to the Web-based configuration utility of the HG532c.
2.
In the navigation tree on the left, choose
Basic
>
WLAN
.
3.
Choose the
WLAN
page.
4.
Select the
Enable
WLAN
option.
5.
Enter a wireless network name in the
SSID
text box.
6.
Select
WPA-PSK
from the
Security
drop-down combo box.
7.
Enter an access password in the
WPA pre-shared key
text box.
8.
Select
AES
from the
WPA encryption
drop-down combo box.
9.
Click
Submit
to save the settings.
Step 2
Launch the WPS client software of the wireless network adapter of the
computer. Perform operations based on the software user interface to display
the interface of searching for the wireless network.
Step 3
Press the WPS button of the HG532c to enable the HG532c to enter the WPS
negotiation state.
Step 4
Press the WPS button on the side panel of the HG532c within 120s.
9