background image

1  

Getting to Know Your Phone 

Your Phone 

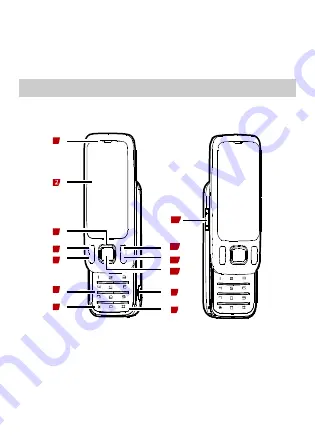
The following figure shows the appearance of your phone and 
it is for your reference only.   

1

7

3

4
5

6

9

10

11

12

13

8


Earpiece 

# key 

Screen 

Charger/Headset/USB 
jack 

Navigation keys 

10  Confirm key 

Left soft key 

11  Right soft key 

Call/Answer key 

12  End/Power key 

Summary of Contents for G5760

Page 1: ...G5760 GSM Mobile Phone User Guide ...

Page 2: ...oduct and its accessories described herein rely on the software installed capacities and settings of local network and may not be activated or may be limited by local network operators or network service providers Thus the descriptions herein may not exactly match the product or its accessories you purchase Huawei Technologies Co Ltd reserves the right to change or modify any information or specif...

Page 3: ...plicable export or import laws and regulations and will obtain all necessary governmental permits and licenses in order to export re export or import the product mentioned in this manual including the software and technical data therein ...

Page 4: ...ling the SIM Card and the Battery 5 Removing the Battery and the SIM Card 6 Installing the microSD Card 6 Charging the Battery 7 3 Getting Started 7 Using the Stylus 7 Calibrating the Screen 8 Using the Function Menu 8 Phone Lock 9 PIN and PUK 9 Locking the Keypad 9 Entertainment 10 4 Call Function 10 Making a Call 10 Answering a Call 11 Dial healthily 11 ...

Page 5: ...g a Text Message 14 Writing and Sending a Multimedia Message 15 7 Contacts 16 Creating a New Contact 16 Searching for a Contact 16 8 Multimedia 17 Audio Player 17 Video Player 18 Camera 20 FM Radio 21 Video Recorder 22 9 WAP 24 Network Settings 24 Connecting to the Network 25 10 Bluetooth 25 11 USB 26 12 Warnings and Precautions 26 ...

Page 6: ...figure shows the appearance of your phone and it is for your reference only 1 7 3 4 5 6 9 10 11 12 13 8 1 Earpiece 8 key 2 Screen 9 Charger Headset USB jack 3 Navigation keys 10 Confirm key 4 Left soft key 11 Right soft key 5 Call Answer key 12 End Power key ...

Page 7: ...w call logs in standby mode Power on or power off the phone by pressing and holding the key for about 3s End a call or reject an incoming call Return to the standby mode Left Select the option displayed in the lower left corner of the screen Right Select the option displayed in the lower right corner of the screen Display Contacts list in standby mode Return to the previous menu Display the main m...

Page 8: ...nd holding the 1 key for about 3s Speed dial phone numbers in standby mode by pressing and holding the 2 9 keys for about 3s when Speed dial is on Select a submenu item labeled with the corresponding number In standby mode press the key once to enter twice to enter three times to enter P and four times to enter W Display the symbol list in any text input mode Enter Enable or disable the meeting mo...

Page 9: ...is activated The Vib and ring alert mode is activated The Vib then ring alert mode is activated Missed call s Call forwarding is activated Unread text message s Unread multimedia message s Bluetooth is activated An alarm is activated Battery power level Keypad is locked Using Shortcut Menu Tap To Enter the main menu ...

Page 10: ...function icon to Standby mode you can also drag it back But if you tap the icon can t be dragged back It will switch to contacts in shortcuts area when you slide left and right in standby mode 2 Installing and Charing Installing the SIM Card and the Battery Ensure that the golden contact area on the SIM card is facing downward and the beveled corner is properly aligned with the SIM card slot ...

Page 11: ...e Battery and the SIM Card Before removing the battery and the SIM card ensure that your phone is powered off Installing the microSD Card Ensure that inserting the memory card with the golden contact area facing up ...

Page 12: ... you start to charge a completely discharged battery the charging icon may appear on the screen several minutes later 3 Disconnect the charger from the power socket when the charging icon becomes static indicating that the battery is fully charged 4 Disconnect the charger from the phone 3 Getting Started Using the Stylus Your phone has a screen with tactility You can use the stylus tip to touch th...

Page 13: ...s Pen Calibration 3 Tap the cross marks that appear on the screen in sequence according to the prompts to finish adjusting the phone display Using the Function Menu 1 In standby mode press or or tap 2 Press to select the desired function menu 3 Press or to display the selected menu or tap function menu directly to enter 4 Press to select a submenu 5 Press or to display the menu 6 Press or tap Back...

Page 14: ...are delivered with the SIM card For details contact your service provider If you enter wrong PINs for a specified number of times consecutively the phone asks you to enter the PUK If you enter wrong PUKs for a specified number of times consecutively the SIM card is invalidated permanently Contact your service provider for a new one Locking the Keypad To lock the keypad close the slide or press and...

Page 15: ... Java to download and install the java applications and games Photo editor to edit photos and tile image Viedo recorder to recorder videos Schedule FM record to record timing for your favorite channel Melody compose to edit ringtones 4 Call Function Making a Call 1 In standby mode enter the phone number To make an international call press twice consecutively to enter the plus sign Then enter the i...

Page 16: ...o answer it Press or tap Options and select Answer to answer it Press or tap Reject to reject it If the Cover answer function is enabled you can open the slide to answer an incoming call If the Any key answer function is enabled you can press any key except and to answer an incoming call Dial healthily When you making a call if Dial healthily is active the phone will vibrate as soon as the call co...

Page 17: ...er on the left of the cursor Press and hold Clear for about 3s to clear all the letters In any text input mode except the 123 mode press to enter a space Using Keys Virtual Keyboard Predictive Input Mode In predictive input mode enter a word as follows 1 Press or tap each key only once according to the spelling sequence of the desired word The phone displays the commonly used word according to the...

Page 18: ...e key and so on Press repeatedly to select and enter commonly used punctuations Press once to enter a space twice to enter 0 Entering a Digit In 123 input mode you can directly press a number key labeled with the desired digit In predictive and multi tap input mode press the number key labeled with the desired digit repeatedly until the digit appears on the screen Entering a Symbol 1 Press or tap ...

Page 19: ...hange to keyboard input method 6 Messaging Writing and Sending a Text Message 1 In standby mode press or or tap 2 Select Messages Write message SMS 3 Write the message 4 Press or tap Options and then select Done for the following options Save and send to add a recipient and send the message with saving it Send only to enter a phone number or select a recipient from the contact list and send the me...

Page 20: ...ct Edit content Edit the content of the message You can add pictures audio and video clips and attachments to the multimedia message You can also insert a new slide preview the message and set the slide duration 6 Press or tap Options and then select Done for the following options Send only to send the multimedia message Save and send to send and save the multimedia message Save to drafts to save ...

Page 21: ...damage your phone such as malicious software 7 Contacts Creating a New Contact 1 In standby mode press or or tap 2 Select Contacts Add new contact 3 Select To SIM or To phone for saving the contact 4 Edit the contact 5 After editing the contact press or tap OK to save the contact Searching for a Contact 1 In standby mode press or or tap 2 Select Contacts Search contact 3 Enter the contact name 4 P...

Page 22: ...timedia Audio Player 1 In standby mode press or or tap 2 Select Multimedia Audio player 1 Adjust the volume 6 Enter the playing list 2 Enter playing list 7 Switch on or off shuffle 3 Switch to the previous music 8 Exit audio player 4 Stop playing the music 9 Switch to the next music 5 Change the play mode 10 Play or pause the music ...

Page 23: ...ss to adjust the volume Press to change the playing music Press and hold 3s to adjust the playing schedule Tap or to change the playing music Press or tap to pause the music Press or tap to stop playing the music Tap to change the play mode Tap to switch on or off shuffle Video Player 1 In standby mode press or or tap 2 Select Multimedia Video player ...

Page 24: ...nter menu options 8 Adjust the volume 3 Press to select a video file 4 Press Play to view the video press or tap to play the video When the video is being played you can do as follows Press or tap to adjust the volume Press to change the playing speed only for AVI format Press or tap to fast forward or rewind the video Press to pause continue the video ...

Page 25: ...or or tap 2 Select Multimedia Camera to launch the camera 1 Set image size 7 Set white balance 2 Enter menu options 8 Set delay timer 3 Exit camera 9 Set cont shot 4 Adjust EV 10 Set scene mode 5 Shoot a picture 11 Set the picture quality 6 Set effect In camera mode you can do as follows Press to view photos or perform relevant settings ...

Page 26: ...ood reception of radio programs do not disconnect the headset from the phone or severely bend the headset cable 1 Connect a compatible headset to the phone 2 In standby mode press or or tap 3 Select Multimedia FM radio 1 Adjust the volume 6 Start or stop recording 2 Enter channel list 7 Back to the previous 3 Enter menu options 8 Open or close the station 4 Perform the settings 9 Start or stop rec...

Page 27: ...program in the background Press or tap to adjust the volume Tap to enter channel list Tap to perform other settings Tap to auto search channel Tap to open or close the station Tap to start or stop recording Press to change the channel Press Options to set the speaker view and set the channel list tune or select other options Video Recorder 1 In standby mode press or or tap 2 Select Multimedia Vide...

Page 28: ... Exit the camera screen 3 Adjust the brightness 3 Press or tap to set relevant parameters 4 Press or tap to start recording a video During the recording press or tap to pause continue 5 Press or tap to stop recording 6 Press to adjust the brightness 7 Press to zoom control ...

Page 29: ...t your service provider Network Settings To access the WAP sites through your phone you need to set the data account and WAP parameters on your phone first Setting the Connection Profile 1 In standby mode press or or tap 2 Select Settings Connection settings Data account 3 Select the network type press OK or tap OK 4 Select your service provider press Edit or tap Eidt 5 Set the account information...

Page 30: ... 10 Bluetooth Bluetooth connections can be set up between devices within a maximum distance of 10 meters and there should be no solid obstacles between the devices 1 In standby mode press or or tap 2 Select Settings Connection settings Bluetooth 3 Select Power on off press On or tap On to activate bluetooth 4 Select Settings to perform relevant settings 5 After that you can use Bluetooth to transl...

Page 31: ...s that are automatically created on the phone or the microSD card Because contents in only the default folder can be read do not create a folder by yourself 12 Warnings and Precautions This section contains important information pertaining to the operating instructions of your device It also contains information about how to use the device safely Read this information carefully before using your d...

Page 32: ...mosphere and comply with all signs and instructions Areas that may have potentially explosive atmospheres include the areas where you would normally be advised to turn off your vehicle engine Triggering of sparks in such areas could cause an explosion or fire resulting in bodily injuries or even deaths Do not switch on the device at refueling points such as service stations Comply with restriction...

Page 33: ...ands free accessories When you have to make or answer a call park the vehicle at the road side before using your device RF signals may affect electronic systems of motor vehicles For more information consult the vehicle manufacturer In a motor vehicle do not place the device over the air bag or in the air bag deployment area Otherwise the device may hurt you owing to the strong force when the air ...

Page 34: ... not use your device when it is being charged to prevent any danger caused by lightning When you are on a call do not touch the antenna Touching the antenna affects the call quality and results in increase in power consumption As a result the talk time and standby time are reduced While using the device observe the local laws and regulations and respect others privacy and legal rights Keep the amb...

Page 35: ...warranty applicable to the device might result in the non operation of the device and might be dangerous Battery and Charger Unplug the charger from the electrical plug and the device when not in use The battery can be charged and discharged hundreds of times before it eventually wears out When the standby time and talk time are shorter than normal replace the battery Use the AC power supply defin...

Page 36: ...on or fire If the power cable is damaged for example the lead is exposed or broken or the plug loosens stop using the cable at once Otherwise it may lead to electric shock short circuit of the charger or a fire Do not dispose of batteries in fire as they may explode Batteries may also explode if damaged Clearing and Maintenance The device battery and charger are not water resistant Keep them dry P...

Page 37: ...fore you clean or maintain the device power off the device and disconnect it from the charger Do not use any chemical detergent powder or other chemical agents such as alcohol and benzene to clean the device and the charger Otherwise parts of the device may get damaged or a fire can be caused You can clean the device and the charger with a piece of damp and soft antistatic cloth Do not dismantle t...

Page 38: ...frequency bands Although the SAR is determined at the highest certified power level the actual SAR level of the phone while operating can be well below the maximum value This is because the phone is designed to operate at multiple power levels so as to use only the poser required to reach the network In general the closer you are to a wireless base station antenna the lower the power output The hi...

Page 39: ...e with FCC RF exposure guidelines If you do no t use a body worn accessory and are not holding the phone at the ear position the handset a minimum of 2 0 cm from your body when the phone is switched on FCC Statement This device has been tested and found to comply with the limits for a Class B digital device pursuant to Part 15 of the FCC Rules This device complies with part 15 of the FCC Rules Ope...

Page 40: ... not occur in a particular installation If this equipment does cause harmful interference to radio or television reception which can be determined by turning the equipment off and on the user is encouraged to try to correct the interference by one or more of the following measures Reorient or relocate the receiving antenna Increase the separation between the equipment and receiver Connect the equi...

Reviews: