background image

8.1 Configuration Example of GRE

Networking Requirements

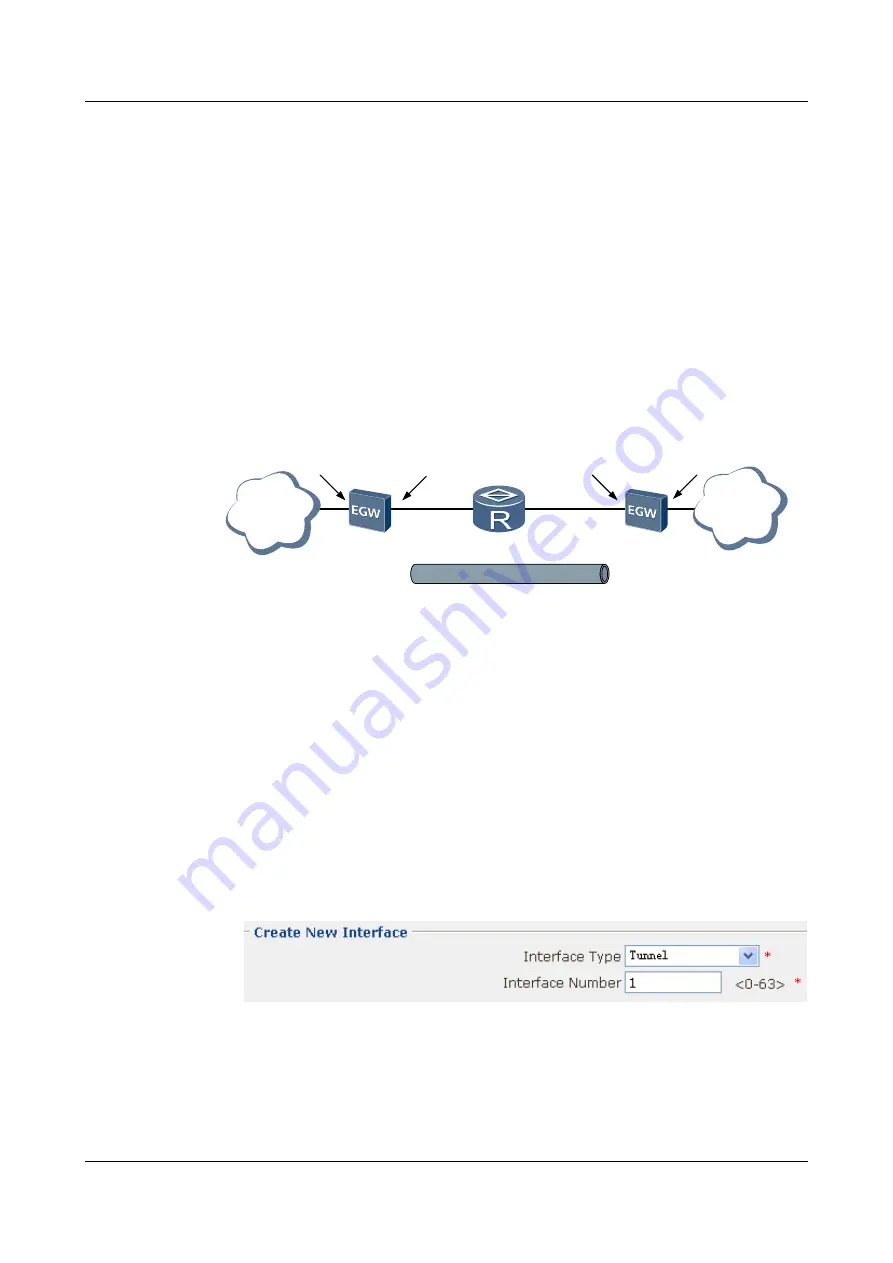
As show in 

Figure 8-1

network A and network B connect to the Internet through EGW2100A

and EGW2100B respectively. The GRE tunnel is required to be configured to use static routes,
so that network A and network B can interwork using GRE.

Network topology diagram

Figure 8-1

 GRE tunnel using static routes

Netwrok A

EGW A

Netwrok B

GRE tunnel

Eth1/0/0

Vlan5

10.100.20.2/24

Eth0/0/0

202.38.10.2/24

Eth1/0/0

Vlan5

10.1.3.1/24

Eth0/0/0

131.108.5.2/24

EGW B

202.38.10.3/24

131.108.5.1/24

Trust

Trust

Untrust

Untrust


Procedure

Step 1

Configure the EGW2100 A.
1.

Configure the VLANs that Vlanif interfaces belong to, set the IP addresses of the Vlanif
interfaces, and add the Vlanif interfaces to the specified zones.
For the configuration procedure, see 

3 Configuration Example of the Basic Operation

.

2.

Choose 

NetWork

 > 

Interface

. The 

Interface

 page is displayed.

3.

Click 

New

. The 

Create New Interface

 page is displayed. Configure the parameters as

shown in 

Figure 8-2

.

Figure 8-2

 Creating an interface named Tunnel1


4.

Click 

Apply

. Then click 

OK

 in the 

Are you sure to submit?

 dialog box that is displayed

to complete the configuration.

5.

Click 

MORE

 in the 

Tunnel1

 row. The page for configure the Tunnel interface is displayed.

Configure the parameters as shown in 

Figure 8-3

.

8 Configuration Example of the VPN

HUAWEI EGW2100

Web Configuration Guide

8-2

Huawei Proprietary and Confidential

Copyright © Huawei Technologies Co., Ltd.

Issue 01 (2010-02-20)

Summary of Contents for EGW2100

Page 1: ...HUAWEI EGW2100 V100R001C01 Web Configuration Guide Issue 01 Date 2010 02 20 Huawei Proprietary and Confidential Copyright Huawei Technologies Co Ltd ...

Page 2: ...d in this document are the property of their respective holders Notice The purchased products services and features are stipulated by the contract made between Huawei and the customer All or part of the products services and features described in this document may not be within the purchase scope or the usage scope Unless otherwise specified in the contract all statements information and recommend...

Page 3: ... Demand 4 21 4 7 Configuration Example of the 3G Interface for Automatic Dialup 4 30 4 8 Configuration Example of a WLAN Crypto Service Class 4 36 4 9 Configuration Example of a WLAN Plain Service Class 4 40 4 10 Configuration Example of a WLAN 802 1X 4 43 5 Configuration Example of the ACL 5 1 6 Configuration Example of NAT 6 1 7 Configuration Example of the Dual System Hot Backup in Routing Mode...

Page 4: ......

Page 5: ...ing the PVC 4 3 Figure 4 4 Obtaining the IP address in PPP negotiation mode 4 3 Figure 4 5 Configuring the PPP user on the Dialer interface 4 4 Figure 4 6 Configuring the Dialer interface 4 4 Figure 4 7 Configuring the packet filtering rule between the Trust security zone and the Untrust security zone 4 4 Figure 4 8 Configuring the static route 4 5 Figure 4 9 Configuring the NAT 4 5 Figure 4 10 En...

Page 6: ...aving the configuration 4 18 Figure 4 37 Networking diagram of OSPF configurations 4 19 Figure 4 38 Configuring process 100 4 20 Figure 4 39 Configuring area 0 4 20 Figure 4 40 Configuring area 1 4 21 Figure 4 41 Saving the configuration 4 21 Figure 4 42 Networking diagram of dial on demand through the Dialer interface 4 22 Figure 4 43 Configuring the Modem 4 22 Figure 4 44 Configuring the dialer ...

Page 7: ...nfiguration 4 36 Figure 4 81 Networking diagram of configuring a WLAN Crypto service class 4 37 Figure 4 82 Creating a Service Class 4 37 Figure 4 83 Configuring the crypto service class 4 38 Figure 4 84 Creating the WLAN BSS interface 4 38 Figure 4 85 Configuring interface Wlan Bss2 4 39 Figure 4 86 Configuring the interzone packet filtering rule 4 39 Figure 4 87 Configuring the NAT 4 39 Figure 4...

Page 8: ...2 Configuring the advanced ACL rule 0 6 2 Figure 6 3 Configuring advanced ACL rule 5 6 3 Figure 6 4 Configuring the packet filtering rule between the DMZ security zone and the Untrust security zone 6 3 Figure 6 5 Configuring the ASPF between the DMZ security zone and the Untrust security zone 6 4 Figure 6 6 Configuring the address mapping of the WWW server 6 4 Figure 6 7 Configuring the address ma...

Page 9: ...e local user 8 9 Figure 8 15 Configuring the IP pool 8 9 Figure 8 16 Configuring the L2TP group 8 10 Figure 8 17 Configuring the IKE proposal 8 10 Figure 8 18 Configuring the IKE peer 8 11 Figure 8 19 Configuring the IPSec proposal 8 11 Figure 8 20 Configuring the IPSec policy template 8 12 Figure 8 21 Configuring the IPSec policy 8 12 Figure 8 22 Applying the policy 8 12 Figure 8 23 Saving the co...

Page 10: ......

Page 11: ... Maintenance engineer l Network engineer l Network administrator l Network maintenance engineer Organization This document is organized as follows Chapter Description 1 Configuration Example of Logging in to Web This chapter describes the configuration of logging in to web 2 Configuration Example of Quick Config This chapter describes the configuration of quick config HUAWEI EGW2100 Web Configurat...

Page 12: ...This chapter describes the abbreviations in this document Conventions Symbol Conventions The symbols that may be found in this document are defined as follows Symbol Description DANGER Indicates a hazard with a high level of risk which if not avoided could result in death or serious injury WARNING Indicates a hazard with a medium or low level of risk which if not avoided could result in minor or m...

Page 13: ... in braces and separated by vertical bars One item is selected x y Optional items are grouped in brackets and separated by vertical bars One item is selected or no item is selected x y Optional items are grouped in braces and separated by vertical bars A minimum of one item or a maximum of all items can be selected x y Optional items are grouped in brackets and separated by vertical bars Several i...

Page 14: ... document are defined as follows Action Description Click Select and release the primary mouse button without moving the pointer Double click Press the primary mouse button twice continuously and quickly without moving the pointer Drag Press and hold the primary mouse button and move the pointer to a certain position Update History Updates between document issues are cumulative Therefore the lates...

Page 15: ... 192 168 0 2 24 Procedure Step 1 The PC is connected to Ethernet1 0 0 of the EGW2100 Step 2 Configure the IP address of the PC The configuration details are not mentioned here Step 3 Access the EGW2100 through the Web browser of the PC Input http 192 168 0 1 in the Internet Explorer to enter the Web login page Figure 1 2 shows the login page Figure 1 2 Login page HUAWEI EGW2100 Web Configuration G...

Page 16: ...sword Admin 123 The configuration interface is shown End 1 Configuration Example of Logging in to Web HUAWEI EGW2100 Web Configuration Guide 1 2 Huawei Proprietary and Confidential Copyright Huawei Technologies Co Ltd Issue 01 2010 02 20 ...

Page 17: ...ckup link Figure 2 1 Networking diagram for the web manager function PC PC ADSL WLAN 192 168 0 0 24 3G Data Preparation Item EGW2100 Station ADSL PVC 0 33 User Name adsl Password password 3G User Name internet Password password Dialer Number 99 Access point name APN HUAWEI EGW2100 Web Configuration Guide 2 Configuration Example of Quick Config Issue 01 2010 02 20 Huawei Proprietary and Confidentia...

Page 18: ...e ADSL Configuration group box Figure 2 2 shows the parameter setting Figure 2 2 Configuring the ADSL 3 Click Apply Then click OK in the Are you sure to submit dialog box that is displayed to complete the configuration 4 Click Refresh ADSL IP disconnected as shown in Figure 2 2 turns to the obtained IP address This indicates the ADSL connection succeeds 5 In the 3G configuration group box Figure 2...

Page 19: ...he LAN 3 Click Apply Then click OK in the Are you sure to submit dialog box that is displayed to complete the configuration 4 In the WLAN configuration group box Figure 2 5 shows the parameter setting Figure 2 5 Configuring the WLAN 5 Click Apply Then click OK in the Are you sure to submit dialog box that is displayed to complete the configuration Step 3 Save the configuration 1 Click Save on the ...

Page 20: ...at is displayed to complete the configuration Step 4 Save the Station Change the TCP IP setting of the Station to obtain its IP address automatically For help see the operating system documentation for the Station End 2 Configuration Example of Quick Config HUAWEI EGW2100 Web Configuration Guide 2 4 Huawei Proprietary and Confidential Copyright Huawei Technologies Co Ltd Issue 01 2010 02 20 ...

Page 21: ...played 2 Click New to enter the VLAN Config interface Figure 3 1 shows the parameter setting Figure 3 1 Configuring the VLAN 3 Click Apply Then click OK in the Are you sure to submit dialog box that is displayed to complete the configuration Step 2 Create interface Dialer 0 1 Choose NetWork Interface The Interface page is displayed 2 Click New to enter the Create New Interface interface Figure 3 2...

Page 22: ...displayed to complete the configuration Step 4 Create ACL 3001 and configure the rule for ACL 3001 The action of the packets whose source IP addresses are in network segment 10 1 1 0 24 is configured as Permit 1 Choose Resource ACL The ACL page is displayed 2 Click New to enter the ACL Basic Config interface Figure 3 4 shows the parameter setting Figure 3 4 Creating ACL 3001 3 Click Apply Then cli...

Page 23: ...ter Configpage is displayed Figure 3 6 shows the parameter setting Figure 3 6 Configuring the interzone packet filtering rule 3 Click Apply Then click OK in the Are you sure to submit dialog box that is displayed to complete the configuration Step 6 Save the configuration 1 Click Save on the upper right of the page to save the configuration Figure 3 7 shows the parameter setting HUAWEI EGW2100 Web...

Page 24: ...er pages you will not get the operation result Are you sure to save dialog box that is displayed to complete the configuration End 3 Configuration Example of the Basic Operation HUAWEI EGW2100 Web Configuration Guide 3 4 Huawei Proprietary and Confidential Copyright Huawei Technologies Co Ltd Issue 01 2010 02 20 ...

Page 25: ...IP you can exchange routing information through UDP packets This protocol is widely used in simple small medium sized networks 4 5 Configuration Example of OSPF OSPF is an internal network gateway protocol based on the link status developed by the IETF and is also a dynamic routing protocol applied to the internal of the AS 4 6 Configuration Example of the 3G Interface for Dial on Demand 4 7 Confi...

Page 26: ...Step 2 Create Virtual Ethernet 1 VE 1 interface and add VE 1 to the Untrust zone Create Dialer 1 interface and add Dialer 1 to the Untrust zone For the configuration procedure see 3 Configuration Example of the Basic Operation Step 3 Configure the ADSL interface 1 Choose NetWork Interface The Interface page is displayed 2 Click MORE corresponding to Atm2 0 0 to enter the Interface Basic Config int...

Page 27: ... MORE corresponding to Dialer1 to enter the Interface Basic Config interface 3 In the Interface Basic Config group box click IP Address Detail Config The IP Address Config interface is displayed Figure 4 4 shows the parameter setting Figure 4 4 Obtaining the IP address in PPP negotiation mode 4 Click Apply Then click OK in the Are you sure to submit dialog box that is displayed to complete the con...

Page 28: ...yed to complete the configuration Step 5 Configure the interzone packet filtering rule 1 Choose Security Packet Filter The Packet Filter page is displayed 2 ClickMORE corresponding totrust untrust ThePacket Filter Configpage is displayed Figure 4 7 shows the parameter setting Figure 4 7 Configuring the packet filtering rule between the Trust security zone and the Untrust security zone 3 Click Appl...

Page 29: ...ge is displayed 3 Select NAT Policy tab Click New The NAT Policy page is displayed Figure 4 9 shows the parameter setting Figure 4 9 Configuring the NAT NOTE When selecting the ACL you can select basic ACL or advanced ACL from the drop down list Then select the proper ACL in the ACL classification table 4 Click Apply Then click OK in the Are you sure to submit dialog box that is displayed to compl...

Page 30: ...e 4 Click Apply Then click OK in the Are you sure to submit dialog box that is displayed to complete the configuration Step 9 Configure the DNS 1 Choose NetWork DNS Config The DNS Config page is displayed 2 Click the Basic Configurations tab Select the Enable DNS Proxy check box to enable the DNS proxy function Figure 4 12 shows the parameter setting Figure 4 12 Enabling the DNS proxy 3 Click the ...

Page 31: ...ou switch to other pages you will not get the operation result Are you sure to save dialog box that is displayed to complete the configuration End 4 2 Configuration Example of SHDSL Networking Requirements The EGW2100 connects to a LAN through Ethernet 0 0 0 and LAN users access the Internet through the SHDSL interface ATM 2 0 0 Networking Diagram Figure 4 15 shows the networking of the SHDSL conf...

Page 32: ...ce page is displayed 2 Click MORE corresponding to Atm2 0 0 to enter the Interface Basic Config interface Figure 4 16 shows the parameter setting Figure 4 16 Basic configuration of the SHDSL interface 3 Click Apply Then click OK in the Are you sure to submit dialog box that is displayed to complete the configuration Completing the operations on the EGW2100 takes a while about 10 seconds Wait with ...

Page 33: ...8 Configuring the packet filtering rule between the Trust security zone and the Untrust security zone 3 Click Apply Then click OK in the Are you sure to submit dialog box that is displayed to complete the configuration Step 5 Configure a specific route 1 Choose NetWork Route Config The Route Config page is displayed 2 Click the Route Static tab Click New The Route Static Config page is displayed F...

Page 34: ...s to the DHCP client Networking Requirements A DHCP server dynamically assigns the IP addresses to a client in the same network segment The address pool segment 10 1 1 0 24 is divided into two segments 10 1 1 0 25 and 10 1 1 128 25 The two network segments are in the Trust zone The IP addresses of the two Ethernet interfaces on the DHCP server are 10 1 1 1 25 and 10 1 1 129 25 The IP lease of the ...

Page 35: ... corresponding totrust untrust ThePacket Filter Configpage is displayed Select the permit option button respectively next to Inbound Default Packet filter and Outbound Default Packet filter 3 Click Apply Then click OK in the Are you sure to submit dialog box that is displayed to complete the configuration CAUTION The default packet filtering rule that allows all the packets to pass may cause secur...

Page 36: ... the Are you sure to submit dialog box that is displayed to complete the configuration Step 4 Configure the IP addresses that do not participate in auto allocation including addresses of the DNS server the NetBIOS server and the egress gateway 1 Select Service DHCP DHCP Server The DHCP Server page is displayed 2 Select Forbidden Ip tab Click New The Forbidden IP Config page is displayed Set the pa...

Page 37: ...IP Config page is displayed Set the parameters based on Figure 4 26 Figure 4 26 Configuring the forbidden IP addresses 7 Click Apply Then click OK in the Are you sure to submit dialog box that is displayed to complete the configuration 8 Select Forbidden Ip tab Click New The Forbidden IP Config page is displayed Set the parameters based on Figure 4 27 Figure 4 27 Configuring the forbidden IP addre...

Page 38: ...ion 4 Select Global Ip pool tab Click New The Global Ip Pool Config page is displayed Set the parameters based on Figure 4 29 Figure 4 29 Configuring attributes of DHCP address pool 2 5 Click Apply Then click OK in the Are you sure to submit dialog box that is displayed to complete the configuration Step 6 Save the configuration 1 Click Save on the upper right of the page to save the configuration...

Page 39: ... routers Routing Information Protocol RIP works on both the EGW2100 and routers After the configuration the EGW2100 Router B and Router C can learn routing information from each other The EGW2100 Router B and Router C respectively serve as the default gateways of the 192 1 2 0 24 192 1 3 0 24 and 192 1 4 0 24 network segments The EGW2100 connects to the Ethernet interfaces of Router B and Router C...

Page 40: ...iguration Example of the Basic Operation 2 Configure the Packet Filter For the configuration procedure see 3 Configuration Example of the Basic Operation 3 Choose NetWork RIP The RIP page is displayed 4 Click the Interface Configuration tab 5 Click New The Interface Configuration page is displayed Set the parameters of the interface on this page as shown in Figure 4 32 4 Configuration Example of t...

Page 41: ...ble check box to enable the RIP function as shown in Figure 4 33 Figure 4 33 Enabling the RIP function 8 Click MORE The RIP Config page is displayed Set the parameters based on Figure 4 34 Figure 4 34 Configuring the IP address of the RIP network segment HUAWEI EGW2100 Web Configuration Guide 4 Configuration Example of the Internetworking Issue 01 2010 02 20 Huawei Proprietary and Confidential Cop...

Page 42: ...esult Are you sure to save dialog box that is displayed to complete the configuration Step 3 Configure Router B and Router C For the configuration procedure see the configurations of the EGW2100 End 4 5 Configuration Example of OSPF OSPF is an internal network gateway protocol based on the link status developed by the IETF and is also a dynamic routing protocol applied to the internal of the AS Ne...

Page 43: ... Step 1 Configure the EGW2100 1 Configure the VLANs that Vlanif interfaces belong to set the IP addresses of the Vlanif interfaces and add the Vlanif interfaces to the specified zones For the configuration procedure see 3 Configuration Example of the Basic Operation 2 Choose Security Packet Filter The Packet Filter page is displayed 3 ClickMORE corresponding totrust untrust ThePacket Filter Config...

Page 44: ...e you sure to submit dialog box that is displayed to complete the configuration 9 Click MORE corresponding to 100 and choose the Area Config tab 10 Click New to enter the Area Config interface Figure 4 39 shows the parameter setting Figure 4 39 Configuring area 0 11 Click Add to add the 172 10 0 0 16 network segment to area 0 12 Click Apply Then click OK in the Are you sure to submit dialog box th...

Page 45: ...uter B For the configuration procedure see the configurations of the EGW2100 End 4 6 Configuration Example of the 3G Interface for Dial on Demand Networking Requirements The EGW2100 connects to the enterprise intranet through Ethernet 0 0 0 and to the Internet through USB WCDMA 3G card The networking requirements are as follows l The intranet of the enterprise is in network segment 192 168 1 0 24 ...

Page 46: ...New to enter the Dialer Rule Config interface Figure 4 44 shows the parameter setting Figure 4 44 Configuring the dialer rule 3 Click Apply Then click OK in the Are you sure to submit dialog box that is displayed to complete the configuration Step 3 Configure the Dialer interface and associate dialup access group 1 with the interface Enable circular DCC and configure the dialing string 1 Choose Ne...

Page 47: ...re 4 47 shows the parameter setting Figure 4 47 Obtaining the IP address in PPP negotiation mode 7 Click Apply Then click OK in the Are you sure to submit dialog box that is displayed to complete the configuration 8 Click back Then return to the Interface Dialer0 Config interface 9 In the PPP User and Dialer group box click PPP User and Dialer The PPP User Config interface is displayed Figure 4 48...

Page 48: ...iguring circular DCC 13 Click Apply Then click OK in the Are you sure to submit dialog box that is displayed to complete the configuration Step 4 Configure the Cellular5 0 0 interface 1 Choose NetWork Interface The Interface page is displayed 2 Click MORE corresponding to Cellular5 0 0 to enter the Cellular5 0 0 Interface Config interface 3 In the PPP User and Dialer group box click PPP User and D...

Page 49: ...CC Configuration interface is displayed Figure 4 51 shows the parameter setting Figure 4 51 Adding the Cellular interface to the Dialer circular group 7 Click Apply Then click OK in the Are you sure to submit dialog box that is displayed to complete the configuration 8 In the Data Card Config group box click Data Card Config Then click the Operator Manage tab The Operator Config interface is displ...

Page 50: ...hen click OK in the Are you sure to submit dialog box that is displayed to complete the configuration Step 6 Configure the NAT rule the routing rule and the packet filtering rule 1 Choose Resource ACL The ACL page is displayed 2 Click New to enter the ACL Basic Config interface Figure 4 54 shows the parameter setting Figure 4 54 Creating ACL 3001 3 Click Apply Then click OK in the Are you sure to ...

Page 51: ...Configuring the NAT 8 Click Apply Then click OK in the Are you sure to submit dialog box that is displayed to complete the configuration 9 Choose Security Packet Filter The Packet Filter page is displayed 10 ClickMORE corresponding totrust untrust ThePacket Filter Configpage is displayed Figure 4 57 shows the parameter setting HUAWEI EGW2100 Web Configuration Guide 4 Configuration Example of the I...

Page 52: ...figure the DHCP function which can dynamically assign IP addresses to intranet users 1 Choose Service DHCP DHCP Basic The DHCP Basic Config page is displayed 2 In the DHCP Basic Config group box select the DHCP Enable check box Click OK in the Are you sure to enable dialog box to enable the DHCP function Figure 4 59 shows the parameter setting Figure 4 59 Enabling the DHCP function 3 In the Settin...

Page 53: ...he parameter setting Figure 4 62 Configuring the DNS server address 4 Click add Then click OK in the Are you sure to submit dialog box that is displayed to complete the configuration Step 9 Save the configuration 1 Click Save on the upper right of the page to save the configuration Figure 4 63 shows the parameter setting Figure 4 63 Saving the configuration 2 Click OK in the This will save current...

Page 54: ...working diagram of automatic dialup through the Dialer interface 192 168 1 0 24 Ethernet 0 0 0 192 168 1 1 24 3G interface EGW Procedure Step 1 Configure the Modem 1 Choose NetWork Modem The Modem Config page is displayed Figure 4 65 shows the parameter setting Figure 4 65 Configuring the Modem 2 Click Apply Then click OK in the Are you sure to submit dialog box that is displayed to complete the c...

Page 55: ...t is displayed to complete the configuration 4 In the Interface Basic Config group box click IP Address Detail Config The IP Address Config interface is displayed Figure 4 68 shows the parameter setting Figure 4 68 Obtaining the IP address in PPP negotiation mode 5 Click Apply Then click OK in the Are you sure to submit dialog box that is displayed to complete the configuration 6 Click back Then r...

Page 56: ...e the configuration 9 Click back Then return to the Interface Cellular5 0 0 Config interface 10 In the Dial Control Center group box click DCC Configuration The DCC Configuration interface is displayed Figure 4 70 shows the parameter setting CAUTION You can obtain the Peer Number from the operator Figure 4 70 Configuring circular DCC 4 Configuration Example of the Internetworking HUAWEI EGW2100 We...

Page 57: ... that is displayed to complete the configuration Step 5 Configure the NAT rule the routing rule and the packet filtering rule 1 Choose Resource ACL The ACL page is displayed 2 Click New to enter the ACL Basic Config interface Figure 4 72 shows the parameter setting Figure 4 72 Creating ACL 3001 3 Click Apply Then click OK in the Are you sure to submit dialog box that is displayed to complete the c...

Page 58: ...Configuring the NAT 8 Click Apply Then click OK in the Are you sure to submit dialog box that is displayed to complete the configuration 9 Choose Security Packet Filter The Packet Filter page is displayed 10 ClickMORE corresponding totrust untrust ThePacket Filter Configpage is displayed Figure 4 75 shows the parameter setting 4 Configuration Example of the Internetworking HUAWEI EGW2100 Web Confi...

Page 59: ...figure the DHCP function which can dynamically assign IP addresses to intranet users 1 Choose Service DHCP DHCP Basic The DHCP Basic Config page is displayed 2 In the DHCP Basic Config group box select the DHCP Enable check box Click OK in the Are you sure to enable dialog box to enable the DHCP function Figure 4 77 shows the parameter setting Figure 4 77 Enabling the DHCP function 3 In the Settin...

Page 60: ...n the This will save current configuration if you switch to other pages you will not get the operation result Are you sure to save dialog box that is displayed to complete the configuration End 4 8 Configuration Example of a WLAN Crypto Service Class Networking Requirements l The EGW2100 AP is connected to the Router through Ethernet 0 0 0 already added to the Untrust zone l The fixed IP address o...

Page 61: ... the interface to the Trust zone For the configuration procedure see 3 Configuration Example of the Basic Operation Step 3 Configure the service class NOTE By default Service Class 0 is enabled If Service Class 0 is not needed it is recommended to disable the Service Class 1 Choose NetWork Wlan Service Class The Service Class page is displayed 2 Click New to enter the Create a Service Class interf...

Page 62: ...terface 1 Choose NetWork Wlan Radio Setting The Radio Setting page is displayed 2 Click New Bss in the Wlan Bss group box to access the Interface Basic Config interface Figure 4 84 shows the parameter setting Figure 4 84 Creating the WLAN BSS interface 3 Click Apply Then click OK in the Are you sure to submit dialog box that is displayed to complete the configuration 4 Click MORE corresponding to ...

Page 63: ...ck Apply Then click OK in the Are you sure to submit dialog box that is displayed to complete the configuration Step 6 Configure the NAT 1 Create ACL 3001 and configure the rule for ACL 3001 Match all IP packets For the configuration procedure see 3 Configuration Example of the Basic Operation 2 Choose Service NAT Nat Policy The Nat Policy page is displayed 3 Click new to enter the NAT Policy inte...

Page 64: ...Click OK in the This will save current configuration if you switch to other pages you will not get the operation result Are you sure to save dialog box that is displayed to complete the configuration Step 9 Configure the wireless network cards on the client l Manually set the IP addresses of the wireless network cards to 192 168 1 2 24 and 192 168 1 3 24 l The SSID encryption mode authentication m...

Page 65: ...e see 3 Configuration Example of the Basic Operation Step 2 Create VLAN 2 Set the IP address of interface Vlanif 2 to 192 168 1 1 24 and add the interface to the Trust zone For the configuration procedure see 3 Configuration Example of the Basic Operation Step 3 Configure the DHCP function 1 Choose Service DHCP DHCP Basic The DHCP Basic Config page is displayed 2 In the DHCP Basic Config group box...

Page 66: ...ows the parameter setting Figure 4 93 Configuring the plain service class 4 Click Apply Then click OK in the Are you sure to submit dialog box that is displayed to complete the configuration 5 Click ENABLE corresponding to service class number 0 Click OK in the Are you sure to enalbe dialog box that is displayed and clickOK in the Info Service class 0 is enabled successfully and the status of BSS ...

Page 67: ...reless network cards to automatically obtain IP addresses l The SSID encryption mode and authentication mode on the wireless network cards should be consistent with those on the EGW2100 End 4 10 Configuration Example of a WLAN 802 1X Networking Requirements l The EGW2100 AP is connected to the Router through Ethernet 0 0 0 already added to the Untrust zone l The fixed IP address of Ethernet 0 0 0 ...

Page 68: ...e 3 Configuration Example of the Basic Operation Step 3 Configure the service class NOTE By default Service Class 0 is enabled If Service Class 0 is not needed it is recommended to disable the Service Class 1 Choose NetWork Wlan Service Class The Service Class page is displayed 2 Click New to enter the Create a Service Class interface Figure 4 97 shows the parameter setting Figure 4 97 Creating a ...

Page 69: ... that is displayed and clickOK in the Info Service class 2 is enabled successfully dialog box that is displayed to complete the configuration Step 4 Configure the binding between the service class and the WLAN BSS interface 1 Choose NetWork Wlan Radio Setting The Radio Setting page is displayed 2 Click New Bss in the Wlan Bss group box to access the Interface Basic Config interface Figure 4 100 sh...

Page 70: ...figuring the DHCP The configuration procedure is similar to that for the WLAN of the plain service class see 4 9 Configuration Example of a WLAN Plain Service Class Step 7 Configure the RADIUS 1 Choose Resource AAA Radius The Radius interface is displayed 2 Click new The Radius Template Config interface is displayed Figure 4 102 shows the parameter setting Figure 4 102 Configuring the RADIUS templ...

Page 71: ...ows the parameter setting Figure 4 104 Configuring the RADIUS authentication scheme 3 Click Apply Then click OK in the Are you sure to submit dialog box that is displayed to complete the configuration 4 Choose Resource AAA Domain The Domain interface is displayed 5 Click new The Domain Basic Config interface is displayed Figure 4 105 shows the parameter setting Figure 4 105 Configuring the domain ...

Page 72: ... Figure 4 107 Saving the configuration 2 Click OK in the This will save current configuration if you switch to other pages you will not get the operation result Are you sure to save dialog box that is displayed to complete the configuration Step 10 Configure the wireless network cards on the client l Configure the wireless network cards to automatically obtain IP addresses l The SSID and authentic...

Page 73: ... Internet l The company provides WWW FTP and Telnet services for external users The network segment of the internal network is 10 100 20 0 24 l The IP address of a specific external user is 202 39 2 3 Configuration requirement l In the external network only host 202 39 2 3 can access the internal FTP server Telnet server WWW server l In the internal network only host 10 100 20 3 and host 10 100 20...

Page 74: ...ck New to enter the VLAN Config interface Enter 5 in VLAN ID 3 Click Select Select Ethernet1 0 0 in the interface list Click choose to return to the VLAN Config interface Click Add to add Ethernet1 0 0 to VLAN 5 As shown in Figure 5 2 Figure 5 2 Creating VLAN 5 4 Choose NetWork Interface The Interface page is displayed 5 Click New to enter the Create New Interface interface Figure 5 3 shows the pa...

Page 75: ...esponding to Ethernet0 0 0 to enter the Ethernet0 0 0 Interface Config interface Figure 5 5 shows the parameter setting Figure 5 5 Configuring interface Ethernet0 0 0 11 Click Apply Then click OK in the Are you sure to submit dialog box that is displayed to complete the configuration Step 2 Configure a specific route to the external network 1 Choose NetWork Route Config The Route Config page is di...

Page 76: ... Choose Resource ACL The ACL page is displayed 2 Click New The ACL Basic Configuration page is displayed 3 In ACL Number enter 3102 4 Click apply to create an ACL rule 5 In the ACL Rule Configuration area click New The Rule Configuration page is displayed Set the parameters based on Figure 5 7 Figure 5 7 Configuring ACL rule 1 5 Configuration Example of the ACL HUAWEI EGW2100 Web Configuration Gui...

Page 77: ...igure 5 8 Configuring ACL rule 2 8 Click Apply Then click OK in the Are you sure to submit dialog box that is displayed to complete the configuration 9 In the ACL Rule Configuration area click New The Rule Configuration page is displayed Set the parameters based on Figure 5 9 HUAWEI EGW2100 Web Configuration Guide 5 Configuration Example of the ACL Issue 01 2010 02 20 Huawei Proprietary and Confid...

Page 78: ... Figure 5 10 Figure 5 10 Configuring packet filtering rule 1 13 Click Apply Then click OK in the Are you sure to submit dialog box that is displayed to complete the configuration 14 Choose Security ASPF The ASPF Config page is displayed 15 Click the InterZone ASPF tab In the InterZone select DMZ and Untrust 16 Click confirm Set the parameters based on Figure 5 11 5 Configuration Example of the ACL...

Page 79: ... ACL Basic Configuration page is displayed 3 In ACL Number enter 3103 4 Click apply to create an ACL rule 5 In the ACL Rule Configuration area click New The Rule Configuration page is displayed Set the parameters based on Figure 5 12 Figure 5 12 Configuring ACL rule 4 6 Click Apply Then click OK in the Are you sure to submit dialog box that is displayed to complete the configuration HUAWEI EGW2100...

Page 80: ...ket Filter page is displayed 10 Click MORE corresponding to dmz untrust The Packet Filter Config page is displayed Set the parameters based on Figure 5 14 Figure 5 14 Configuring packet filtering rule 2 11 Click Apply Then click OK in the Are you sure to submit dialog box that is displayed to complete the configuration Step 5 Save the configuration 5 Configuration Example of the ACL HUAWEI EGW2100...

Page 81: ...the This will save current configuration if you switch to other pages you will not get the operation result Are you sure to save dialog box that is displayed to complete the configuration End HUAWEI EGW2100 Web Configuration Guide 5 Configuration Example of the ACL Issue 01 2010 02 20 Huawei Proprietary and Confidential Copyright Huawei Technologies Co Ltd 5 9 ...

Page 82: ......

Page 83: ...ty zone Requirement Two internal servers are provide to external users The internal IP address of the WWW server is 10 100 20 1 24 and the port is 8080 The internal IP address of the FTP server is 10 100 20 3 24 For both severs the external IP address is 202 38 10 2 and the external port numbers are the default numbers Networking Diagram Figure 6 1 shows the networking of a NAT configuration examp...

Page 84: ...pply Then click OK in the Are you sure to submit dialog box that is displayed to complete the configuration 5 Click New The Rule Configuration page is displayed Set the parameters based on Figure 6 2 Figure 6 2 Configuring the advanced ACL rule 0 6 Click Apply Then click OK in the Are you sure to submit dialog box that is displayed to complete the configuration 7 Click New The Rule Configuration p...

Page 85: ...ure 6 4 Configuring the packet filtering rule between the DMZ security zone and the Untrust security zone 3 Click Apply Then click OK in the Are you sure to submit dialog box that is displayed to complete the configuration Step 4 Configure the function of filtering application layer based FTP packets on the EGW2100 1 Choose Security ASPF and then click InterZone ASPF The ASPF Config page is displa...

Page 86: ...s Mapping page is displayed Set the parameters based on Figure 6 6 Figure 6 6 Configuring the address mapping of the WWW server 3 Click Apply Then click OK in the Are you sure to submit dialog box that is displayed to complete the configuration 4 Click New The Configuraition of Address Mapping page is displayed Set the parameters based on Figure 6 7 Figure 6 7 Configuring the address mapping of th...

Page 87: ...ws the parameter setting Figure 6 8 Saving the configuration 2 Click OK in the This will save current configuration if you switch to other pages you will not get the operation result Are you sure to save dialog box that is displayed to complete the configuration End HUAWEI EGW2100 Web Configuration Guide 6 Configuration Example of NAT Issue 01 2010 02 20 Huawei Proprietary and Confidential Copyrig...

Page 88: ......

Page 89: ...n both EGW2100s are configured to connect to a heartbeat line The network segment is 10 100 20 0 24 The DMZ zone connects to the interfaces Ethernet 0 0 0 l The external networks are classified into the Untrust zone and the Untrust zone connects to the interfaces Ethernet 1 0 1 Vlanif 6 of the EGW2100s l Two EGW2100s are connected to each zone through a LAN switch The mappings between the virtual ...

Page 90: ... to related security zones For the configuration procedure see 3 Configuration Example of the Basic Operation Step 2 Configure the Packet Filtering between the Trust security zone DMZ security zone and Untrust security zone of the EGW2100 A For the configuration procedure see 3 Configuration Example of the Basic Operation Step 3 Create the VRRP backup groups of the EGW2100 A 1 Click Reliability VR...

Page 91: ...ayed Figure 7 4 shows the parameter setting Figure 7 4 Configuring VRRP backup group 3 7 Click Apply Then click OK in the Are you sure to submit dialog box that is displayed to complete the configuration Step 4 Enable the HRP function of the EGW2100 A 1 Choose Reliability HRP The HRP page is displayed 2 Click the VGMP Config tab The VGMP Config page is displayed 3 Click New The VGMP Config page is...

Page 92: ... Configure EGW2100 B The procedure for configuring the EGW2100 B is the same as that for configuring the EGW2100 A The following parameters however are different l The interface IP addresses of EGW2100 B are different from those of the EGW2100 A l The default priority of the VRRP management group on EGW2100 B is 100 Step 6 Save the configuration 1 Click Save on the upper right of the page to save ...

Page 93: ... will not get the operation result Are you sure to save dialog box that is displayed to complete the configuration End HUAWEI EGW2100 Web Configuration Guide 7 Configuration Example of the Dual System Hot Backup in Routing Mode Issue 01 2010 02 20 Huawei Proprietary and Confidential Copyright Huawei Technologies Co Ltd 7 5 ...

Page 94: ......

Page 95: ...apter 8 1 Configuration Example of GRE 8 2 Configuration Example of L2TP IPSec HUAWEI EGW2100 Web Configuration Guide 8 Configuration Example of the VPN Issue 01 2010 02 20 Huawei Proprietary and Confidential Copyright Huawei Technologies Co Ltd 8 1 ...

Page 96: ...f interfaces belong to set the IP addresses of the Vlanif interfaces and add the Vlanif interfaces to the specified zones For the configuration procedure see 3 Configuration Example of the Basic Operation 2 Choose NetWork Interface The Interface page is displayed 3 Click New The Create New Interface page is displayed Configure the parameters as shown in Figure 8 2 Figure 8 2 Creating an interface ...

Page 97: ...played Set the parameters based on Figure 8 4 Figure 8 4 Configuring the static route 9 Click Apply Then click OK in the Are you sure to submit dialog box that is displayed to complete the configuration 10 Click New The Route Static Config page is displayed Set the parameters based on Figure 8 5 HUAWEI EGW2100 Web Configuration Guide 8 Configuration Example of the VPN Issue 01 2010 02 20 Huawei Pr...

Page 98: ... recommended to apply the ACL rule between security zones 15 Click Save on the upper right of the page to save the configuration Step 2 Configure the IP addresses of interfaces of the EGW2100 B and add the interfaces to related security zones 1 Choose NetWork Interface The Interface page is displayed 2 Click New The Create New Interface page is displayed Configure the parameters as shown in Figure...

Page 99: ...splayed Set the parameters based on Figure 8 8 Figure 8 8 Configuring the static route 8 Click Apply Then click OK in the Are you sure to submit dialog box that is displayed to complete the configuration 9 Click New The Route Static Config page is displayed Set the parameters based on Figure 8 9 HUAWEI EGW2100 Web Configuration Guide 8 Configuration Example of the VPN Issue 01 2010 02 20 Huawei Pr...

Page 100: ... pass may cause security troubles Therefore it is recommended to apply the ACL rule between security zones 14 Click Save on the upper right of the page to save the configuration End 8 2 Configuration Example of L2TP IPSec Networking Requirements The company headquarters access the Internet through the EGW2100 The VPN Client is installed on the PC of the employees on business trip the employee send...

Page 101: ...PSec Encapsulation Mode Tunnel Tunnel Transform ESP ESP ESP Authentication Algorithm MD5 MD5 ESP Encryption Algorithm DES DES Nat Traversal Enable Enable IKE Pre Shared Key abcde abcde Exchange Mode aggressive aggressive Local Id Type Name Name IKE Local Name server client Remote Name client server Authentication Algorithm MD5 MD5 HUAWEI EGW2100 Web Configuration Guide 8 Configuration Example of t...

Page 102: ...ace Config interface 6 In the Interface Basic Config group box Figure 8 11 shows the parameter setting Figure 8 11 Configuring the Virtual Template1 interface 7 Click Apply Then click OK in the Are you sure to submit dialog box that is displayed to complete the configuration 8 Click PPP Config to enter the PPP Config interface Figure 8 12 shows the parameter setting Figure 8 12 Configuring PPP NOT...

Page 103: ... Figure 8 14 shows the parameter setting Figure 8 14 Configuring the local user 3 Click Apply Then click OK in the Are you sure to submit dialog box that is displayed to complete the configuration Step 4 Configure the IP Address Pool 1 Choose Resource AAA IP Pool The IP Pool page is displayed 2 Click new The IP Pool Config page is displayed Figure 8 15 shows the parameter setting Figure 8 15 Confi...

Page 104: ...he configuration Step 6 Configure the IKE 1 Choose VPN IPSec IKE The IKE page is displayed 2 Choose IKE Proposal tab then click new The IKE Proposal Config page is displayed Figure 8 17 shows the parameter setting Figure 8 17 Configuring the IKE proposal 3 Click Apply Then click OK in the Are you sure to submit dialog box that is displayed to complete the configuration 4 Choose IKE Peer tab then c...

Page 105: ...isplayed Figure 8 19 shows the parameter setting Figure 8 19 Configuring the IPSec proposal 3 Click Apply Then click OK in the Are you sure to submit dialog box that is displayed to complete the configuration 4 Choose IPSec Policy Template tab then click new The IPSec Policy Template page is displayed Figure 8 20 shows the parameter setting HUAWEI EGW2100 Web Configuration Guide 8 Configuration Ex...

Page 106: ...te the configuration Apply the policy on Ethernet 0 0 0 Figure 8 22 shows the parameter setting Figure 8 22 Applying the policy NOTE The policy should be applied on the upstream interface of the obtained IP address For example when the 3G uplink is adopted the policy should be applied on the Dialer interface Step 8 Save the configuration 1 Click Save on the upper right of the page to save the conf...

Page 107: ...iguration Step 9 Configure the VPN Client l Install the VPN Client on the PC of the remote user l Create the dial up program the parameters should be consistent with those on the EGW2100 l Click the connection to start communications with the headquarters End HUAWEI EGW2100 Web Configuration Guide 8 Configuration Example of the VPN Issue 01 2010 02 20 Huawei Proprietary and Confidential Copyright ...

Page 108: ......

Page 109: ...Configuration Protocol DMZ DeMilitarized Zone F FTP File Transfer Protocol H HTTP Hypertext Transfer Protocol I ICMP Internet Control Message Protocol IP Internet Protocol M MAC Media Access Control HUAWEI EGW2100 Web Configuration Guide A Acronyms and Abbreviations Issue 01 2010 02 20 Huawei Proprietary and Confidential Copyright Huawei Technologies Co Ltd A 1 ...

Page 110: ...ication Dial in User Service RIP Routing Information Protocol T TFTP Trivial File Transfer Protocol V VLAN Virtual Local Area Network W WWW World Wide Web A Acronyms and Abbreviations HUAWEI EGW2100 Web Configuration Guide A 2 Huawei Proprietary and Confidential Copyright Huawei Technologies Co Ltd Issue 01 2010 02 20 ...

Reviews: