background image

3


Setting up a Wi-Fi connection 

Step 1: Enabling Wi-Fi on the B310 

When the 

  indicator is steady on, the Wi-Fi function of the B310 is turned on. 

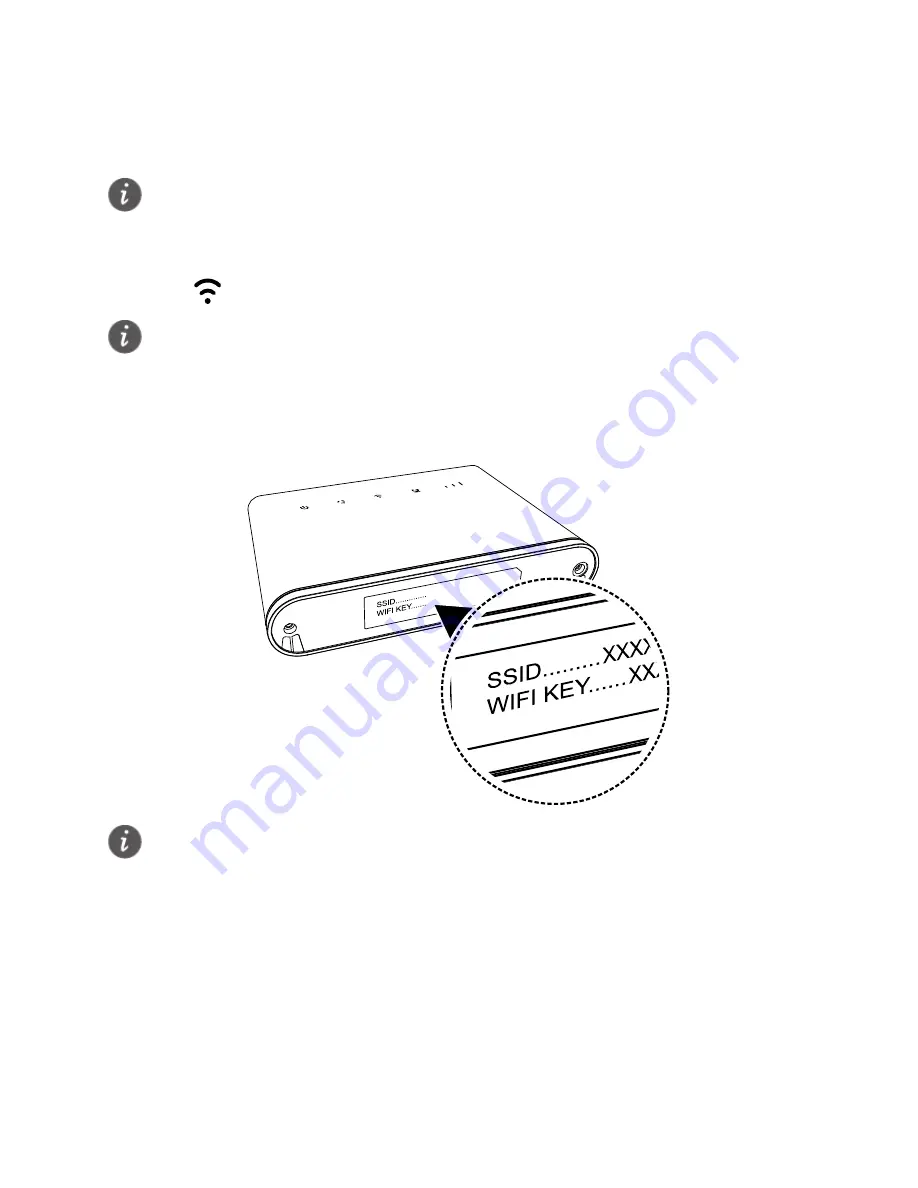
Step 2: Recording the SSID and Wi-Fi key 

The default SSID and Wi-Fi key are printed on the B310's bottom label. 


Step 3: Setting up a Wi-Fi connection on your client 


Method 1: Setting up a Wi-Fi connection manually 

1.


From your Wi-Fi enabled client, scan for wireless networks in your area. 

2.


Connect to the network name that matches the SSID found on the device label. 

3.


When prompted for password, enter the Wi-Fi Key found on the device label. (The 
Wi-Fi key is case sensitive.) Your client will notify you when it is connected. 


Make sure your client (computer, tablet, or smart phone) also supports Wi-Fi. 


For details about how to manually enable or disable the Wi-Fi function, refer to the 
WLAN settings section of the help information on the web management page. 


To prevent unauthorized parties from accessing your Wi-Fi network, it is recommended 
that you change the SSID and Wi-Fi key from time to time. For details, see the help 
information on the web management page. 

Summary of Contents for B310 LTE CPE

Page 1: ...B310 LTE CPE Quick Start ...

Page 2: ...31506955_01 ...

Page 3: ...teady cyan connected to an LTE network Steady blue connected to a 3G network Steady yellow connected to a 2G network Steady green connected to an Ethernet network Steady red The SIM card is not recognized the PIN has not been entered or the PIN verification failed Failed to connect to a mobile network or an Ethernet network ...

Page 4: ...external antenna after remove the cover WPS button Press and hold for 2 or more seconds until is blinking to active WPS connection when Wi Fi is turned on Power button Press and hold for about 3 seconds to power the B310 on or off Reset button Restoring the default settings of the B310 will erase all previous settings When the B310 is powered on use a sharply pointed object to press and hold for a...

Page 5: ...3 Telephone port Connect to a telephone ...

Page 6: ...Slide off the card slot cover 2 Insert the SIM card into the card slot Ensure that the beveled edge of the SIM card aligns with that of the card slot 3 Close the card slot cover Do not remove the SIM card when it is in use Doing so will affect the performance of your B310 and data stored on the SIM card may be lost ...

Page 7: ...e B310 at least 1 meter 3 28 feet away from telephone and other electrical devices The B310 s power adapter model is HW 120100XYW X andY represent letters or numbers that vary by region For details about the specific adapter model contact an authorized dealer Do not connect the B310 to the telephone wall outlet or any Public SwitchedTelephone Network because doing so could damage the B310 due to e...

Page 8: ...ccessory and may not included in the packaging box If required please contact your local dealer to purchase it Before installing the external antenna ensure that the B310 is powered off and disconnected from the power outlet Only use the external antenna indoors and do not use it during thunderstorm Do not change another unexpected antenna unless manufacturer provide To comply with FCC regulations...

Page 9: ... phone To prevent interference caused by radio signals place the B310 at least 1 meter 3 28 feet away from telephone and other electrical devices The B310 s power adapter model is HW 120100XYW X andY represent letters or numbers that vary by region For details about the specific adapter model contact an authorized dealer Do not connect the B310 to the telephone wall outlet or any Public SwitchedTe...

Page 10: ...etwork name that matches the SSID found on the device label 3 When prompted for password enter the Wi Fi Key found on the device label The Wi Fi key is case sensitive Your client will notify you when it is connected Make sure your client computer tablet or smart phone also supportsWi Fi For details about how to manually enable or disable theWi Fi function refer to the WLAN settings section of the ...

Page 11: ... the WPS connection on the client in 2 minutes AirPort On Turn AirPort Off No network selected XXXXXXXX Join Other Network Create Network Open Network Preferences i Settings WLAN XXXXXXXX Other Ask to Join Nerworks CHOOSE A NETWORK WLAN XXXXXXXX WLAN XXXXXXXX Secured with WPA2 Networks WiFi Connect XXXXXXXX Connect automatically Windows 7 iPhone Mac Windows 8 Android For instructions about how to ...

Page 12: ...w the quick setup wizard to check or set network connection parameters step by step For details see the help information on the web management page Once you are done try opening a web page on the client to verify whether you have Internet access To protect your account change the password after your first login For details see the help information on the web management page If you modify the SSID ...

Page 13: ...tore the B310 to its factory settings Contact your service provider Please visit http consumer huawei com en support hotline for recently updated hotline and email address in your country or region Figures in this guide are for your reference only Specific models may vary slightly contact your service provider for more detailed information ...

Page 14: ...do not carry the device in your front pocket Areas with flammables and explosives Do not use the device where flammables or explosives are stored in a gas station oil depot or chemical plant for example Using your device in these environments increases the risk of explosion or fire In addition follow the instructions indicated in text or symbols Do not store or transport the device in containers w...

Page 15: ... exposed to an overheated device for an extended period low temperature burn symptoms such as red spots and darker pigmentation may occur Do not touch the device s antenna Otherwise communication quality may be reduced Do not allow children or pets to bite or suck the device or accessories Doing so may result in damage or explosion Observe local laws and regulations and respect the privacy and leg...

Page 16: ...to short circuits malfunctions or electric shocks If your power adapter has been exposed to water other liquids or excessive moisture take it to an authorized service center for inspection Ensure that the power adapter meets the requirements of Clause 2 5 in IEC60950 1 EN60950 1 UL60950 1 and has been tested and approved according to national or local standards Cleaning and maintenance During stor...

Page 17: ... The device and its accessories if included such as the power adapter headset and battery should not be disposed of with household garbage Disposal of the device and its accessories is subject to local regulations Support proper collection and recycling FCC Regulatory Compliance FCC statement This equipment has been tested and found to comply with the limits for a Class B digital device pursuant t...

Page 18: ...ng two conditions 1 this device may not cause harmful interference and 2 this device must accept any interference received including interference that may cause undesired operation Caution Any changes or modifications to this device not expressly approved by Huawei Technologies Co Ltd for compliance could void the user s authority to operate the equipment ...

Page 19: ...y of their respective owners Notice Some features of the product and its accessories described herein rely on the software installed capacities and settings of local network and therefore may not be activated or may be limited by local network operators or network service providers Thus the descriptions herein may not exactly match the product or its accessories which you purchase Huawei reserves ...

Page 20: ...TOTHE AMOUNT PAID BY CUSTOMERS FORTHE PURCHASE OFTHIS PRODUCT Import and Export Regulations Customers shall comply with all applicable export or import laws and regulations and be responsible to obtain all necessary governmental permits and licenses in order to export re export or import the product mentioned in this manual including the software and technical data therein Privacy Policy To better...

Page 21: ......

Reviews: