Installing a Device
5
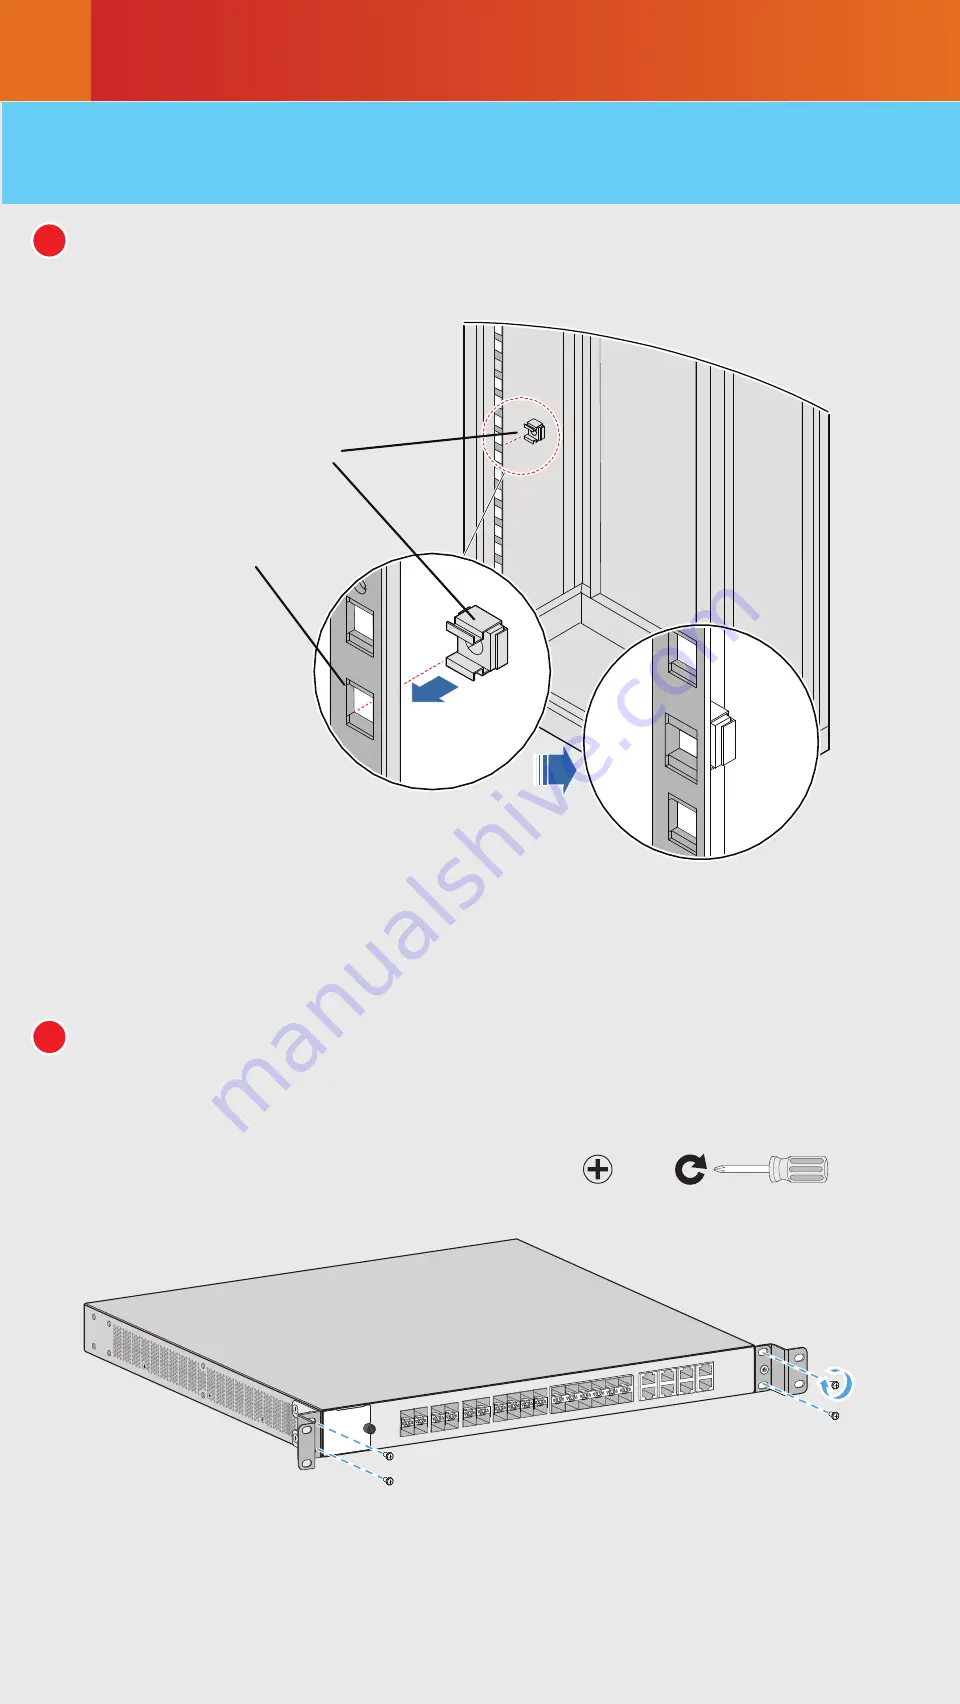
5.2 Installing a Device in an ETSI 21-Inch Cabinet
with Front Columns
1
Install floating nuts onto the cabinet.
2
Install the conversion mounting ears on both sides of the chassis.
Installation hole
Floating nut
M6
Page 1: ... IEC 19 inch ETSI 21 inch Cabinet 1 U Quick Installation Guide This document applies to the installation of the ATN 910C K M G ATN 910D A NetEngine 8000 M1A M1C and OptiX PTN 916 F Issue 01 ...
Page 2: ...in an installation accessory package vary according to the device model Check the delivered items against the actual packing list NOTE DC and AC power modules can be installed in any of the power module slots on the ATN 910C K M and ATN 910D A NOTE Packing list Insulation tape Serial cable Label cable tie Fiber binding tape Panel screw M6x12 Floating nut M6 Signal cable label Cable tie 300 x 3 6 m...
Page 3: ... A ATN 910D A 10 A 48 V 60 V 40 V to 72 V 100 V to 240 V OptiX PTN 916 F NetEngine 8000 M1A ATN 910C G 110 V 220 V NetEngine 8000 M1C ATN 910C K M ATN 910D A 200 V to 240 V 100 V to 127 V dual live wires support 240V HVDC AC Chassis 1 U 44 45 mm x 442 mm x 220 mm 1 75 in x 17 4 in x 8 66 in OptiX PTN 916 F 3 6 kg NetEngine 8000 M1A 4 5 kg NetEngine 8000 M1C 3 9 kg ATN 910C K 4 1 kg ATN 910C M 3 9 ...
Page 4: ...wer is on To ensure equipment and personal safety ground the equipment before powering it on DANGER Use multiple persons to move or lift a chassis and take measures to protect personal safety Laser beams will cause eye damage Do not look into bores of optical modules or opticalfibers without eye protection WARNING During equipment transport and installation prevent the equipment from colliding with...
Page 5: ... such devices must be installed indoors ensure that the electromagnetic environment meets relevant requirements or take necessary electromagnetic shielding measures The device to be installed must be used indoors To ensure normal operation and long service life of the device the following requirements must be met The temperature and humidity in the installation site must meet device requirements d...
Page 6: ... each cabinet door must be greater than 50 meeting heat dissipation requirements of devices 5 The cabinet has installation accessories such as guide rails floating nuts and screws 6 The cabinet has a ground terminal to connect to the device 7 The cabinet has a cable outlet on the top or at the bottom for overhead or underfloor cabling The cabinet may be installed on an ESD floor or a concrete floor Fo...
Page 7: ...lled near the air exhaust vents of those devices Consider the impact of a device s air exhaust vent on adjacent devices to prevent high temperature When fastening floating nuts ensure that there is at least 75 mm space on the left and right sides of the device for ventilation after device installation CAUTION Installation hole Floating nut NOTE Certain steps support two installation modes Select a ...
Page 8: ...Installing a Device 5 M4 PWR2 PWR1 2 Connect the PGND cable to the front or side face of the device Connecting the cable to the side face is preferred ...
Page 9: ...tall the device into the cabinet ATN 910D A CLK TOD ETH OAM ALM ALMO RST STAT CLK TEST ALM 0 1 2 3 4 5 6 7 8 9 10 11 12 13 14 15 16 17 18 19 20 21 22 23 10GE FE 0 7 25GE 10GE GE 8 23 BREAKOUT 0 1 2 3 24 25 100GE 50GE 26 27 PWR2 PWR1 ...
Page 10: ...ice 5 5 2 Installing a Device in an ETSI 21 Inch Cabinet with Front Columns 1 Install floating nuts onto the cabinet 2 Install the conversion mounting ears on both sides of the chassis Installation hole Floating nut M6 ...
Page 11: ...f the device Connecting the cable to the side face is preferred M4 ATN 910D A CLK TOD ETH OAM ALM ALMO RST STAT CLK TEST ALM PWR2 PWR1 0 1 2 3 4 5 6 7 8 9 10 11 12 13 14 15 16 17 18 19 20 21 22 23 10GE FE 0 7 25GE 10GE GE 8 23 BREAKOUT 0 1 2 3 24 25 100GE 50GE 26 27 PWR2 PWR1 ...
Page 12: ...ical fiber DC power cable AC power cable Shielded Ethernet cable 120 ohm 16 x E1 cable 75 ohm 16 x E1 cable M6 ATN 910D A CLK TOD ETH OAM ALM ALMO RST STAT CLK TEST ALM 0 1 2 3 4 5 6 7 8 9 10 11 12 13 14 15 16 17 18 19 20 21 22 23 10GE FE 0 7 25GE 10GE GE 8 23 BREAKOUT 0 1 2 3 24 25 100GE 50GE 26 27 PWR2 PWR1 ...
Page 13: ...ical fibers and Ethernet cables be on the right side of the cabinet If cables are routed on the rear of a device ensure that the cables do not block the air vents of the device to achieve proper heat dissipation Before routing cables make temporary labels and attach them to the cables After the cables are routed make formal labels and attach them to the cables as required Do not bundle or route out...
Page 14: ...N1 NEG2 RTN2 Device Model Maximum Cable Size Recommended Fuse Capacity NetEngine 8000 M1A M1C OptiX PTN 916 F 4 mm ATN 910C G K M ATN 910D A 4 A For hierarchical power supplying protection the current of the circuit breaker at the user side should be no less than 4 A 6 A For hierarchical power supplying protection the current of the circuit breaker at the user side should be no less than 6 A ...
Page 15: ...C G NetEngine 8000 M1C OptiX PTN 916 F ATN 910C K M ATN 910D A 1 5 A For hierarchical power supplying protection the current of the circuit breaker at the user side should be no less than 1 5 A 2 A For hierarchical power supplying protection the current of the circuit breaker at the user side should be no less than 2 A 4 A For hierarchical power supplying protection the current of the circuit brea...
Page 16: ...old excessive optical fibers It is recommended that an open end corrugated pipe with a diameter of 32 mm accommodate a maximum of 60 fibers with a diameter of 2 mm It is recommended that the length of a corrugated pipe inside a cabi net be about 100 mm NOTE Installing Optical Fibers When performing operations such as installing or maintaining optical fibers do not move your eyes close to or look into...
Page 17: ...ing Cables 6 Installing an E1 Cable This step is required only for the ATN 910C K chassis It is recommended that E1 cables and Ethernet cables be routed in interleaving mode NOTE Installing Optical Fibers 1 2 ...
Page 18: ...ties are evenly spaced and face the same direction Before bundling network cables use a network cable tester to test cable connectivity In a 300 mm deep cabinet with a flat door common shielded network cables are not recommended when electrical modules are used Instead use Huawei customized conversion short pigtail shielded network cables NOTE Installing Ethernet Cables ...
Page 19: ...ming a power on check turn off all the switches on the device and external power supply system If indicators are in specified abnormal states after you power on the device handle the abnormalities onsite WARNING Hardware Module Steady green Chassis off Steady green STAT ALM PWR STAT Indicator Working status indicator Alarm indicator Power supply status indicator Name State Power on Check For more i...
Page 20: ... to find its documentation Log in to carrier enterprise support community https forum huawei com carrier and post your questions in the community For enterprise users For carrier usesrs Huawei Carrier Technical Support Huawei Enterprise Technical Support Trademarks and Permissions All other trademarks and trade names mentioned in this document are the property of their respective holders Copyright ...
Page 21: ...r fiber section or fiber splicing surface is dirty optical signals are reflected back and forth on the fiber link causing interference due to co channel noise on the receive side As a result the optical link is unstable or intermittently disconnected To prevent this issue you need to check and clean the optical fiber connectors before installation For details see Installation and maintenance Preparing ...