background image


SCH-200 Imaging Unit Series

│ 

Quick Installation Guide


Page 18 


4.


Login to the configurator with the default username and password:  


Username: 

admin 


Password: 

1234 


5.


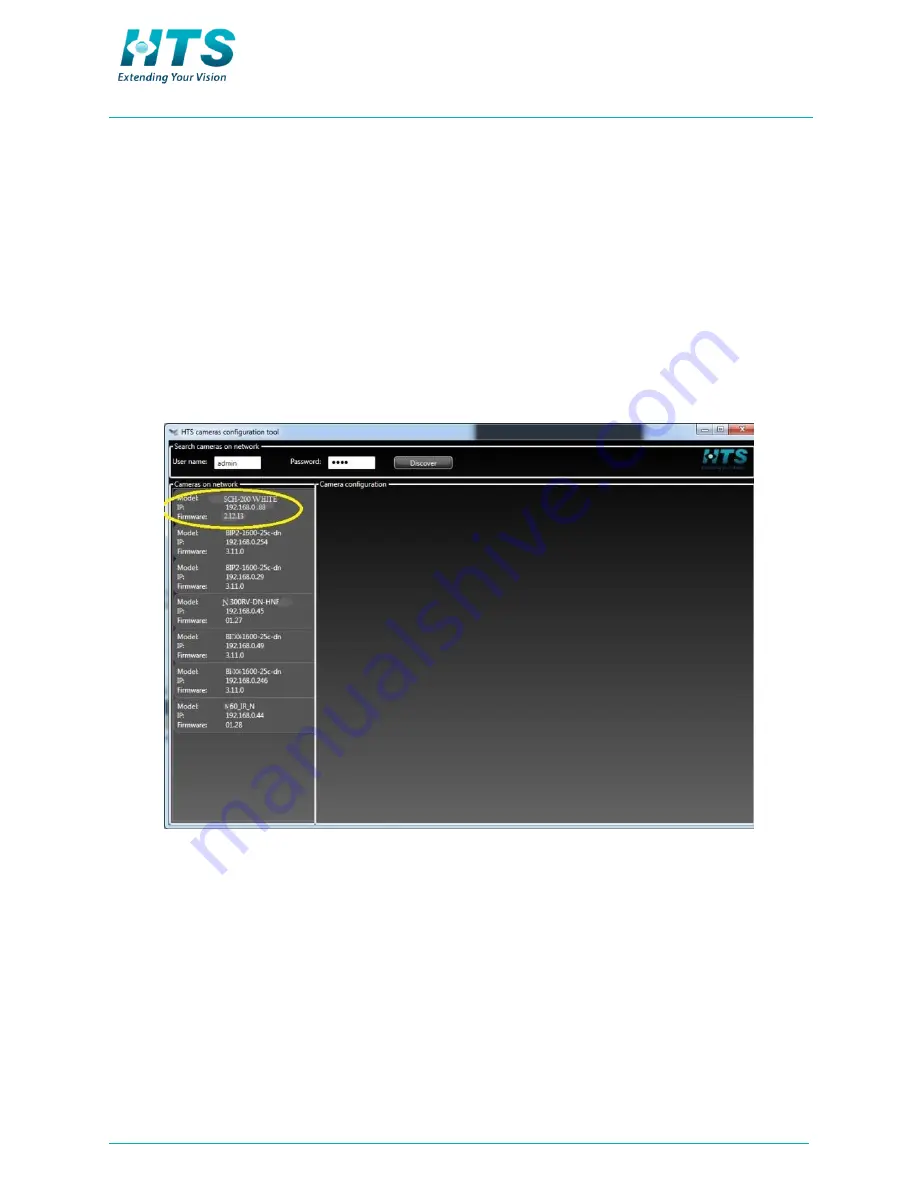
Press the discover button.  The window displays a list of units 
currently in operation on the network, as depicted in Figure 11 
below. 


Figure 11: List of Imaging Units in the Network 

Summary of Contents for VRS SCH-200

Page 1: ...VRS SCH 200 Imaging Unit 2 Megapixel Network Box Camera Series Quick Installation Guide Version 1 0 June 2013 ...

Page 2: ...ON 8 3 1 Unpacking the Unit 8 3 2 Checking for Damage 8 3 3 Wall Mount Bracket 9 3 4 Pole Mount Adaptor 9 CHAPTER 4 INSTALLATION 10 4 1 Installation Tools 10 4 2 Mounting the SCH 200 on a Wall 10 4 3 Mounting the SCH 200 on a Pole 12 4 4 Connecting the External Wiring 13 4 5 Network Topology 15 CHAPTER 5 IP CONFIGURATION 16 5 1 Default IP Address 16 5 2 IP Configurator Utility 16 5 2 1 Running IP ...

Page 3: ... risk of fire or electric shock do not expose the product to rain or moisture Wipe the imaging unit with a dry soft cloth For tough stains apply a small quantity of diluted neutral detergent and wipe dry with a soft cloth Do not apply benzene gasoline or thinner to the imaging unit which may melt the surface of the unit or cause fogging in the lens Avoid aligning the lens to very bright objects fo...

Page 4: ... Waste Electrical and Electronic Equipment Correct disposal of this product applicable in the European Union and other European countries with separate collection systems This product should be disposed of at the end of its useful life as per applicable local laws regulations and procedures ...

Page 5: ...ular installation If this unit does cause harmful interference to radio or television reception which can be determined by turning the unit off and on the user is encouraged to try to correct the interference For example try reorienting or relocating the receiving antenna increasing the separation between the unit and receiver or connecting the unit to an outlet on a different circuit CAUTION Chan...

Page 6: ... interface for transmission of images The Ethernet interface is also used by management software to configure the imaging unit 2 2 Specifications Item Specification Camera Basler BIP2 1600c dn Sensor type 1 1 8 color CCD Shutter type Progressive Scan Active Pixels 1600 H x 1200 V Lens Standard 35 mm Optional 16 25 50 mm Effective Range Standard 5 10 meters Optional 5 20 meters Day Night Removable ...

Page 7: ...gement Electrical 24 VDC 2 amperes Heating Contains heater with thermostat control Illumination Spectrum Infra red 850 nm or white illumination Quantity 4 LEDs Angle 30 45 Intensity 4 levels high medium low off Frequency multiplier Internally VIA PLL card Safety and Certifications Emissions FCC Part 15 Class B CE Class B Product Safety CE EN IEC60950 1 2005 Eye Safety EN60825 1 class 1 LED Product...

Page 8: ...external illumination One Ethernet cable outlet with female to female RJ45 connector One mounting Bracket 3 screws 3 plastic nuts and three 8 mm masonry anchors One hex key Allen wrench One BR 20 pole mount adapter kit Optional NOTE Please contact HTS if any of the items listed is missing 3 2 Checking for Damage When first unpacking please check if there is any visible damage to the unit and its a...

Page 9: ...upplied with the SCH 200 is depicted in Figure 1 below Figure 1 Bracket Drawing and Dimensions 3 4 Pole Mount Adaptor The pole mount bracket is not supplied with the SCH 200 It is optional to order the adaptor for Pole mounting The BR 20 pole adaptor is depicted in Figure 2 below Figure 2 Pole Mount Adaptor ...

Page 10: ...tion Tools The following tools may be necessary to complete the installation Electric drill Screwdrivers Wire cutters Set of hex keys Allen wrenches 4 2 Mounting the SCH 200 on a Wall Mount the imaging unit on a wall or ceiling using the bracket as illustrated in Figure 3 below Figure 3 Wall Mount ...

Page 11: ...surface s material different screws and anchors than those supplied may be required HAZARD The imaging unit is heavy and could cause damage or personal injury if it falls To prevent the imaging unit from falling ensure that it is mounted firmly to a wall or a pole Make sure that a safety wire connects the housing and the cover to prevent damage or injury if the event that the unit detaches from th...

Page 12: ...ket base of SCH 200 to the pole adapter board Use the three screws and nuts provided in the BR 20 pole adapter kit See Figure 5 for guidance in positioning the screws Figure 5 Screw Locations in the Pole Adapter 3 Mount SCH 200 on the pole as described in the N Series Imaging Unit Quick Installation Guide 4 Adjust the imaging unit and secure the screws as shown previously in Figure 4 Use the two s...

Page 13: ...with your local electrical safety rules The SCH 200 Imaging Unit is supplied with two 1 meter long cables CAT 6 Ethernet cable with RJ 45 female to female connector Cable containing 2 shielded pairs Red black 24 VDC 2 amp power feeder Green white sends synchronization pulses to an external illumination source Figure 6 Connecting the External Wires ...

Page 14: ...d connect the synchronization pair green white to the external illumination source 3 Connect RJ 45 male connector of the imaging unit to the Lane Controller by using of female to female RJ 45 network interface connector NOTE Network connectivity topology is defined in the next paragraph WARNING To avoid damage to the unit connect it only to a 24VDC 30W power supply ...

Page 15: ...t and your Intranet Using its Ethernet RJ 45 network interface it connects to a Lane Controller LC 2000 or similar To connect the network wiring Connect up to 3 imaging units to a single Lane Controller either directly connected see Figure 7 or using a switch see Figure 8 Figure 7 Network Topology Direct Connectivity Figure 8 Network Topology Using a Switch ...

Page 16: ...ogram that helps users to locate the imaging unit in local area network 5 2 1 Running IP Configurator from the Lane Controller The IP configurator utility comes installed on the LC 1000 or LC 2000 Lane Controllers Double click on the IP Configurator icon see Figure 9 to run the utility Figure 9 IP Configurator Icon 5 2 2 Running IP Configurator on the Internet The IP Configurator utility is availa...

Page 17: ...ging Unit and your Lane Controller are in the same subnet 2 Connect the SCH 200 s Ethernet connector directly to the Lane Controller or via a switch 3 Run the IP configurator as described in Section 5 2 The Login Window appears as shown in Figure 10 below Figure 10 Login Window NOTE Connect only one unit at a time to finalize the IP ...

Page 18: ...n to the configurator with the default username and password Username admin Password 1234 5 Press the discover button The window displays a list of units currently in operation on the network as depicted in Figure 11 below Figure 11 List of Imaging Units in the Network ...

Page 19: ...ow Figure 12 Configuring a New IP Address 7 Enter the new IP address in the field designated in Figure 12 above Click Save to activate the settings 8 Wait a few seconds while the imaging unit reboots with the new IP address and exit the utility NOTE In order to recall the imaging unit s IP address when necessary stick a label with the IP address on the imaging unit END OF DOCUMENT ...

Reviews: