HTC PHAR160 Quick Start Manual Download Page 39

Quick Start Guide  39    

27.  Resetting Your Device

If you experience some sluggishness with your device, you can 

perform a reset to shut down all programs and restart your 

device. 

To perform a soft reset
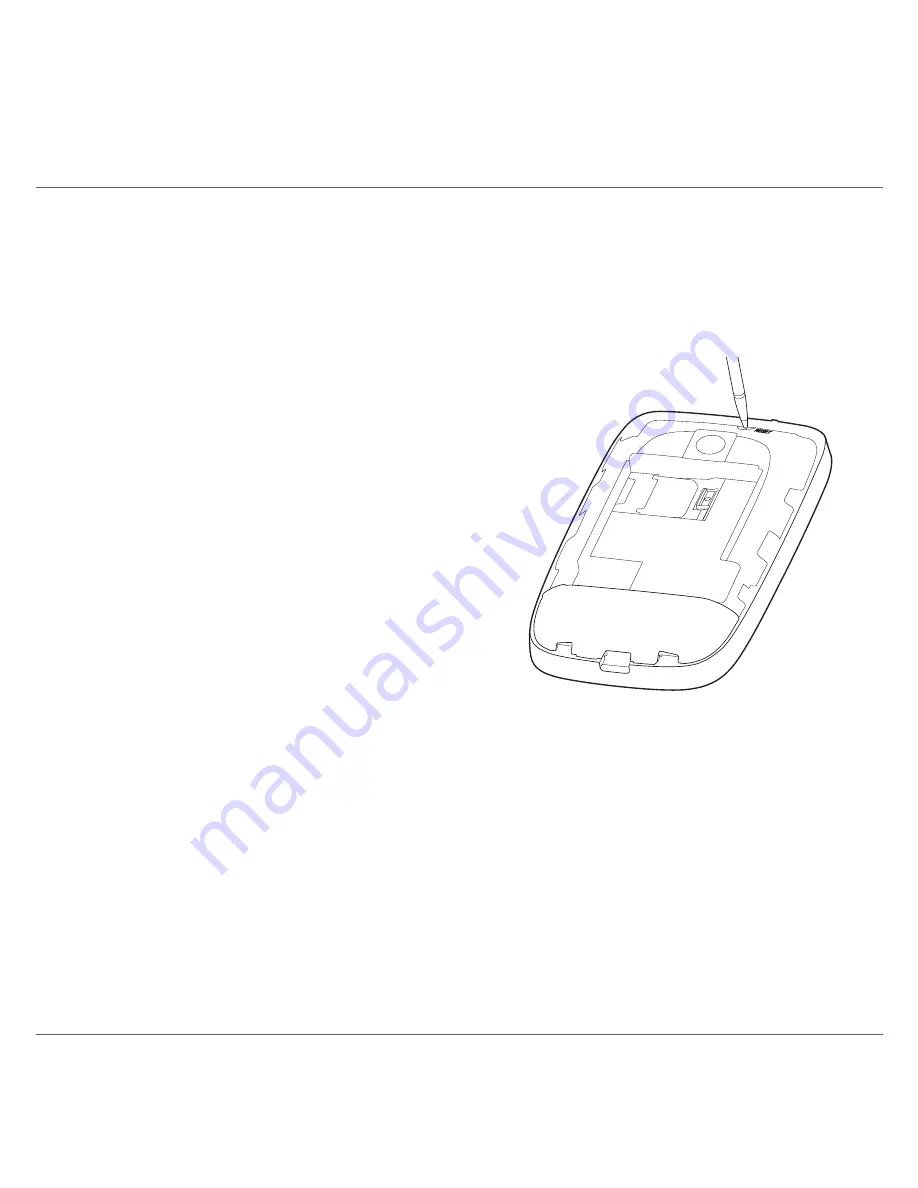
1. 

Pull out the stylus. 

2. 

Remove the back cover.

3. 

Use the stylus tip to press 

the red RESET button 

located at the top, back of 

the device.

You can also perform a hard reset. After a hard reset, the device is 

restored to its default settings—the way it was when you first 

purchased it and turned it on. Only Windows Mobile® software 

and other pre-installed programs will remain.

To learn how to perform a hard reset, please refer to Chapter 12 of 

the User Manual PDF.  

Summary of Contents for PHAR160

Page 1: ...Quick Start Guide...

Page 2: ...OM HTC TO THE MAXIMUM EXTENT PERMITTED BY APPLICABLE LAW HTC AND ITS AFFILIATES expressly disclaim any and all representations and warranties express or implied arising by law or otherwise regarding t...

Page 3: ...INACCURACIES AND YOU WILL USE COMMON SENSE AND FOLLOW STANDARD SAFETY PRECAUTIONS IN CONNECTION WITH THE USE OF THE WEATHER INFORMATION DATA OR DOCUMENTATION Limitation of Damages TO THE MAXIMUM EXTE...

Page 4: ...y 8 5 Charging the Battery 10 6 Starting Up 10 7 The Home Screen 13 8 TouchFLO 14 9 Making Your First Call 15 10 Entering Information 16 11 Adding Contacts to Your Device 17 12 Sending a Text Message...

Page 5: ...of Things to Do 29 21 Taking Photos and Shooting Videos 30 22 Viewing Photos and Videos 32 23 Synchronizing Your Device with Your PC 34 24 Copying Files to Your Device 36 25 Synchronizing Music Files...

Page 6: ...rough the features we feel that you want to know or use right away when you turn on your device for the first time For a more complete guide in using your device please refer to the User Manual PDF th...

Page 7: ...tting to Know the Touch Phone Earpiece Touch Screen END NAVIGATION CONTROL ENTER TALK SEND Speaker Strap Holder Back Cover 2 Megapixel Camera POWER Sync Connector Earphone Jack Microphone Stylus VOLUM...

Page 8: ...remove the back cover Hold the device with both hands and the front panel facing down Push the back cover down with your thumb until it disengages from the device and then slide it out to remove 1 2 T...

Page 9: ...side the battery compartment Insert the contact s side of the battery first and then gently push the battery into place Replace the back cover 1 2 3 You can also install a microSD card not included in...

Page 10: ...ttery The battery is fully charged after about 3 hours of charging 6 Starting Up After installing your SIM card and battery and charging the battery you can now power on and start using your device To...

Page 11: ...settings After the device restarts you will be asked if you want to automatically configure your device s data connections By letting the device configure the data connection settings you do not need...

Page 12: ...the screen tap Yes Connection Setup then starts to configure your device s data connection settings After the Connection Setup completes the configuration tap Restart 1 2 Note For step 1 if your SIM c...

Page 13: ...ts from configuring your data connections you are taken to the Home screen The default home screen of the device is the TouchFLO Home screen which allows finger touch access to the most important func...

Page 14: ...most widely used functions such as People Messages Mail Music Internet and more Allows you to use finger gestures to navigate screens Scroll through the tabs on the Home screen by touching the active...

Page 15: ...ypad to enter the phone number Tip If you tapped a wrong number tap to erase each subsequent digit of a number To erase the entire number tap and hold 3 Press the TALK SEND button to place the call Ti...

Page 16: ...ll QWERTY Compact QWERTY Phone Keypad To enter characters simply tap on the keys on the keyboard Depending on the keyboard layout selected you may need to tap the same key more than once to get to the...

Page 17: ...lide to the People tab and then tap All People Tap New Outlook Contact Enter the contact information and then tap OK To copy SIM card contacts to your device Copying the contacts on your SIM card to t...

Page 18: ...a contact from your Contacts list 3 Compose your message and then tap Send 13 Sending an MMS Message Create and send multimedia messages from your device On the Home screen slide to the Messages tab...

Page 19: ...screen slide to the Settings tab 2 On the Settings screen tap Communications Wi Fi to turn on Wi Fi 3 The network names of the detected wireless networks are displayed on a pop up message window Tap t...

Page 20: ...ail Address and Password of your personal e mail account and select the Save password checkbox Tap Next 3 After the device finds the settings for the e mail account tap Next Settings for the e mail ac...

Page 21: ...messages on the server in Automatic Send Receive and then tap Finish 6 Choose whether or not to download messages from the e mail account To send e mail using the Internet e mail account On the Mail t...

Page 22: ...the web with Opera Mobile 1 On the Home screen slide to the Internet tab and then tap Browser 2 On the Opera Mobile screen tap the address bar 3 Enter the URL address and tap Watch YouTube videos Watc...

Page 23: ...t Settings Personal tab Sounds Notifications Notifications tab In Event select Phone Incoming call Select the Ring type and Ring tone you want to use and then tap OK To set an alarm On the Home screen...

Page 24: ...idle for a set period of time On the Home screen slide to the Settings tab and then tap All Settings On the Personal tab tap Lock Select the Prompt if device unused for check box and then choose the...

Page 25: ...one is used check box Enter the PIN number and then tap OK To change battery and backlight settings Conserve battery power by adjusting the battery and backlight settings On the Home screen slide to t...

Page 26: ...ther Bluetooth devices within range Tap the device name in the box then tap Next Specify a passcode to establish a secure connection The passcode can be 1 up to 16 characters Tap Next Wait for the pai...

Page 27: ...ide to the Settings tab and then tap Menu Bluetooth Devices Devices tab Add new device Tap the name of the Bluetooth headset then tap Next The device will automatically pair with the Bluetooth headset...

Page 28: ...s To enter an appointment into your device 1 On the Home screen Home tab tap Calendar 2 On the Calendar screen tap Menu New Appointment 3 Use the onscreen keyboard to enter the appointment details 4 A...

Page 29: ...a to do list Tap Start Programs Tasks On the Tasks screen tap Tap here to add a new task and then enter the task name Tap the ENTER button on the onscreen keyboard Tip You can also tap outside the fi...

Page 30: ...take photos and shoot videos To take a photo On the Home screen slide to the Photos and Videos tab and then tap the camera icon The screen orientation automatically switches to landscape mode when yo...

Page 31: ...orientation automatically switches to landscape mode when you open the Camera program Aim the device at the subject Press the ENTER button to start capturing video Press ENTER again to stop recording...

Page 32: ...3GP MP4 and WMV formats To view photos 1 On the Home screen slide to the Photos and Videos tab and tap Album 2 Tap an image to view it in full screen mode 3 Use finger gestures to go to the next previ...

Page 33: ...video Tap the screen to show the playback controls 1 On the Home screen slide to the Photos and Videos tab and tap Album 2 Tap the video you want to playback For more information about Album refer to...

Page 34: ...Sync 4 5 or later or Windows Mobile Device Center to synchronize your device with your PC To synchronize your device with a Windows XP PC Install ActiveSync 4 5 on your PC from the Getting Started Dis...

Page 35: ...e with a Windows Vista PC Connect your device to your PC using the supplied USB cable Windows Mobile Device Center will open On the screen click Set up your device Select the information you want to s...

Page 36: ...in Windows Mobile Device Center or click Explore in ActiveSync on your PC This opens Windows Explorer on your PC and displays the contents of your device Browse the folders on your PC right click the...

Page 37: ...mputer 2 On the Device Setup dialog box enter a name for your device and click Finish 3 On the left panel of Windows Media Player right click the name of your device and click Set Up Sync Note You can...

Page 38: ...e Music tab on the Home screen to play back music on your device To listen to music 1 On the Home screen slide to the Music tab 2 Select the song you want to play back by swiping up or down on the scr...

Page 39: ...e the back cover 3 Use the stylus tip to press the red RESET button located at the top back of the device You can also perform a hard reset After a hard reset the device is restored to its default set...

Page 40: ...ONS FOR PROPER GROUNDING INSTALLATION CAUTION Connecting to an improperly grounded equipment can result in an electric shock to your device This product is equipped with a USB Cable for connecting wit...

Page 41: ...of explosion if battery is incorrectly replaced To reduce risk of fire or burns do not disassemble crush puncture short external contacts expose to temperature above 60 C 140 F or dispose of in fire...

Page 42: ...fire as there is a danger of ignition or explosion SAFETY PRECAUTIONS FOR DIRECT SUNLIGHT Keep this product away from excessive moisture and extreme temperatures Do not leave the product or its batte...

Page 43: ...l storehouses below deck on boats chemical plants fuel or chemical transfer or storage facilities and areas where the air contains chemicals or particles such as grain dust or metal powders Please be...

Page 44: ...and radio Use only original manufacturer approved accessories or accessories that do not contain any metal Use of non original manufacturer approved accessories may violate your local RF exposure gui...

Page 45: ...human body be allowed to come too close to the antenna during operation of the equipment Use only the supplied integral antenna Use of unauthorized or modified antennas may impair call quality and dam...

Page 46: ...vice in a protective case and only use the device stylus or your finger when interacting with the touch screen Cracked display screens due to improper handling are not covered by the warranty Device g...

Page 47: ...rized service technician or provider under the following conditions Liquid has been spilled or an object has fallen onto the product The product has been exposed to rain or water The product has been...

Page 48: ...to room temperature before turning on power Avoid pushing objects into product Never push objects of any kind into cabinet slots or other openings in the product Slots and openings are provided for ve...

Page 49: ...se only the accessories listed below with your OPAL100 The Battery Pack has been assigned a model number of PHAR160 Note This product is intended for use with a certified Class 2 Limited Power Source...

Page 50: ...e hearing aids In the event of such interference you may want to consult your service provider or call the customer service line to discuss alternatives Other Medical Devices If you use any other pers...

Page 51: ...ped with your other household waste You are liable to dispose of all your electronic or electrical waste equipment by relocating over to the specified collection point for recycling of such hazardous...

Page 52: ...product is in compliance with Directive 2002 95 EC of the European Parliament and of the Council of 27 January 2003 on the restriction of the use of certain hazardous substances in electrical and ele...

Reviews: