en
►TIMER AUTOMATIC STOP: When the
device is in use, press the button and set
the number of hours (1-24), after the expiry
of which, the device will stop operating.
►WATER SUPPLY: Use clean and fresh
water only. Pour water through an inlet
located on the right side of the device
(maximum 60 l). Optionally, in order to fill
the vessel, it is possible to connect the
hose with water to the inlet located on the
left side of the device. If high pressure
is present in the water source, use a
reducing valve.
►
►
4.4. SWITCHING OFF:
►4.4.1.
Press the ON/OFF button to switch
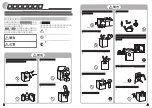
off the appliance (Fig. 9).
►4.4.2.
Empty the tank using the drain cap
(Fig. 11-12-13).
►►5. CLEANING AND
MAINTENANCE
WARNING: BEFORE PERFORMING
ANY MAINTENANCE OR REPAIR,
DISCONNECT THE POWER CABLE
FROM THE MAINS.
DEPENDING ON THE ENVIRONMENT
WHERE THE APPLIANCE IS USED,
DUST, DIRT OR WATER QUALITY CAN
AFFECT THE PERFORMANCE OF THE
UNIT. THEREFORE, CLEANING THE
FOLLOWING COMPONENTS CAN BE
NECESSARY:
►►5.1. TANK:
We recommend changing the water
frequently.
►5.1.1.
Switch off the appliance and
disconnect the plug from the mains (Fig.
9-6).
►5.1.2.
Remove the drain plug and empty
the vessel, then wash it, using a soft
cloth. Wash away the dirt from the water
sensor, water pump and float valve. Rinse
everything.
►5.1.3.
In order to clean the housing, use
delicate soap and a soft cloth. Do not
use any caustic detergents, which may
damage the air conditioner housing.
►5.1.4.
In order to prevent the accumulation
of algae and other biological organisms in
the vessel, add chlorine or bromine tablets
or other tablets recommended by the
manufacturer regularly, intended for the
vessels of evaporation air conditioners.
►►5.2. FILTERS FOR MODEL BC 60:
We
recommend
cleaning
filters
frequently.
WARNING: Dirty filters can affect the
performance of the appliance.
►5.2.1.
Switch off the appliance and
disconnect the plug from the mains (Fig.
9-6).
►5.2.2.
Remove the filters upwards (Fig.
14).
►5.2.3.
Clean the filters using a mild
detergent and a clean cloth (Fig. 15).
Ensure the filter is fully dry.
►5.2.4.
Place the filter back into its housing
(Fig. 16).
Figures and texts of this book are protected by COPYRIGHT.


