


VDPL300D
HQPOWER™
3
•
All modifications of the device are forbidden for safety reasons.
•
Only use the device for its intended purpose. All other uses may lead to short circuits, burns,
electroshocks, crash, etc. Using the device in an unauthorised way will void the warranty.
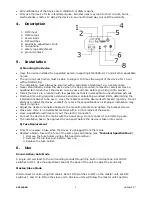
4. Description
1.
DMX input
2.
DMX output
3.
power input
4.
DIP switches
5.
sensitivity adjustment knob
6.
microphone
7.
safety rope attachment
8.
ground contact
5. Installation
a) Mounting the Device
•
Have the device installed by a qualified person, respecting EN 60598-2-17 and all other applicable
norms.
•
The carrying construction must be able to support 10 times the weight of the device for 1 hour
without deforming.
•
The installation must always be secured with a secondary attachment e.g. a safety cable.
•
Never stand directly below the device when it is being mounted, removed or serviced. Have a
qualified technician check the device once a year and once before you bring it into service.
•
Install the device in a location with few passers-by that is inaccessible to unauthorised persons.
•
Overhead mounting requires extensive experience: calculating workload limits, determining the
installation material to be used… Have the material and the device itself checked regularly. Do not
attempt to install the device yourself if you lack these qualifications as improper installation may
result in injuries.
•
Adjust the desired inclination angle via the mounting bracket and tighten the bracket screws.
•
Make sure there is no flammable material within a 0.5m radius of the device.
•
Have a qualified electrician carry out the electric connection.
•
Connect the device to the mains with the power plug. Do not connect it to a dimming pack.
•
The installation has to be approved by an expert before the device is taken into service.
b) Fuse Replacement
•
Only fit or replace a fuse when the device is unplugged from the mains.
•
Replace a blown fuse with a fuse of the same type and rating (see “
Technical Specifications
”):
1. Remove the fuse holder using a flat-head screwdriver.
2. Remove the old fuse and install a new one.
3. Replace the fuse holder.
6. Use
Sound-Active/Auto Mode
A single unit will react to the surrounding sounds through the built-in microphone. Set all DIP
switches to OFF. Use the adjustment knob at the back of the unit to adjust the sensitivity.
Master/Slave Mode
Interconnect all units using XLR cables. Set all DIP switches to OFF on the master unit, set DIP
switches 1 and 10 to ON on the slave units. All slave units will follow the master unit’s pattern.