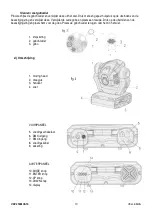
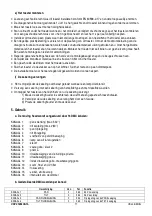
HQ Power VDP250MHS16 Manual Download Page 5

VDP250MHS16 

VELLEMAN 


127 

No function 

128 

139 

Lamp on after 3 sec, reset 

140 

229 

No function 

230 

239 

Lamp off after 3 sec. 

CHANNEL 6 

LAMP ON / OFF AND RESET 

240 

255 

No function 

15 

White 

16 

31 

Red 

32 

47 

Yellow 

48 

63 

Magenta 

64 

79 

Green  

80 

95 

Orange 

96 

111 

Blue 

112 

127 

Pink 

CHANNEL 7 

COLOUR 1 

128 

255 

Forwards rainbow effect from slow to fast 

36 

White 

37 

73 

Static gobo 1 

74 

110 

Static gobo 2 

111 

147 

Static gobo 3 

148 

184 

Light orange 

185 

221 

Pale purple 

CHANNEL 8 

STATIC GOBO/COLOUR 2 

222 

255 

Light blue 

127 

No Function 

CHANNEL 9 

PRISM 

128 

255 

3-facet prism 

No rotation 

127 

Forward rotation from slow to fast 

128 

132 

No rotation 

CHANNEL 10 

3-FACET PRISM ROTATION 

133 

255 

Backwards rotation from slow to fast  

31 

Open 

32 

63 

Rotating gobo 1 

64 

95 

Rotating gobo 2 

96 

127 

Rotating gobo 3 

128 

159 

Rotating gobo 4 

160 

223 

Rotating gobo 5 

CHANNEL 11 

ROTATING GOBOS 

224 

255 

Continuous rotation from slow / fast 

60 

Gobo index ( 0-540°) 

61 

158 

Forwards gobo rotation from slow / fast 

CHANNEL 12 

ROT. GOBO INDEX, ROT.GOBO 

ROTATION 

159 

255 

Backwards rotation from slow / fast 

31 

Zoom 15° 

32 

47 

Zoom 18° 

48 

63 

Zoom 21° 

64 

79 

Zoom 24° 

80 

95 

Zoom 26° 

96 

111 

Frost 

112 

127 

UV Filter 

128 

159 

Zoom 15° 

160 

175 

Zoom 18° 

176 

191 

Zoom 21° 

192 

207 

Zoom 24° 

208 

223 

Zoom 26° 

224 

239 

Frost 

CHANNEL 13 

ZOOM, FROST, UV FILTER 

240 

255 

UV Filter 

CHANNEL 14 

FOCUS 

255 

Far  /  close distance 

31 

Shutter closed 

32 

63 

Shutter open 

64 

95 

Strobe effect from slow to fast 

96 

127 

Shutter open 

128 

159 

Pulse effect in sequence from slow to fast 

160 

191 

Shutter open 

192 

223 

Random strobe from slow to fast 

CHANNEL 15 

SHUTTER , STROBE 

224 

255 

Shutter open 

CHANNEL 16 

DIMMER 

100 

Black  /  Brightness 

Summary of Contents for VDP250MHS16

Page 1: ...as been exposed to changes in temperature Protect the device against damage by leaving it switched off until it has reached room temperature This device falls under protection class I It is therefore...

Page 2: ...s tight Close the top cover of the head and tighten the 3 screws b Lamp adjustment The lamp holder is aligned at the factory Due to difference between lamps fine adjustment may improve light performan...

Page 3: ...sert the new gobo Press the ends of the fixation ring together and insert it in the front of the gobo Put the gobo holder back under the pressing snap and push it to the 3 fixative notches 1 pressing...

Page 4: ...nnect the device to the mains with the power plug Do not connect it to a dimming pack The installation has to be approved by an expert before the device is taken into service f Replacing the fuse If t...

Page 5: ...Open 32 63 Rotating gobo 1 64 95 Rotating gobo 2 96 127 Rotating gobo 3 128 159 Rotating gobo 4 160 223 Rotating gobo 5 CHANNEL 11 ROTATING GOBOS 224 255 Continuous rotation from slow fast 0 60 Gobo i...

Page 6: ...imply an XLR plug with a 120 resistor between pins 2 and 3 which is then plugged into the XLR output socket of the last device in the chain Please see illustrations to the left e Projector DMX start a...

Page 7: ...oles in mounting supports do not change the location of the connections 3 Mechanically moving parts must not show any signs of wear and tear 4 The electric power supply cables must not show any damage...

Page 8: ...houden door een geschoolde technicus Om beschadiging te vermijden zet u het toestel best niet aan onmiddellijk nadat het werd blootgesteld aan temperatuurschommelingen Wacht tot het toestel op kamerte...

Page 9: ...chroeven aan te spannen Sluit de dekplaat af en span de 3 schroeven aan b De lamp regelen Draai elke schroef een kwartdraai met of tegen de wijzers van de klok Kunt u de straal moeilijk centreren rege...

Page 10: ...oude gobo en plaats een nieuwe Druk op de uiteinden van de bevestigingsring en plaats hem voor de gobo Plaats de gobohouder terug en duw hem in het wiel 1 knipsluiting 2 gobohouder 3 gobo d Omschrijvi...

Page 11: ...ten Sluit het toestel via de stekker aan op het lichtnet Sluit het niet aan op een dimmerpack De installatie moet voor het eerste gebruik gekeurd worden door een expert f De zekering vervangen Het is...

Page 12: ...aibeweging van traag naar snel 0 31 Open 32 63 Draaiende gobo 1 64 95 Draaiende gobo 2 96 127 Draaiende gobo 3 128 159 Draaiende gobo 4 160 223 Draaiende gobo 5 KANAAL 11 DRAAIENDE GOBOS 224 255 Doorl...

Page 13: ...stand van 120 van pin 2 naar 3 Deze XLR plug wordt dan aangesloten op de XLR uitgang van het laatste toestel in de reeks Zie de illustraties links e Startadres van de projector kiezen Alle DMX gestuur...

Page 14: ...h bewegende delen mogen geen sporen van slijtage vertonen en mogen niet onregelmatig bewegen 4 De voedingskabels mogen niet beschadigd zijn Laat het toestel onderhouden door een geschoolde technicus 5...

Page 15: ...icien qualifi Pour viter d endommager l appareil ne l allumez pas tout de suite apr s un changement de temp rature Patientez et faites chambrer l appareil Cet appareil est sujet la classe de protectio...

Page 16: ...rmez la plaquette et resserrez les 3 vis b R glage de la lampe Tournez chaque vis un quart de tour dans ou contre le sens des aiguilles d une montre S il s av re difficile de centrer le faisceau r gle...

Page 17: ...r un nouveau Pressez sur les extr mit s de l anneau de fixation et placez le sur le gobo Replacez le porte gobo en le poussant dans la roue 1 verrouillage 2 porte gobo 3 gobo d Description 1 projecteu...

Page 18: ...la connexion lectrique Branchez l appareil sur le r seau lectrique par la fiche d alimentation Ne le branchez pas sur un bloc de puissance Un expert doit approuver l installation avant qu elle puisse...

Page 19: ...ide 0 31 Ouvert 32 63 Gobo rotatif 1 64 95 Gobo rotatif 2 96 127 Gobo rotatif 3 128 159 Gobo rotatif 4 160 223 Gobo rotatif 5 CANAL 11 GOBOS ROTATIFS 224 255 Mouvement rotatif continu de lent rapide 0...

Page 20: ...gnal de contr le num rique par le bruit lectrique Cette fiche XLR est connect e la sortie XLR du dernier appareil de la s rie e D terminer l adresse de d part du projecteur Avec des signaux DMX chaque...

Page 21: ...rous additionnels dans un support ne pas d placer les connexions etc 3 Les parties m caniques mobiles ne peuvent pas tre us es ou bouger de mani re irr guli re 4 Les c bles d alimentation ne peuvent p...

Page 22: ...resultantes La instalaci n y el mantenimiento deben ser realizados por personal especializado No conecte el aparato si ha estado expuesto a grandes cambios de temperatura Espere hasta que el aparato l...

Page 23: ...lo A de la parte trasera del proyector v ase abajo fig 1 Ajustar la l mpara Vuelva a cerrar la placa de recubrimiento al apretar los 2 tornillos Cierre la placa y apriete los 3 tornillos b Ajustar la...

Page 24: ...portagobos 3 gobo d Descripci n 1 moving head 2 yugo 3 empu adura 4 base PANEL FRONTAL 5 interruptor de alimentaci n 6 salida DMX 7 entrada DMX 8 cable de alimentaci n 9 fusible PANEL TRASERO 10 bot...

Page 25: ...ible por un fusible del mismo tipo y con los mismos valores Desconecte el aparato de la red antes de reemplazar el fusible 1 Desatornille el portafusibles de la parte trasera de la base con un destorn...

Page 26: ...0 60 ndice gobo 0 540 61 158 Movimiento giratorio del gobo hacia adelante de lento a r pido CANAL 12 NDICE GOBO GIRATORIO MOVIMIENTO GIRATORIO GOBO 159 255 Movimiento giratorio hacia atr s de lento a...

Page 27: ...digital es el primer canal en el cual el aparato reaccionar a las se ales DMX del controlador DMX Determine esta direcci n con los interruptores DIP Es posible elegir entre una sola direcci n inicial...

Page 28: ...ci n Contacte con un t cnico especializado para instalar el aparato 5 Desconecte el aparato de toda fuente antes de limpiarlo 6 Limpie el aparato regularmente con un pa o h medo Evite el uso de alcoho...

Page 29: ...etriebs nicht denn das Geh use heizt auf Keinem Regen oder keiner Feuchte aussetzen Trennen Sie das Ger t vom Netz bevor Sie das Geh use ffnen Bei Sch den die durch Nichtbeachtung der Bedienungsanleit...

Page 30: ...des Effektstrahlers ffnen Drehen Sie die 3 Schrauben der Abdeckplatte der Lampe los ffnen Sie die schmale Abdeckplatte indem Sie die 2 Schrauben l sen Entfernen Sie die alte Lampe und legen Sie eine n...

Page 31: ...das Gobo 1 Befestigungsring 2 Gobo 3 Rad Farben festes Goborad Falten Sie den Gobohalter vorsichtig und entfernen Sie diesen aus dem Rad Dr cken Sie mit einem geeigneten Werkzeug auf die Enden des Bef...

Page 32: ...einem Abstand von 0 5m Der elektrische Anschluss darf nur von einer Fachkraft durchgef hrt werden Schlie en Sie das Ger t ber den Stecker an das Netz an Lichteffekte sollten im Allgemeinen nicht ber...

Page 33: ...ichtorange 185 221 Fahler Purpur KANAL 8 FESTES GOBO FARBE 2 222 255 hellblau 0 127 Keine Funktion KANAL 9 PRISMA 128 255 3 seitiges Prisma 0 4 Keine Drehbewegung 5 127 Drehbewegung vorw rts langsam s...

Page 34: ...miteinander zu verbinden Besetzung vom XLR Anschluss Die Controller Linie von 3 Pin nach 5 Pin anzupassen Stecker und Kontakt d DMX 512 Kette mit Terminierung Es empfiehlt sich eine DMX Terminierung...

Page 35: ...arbe linear oder schrittweise YES linear OFF DMX 512 Modus PR Automatisch RUN in Betrieb SLAE Slave Modus ON Lampe ein LAMP Lampenschalter OFF Lampe aus VEr Software Version HEAT Lampe hei LA Er Lampe...

Page 36: ...250W MSD Lampe Bestell Nr LAMP250MSD 2SYL Sylvania mitgeliefert LAMP250MSD Philips nicht mitgeliefert LAMP250MSD 2 preiswert mitgeliefert eine preiswerte Lampe wird f r Testzwecke mitgeliefert DMX Kan...

Reviews: