


VDP250MH6/2_v2
HQPOWER
5
•
Connect the device to the mains with the power plug. Do not connect it to a dimming pack.
•
The installation has to be approved by an expert before the device is taken into service.
5. Use
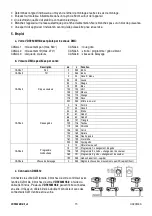
a. The moving head is controlled by 6 DMX channels:
CHANNEL 1 : pan movement (max. 540°)
CHANNEL 2 : tilt movement (max. 270°)
CHANNEL 3 : colour wheel
CHANNEL 4 : gobo wheel
CHANNEL 5 : program, shaking gobo
CHANNEL 6 : scan speed
HINT: to make a strobe effect: select the open gobo on channel 4 and use program 1 on channel 5.
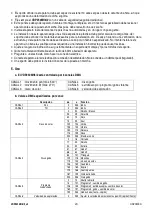
b. Detailed DMX values per channel:
Description
From
To Function
CHANNEL 1
Pan
0
255 8 bit
CHANNEL 2
Tilt
0
255 8 bit
0
24 Open / white
25
49 Red
50
74 Yellow
75
99 Blue
100
124 Green
125
149 Mauve
150
174 Orange
175
199 Pink
CHANNEL 3
Colour wheel
200
255 Rainbow effect
0
16 Closed
17
33 Open
34
50 Star
51
67 Gobo 1
68
84 Gobo 2
85
101 Triangle
102
118 Spots
119
135 Dotted line
136
152 Square
153
169 Spiral
170
186 Four Dots
187
199 Star sky
CHANNEL 4
Gobo wheel
200
255 Gobo cycle
0
15 Shutter open
16
91 Program 1: gobo change
92
135 Program 2: colour change strobe
136
195 Program 3: gobo and colour change
CHANNEL 5
Program
Shaking gobo
196
255 Gobo shake (slow
→
fast)
CHANNEL 6
Scan Speed
0
255 Set pan/tilt scanning speed (fast
→
slow)
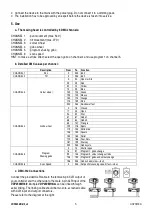
c. DMX-512 Connections
Connect the provided XLR cable to the female 3-pin XLR output of
your controller and the other side to the male 3-pin XLR input of the
VDP250MH6/2
. Multiple
VDP250MH6/2
s can be linked through
serial linking. The linking cable should be two core, screened cable
with XLR input and output connectors.
Please refer to the diagram at the right.
Summary of Contents for VDP250MH6/2
Page 2: ...VDP250MH6 2_v2 HQPOWER 2 ...


