HQ Power EXCALIBOR I User Manual Download Page 20

VDPL3601MHW12


HQPOWER 

20 

190 

203 

Carmesí 

204 

217 

Violeta 

218 

231 

Color del vino 

232 

244 

Macro móvil 1 

245 

255 

Macro móvil 2 

11 

Velocidad del LED 

255 

Cambio de colores con velocidad decreciente 

Sin función 

22 

Programa automático 1 

23 

37 

Programa automático 2 

38 

52 

Programa automático 3 

53 

67 

Programa automático 4 

68 

82 

Programa automático 5 

83 

97 

Programa automático 6 

98 

112 

Programa automático 7 

113 

127 

Programa automático 8 

128 

142 

Control por la música 1 

143 

157 

Control por la música 2 

158 

172 

Control por la música 3 

173 

187 

Control por la música 4 

188 

202 

Control por la música 5 

203 

217 

Control por la música 6 

218 

232 

Control por la música 7 

12 

Programa automático 

233 

255 

Control por la música 8 
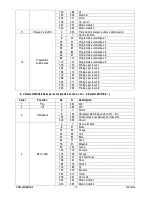
 

f.


Valores DMX detallados por canal (modo 4 canales, véase «  6. Uso MODO 6  ») 


Canal 

Función 

De 

Descripción 

Pan 

255 

540° 

Tilt 

255 

270° 

Cerrado 

134 

Dimmer electrónico de 100% ~ 0% 

135 

239 

Estroboscopio con velocidad creciente 

Obturador 

240 

255 

Abierto 

Sin función 

21 

Blanco 

22 

35 

Rojo 

36 

49 

Verde 

50 

63 

Azul 

64 

77 

Cianógeno 

78 

91 

Magenta 

92 

105 

Amarillo 

106 

119 

Púrpura 

120 

133 

Naranja 

134 

147 

Amarillo verdoso 

148 

161 

Rosa 

162 

175 

Marrón 

176 

189 

Oro 

190 

203 

Carmesí 

204 

217 

Violeta 

218 

231 

Color del vino 

232 

244 

Macro móvil 1 

Macro LED 

245 

255 

Macro móvil 2 

Summary of Contents for EXCALIBOR I

Page 1: ...LED MOVING HEAD 36 x 1W LEDS EXCALIBOR I PROJECTEUR LYRE LED 36 x 1W LEDS EXCALIBOR I CABEZA M VIL CON LEDs 36 LEDs DE 1W EXCALIBOR I LED MOVING HEAD SCHEINWERFER 36 x 1W LEDs USER MANUAL GEBRUIKERSH...

Page 2: ...VDPL3601MHW12 HQPOWER 2...

Page 3: ...tage stated in the specifications of this manual Do not crimp the power cord and protect it against damage Have an authorized dealer replace it if necessary Disconnect the device from the mains to cle...

Page 4: ...ial to be used Have the material and the device itself checked regularly Do not attempt to install the device yourself if you lack these qualifications as improper installation may result in injuries...

Page 5: ...188 202 Sound control 5 203 217 Sound control 6 218 232 Sound control 7 12 Auto program 233 255 Sound control 8 b Detailed DMX Values per Channel 4 Channel Mode see 6 Use MODE 6 Channel Function From...

Page 6: ...e address all the VDPL3601MHW12 will listen to the control signal on one particular channel In other words changing the settings of one channel will affect all devices simultaneously If you set differ...

Page 7: ...ns means a tilt of 270 means a tilt of 180 and means a tilt of 90 Press the ENTER button to confirm the desired function The display will indicate the DMX or MASTER SLAVE mode that you selected before...

Page 8: ...niet hoger zijn dan de spanning in de specificaties achteraan de handleiding De voedingskabel mag niet omgeplooid of beschadigd zijn Laat uw dealer zo nodig een nieuwe kabel plaatsen Trek de stekker...

Page 9: ...nstructie kunnen berekenen weten welk constructiemateriaal u kunt gebruiken en u moet het gebruikte materiaal en het toestel af en toe laten nakijken Monteer het toestel niet zelf indien u er geen erv...

Page 10: ...Muzieksturing 3 173 187 Muzieksturing 4 188 202 Muzieksturing 5 203 217 Muzieksturing 6 218 232 Muzieksturing 7 12 Automatisch programma 233 255 Muzieksturing 8 b Gedetailleerde DMX waarden per kanaal...

Page 11: ...n nieuw startadres ingeven Wanneer u n enkel startadres instelt zullen alle toestellen luisteren naar hetzelfde kanaal Met andere woorden wanneer u de instellingen voor 1 kanaal verandert zullen alle...

Page 12: ...ruk op ENTER om de functie te bevestigen De display geeft de eerder geselecteerde DMX of MASTER SLAVE modus weer MODUS 9 Druk op MODE ESC tot op het scherm verschijnt Druk op ENTER om het systeem te r...

Page 13: ...pas d passer la tension mentionn e dans les sp cifications la fin de cette notice Le c ble d alimentation ne peut pas tre repliss ou endommag Demander votre revendeur de renouveler le c ble d aliment...

Page 14: ...De temps en temps un technicien qualifi doit v rifier la construction portante et l appareil m me Ne pas essayer d installer cet appareil vous m me si vous n avez pas les qualifications requises une i...

Page 15: ...r le son 3 173 187 Pilotage par le son 4 188 202 Pilotage par le son 5 203 217 Pilotage par le son 6 218 232 Pilotage par le son 7 12 Programme automatique 233 255 Pilotage par le son 8 b Valeurs DMX...

Page 16: ...us avez le choix entre une seule adresse de d part pour toute une s rie d appareils ou une adresse de d part par appareil Dans le cas d une seule adresse tous les appareils couteront les m mes signaux...

Page 17: ...t s lectionner pour une rotation horizontale de 90 Enfoncer ENTER pour confirmer la s lection Le mode DMX ou MASTER SLAVE pr alablement s lectionn sera affich MODE 9 Enfoncer MODE ESC jusqu ce que s a...

Page 18: ...aplaste el cable de alimentaci n y prot jalo contra posibles da os causados por alg n tipo de superficie afilada Si es necesario pida a su distribuidor reemplazar el cable de alimentaci n Desconecte...

Page 19: ...ci n etc De vez en cuando una verificaci n de la estructura y del aparato mismo debe ser llevada a cabo por un t cnico especializado No intente instalar este aparato si no tiene las cualificaciones re...

Page 20: ...ontrol por la m sica 4 188 202 Control por la m sica 5 203 217 Control por la m sica 6 218 232 Control por la m sica 7 12 Programa autom tico 233 255 Control por la m sica 8 f Valores DMX detallados p...

Page 21: ...atos o una direcci n inicial por aparato Con una sola direcci n inicial para una serie de aparatos todos los aparatos reaccionar n sincronizadamente a la misma se al Por lo tanto cambiar los ajustes d...

Page 22: ...eleccione para una rotaci n horizontal de 90 Pulse ENTER para confirmar la selecci n El modo DMX o MASTER SLAVE seleccionado antes se visualizar MODOE 9 Pulse MODE ESC hasta que se visualice Pulse ENT...

Page 23: ...rt ist Zimmertemperatur erreicht hat Der Aufbau des Ger tes entspricht der Schutzklasse I Gem den Vorschriften muss das Ger t geerdet sein Der elektrische Anschluss darf nur von einer Fachkraft durchg...

Page 24: ...uss immer mit einer zweiten Befestigung z B mit einem Sicherheitskabel gesichert werden Stehen Sie w hrend der Montage Entfernung oder Wartung nie direkt unter dem Ger t Lassen Sie das Ger t j hrlich...

Page 25: ...utomatisches Programm 4 68 82 Automatisches Programm 5 83 97 Automatisches Programm 6 98 112 Automatisches Programm 7 113 127 Automatisches Programm 8 128 142 Musiksteuerung 1 143 157 Musiksteuerung 2...

Page 26: ...ette angeschlossen wird Siehe Abbildung links e Startadresse des Projektors w hlen Alle DMX gesteuerten Ger te brauchen eine digitale Startadresse sodass das richtige Ger t auf die Signale reagieren k...

Page 27: ...normale Modus ist die umgekehrte Anzeige Dr cken Sie ENTER um die Funktion zu best tigen Das Display zeigt den vorher ausgew hlten DMX oder MASTER SLAVE Modus an MODUS 6 Dr cken Sie MODE ESC bis im Di...

Page 28: ...iner Fachkraft installieren 5 Trennen Sie das Ger t vor der Reinigung oder Wartung vom Netz 6 Verwenden Sie zur Reinigung ein feuchtes fusselfreies Tuch Verwenden Sie auf keinen Fall Alkohol oder irge...

Reviews: