background image

4.

Proceed to 

Preparing the server for operation

.

Preparing the server for operation

Procedure

1.

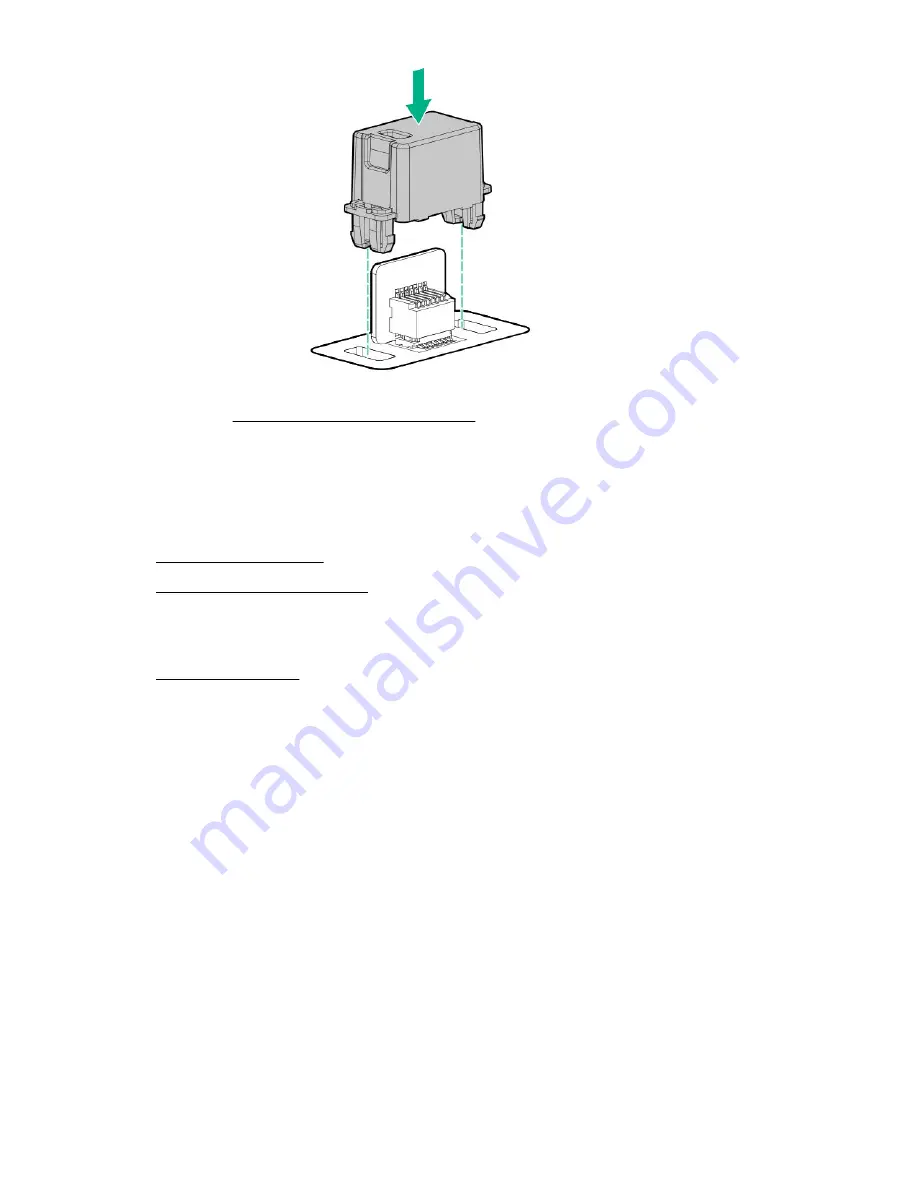
Install any options or cables previously removed to access the TPM connector.

2. Install the access panel

.

3. Install the server into the rack

.

4.

Connect each power cord to the server.

5.

Connect each power cord to the power source.

6. Power up the server

.

Enabling the Trusted Platform Module

When enabling the Trusted Platform module, observe the following guidelines:

• By default, the Trusted Platform Module is enabled as TPM 2.0 when the server is powered on after

installing it.

• In UEFI Boot Mode, the Trusted Platform Module can be configured to operate as TPM 2.0 or TPM

1.2.

• In Legacy Boot Mode, the Trusted Platform Module configuration can be changed between TPM 1.2

and TPM 2.0, but only TPM 1.2 operation is supported.

Enabling the Trusted Platform Module as TPM 2.0

Procedure

1.

During the server startup sequence, press the 

F9

 key to access 

System Utilities

.

2.

From the System Utilities screen, select 

System Configuration

 > 

BIOS/Platform Configuration

(RBSU)

 > 

Server Security

 > 

Trusted Platform Module options

.

120

Hardware options installation

Summary of Contents for ProLiant DL180

Page 1: ...Edition 3 Abstract This document is for the person who installs administers and troubleshoots servers and storage systems Hewlett Packard Enterprise assumes you are qualified in the servicing of compu...

Page 2: ...ata for Commercial Items are licensed to the U S Government under vendor s standard commercial license Links to third party websites take you outside the Hewlett Packard Enterprise website Hewlett Pac...

Page 3: ...plug drive LED definitions 25 NVMe SSD LED definitions 26 NVMe SSD button actions 27 Drive box identification 28 Drive bay numbering 29 Fan bay numbering 30 Setup 31 Optional service 31 Initial server...

Page 4: ...d optical drive options 71 Installing the optical drive in the LFF chassis 71 Installing the optical drive or NVMe drives in the SFF chassis 74 Storage controller options 77 Storage controller install...

Page 5: ...7 Box 2 to type a controller 128 Box 2 to type p controller 128 Box 3 to system board 129 Box 3 to type a controller 129 Box 3 to type p controller 130 8 bay SFF power cable default 130 16 bay 24 bay...

Page 6: ...Keeping the system current 154 Updating firmware or system ROM 154 Drivers 157 Software and firmware 157 Operating system version support 157 HPE Pointnext Portfolio 158 Proactive notifications 158 Tr...

Page 7: ...168 Turkey RoHS material content declaration 169 Ukraine RoHS material content declaration 169 Warranty information 169 Websites 170 Support and other resources 171 Accessing Hewlett Packard Enterpri...

Page 8: ...the product QuickSpecs on the Hewlett Packard Enterprise website http www hpe com info qs The links in this guide might not cover HPE ProLiant DL180 Gen10 Server information For more information conta...

Page 9: ...bay LFF drive model Item Description 1 LFF drives 2 NVMe drives optional 3 Optical drive optional 4 iLO Service Port 5 USB 3 0 port 12 bay LFF drive model Item Description 1 LFF drives 2 USB 3 0 port...

Page 10: ...ial number iLO information pull tab 16 bay SFF drive model Item Description 1 Optical drive optional 2 NVMe drives optional 3 SFF drives 4 iLO Service Port 5 USB 3 0 port 6 Serial number iLO informati...

Page 11: ...age contains links to server setup information spare part numbers QuickSpecs troubleshooting resources and other useful product links Front panel LEDs and buttons Front panel LEDs and buttons in an LF...

Page 12: ...erify the following conditions The facility power is present The power supply is installed and is working correctly The power cord is attached and is connected to a power source The front I O cable is...

Page 13: ...ar panel components with optional rear 2 bay SFF SAS SATA drives Item Description 1 PCIe slots 1 3 top to bottom primary riser for processor 1 2 Serial port optional 3 Rear 2 bay SFF SAS SATA drives o...

Page 14: ...tom primary riser for processor 1 2 FlexibleLOM optional 3 Serial port optional 4 PCIe slots 4 6 secondary riser for processor 2 optional 5 Standard power supply non hot plug 6 Flexible Slot power sup...

Page 15: ...ports 3 4 Rear panel LEDs Item Description Status 1 NIC link LED Green Network link Off No network link 2 NIC activity LED Solid green Link to network Flashing green Network active Off No network acti...

Page 16: ...y mode Power supply error PCIe riser board slot definitions The server ships with a primary PCIe riser cage installed and a secondary PCIe riser cage blank A second processor is required to support in...

Page 17: ...length x8 8 4 1 FlexibleLOM riser cage assembly Install in the primary PCIe riser connector Item Type Form factor Connector link width Negotiable link width 1 PCIe 3 0 Full height full length x8 8 4 1...

Page 18: ...x8 x16 x8 secondary riser cage assembly Install in the secondary PCIe riser connector Item Type Form factor Connector link width Negotiable link width 1 PCIe 3 0 Full height full length x16 16 8 4 1...

Page 19: ...onnector link width Negotiable link width 1 PCIe 3 0 Full height full length x8 8 4 1 2 PCIe 3 0 Full height half length x8 8 4 1 3 PCIe 3 0 Half height half length x8 8 4 1 PCIe slot description Comp...

Page 20: ...r constant development For the latest information see the PCI SIG website 2 Physical connector link width PCIe devices communicate through a logical connection called an interconnect or link At the ph...

Page 21: ...1 4 TPM connector 5 Serial port connector 6 iLO Service Port connector 7 Primary PCIe riser connector for processor 1 8 System maintenance switch 9 Mini SAS port 1 10 Mini SAS port 3 11 Media Module c...

Page 22: ...USB 3 0 port 1 If the memory card connected to the microSD slot is not visible in Windows Device Manager in the menu bar click View Show hidden device System maintenance switch descriptions Position D...

Page 23: ...uring defaults 3 When the system maintenance switch position 6 is set to the On position and Secure Boot is enabled some configurations cannot be restored For more information see Secure Boot on page...

Page 24: ...fied by a management application Flashing amber blue 1 flash per second The drive has failed or a predictive failure alert has been received for this drive it also has been identified by a management...

Page 25: ...efinitions Item LED Status Definition 1 Locate Solid blue The drive is being identified by a host application Flashing blue The drive carrier firmware is being updated or requires an update 2 Activity...

Page 26: ...bus device A device attached to a PCIe bus cannot be removed without allowing the device and bus to complete and cease the signal traffic flow CAUTION Do not remove an NVMe SSD from the drive bay whil...

Page 27: ...t configured and predicts the drive will fail Solid amber The drive has failed Off The drive is not configured by a RAID controller 4 Do not remove Solid white Do not remove the drive The drive must b...

Page 28: ...est PCIe ejection Removal request can be denied by the RAID controller one or more of the logical drives could fail Operating system Drive box identification Front boxes SFF Item Description 1 Box 1 2...

Page 29: ...box Item Description 1 Box 4 Drive bay numbering 8 bay LFF hot plug drive model 12 bay LFF hot plug drive model 8 bay SFF hot plug drive model 16 bay SFF hot plug drive model Component identification...

Page 30: ...24 bay SFF hot plug drive model Fan bay numbering 30 Component identification...

Page 31: ...ardware and software Hewlett Packard Enterprise Education Services Help train your IT staff 1The time commitment for this repair service might vary depending on the geographical region of site For mor...

Page 32: ...setting up the server Download the latest SPP http www hpe com servers spp download Support validation required Verify that your OS or virtualization software is supported http www hpe com info ossupp...

Page 33: ...ilo The iLO Management Port is connected to a secure network b Using a browser navigate to the iLO web interface and then log in https iLO hostname or IP address Note the following The iLO hostname is...

Page 34: ...D d Save the configuration and reboot the server e Create an array I From the boot screen press F9 to run UEFI System Utilities II From the UEFI System Utilities screen select System Configuration Emb...

Page 35: ...ensures proper airflow Using a rack without blanking panels results in improper cooling that can lead to thermal damage The 9000 and 10000 Series Racks provide proper server cooling from flow through...

Page 36: ...rticle 250 as well as any local and regional building codes In Canada you must install the equipment in accordance with Canadian Standards Association CSA C22 1 Canadian Electrical Code In all other c...

Page 37: ...he rack if it is a single rack installation The racks are coupled together in multiple rack installations Only one component is extended at a time A rack may become unstable if more than one component...

Page 38: ...se conductive field service tools Use a portable field service kit with a folding static dissipating work mat If you do not have any of the suggested equipment for proper grounding have an authorized...

Page 39: ...extra length and buckle part of the strap must be facing the outside of the rack rail b Loop the end of the hook and loop strap through the buckle When multiple hook and loop straps are used in the sa...

Page 40: ...nnect power to the equipment unplug the power cord from the power supply Do not route the power cord where it can be walked on or pinched by items placed against it Pay particular attention to the plu...

Page 41: ...tem software and firmware updates download the Service Pack for ProLiant from the Hewlett Packard Enterprise website Software and firmware must be updated before using the server for the first time un...

Page 42: ...the latest information on supported operating systems see the Hewlett Packard Enterprise website The server does not ship with OS media All system software and firmware is preloaded on the server 42 S...

Page 43: ...dby button for more than 4 seconds to force the server to enter standby mode This method forces the server to enter standby mode without properly exiting applications and the OS If an application stop...

Page 44: ...requirements and guidelines for manual material handling Get help to lift and stabilize the product during installation or removal especially when the product is not fastened to the rails Hewlett Pac...

Page 45: ...remove the server from the rack see the documentation that ships with the rack rail system 5 Place the server on a sturdy level surface Releasing the cable management arm Procedure 1 Remove the cable...

Page 46: ...er grounding can cause electrostatic discharge CAUTION Do not operate the server for long periods with the access panel open or removed Operating the server in this manner results in improper airflow...

Page 47: ...secured with clips Procedure 1 Place the access panel on top of the server with the latch open Allow the panel to extend past the rear of the server approximately 1 25 cm 0 5 in 2 Push down on the la...

Page 48: ...ower source b Disconnect each power cord from the server 4 Disconnect all peripheral cables from the server 5 Do one of the following Extend the server from the rack Remove the server from the rack 6...

Page 49: ...n rotate it 180 counterclockwise b Grasp the riser cage at the touch points and lift it out of the chassis Primary riser cage Secondary riser cage Removing an expansion slot blank Prerequisites T 10 T...

Page 50: ...owing Extend the server from the rack Remove the server from the rack 4 Remove the access panel 5 Remove the riser cage 6 Remove the slot blank a Press the latch on the slot blank retainer b Open the...

Page 51: ...board Prerequisites T 15 Torx screwdriver Procedure 1 Power down the server 2 Remove all power a Disconnect each power cord from the power source b Disconnect each power cord from the server 3 Do one...

Page 52: ...d Primary riser cage Secondary riser cage Removing the air baffle CAUTION For proper cooling do not operate the server without the access panel baffles expansion slot blanks or blanks installed If the...

Page 53: ...k 6 Remove the access panel 7 If the full length GPU or the 12G SAS expander is installed remove the riser cage 8 Remove the air baffle Installing the air baffle CAUTION For proper cooling do not oper...

Page 54: ...panel 4 Install the server into the rack 5 Connect all peripheral cables to the server 6 Connect each power cord to the server 7 Connect each power cord to the power source 8 Power up the server on pa...

Page 55: ...eing installed read the installation instructions for all the hardware options to identify similar steps and streamline the installation process WARNING To reduce the risk of personal injury from hot...

Page 56: ...while the Do not remove LED is flashing The Do not remove LED flashes to indicate that the device is still in use Removal of the NVMe SSD before the device has completed and ceased signal traffic flow...

Page 57: ...SFF drives are installed review Fan population guidelines on page 86 to make sure that the server has adequate fans installed Procedure 1 If installed remove the front bezel 2 Remove the drive blank L...

Page 58: ...SFF 4 Install the drive LFF SFF 58 Hardware options installation...

Page 59: ...Array SR Gen10 Configuration Guide at the Hewlett Packard Enterprise website Installing an NVMe drive Prerequisites If NVMe drives are installed review Fan population guidelines on page 86 to make sur...

Page 60: ...ttached to the system For more information see the HPE Smart Array SR Gen10 Configuration Guide at the Hewlett Packard Enterprise website Drive cage options The server supports the following drive cag...

Page 61: ...b Disconnect each power cord from the server 4 Disconnect all peripheral cables from the server 5 Do one of the following Extend the server from the rack Remove the server from the rack 6 Remove the a...

Page 62: ...he server 19 Connect each power cord to the power source 20 Power up the server on page 43 21 If removed install the front bezel The installation is complete Installing the rear 2 bay SFF drive cage P...

Page 63: ...2 bay SFF drive cage remove the left inner rail 6 Remove the access panel 7 Remove the air baffle 8 If installed remove one of the following components a Secondary riser cage blank b Secondary riser c...

Page 64: ...ect GPU and rear 2 bay SFF power cable 12 Install the drives 13 Install the air baffle 14 Install the access panel 15 Install the server into the rack 16 Connect all peripheral cables to the server 17...

Page 65: ...installed remove the front bezel 2 Power down the server 3 Remove all power a Disconnect each power cord from the power source b Disconnect each power cord from the server 4 Disconnect all peripheral...

Page 66: ...b Remove the screws lift the top cover slightly and then pull out the partition c Install the NVMe drive cage and then install the screw on the top of the chassis 66 Hardware options installation...

Page 67: ...the power source 18 Power up the server on page 43 19 If removed install the front bezel The installation is complete Installing the 8 to 12 upgrade option in the LFF chassis The 8 LFF chassis can be...

Page 68: ...ripheral cables from the server 5 Do one of the following Extend the server from the rack Remove the server from the rack 6 Remove the access panel 7 Remove the air baffle 8 Disconnect the iLO service...

Page 69: ...n the fillers for future use 12 Install the partition a Lift the top cover upward slightly b Insert the partition c Secure the partition with two screws 13 Remove all fans Hardware options installatio...

Page 70: ...stall the drive backplane 15 Connect the Mini SAS cable 16 Disconnect the existing power cable 17 Connect the power cable 18 Install the drive in box 1 19 Install all fans 70 Hardware options installa...

Page 71: ...ver on page 43 27 If removed install the front bezel The installation is complete Optical drive cage and optical drive options Installing the optical drive in the LFF chassis Prerequisites Before you...

Page 72: ...the server 5 Do one of the following Extend the server from the rack Remove the server from the rack 6 Remove the access panel 7 Remove the air baffle 8 Disconnect the iLO service port cable from syst...

Page 73: ...b Install the optical drive into cage c Install the optical drive cage into the box 1 Hardware options installation 73...

Page 74: ...17 Connect each power cord to the power source 18 Power up the server on page 43 19 If removed install the front bezel The installation is complete Installing the optical drive or NVMe drives in the S...

Page 75: ...rver 4 Disconnect all peripheral cables from the server 5 Do one of the following Extend the server from the rack Remove the server from the rack 6 Remove the access panel 7 Remove the air baffle 8 Re...

Page 76: ...cage do the following a Install the NVMe drives b Remove the primary riser cage c Install the NVMe and FlexibleLOM riser cage d Disconnect the existing drive power cable e Connect the NVMe signal and...

Page 77: ...ows the PCIe riser board slots compatible with the storage controllers supported by this server Storage controller option Compatible PCIe slot E208i p P408i p Slot 1 and 21 E208e p P408e p Slot 1 2 3...

Page 78: ...n and the last to be powered back up Taking this precaution ensures that the system does not erroneously mark the drives as failed when the server is powered up Procedure 1 If installed remove the fro...

Page 79: ...e front bezel 18 Configure the storage controller The installation is complete Configuring an HPE Smart Array Gen10 controller Procedure 1 Power up the server on page 43 2 If you are running the serve...

Page 80: ...s in case of an unplanned server power loss After the battery is installed it might take up to two hours to charge Controller features requiring backup power are not enabled until the battery is capab...

Page 81: ...battery cable as shown in below illustration 11 Connect the controller backup power cable 12 Install the air baffle 13 If removed install the secondary riser cage 14 Install the access panel 15 Insta...

Page 82: ...cable that ships with the M 2 SSD enablement option Prerequisites Before you perform this procedure make sure that you have the following items available M 2 SSD enablement option M 2 SSD DL180 Gen10...

Page 83: ...access panel 15 Install the server into the rack 16 Connect all peripheral cables to the server 17 Connect each power cord to the server 18 Connect each power cord to the power source 19 Power up the...

Page 84: ...ardware option kit T 30 Torx screwdriver Procedure 1 Identify the processor heatsink and socket module components 2 Review the processor cautions 3 If installed remove the front bezel 4 Power down the...

Page 85: ...the order indicated Otherwise boot failure or intermittent shutdowns might occur c Using a T 30 Torx screwdriver tighten the nuts until they stop 11 Install the air baffle 12 Install the access panel...

Page 86: ...n One processor with NVMe drives or rear 2 SFF drives installed No Blank Fan Fan Fan Fan Fan One processor with NVMe drives or rear 2 SFF drives installed Yes Fan Fan Fan Fan Fan Fan Two processors No...

Page 87: ...the server 5 Do one of the following Extend the server from the rack Remove the server from the rack 6 Remove the access panel 7 Remove the air baffle 8 Determine which fan blanks need to be removed...

Page 88: ...nstallation is complete Memory options IMPORTANT This server does not support mixing LRDIMMs and RDIMMs Attempting to mix any combination of these DIMMs can cause the server to halt during BIOS initia...

Page 89: ...M x4 4 bit x8 8 bit x16 16 bit 4 Memory generation PC4 DDR4 5 Maximum memory speed 2133 MT s 2400 MT s 2666 MT s 6 CAS latency P CAS 15 15 15 T CAS 17 17 17 U CAS 20 18 18 V CAS 19 19 19 for RDIMM LRD...

Page 90: ...he front bezel 2 Power down the server 3 Remove all power a Disconnect each power cord from the power source b Disconnect each power cord from the server 4 Disconnect all peripheral cables from the se...

Page 91: ...System Utilities System Configuration BIOS Platform Configuration RBSU Memory Options to configure the memory settings Riser board and riser cage options Installing a riser board Prerequisites Before...

Page 92: ...rack 13 Connect all peripheral cables to the server 14 Connect each power cord to the server 15 Connect each power cord to the power source 16 Power up the server on page 43 The installation is compl...

Page 93: ...from the server 3 Disconnect all peripheral cables from the server 4 Do one of the following Extend the server from the rack Remove the server from the rack 5 Remove the access panel 6 If installing s...

Page 94: ...he riser board with the corresponding connectors on the system board and then press down the PCIe riser cage b Push down the release tab rotate it 180 clockwise and then press it flat on the PCIe rise...

Page 95: ...guidelines for network cards and PCIe workload accelerator options The following table shows the PCIe riser board slots supported with the network cards and the PCIe workload accelerator options of t...

Page 96: ...b Disconnect each power cord from the server 4 Disconnect all peripheral cables from the server 5 Do one of the following Extend the server from the rack Remove the server from the rack 6 Remove the a...

Page 97: ...Secondary riser cage Slot 4 Slot 5 or 6 Hardware options installation 97...

Page 98: ...h power cord to the power source 21 Power up the server on page 43 The installation is complete Installing the HPE 12G SAS Expander Card option The HPE 12G SAS expander card is supported in the PCIe3...

Page 99: ...2 Connect the Mini SAS cables between the SAS expander and the controller according to the labels on cables 13 Install the cable clip on the air baffle 14 Install the air baffle 15 Install the primary...

Page 100: ...ront bezel 2 Power down the server 3 Remove all power a Disconnect each power cord from the power source b Disconnect each power cord from the server 4 Disconnect all peripheral cables from the server...

Page 101: ...Secondary riser cage Rear 2 bay SFF SAS SATA drive cage 9 Install the GPU a Remove the expansion slot blank b Install the GPU into the riser cage Primary riser cage Hardware options installation 101...

Page 102: ...cable in the primary PCI riser cage For specific information about power requirements of a GPU see the GPU user documentation For a list of specific GPU models supported by this server see the server...

Page 103: ...20 Connect each power cord to the server 21 Connect each power cord to the power source 22 Power up the server on page 43 The installation is complete Installing the FlexibleLOM adapter Prerequisites...

Page 104: ...Disconnect all peripheral cables from the server 5 Do one of the following Extend the server from the rack Remove the server from the rack 6 Remove the access panel 7 Remove the primary riser cage 8...

Page 105: ...ing the Media Module Prerequisites Before you perform this procedure make sure that you have a T 15 Torx screwdriver available Procedure 1 If installed remove the front bezel 2 Power down the server 3...

Page 106: ...Module to the opening on the rear panel b Press the other end of the Media Module down to connect on the system board c Firmly seat the Media Module in the connector and ensure that it is secured with...

Page 107: ...2 Install the server into the rack 13 Connect all peripheral cables to the server 14 Connect each power cord to the server 15 Connect each power cord to the power source 16 Power up the server on page...

Page 108: ...r a Disconnect each power cord from the power source b Disconnect each power cord from the server 4 Disconnect all peripheral cables from the server 5 Do one of the following Extend the server from th...

Page 109: ...installed remove the front bezel 2 Power down the server 3 Remove all power a Disconnect each power cord from the power source b Disconnect each power cord from the server 4 Disconnect all peripheral...

Page 110: ...nterprise Power Advisor website http www hpe com info poweradvisor online Installing the redundant power supply assembly CAUTION All power supplies installed in the server must have the same output po...

Page 111: ...own the server 3 Remove all power a Disconnect each power cord from the power source b Disconnect each power cord from the server 4 Disconnect all peripheral cables from the server 5 Remove the server...

Page 112: ...Secondary riser cage Rear 2 bay SFF drive cage 10 Remove the nonredundant power supply 112 Hardware options installation...

Page 113: ...Install the power supply cage a Align the arrow on the power supply cage with the arrow on the chassis as shown in following illustration b Install the power supply cage Hardware options installation...

Page 114: ...12 Install the power supply in bay 1 13 If enabling redundant power supply mode do the following a Remove the power supply bay 2 blank 114 Hardware options installation...

Page 115: ...age 15 Install the air baffle 16 Install the access panel 17 Install the server into the rack 18 Connect all peripheral cables to the server 19 Connect each power cord to the server 20 Connect each po...

Page 116: ...Remove the air baffle 7 Attach the Chassis Intrusion Detection switch to the chassis connect the cable to the system board and then route the cable as shown in following illustration 8 If removed inst...

Page 117: ...2 on a supported server In Legacy Boot Mode the configuration can be changed between TPM 1 2 and TPM 2 0 but only TPM 1 2 operation is supported HPE Trusted Platform Module 2 0 Guidelines CAUTION Alwa...

Page 118: ...0 Kit Installing the Trusted Platform Module board Preparing the server for installation Procedure 1 Observe the following warnings WARNING The front panel Power On Standby button does not shut off sy...

Page 119: ...including keys will be erased CAUTION The TPM is keyed to install only in the orientation shown Any attempt to install the TPM in a different orientation might result in damage to the TPM or system bo...

Page 120: ...lt the Trusted Platform Module is enabled as TPM 2 0 when the server is powered on after installing it In UEFI Boot Mode the Trusted Platform Module can be configured to operate as TPM 2 0 or TPM 1 2...

Page 121: ...TPM 1 2 and TPM 2 0 Changing TPM bus from FIFO to CRB Enabling or disabling TPM Clearing the TPM 8 Enable TPM functionality in the OS such as Microsoft Windows BitLocker or measured boot For more info...

Page 122: ...printed after BitLocker is enabled When using BitLocker always retain the recovery key password The recovery key password is required to enter Recovery Mode after BitLocker detects a possible comprom...

Page 123: ...e to verify the length of the cable Use the internal cable management features to properly route and secure the cables When routing cables be sure that the cables are not in a position where they can...

Page 124: ...rict airflow If you intend to use the removed cables later label and store them for future use Cable routing LFF drive model LFF drive to system board Color Description Orange LFF box 1 to Mini SAS po...

Page 125: ...port 1 Blue LFF box 3 to the controller port 2 LFF drive to type p controller To support 12 bay LFF the box 1 is connected to the port 1 of second controller Color Description Orange LFF box 2 to the...

Page 126: ...ge P2 power cable to LFF box 2 Blue P3 power cable to LFF box 3 Yellow P4 power cable to the optical drive 12 bay LFF power cable Color Description Orange P2 power cable to LFF box 1 Blue P3 power cab...

Page 127: ...Cable routing SFF drive model Box 1 to type a controller Box 1 to type p controller Cabling 127...

Page 128: ...Box 2 to type a controller Box 2 to type p controller 128 Cabling...

Page 129: ...Box 3 to system board Box 3 to type a controller Cabling 129...

Page 130: ...Box 3 to type p controller 8 bay SFF power cable default 130 Cabling...

Page 131: ...ption Pink P2 power cable to SFF box 1 or two NVMe drives Blue P3 power cable to SFF box 2 Yellow P4 power cable to SFF box 3 Orange P5 power cable to optical drive Cable routing 12G SAS expander Type...

Page 132: ...rt 1 Orange Type a controller port 2 to 12G SAS expander port 2 Type p controller to SAS expander Color Description Orange Type p controller port 1 to 12G SAS expander port 1 Blue Type p controller po...

Page 133: ...1 2 Green and Black 12G SAS expander ports 7 8 to SFF box 3 ports 1 2 Cable routing SFF NVMe and optical drive cage Color Description Orange P2 power cable to two NVMe drives Blue P5 power cable to t...

Page 134: ...ay SFF drive Mini SAS cable to system board You can connect the rear 2 bay SFF drive to all Mini SAS ports 1 2 or 3 Mini SAS cable to type a controller You can connect the rear 2 bay SFF drive to any...

Page 135: ...Mini SAS cable to SAS expander Cabling 135...

Page 136: ...SFF drive backplane to SATA port 5 Blue Rear 2 bay SFF drive backplane to SATA port 4 Yellow Rear 2 bay SFF drive backplane to SATA management port Rear 2 bay SFF power cable Cable routing M 2 SSD M...

Page 137: ...M 2 SSD enablement board installed in secondary riser Cabling 137...

Page 138: ...outing Smart Storage Battery Cable routing Optical drive SFF Color Description Orange Optical drive signal cable to SATA port 5 Blue Optical drive power cable Yellow Optical drive power cable LFF 138...

Page 139: ...Color Description Orange Optical drive signal cable to SATA port 5 Blue Optical drive power cable Yellow Optical drive power cable Cable routing Fan Cable routing Front I O SFF Cabling 139...

Page 140: ...Color Description Orange Front I O cable Blue USB cable Yellow Thermal sensor cable LFF Color Description Orange Front I O cable Blue USB cable Yellow Thermal sensor cable 140 Cabling...

Page 141: ...Cable routing USB 3 0 Cable routing Power supply HPE 500W power supply cabling non hot plug Cabling 141...

Page 142: ...Cable routing Serial port Cable routing iLO Service Port SFF LFF 142 Cabling...

Page 143: ...Cable routing Chassis Intrusion Detection switch Cable routing Controller backup power cable Primary riser cage Cabling 143...

Page 144: ...Secondary riser cage Slot 4 Slot 5 or 6 144 Cabling...

Page 145: ...Cable routing GPU Color Description Orange GPU power cable Blue Rear 2 bay SFF power cable Cabling 145...

Page 146: ...e Product QuickSpecs For more information about product features specifications options configurations and compatibility see the product QuickSpecs on the Hewlett Packard Enterprise website http www h...

Page 147: ...System Log is full new data overwrites the oldest data in the log It takes less than 5 minutes to download the Active Health System Log and send it to a support professional to help you resolve an iss...

Page 148: ...es but a license is required for using the following features Group Virtual Media Group power control Group power capping Group configuration and Group firmware update For more information about iLO F...

Page 149: ...advanced functionality The iLO Amplifier Pack performs rapid server discovery and inventory for thousands of supported servers for the purpose of updating firmware and drivers at scale For more inform...

Page 150: ...s Also downloading and updating the latest version of Intelligent Provisioning ensures the latest supported features are available For ProLiant servers firmware is updated using the Intelligent Provis...

Page 151: ...er configuration process This automated server configuration process cuts time from each deployment making it possible to scale rapid high volume server deployments For more information or to download...

Page 152: ...ot ensures that each component launched during the boot process is digitally signed and that the signature is validated against a set of trusted certificates embedded in the UEFI BIOS Secure Boot vali...

Page 153: ...party UEFI tools are not restricted 3 If an administrator password is set enter it at the prompt and press Enter The Shell prompt appears 4 Enter the commands required to complete your task 5 Enter th...

Page 154: ...r additional security external USB functionality can be disabled through USB options in UEFI System Utilities Redundant ROM support The server enables you to upgrade or configure the ROM safely with r...

Page 155: ...options SUM identifies associated nodes you can update at the same time to avoid interdependency issues Key features of SUM include Discovery engine that finds installed versions of hardware firmware...

Page 156: ...mware components in the system including the system BIOS NICs and storage cards Procedure 1 Access the System ROM Flash Binary component for your server from the Hewlett Packard Enterprise Support Cen...

Page 157: ...firmware update Drivers IMPORTANT Always perform a backup before installing or updating device drivers Update drivers using any of the following Smart Update Solutions Download the latest Service Pac...

Page 158: ...hpe com us en services operational html Utilize the Advisory and Transformation Services in the following areas Private or hybrid cloud computing Big data and mobility requirements Improving data cent...

Page 159: ...he iLO Virtual NMI feature Troubleshooting resources Troubleshooting resources are available for HPE Gen10 server products in the following documents Troubleshooting Guide for HPE ProLiant Gen10 serve...

Page 160: ...r water If the server no longer automatically displays the correct date and time then replace the battery that provides power to the real time clock Under normal use battery life is 5 to 10 years Remo...

Page 161: ...verse the removal procedure 10 Properly dispose of the old battery For more information about battery replacement or proper disposal contact an authorized reseller or an authorized service provider Sy...

Page 162: ...ture range is extended 5 C to 10 C 41 F to 50 F and 35 C to 40 C 95 F to 104 F at sea level with an altitude derating of 1 0 C per every 175 m 1 8 F per every 574 ft above 900 m 2953 ft to a maximum o...

Page 163: ...hot plug Power Supply Specification Value Input requirements Rated input voltage 100 VAC to 240 VAC 240 VDC for China only Rated input frequency 50 Hz to 60 Hz Rated input current 5 8 A at 100 VAC 2...

Page 164: ...t 100 VAC to 127 VAC input 500 W at 100 VAC to 240 VAC input 500 W at 240 VDC input for China only Maximum peak power 500 W at 100 VAC to 127 VAC input 500 W at 100 VAC to 240 VAC input 500 W at 240 V...

Page 165: ...100 VAC to 240 VAC input 800 W at 240 VDC input for China only HPE 800W Flex Slot Titanium Hot plug Low Halogen Power Supply Specification Value Input requirements Rated input voltage 200 VAC to 240 V...

Page 166: ...to 60 Hz Rated input current 4 4 A at 200 VAC 3 1 A at 277 VAC 2 3 A at 380 VDC Maximum rated input power 869 W at 200 VAC 865 W at 230 VAC 861 W at 277 VAC 863 W at 380 VDC BTUs per hour 2964 at 200...

Page 167: ...AC Maximum rated input power 1734 W at 200 VAC 1725 W at 240 VAC BTUs per hour 5918 at 200 VAC 5884 at 240 VAC Power supply output Rated steady state power 1600 W at 200 VAC to 240 VAC input 1600 W at...

Page 168: ...tion report for this product can be found at www hpe com info reach For Hewlett Packard Enterprise product environmental and safety information and compliance data including RoHS and REACH see www hpe...

Page 169: ...material content declaration Warranty information To view the warranty information for your product see the links provided below HPE ProLiant and IA 32 Servers and Options www hpe com support ProLiant...

Page 170: ...owledge SPOCK Storage compatibility matrix www hpe com storage spock Storage white papers and analyst reports www hpe com storage whitepapers For additional general support websites see Support and ot...

Page 171: ...ponents Accessing updates Some software products provide a mechanism for accessing software updates through the product interface Review your product documentation to identify the recommended software...

Page 172: ...ise strongly recommends that you register your device for remote support If your product includes additional remote support details use search to locate that information Remote support and Proactive C...

Reviews: