HP Visualize c200 - Workstation Quick Start Manual Download Page 97

95

Ita

lia

n

o
Português

E

n

g

lis

h

E

n

g

lis

h

E

n

g

lis

h

E

n

g

lis

h

E

n

g

lis

h

F

ra

n

ç

a

is

D

e

u

ts

c

h

E

sp

a

ñ

o

l

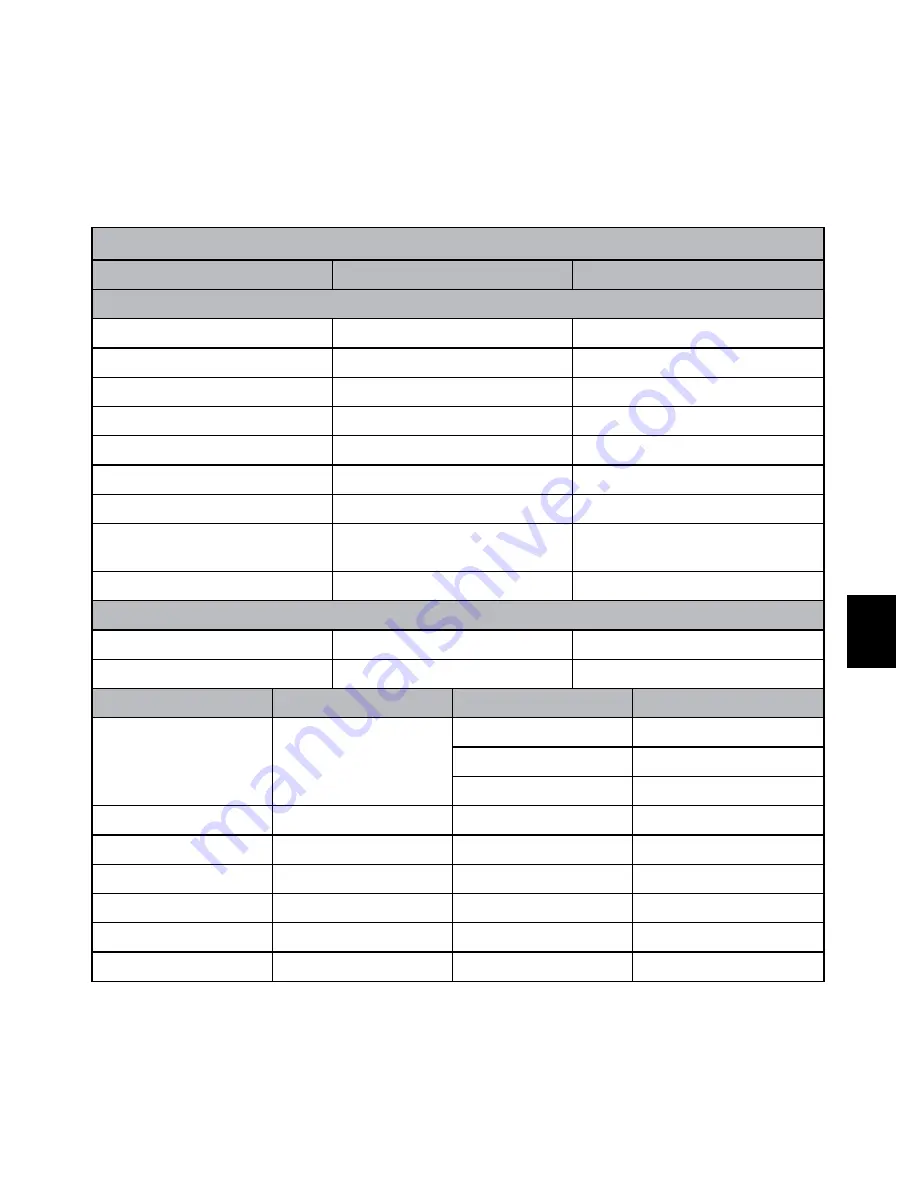
Contacto/Telefone do Apoio:

País

Idioma

Número

Região da Europa (EMEA)

Bélgica

Holandês e Alemão

+ 32 2700 1724

Francês

Francês

+ 33 171230454

Alemanha 

Alemão

+ 49 6950073896

Irlanda

Inglês

+ 353 1850882016

Itália 

Italiano

+ 39 269682189

Países Baixos 

Holandês

+ 31 202015093

Espanha 

Espanhol

+ 34 914533458

Suíça 

Alemão/Francês/
Italiano

+ 41 18009686

RU

Inglês

+ 44 2073652400

América do Norte

Estados Unidos

Inglês

1.866.694.7633

Canadá

Inglês e Francês

1.866.694.7633

País

Idioma

Cidade

Número

México

Espanhol

Cidade do México

52.55.1204.8185

Guadalajara

52.33.1031.3872

Monterrey

52.81.1107.2639

Venezuela

Espanhol

Caracas

58.212.335.4574

Colômbia

Espanhol

Perú

57.1.508.2325

Perú

Espanhol

Lima

51.1.705.6232

Chile

Espanhol

Santiago

55.11.5504.6633

Brasil

Argentina

São Paulo

55.11.5504.6633

Argentina

Espanhol

Buenos Aires

54.11.6091.2399

Summary of Contents for Visualize c200 - Workstation

Page 1: ... ...

Page 2: ...details about the camera operation and troubleshooting please read the User Manual located on the CDROM disc included with your camera or visit http www hp com support and download it for the camera support page ...

Page 3: ...sh English Tour of Your HP Camera Front View 1 2 3 4 Flash 1 Self timer LED AF Assist Lamp 2 Lens 3 Microphone 4 Back View 11 10 5 9 8 7 6 LCD Screen 5 Zoom Buttons 6 LED Indicator 7 Menu Button 8 Function Delete Button 9 OK Button 4 way Navigation Control 10 Playback Button 11 ...

Page 4: ...15 12 14 13 Stabilizer Button 12 Speaker 13 Shutter Button 14 Power Button 15 Bottom View 16 17 18 Tripod Screw Hole 16 Battery Compartment 17 SD Card Compartment 18 Left Right View 19 20 USB Port 19 Strap Ring 20 ...

Page 5: ...is strongly recommended to attach and use the provided camera strap Inserting the Batteries Follow these instructions to insert the batteries into the battery compartment If the batteries are already installed make sure to 1 power off the camera before removing and inserting recharged or new batteries Open the battery compartment at the bottom of the 2 camera as illustrated ...

Page 6: ...4 Insert the batteries into the compartment with 3 correct orientation as illustrated Close and secure the battery compartment 4 ...

Page 7: ...he memory card while powered on may damage the card and camera Open the memory card compartment at the bottom of the 2 camera Insert the SD SDHC card into the memory card slot with 3 the metallic connectors facing the front side of the camera as illustrated below Push the SD SDHC card into the memory slot until it clicks into place If the card does 4 not click into place repeat the previous step t...

Page 8: ...power off the camera before proceeding 1 Removing the memory card while powered on may damage the card and camera Open the memory card compartment 2 Gently push the card until it clicks and pushes our of 3 position Carefully pull out the card 4 ...

Page 9: ...to move through the selections 1 Highlight the desired language and press the 2 OK button to select Setting the Date Time Use the 4 way navigation control to move through the selections and to change the 1 setting values Press 2 OK button when finished This will save your date and time settings If necessary press 3 Menu button to close the menu At this point the camera settings are set to the defa...

Page 10: ...ult when using the Power button to turn on the camera When you turn on your camera using the Power button it will automatically set to scene mode Playback Mode Set your camera to Playback mode so you can view and edit captured images as well as playback videos and audio clips You can also attach a voice memo to any image in this mode Switching between Scene Mode and Playback Mode In Scene Mode pre...

Page 11: ...sh Selecting the Scene Mode options Set the camera to Scene Mode 1 Press 2 MENU to launch Scene Mode Menu Select Scene Mode and then press to enter submenu 3 Select a mode 4 Press the 5 OK button to apply selected mode Use the 4 way navigation control to move through the menu selections ...

Page 12: ... When the camera has successfully completed this automatic routine the focus bracket will turn green If the automatic focus and exposure routine is not successful the bracket will turn red If this occurs simply release the shutter and repeat this step until the bracket turns green In some situations lighting and contrast may be insufficient for the camera to successfully complete the auto focus an...

Page 13: ... mode may be available for different scene modes In Video mode the function menu displays and allows changes to be made to Video resolution setting AWB Metering and Color mode Press the FUNC button of your camera to launch the Function Menu Press the FUNC button again to close the menu The Menu bar displays the current status of the camera settings Only the available functions for the settings are...

Page 14: ...eos audio clips follow the steps below Slide the Mode switch to Playback mode 1 The camera s LCD screen with display an image To understand the icons and other 2 information on the screen please see Photo Mode Screen Layout in the electronic User Manual on the software CD ROM Still Image Use the 3 or keys to view next previous image video audio To play a movie or audio clip press the 4 OK button ...

Page 15: ...menu allows to configure general camera settings To enter the Setup Menu Press 1 Menu button to launch the Record Playback Menu Use the 2 or keys to switch the menu tab to Setup menu Use the 3 or keys to move through the menu selections To select an item press the 4 OK button or key Change the submenu settings using the 4 way navigation control 5 Press the OK button 6 to save and apply settings ...

Page 16: ... original dated sales receipt as proof of purchase and the issued RMA number You will be responsible for shipping charges when shipping the product to the service center The service agent will provide you with an address and you will also be responsible for any shipping charges to the warranty service center Once your product is received by this service center a replacement unit will be shipped ba...

Page 17: ...Nederlandsk 31 202015093 Schweiz Deutsch Français Italiano 41 18009686 UK English 44 2073652400 North America United States English 1 866 694 7633 Canada English and Français 1 866 694 7633 Country Language City Number México Español Mexico City 52 55 1204 8185 Guadalajara 52 33 1031 3872 Monterrey 52 81 1107 2639 Venezuela Español Caracas 58 212 335 4574 Colombia Español Bogota 57 1 508 2325 Perú...

Page 18: ... l appareil photo et le dépannage lisez le manuel de l utilisateur qui se trouve sur le disque CDROM qui accompagne votre appareil photo ou visitez http www hp com support et téléchargez le pour consulter la page d assistance de l appareil photo ...

Page 19: ...de l appareil photo Vue de face 1 2 3 4 Flash 1 LED du Retardateur Faisceau AF 2 Objectif 3 Microphone 4 Vue de dos 11 10 5 9 8 7 6 Ecran d affichage LCD 5 Boutons du zoom 6 Témoin LED 7 Bouton Menu 8 Bouton Fonction Supprimer 9 Bouton OK Contrôle de navigation 4 10 directions Bouton Lecture 11 ...

Page 20: ...isateur 12 Haut parleur 13 Bouton de l obturateur 14 Bouton Marche 15 Vue de dessous 16 17 18 Trou fileté du trépied 16 Porte du compartiment de batteries 17 Compartiment pour la carte SD 18 Vue de gauche droite 19 20 USB 19 Anneau de dragonne 20 ...

Page 21: ...t fortement recommandé de fixer et d utiliser la dragonne fournie Installer les batteries Suivez ces instructions pour installer les batteries AA dans le compartiment à batteries Si les batteries sont déjà installées prenez soin 1 d éteindre l appareil photo avant d enlever et d installer des batteries rechargées ou neuves Ouvrez le compartiment de la batterie au bas de 2 l appareil photo comme il...

Page 22: ...20 Insérez les batteries dans le compartiment avec une 3 orientation correcte comme illustré Fermez et verrouillez le compartiment de batterie 4 ...

Page 23: ...ait d endommager la carte et l appareil photo Ouvrez le compartiment de carte mémoire au bas de 2 l appareil photo Insérez la carte SD SDHC dans le logement de la carte 3 mémoire avec les connecteurs métalliques orientés vers l avant de l appareil photo comme illustré ci dessous Insérez la carte SD SDHC dans le logement pour carte mémoire jusqu à ce qu elle se 4 clique en place Si la carte n émet ...

Page 24: ...suivre Le fait de retirer la carte mémoire lorsque l appareil est allumé risquerait d endommager la carte et l appareil photo Ouvrez le compartiment de carte mémoire 2 Poussez doucement la carte jusqu à entendre un déclic et 3 qu elle sorte de son logement Retirez soigneusement la carte 4 ...

Page 25: ...illance la langue désirée et appuyez sur le 2 bouton OK pour sélectionner Régler la date et l heure Utilisez le contrôle de navigation à 4 directions pour parcourir les sélections et de 1 changer les valeurs de réglage Appuyez sur le 2 bouton OK quand c est terminé Cela enregistrera vos paramètres de date et d heure Si nécessaire appuyez sur le 3 bouton Menu pour fermer le menu A ce stade les para...

Page 26: ... visualiser et éditer des images capturées et lire des clips audio vidéo Dans ce mode vous pouvez également attacher une note audio à chaque image Le mode scène est sélectionné par défaut quand vous utilisez le bouton Marche Arrêt pour allumer l appareil photo Quand vous allumez votre appareil photo à l aide du bouton Marche Arrêt l appareil s allume automatiquement en mode Prise de vue Basculer e...

Page 27: ... Appuyez sur 2 MENU pour lancer le menu du mode scène Sélectionnez Mode de scène puis sélectionnez pour accéder au sous menu 3 Sélectionnez un mode 4 Appuyez sur le 5 bouton OK pour valider le mode sélectionné Utilisez le contrôle de navigation à 4 directions pour parcourir les sélections du menu Use the 4 way navigation control to move through the menu selections ...

Page 28: ...tte routine automatique le cadre de mise au point devient vert Si la mise au point automatique et la routine d exposition n ont pas réussi le cadre devient rouge Si cela se produit relâchez simplement le bouton de l obturateur et répétez cette étape jusqu à ce que le cadre devienne vert Dans certaines situations l éclairage et le contraste peuvent se révéler insuffisants pour que l appareil photo ...

Page 29: ...es scènes En mode Vidéo le menu de fonction s affiche et permet d apporter des changements au paramètre de Résolution vidéo AWB Mesure et mode Couleur Appuyez sur le bouton FUNC FONC de votre appareil photo pour lancer le menu Fonction Appuyez à nouveau sur le bouton FUNC FONC pour fermer le menu La barre de Menu affiche l état actuel des paramètres de l appareil photo Seules les fonctions disponi...

Page 30: ... LCD Pour afficher des images vidéos clips audio suivez les étapes ci dessous Faites glisser le sélecteur de mode sur le mode Lecture 1 L écran LCD affiche une image Pour comprendre les icônes et autres informations sur 2 l écran Image fixe Utilisez les touches 3 ou pour afficher l image vidéo audio suivante précédente Pour lire un clip vidéo ou audio appuyez sur le 4 bouton OK ...

Page 31: ...umérique Pour aller dans le Menu Configuration Appuyez sur le bouton 1 Menu pour lancer le menu Enregistrement Lecture Utilisez les touches 2 ou pour basculer l onglet du menu sur le menu Configuration Utilisez les touches 3 ou pour parcourir les sélections du menu Pour sélectionner un élément appuyez sur le 4 bouton OK ou sur la touche Changez les paramètres du sous menu à l aide du contrôle de n...

Page 32: ...ne copie de votre facture d origine datée comme preuve d achat et le numéro RMA émis Les frais d envoi seront à votre charge lors de l envoi du produit au centre de réparation L agent de service vous fournira une adresse et les frais d envoi seront aussi à votre charge pour l envoi au centre de réparation sous garantie Une fois votre produit reçu par ce centre de réparation un appareil de remplace...

Page 33: ...3 Espagne Espagnol 34 914533458 Suisse Allemand Français Italien 41 18009686 RU Anglais 44 2073652400 Amérique du Nord États Unis Anglais 1 866 694 7633 Canada Anglais et français 1 866 694 7633 Pays Langue Ville Numéro Mexique Espagnol Mexico City 52 55 1204 8185 Guadalajara 52 33 1031 3872 Monterrey 52 81 1107 2639 Vénézuela Espagnol Caracas 58 212 335 4574 Colombie Espagnol Perú 57 1 508 2325 P...

Page 34: ... sobre el funcionamiento de la cámara y solución de problemas lea el Manual del usuario incluido en el disco CDROM que viene con su cámara o visite http www hp com support y descárguelo de la página de soporte de la cámara ...

Page 35: ...la cámara Vista frontal 1 2 3 4 Flash 1 LED de temporizador Lámpara de ayuda 2 a AF Objetivo 3 Micrófono 4 Vista posterior 11 10 5 9 8 7 6 Pantalla LCD 5 Botones del zoom 6 Indicador LED 7 Botón Menu 8 Botón Función Borrar 9 Botón OK control de navegación de 4 10 direcciones Botón de Reproducción 11 ...

Page 36: ...r 12 Altavoz 13 Botón del obturador 14 Botón de encendido 15 Vista inferior 16 17 18 Agujero para tornillo de trípode 16 Puerta del compartimiento de las 17 baterías Compartimiento tarjeta SD 18 Vista izquierda derecha 19 20 USB 19 Anillo de la correa 20 ...

Page 37: ... recomienda encarecidamente colocar y usar la correa incluida Insertar las baterías Siga estas instrucciones para insertar las baterías en el compartimiento para las baterías Si las baterías ya están instaladas asegúrese de 1 apagar la cámara antes de quitar e insertar baterías nuevas o recargadas Abra el compartimiento de las baterías en la parte 2 inferior de la cámara como se ilustra ...

Page 38: ...36 Inserte las baterías en el compartimiento con la 3 orientación correcta como se ilustra Cierre y fije el compartimiento de las baterías 4 ...

Page 39: ...tarjeta y la cámara Abra el compartimiento de las tarjeta de memoria en la 2 parte inferior de la cámara Inserte la tarjeta SD SDHC en la ranura para tarjetas de 3 memoria con la parte metálica mirando a la parte frontal de la cámara como se ilustra a continuación Presione la tarjeta SD SDHC en la ranura de memoria 4 hasta que haga clic en su lugar Si la tarjeta no hace clic al ajustarse repita el...

Page 40: ... antes de continuar 1 Si saca la tarjeta de memoria con la cámara encendida podría dañar la tarjeta y la cámara Abra el compartimiento y tarjeta de memoria 2 Presione con cuidado la tarjeta hasta que haga clic y salga 3 de su posición Tire de la tarjeta con cuidado 4 ...

Page 41: ...l idioma deseado y presione el 2 botón OK Aceptar para seleccionar Ajustar la Fecha y Hora Utilice el control de navegación de 4 direcciones para moverse por las selecciones y 1 para cambiar los valores de la configuración Presione el 2 botón OK cuando haya finalizado Esto guardará la configuración de fecha y hora Si es necesario presione el 3 botón Menu para cerrar el menú En este punto la config...

Page 42: ... ver y editar las imágenes capturadas y reproducir vídeos y clips de audio En este modo también puede adjuntar notas de voz en una imagen El Modo de escena se selecciona por defecto cuando utiliza el botón de encendido en la cámara Cuando encienda la cámara con el botón de encendido se encenderá automáticamente en el modo de escena Cambiar entre los modos Grabación y Reproducción En el Modo de esc...

Page 43: ...cena Ajuste la cámara al modo de escena 1 Presione 2 MENU para abrir el menú Modo de escena Seleccione Modo de escena y luego presione para entrar en el submenú 3 Seleccione un modo 4 Presione el 5 botón OK para aplicar el modo seleccionado Utilice el control de navegación de 4 direcciones para moverse por las opciones del menú ...

Page 44: ...to este ajuste automático el indicador de enfoque cambiará a verde Si el enfoque y exposición automáticos no tienen éxito el indicador cambiará a rojo Si esto ocurre simplemente suelte el obturador y repita este paso hasta que el indicador cambie a verde En algunas situaciones la iluminación y el contraste pueden ser insuficientes para que la cámara complete con éxito el enfoque automático y el ni...

Page 45: ...ibles para distintos modos de grabación En el modo vídeo el menú de funciones muestra y permite realizar cambios en la configuración de Resolución de vídeo AWB Medición y Modo de Color Presione el botón FUNC en su cámara para abrir el menú de funciones Presione el botón FUNC de nuevo para cerrar el menú La barra de menús mostrará el estado actual de la configuración de la cámara Sólo aparecen las ...

Page 46: ...r imágenes vídeos o clips de audio siga estos pasos Deslice el interruptor de modos al modo Reproducción 1 El monitor LCD mostrará una imagen Para comprender los iconos y otra información en 2 la pantalla consulte Diseño de la pantalla de modo Foto Foto Utilice las teclas 3 o para ver imagen vídeo audio siguiente anterior Para reproducir una película o audio presione el 4 botón OK ...

Page 47: ...es de la cámara Para ir al menú Config Presione el 1 botón Menu para abrir el menú Grabación Reproducción Utilice las teclas 2 o para cambiar la ficha del menú al menú Config Utilice las teclas 3 o para moverse por las selecciones del menú Para seleccionar una opción presione el 4 botón OK o la tecla Cambie la configuración del submenú con el control de navegación de 4 direcciones 5 Presione el 6 ...

Page 48: ...a de su recibo de ventas original como prueba de compra y el número RMA emitido Usted se hará cargo de los gastos de envío cuando envíe el producto al centro de servicios El agente de servicios le ofrecerá una dirección y usted también se hará cargo de cualquier gasto de envío al centro de servicio de garantía Una vez recibido su producto en el centro de servicios se le enviará una unidad nueva no...

Page 49: ...España Español 34 914533458 Suizo Alemán Francés Italiano 41 18009686 RU Español 44 2073652400 Norteamérica Estados Unidos Español 1 866 694 7633 Canadá Inglés y francés 1 866 694 7633 País Idioma Ciudad Número México Español Ciudad de México 52 55 1204 8185 Guadalajara 52 33 1031 3872 Monterrey 52 81 1107 2639 Venezuela Español Caracas 58 212 335 4574 Colombia Español Perú 57 1 508 2325 Perú Espa...

Page 50: ...ameraoptionen und Hilfen zur Fehlerbehebung finden Sie im Benutzerhandbuch auf der CD ROM die Sie zusammen mit der Kamera erhalten haben Die Hilfe Seite für die Kamera können Sie sich auf der Website http www hp com support herunterladen ...

Page 51: ...l Kameraansichten Ansicht von vorn 1 2 3 4 Blitz 1 Selbstauslöser LED AF Hilfsanzeige 2 Objektiv 3 Mikrofon 4 Ansicht von hinten 11 10 5 9 8 7 6 LCD Monitor 5 Zoomtasten 6 LED Anzeige 7 Menütaste 8 Taste Funktion Löschen 9 Taste OK 4 Richtungs Navigationstaste 10 Wiedergabe Taste 11 ...

Page 52: ... oben 15 12 14 13 Stabilisatortaste 12 Lautsprecher 13 Auslöser 14 Ein Aus Taste 15 Ansicht von unten 16 17 18 Stativgewinde 16 Batterie 17 SD Kartenfach 18 Ansicht von links rechts 19 20 USB 19 Ring für Trageband 20 ...

Page 53: ... Handgelenkband an der Kamera zu befestigen Einsetzen der Akkus Setzen Sie die Batterien entsprechend der folgenden Anleitung in das Akkufach ein Wenn Sie die Batterien auswechseln möchten 1 müssen Sie zuerst die Kamera ausschalten Nehmen Sie dann die alten Batterien heraus und setzen Sie die neuen oder neu aufgeladenen Batterien ein Öffnen Sie das Batterie fach an der Unterseite der 2 Kamera sieh...

Page 54: ...52 Setzen Sie die Batterien richtig gepolt in das 3 Batteriefach ein siehe Abbildung Verschließen Sie wieder das Batterie fach 4 ...

Page 55: ...chädigt werden Öffnen Sie das Speicherkartenfach an der Unterseite der 2 Kamera Setzen Sie die SD SDHC Karte in den Speicherkartensteckplatz ein Die 3 Metallkontaktseite muss zur Vorderseite der Kamera zeigen siehe Abbildung unten Drücken Sie die SD SDHC Karte so weit in den Speichersteckplatz bis sie einrastet 4 Wenn die Karte nicht einrastet wurde die Karte möglicherweise falsch herum eingesetzt...

Page 56: ...en 1 Wenn Sie die Speicherkarte bei eingeschalteter Kamera herausnehmen können die Karte und die Kamera beschädigt werden Öffnen Sie das Speicherkartenfach 2 Drücken Sie die Karte vorsichtig in den Steckplatz hinein 3 bis sie leicht ausgeworfen wird Ziehen Sie die Karte vorsichtig heraus 4 ...

Page 57: ...bewegen Markieren Sie die gewünschte Sprache und drücken Sie zur Auswahl auf die Taste 2 OK Einstellen von Datum Zeit Verwenden Sie die 4 Wege Tastensteuerung um sich zwischen den Optionen zu 1 bewegen und die Einstellungswerte zu ändern Drücken Sie abschließend auf 2 OK Dabei werden die Einstellungen für das Datum und die Uhrzeit gespeichert Drücken Sie auf die 3 Menü Taste um das Menü zu schließ...

Page 58: ...Motivmodus eingeschaltet Wenn Sie die Kamera durch Drücken der Ein Aus Taste einschalten gelangt sie automatisch in den Motivmodus Wiedergabemodus Im Wiedergabemodus können Sie die Fotos Videos und Audioclips wiedergeben und bearbeiten In diesem Modus können Sie auch zu beliebigen Bildern Sprachnotizen hinzufügen Wechseln zwischen Motivmodus und Wiedergabemodus Drücken Sie im Motivmodus auf die Wi...

Page 59: ...e die Kamera in den Motivmodus 1 Drücken Sie auf 2 MENU um das Aufnahme Menü zu starten Wählen Sie Motivmodus und drücken Sie dann auf um ins Untermenü zu 3 gelangen Wählen Sie einen Modus 4 Drücken Sie auf 5 OK um den gewählten Modus zu speichern Mit der 4 Richtungs Navigationstaste können Sie sich durch die Menüeinträge bewegen ...

Page 60: ...chtung ein Wenn die Kamera diese automatische Routine abgeschlossen hat wird der Fokusrahmen grün Hat sie die Routine nicht erfolgreich abgeschlossen wird er rot In diesem Fall lassen Sie den Auslöser los und wiederholen den Vorgang so lange bis der Fokusrahmen grün ist In bestimmten Situationen sind die Licht und Kontrastbedingungen so schlecht dass die Kamera den Fokus und die Belichtung nicht e...

Page 61: ...Einstellungen Messung und Farbmodus vorhanden sein Im Videomodus wird das Funktionsmenü angezeigt und es können Änderungen bei der Videoauflösung AWB Messung und Farbmodus eingestellt werden Drücken Sie auf die Taste FUNC um das Funktionsmenü z starten Drücken Sie erneut auf FUNC um das Menü zu schließen Auf der Menüleiste wird der aktuelle Status der Kameraeinstellungen gezeigt Nur die für eine b...

Page 62: ...dioclips abspielen möchten führen Sie die folgenden Schritte aus Schalten Sie den Modusschalter auf den Wiedergabemodus 1 Auf dem LCD Monitor wird ein Bild angezeigt Die Symbole und weitere Informationen 2 die auf dem Bildschirm angezeigt werden werden auf Der Monitor im Fotomodus beschrieben Foto Mit der Tasten 3 und können Sie zum nächsten vorhergehenden Foto Video Audioclip wechseln Um einen Vi...

Page 63: ...llungen vornehmen So gelangen Sie ins Menü Setup Drücken Sie auf die 1 Menü Taste um das Aufnahme Wiedergabemenü zu starten Wechseln Sie mit 2 oder auf die Registerkarte des Menüs Setup Mit 3 und können Sie sich durch die Menüoptionen bewegen Um einen Eintrag auszuwählen drücken Sie auf 4 OK oder Ändern Sie die Untermenüeinstellungen mit der 4 Richtungs Navigationstaste 5 Drücken Sie auf 6 OK um d...

Page 64: ...antieansprüchen sind eine Kopie der Erstkaufquittung als Kaufnachweis und die Warenrücksendenummer erforderlich Bei einem Versand zum Service Center trägt der Endbenutzer die Kosten des Versands Vom Kundendienstmitarbeiter erhalten Sie eine Adresse an die Sie das Produkt senden müssen Als Endbenutzer tragen Sie die Kosten für den Versand zum Garantieservice Center Nach Eingang des Produkts im Serv...

Page 65: ...3 Spanien Spanish 34 914533458 Schweiz Deutsch Französisch Italienisch 41 18009686 UK Englisch 44 2073652400 Nordamerika USA Englisch 1 866 694 7633 Kanada Englisch und Französisch 1 866 694 7633 Land Sprache Stadt Nummer Mexiko Spanisch Mexiko Stadt 52 55 1204 8185 Guadalajara 52 33 1031 3872 Monterrey 52 81 1107 2639 Venezuela Spanisch Caracas 58 212 335 4574 Kolumbien Spanisch Peru 57 1 508 232...

Page 66: ...a videocamera e sulla risoluzione dei problemi consultare il Manuale dell utente contenuto sul CD fornito a corredo con la videocamera oppure visitare il sito http www hp com support e scaricare il manuale dalla pagina di assistenza della videocamera ...

Page 67: ...riore 1 2 3 4 Flash 1 LED autoscatto Lampada di assistenza 2 Autofocus Obiettivo 3 Microfono Vista posteriore 4 Vista posteriore 11 10 5 9 8 7 6 Schermo di visualizzazione LCD 5 Pulsanti Zoom 6 Indicatore LED 7 Pulsante Menu 8 Pulsante FUNZ Cancella 9 Pulsante OK Controllo di navigazione 10 a 4 vie Pulsante Riproduzione 11 ...

Page 68: ...12 Altoparlante 13 Pulsante Otturatore 14 Pulsante dell alimentazione 15 Vista inferiore 16 17 18 Foto vite per il treppiedi 16 Sportello vano batteria 17 Alloggiamento scheda di memoria 18 Vista sinistra destra 19 20 USB 19 Anello per il cinturino 20 ...

Page 69: ... vivamente consigliato attaccare e usare il cinghiolino fornito Inserimento delle batterie Le istruzioni seguenti illustrano come inserire le batterie AA nel vano batterie di memoria Se le batterie sono già installate spegnere la 1 fotocamera prima di rimuovere le batterie vecchie e inserire quelle nuove o ricaricate Aprire il vano batterie di memoria nella parte bassa 2 della fotocamera come illu...

Page 70: ...68 Inserire le batterie nel vano batterie con 3 l orientamento corretto come indicato Chiudere e bloccare il vano batteria 4 ...

Page 71: ...n la fotocamera accesa può danneggiare la scheda e la fotocamera Aprire il vano scheda di memoria nella parte bassa della 2 fotocamera Inserire la scheda SD SDHC nello slot della scheda di 3 memoria orientando i contatti metallici verso il lato anteriore della fotocamera come illustrato sotto Spingere la scheda SD SDHC nello slot di memoria finché non scatta in posizione 4 Se la scheda non scatta ...

Page 72: ... 1 spenta La rimozione della scheda di memoria con la fotocamera accesa può danneggiare la scheda e la fotocamera Aprire il vano per schede di memoria 2 Spingere con delicatezza la scheda finché non da uno 3 scatto e viene spinta verso l esterno Estrarre la scheda con molta attenzione 4 ...

Page 73: ...idenziare la lingua desiderare e premere 2 OK per selezionare Impostazione di data e ora Usare il controllo di navigazione multi direzionale per scorrere le selezioni e cambiare i 1 valori delle impostazioni Premere il 2 pulsante 2 OK quando terminato Quest operazione si salva la data e l ora impostate Se necessario premere il 3 3 pulsante Menu per chiudere il menu A questo punto le impostazioni p...

Page 74: ...one per accendere la fotocamera Quando si accende la fotocamera utilizzando il pulsante Alimentazione questa viene impostata automaticamente in modalità Scena Modalità di riproduzione Impostare la fotocamera in modalità Riproduzione per visualizzare e modificare le foto scattate nonché per riprodurre video e clip audio In questa modalità è anche possibile allegare un promemoria vocale a una qualsi...

Page 75: ...atto Impostare la fotocamera in modalità Scatto 1 Premere 2 MENU per avviare il menu della modalità Scatto Selezionare Mod scatto e premere per entrare nel sottomenu 3 Selezionare una modalità 4 Premere 5 OK per applicare la modalità selezionata Utilizzare il controllo di navigazione a 4 tasti per spostarsi nelle voci del menu ...

Page 76: ...on successo questa routine automatica il riquadro di messa a fuoco diventa verde Se la routine di messa a fuoco esposizione automatica non va a buon fine il riquadro di messa a fuoco diventa rosso Quando si verifica questa eventualità basta rilasciare l otturatore e ripetere questo passo fino a quando il riquadro di messa a fuoco non diventa verde In alcune situazioni l illuminazione e il contrast...

Page 77: ...i per le diverse modalità di scena Nella modalità video il menu funzione visualizza i permette di effettuare modifiche alle impostazioni della risoluzione video AWB misurazione e modalità colore Premere il pulsante FUNZ sulla fotocamera per aprire il menu Funzioni Premere nuovamente il pulsante FUNZ sulla fotocamera per chiudere il menu La barra di Menu visualizza lo stato corrente delle impostazi...

Page 78: ...clip audio attenersi alla procedura seguente Portare l interruttore di modalità sulla modalità Riproduzione 1 Il monitor LCD visualizza un immagine Per comprendere le icone e le altre informazioni 2 fornite sullo schermo vedere Disposizione della schermo in modalità foto Fotografia Utilizzare i tasti 3 o per visualizzare l immagine video audio successivo o precedente Per riprodurre un filmato o cl...

Page 79: ...li della fotocamera Per aprire il menu Configurazione Premere il 1 pulsante Menu per avviare il menu Registrazione Riproduzione Utilizzare i tasti 2 e per passare la scheda del menu al menu Configurazione Utilizzare i tasti 3 o per spostarsi nelle voci del menu Per selezionare una voce premere il 4 pulsante OK o tasto Cambiare le impostazioni del sottomenu utilizzando il controllo di navigazione a...

Page 80: ...cessario fornire una copia della ricevuta di vendita originale come prova d acquisto e il numero di RMA L utente sarà responsabile delle spese di spedizione per l invio del prodotto al centro assistenza L agente di garanzia fornirà un indirizzo e l utente sarà responsabile per qualsiasi spesa si spedizione trasporto al centro di assistenza Quando il prodotto sarà stato ricevuto dal centro assisten...

Page 81: ...lo 34 914533458 Svizzera Tedesco francese italiano 41 18009686 Regno Unito Inglese 44 2073652400 Nord America Stati Uniti Inglese 1 866 694 7633 Canada Inglese e francese 1 866 694 7633 Paese Lingua Città Numero Messico Spagnolo Città del Messico 52 55 1204 8185 Guadalajara 52 33 1031 3872 Monterrey 52 81 1107 2639 Venezuela Spagnolo Caracas 58 212 335 4574 Colombia Spagnolo Perú 57 1 508 2325 Per...

Page 82: ...eração da câmara e resolução de problemas por favor leia o Manual do Utilizador incluído no disco CD ROM que acompanha sua câmara ou visite http www hp com support e faça download da página de suporte da câmara Tour of Your HP Camera ...

Page 83: ... da câmara Vista Frontal 1 2 3 4 Flash 1 LED cronómetro automático Lâmpada 2 de Assist FA Lente 3 Microfone 4 Vista Traseira 11 10 5 9 8 7 6 Ecrã LCD 5 Botões de Zoom 6 Indicador LED 7 Botão do menu 8 Botão Função Eliminar 9 Botão OK controlo de navegação de 4 10 direcções Botão Reprodução 11 ...

Page 84: ...ador 12 Altifalante 13 Botão do obturador 14 Botão de alimentação 15 Vista Inferior 16 17 18 Furo do parafuso do tripé 16 Porta do compartimento da Bateria 17 Compartimento do cartão SD 18 Vista Esquerda Direita 19 20 Saída USB 19 Anel da alça 20 ...

Page 85: ...da se que utilize a alça para câmara fornecida Colocação das baterias Siga as instruções para introduzir as baterias no compartimento de cartão de bateria Se as baterias já estiverem instaladas certifique se 1 que desliga a câmara antes de retirar e colocar as baterias recarregadas ou novas Abra o compartimento do cartão de bateria na parte 2 inferior da câmara conforme ilustrado ...

Page 86: ...84 Introduza as baterias no compartimento com a 3 orientação correcta conforme ilustrado Feche e bloqueie o compartimento de cartão de bateria 4 ...

Page 87: ...ar o cartão e a câmara Abra o compartimento do cartão de memória na parte 2 inferior da câmara Insira o cartão SD SDHC na ranhura do cartão de 3 memória com a parte metálica voltada para a parte da frente da câmara conforme ilustrado em baixo Empurre o cartão SD SDHC para dentro da ranhura do cartão até que se encaixe com 4 um clique Se o cartão não clicar no lugar repita o passo anterior para ass...

Page 88: ...sliga a câmara antes de continuar 1 Remover o cartão de memória quando ligado pode danificar o cartão e a câmara Abra o compartimento do cartão de memória 2 Prima suavemente o cartão até que clique e saia de 3 posição Retire o cartão cuidadosamente 4 ...

Page 89: ...lecções 1 Destaque o idioma desejado e prima o 2 botão OK para seleccionar Configurar a data hora Utilize o controlo de navegação de 4 direcções para percorrer as selecções e alterar os 1 valores das definições Prima o botão OK 2 quando terminar As suas configurações de data e hora serão guardadas Se necessário prima o 3 botão do Menu para fechar o menu Neste ponto as configurações da câmara estão...

Page 90: ... botão Power para ligar a câmara Quando ligar sua câmara com o botão Power o modo Cena é automaticamente activado Modo Reprodução Coloque sua câmara no modo Reprodução para que possa visualizar e editar imagens capturadas bem como reproduzir vídeos e clipes de áudio Pode anexar uma memória de voz a qualquer imagem neste modo Alternar entre o modo Cena e o modo Reprodução No modo Gravação prima o b...

Page 91: ... Scena Impostare la fotocamera in modalità scena 1 Premere 2 MENU per avviare il menu della modalità Scena Selezionare Mod scena e premere per entrare nel sottomenu 3 Selezionare una modalità 4 Premere 5 OK per applicare la modalità selezionata Utilizzare il controllo di navigazione a 4 tasti per spostarsi nelle voci del menu ...

Page 92: ...rotina automática o colchete de focagem ficará verde Se a focagem automática e rotina de exposição não forem bem sucedidas o colchete ficará vermelho Se isto ocorrer liberte simplesmente o obturador e repita este passo até que o colchete fique verde Em algumas situações a iluminação e o contraste podem ser insuficientes para a câmara concluir com sucesso a focagem automática e rotina de nível de e...

Page 93: ...ações ISO Medição e Cor para diferentes modos de gravação No modo Vídeo o menu Funções apresenta e permite alterar a configuração de resolução de vídeo AWB Medição e Cor Prima o botão FUNC da sua câmara para abrir o Menu Funções Prima novamente o botão FUNC para fechar o menu A barra de Menu exibe o estado actual das configurações da câmara Apenas as funções disponíveis para as configurações são e...

Page 94: ...monitor LCD Para visualizar imagens filmes clipes de áudio siga os passos abaixo Seleccionar o modo de Reprodução 1 O monitor LCD exibe uma imagem Para entender os ícones e outras informações no 2 ecrã veja Layout do ecrã no modo Foto Imagem Estática Use as teclas 3 ou para ver a imagem vídeo áudio anterior seguinte Para reproduzir um clipe de áudio ou filme prima o 4 botão OK ...

Page 95: ...gerais na câmara Para ir para o menu Configuração Prima o 1 botão do Menu para abrir o Menu Gravar Reprodução Use as teclas 2 ou para mudar o separador do menu para o menu Configuração Use as teclas 3 ou para percorrer as selecções do menu Para seleccionar um item prima o botão OK 4 ou a tecla Altere as configurações do submenu com a utilização do controlo de navegação de 4 5 direcções Prima o 6 b...

Page 96: ...da nota de compra com a data da compra original como prova de compra e também o número do RMA emitido Os custos de envio serão de sua responsabilidade quando enviar o produto para a assistência técnica A assistência técnica fornecerá um endereço e será também de sua responsabilidade qualquer custo de envio para o centro de serviços de garantia Assim que o seu produto for recebido por este centro d...

Page 97: ...a Espanhol 34 914533458 Suíça Alemão Francês Italiano 41 18009686 RU Inglês 44 2073652400 América do Norte Estados Unidos Inglês 1 866 694 7633 Canadá Inglês e Francês 1 866 694 7633 País Idioma Cidade Número México Espanhol Cidade do México 52 55 1204 8185 Guadalajara 52 33 1031 3872 Monterrey 52 81 1107 2639 Venezuela Espanhol Caracas 58 212 335 4574 Colômbia Espanhol Perú 57 1 508 2325 Perú Esp...

Page 98: ...erking van de camera en foutopsoring de Gebruikershandleiding die zich bevindt op de cd rom die bij uw camera geleverd wordt of ga naar http www hp com support en download daar de pagina voor de cameraondersteuning Tour of Your HP Camera ...

Page 99: ...tsch Español Overzicht van de camera Vooraanzicht 1 2 3 4 Flitser 1 Zelfontspanner LED AF hulplamp 2 Lens 3 Microfoon 4 Achteraanzicht 11 10 5 9 8 7 6 LCD scherm 5 Zoomknoppen 6 LED indicator 7 Menuknop 8 Functie Verwijderknop 9 OK knop 4 weg navigatiebesturing 10 Afspeelknop 11 ...

Page 100: ...ht 15 12 14 13 Stabilisatieknop 12 Luidsprkr 13 Sluiterknop 14 Power knop 15 Onderaanzicht 16 17 18 Schroefgat voor statief 16 Batterijvak 17 SD kaartvak 18 Rechter linkeraanzicht 19 20 Usb poort 19 Ring voor riem 20 ...

Page 101: ...len om de meegeleverde camerariem te bevestigen en te gebruiken De batterijen plaatsen Volg deze instructies om de batterijen in het batterijcompartiment te plaatsen Wanneer er al batterijen geplaatst zijn zorg er 1 dan voor dat de camera uitgeschakeld is voordat u batterijen verwijdert en opgeladen of nieuwe batterijen plaatst Open het batterijvak aan de onderzijde van de 2 camera zoals op de afb...

Page 102: ...100 Plaats de batterijen in de juiste richting in het vak 3 zoals op de afbeelding staat Sluit en vergrendel het batterijvak 4 ...

Page 103: ...ijl de camera aanstaat kunnen zowel de kaart als de camera beschadigd raken Open het geheugenkaartvak aan de onderkant van de 2 camera Plaats de SD SDHC kaart in de geheugenkaartsleuf met 3 de metalen contactpunten naar de achterkant van de camera gericht zoals onderstaand staat aangegeven Duw de SD SDHC kaart in de geheugensleuf totdat de kaart op z n plek klikt Wanneer 4 de kaart niet op zijn pl...

Page 104: ... verdergaat 1 Wanneer u de geheugenkaart verwijdert terwijl de camera aanstaat kunnen zowel de kaart als de camera beschadigd raken Open het geheugenkaartvak 2 Druk voorzichtig op de kaart totdat die klikt en uit zijn 3 positie naar buiten schuift Verwijder de kaart voorzichtig 4 ...

Page 105: ...laderen 1 Markeer de gewenste taal en druk op de 2 OK knop om een selectie te maken Datum en tijd instellen Gebruik de 4 wegnavigatie om door de selecties te bladeren en de instellingswaarden 1 te wijzigen Druk op de 2 OK knop als u klaar bent Daarmee zullen de instellingen van datum en tijd worden opgeslagen Indien nodig drukt u nog eens op de 3 Menuknop om het menu te sluiten Op dat moment worde...

Page 106: ...wer knop gebruikt wordt om de camera in te schakelen Wanneer u uw camera aanzet met gebruik van de Power knop zal die automatisch in de scènemodus gezet worden Afspeelmodus Zet uw camera in de Afspeelmodus zodat u gemaakte foto s kunt bekijken en bewerken en video s en audiofragmenten kunt afspelen U kunt in deze modus ook een spraakmemo aan foto s toevoegen Schakelen tussen de Opnamemodus en de a...

Page 107: ...el de cameramodus in de Opnamemodus 1 Druk op 2 MENU om het Scènemodusmenu te openen Selecteer Opnamemodus en druk dan op enter om toegang te krijgen tot het 3 submenu Selecteer een modus 4 Druk op de 5 OK knop om de geselecteerde modus in te schakelen Gebruik de 4 wegnavigatiebesturing om door de menuselecties te bladeren ...

Page 108: ... het scherpstelkader groen worden Wanneer de automatische scherpstel en belichtingsprocedure niet succesvol is verlopen zal het scherpstelkader rood worden Wanneer dat gebeurt laat u eenvoudig de sluiterknop los en herhaalt u deze stap totdat het scherpstelkader groen wordt In sommige situaties kan er te weinig licht en contrast zijn zodat de camera de procedure van automatische scherpstelling en ...

Page 109: ...licht beschikbaar voor de verschillende scènemodi In de Videomodus wordt het functiemenu weergegeven en kunt u wijzigingen aanbrengen in de instellingen van de Videoresolutie AWB Meting en Kleurenmodus Druk op de knop FUNC van uw camera om het Functiemenu te openen Druk nogmaals op de knop FUNC om het menu te sluiten De menubalk toont de actuele status van de camerainstellingen Alleen de beschikba...

Page 110: ...o s geluidsfragmenten te bekijken volgt u onderstaande stappen Schuif de Modusknop in de Afspeelmodus 1 Op het LCD scherm verschijnt een beeld Voor meer informatie over de pictogrammen 2 en andere zaken op het scherm zie Schermindeling van de fotomodus Foto Gebruik de toets 3 of om de het vorige volgende foto video geluidsfragment te bekijken Om een film of een geluidsfragment af te spelen drukt u...

Page 111: ...t menu Instellingen Druk op de 1 Menuknop om het menu Opnemen afspelen te openen Gebruik de toets 2 of om naar het tabblad te gaan boven in het scherm van het Instellingen menu Use the keys to move through the menu selections 3 Gebruik de toets 4 of om door de beschikbare keuzes te lopen Selecteer een item door te drukken op de 5 OK knop of toets Verander de instellingen van een submenu met de 4 w...

Page 112: ...erkoopbon als aankoopbewijs en het uitgegeven RMA nummer overleggen U bent verantwoordelijk voor de verzendkosten indien het product naar het servicecentrum verzonden moet worden De service agent zal u een adres geven en u bent tevens verantwoordelijk voor verzendkosten naar het garantie serivce centrum Zodra uw product door dit servicecentrum ontvangen is zal er gewoonlijk binnen 5 werkdagen een ...

Page 113: ...ederland Nederlands 31 202015093 Schweiz Deutsch Français Italiano 41 18009686 UK English 44 2073652400 North America United States English 1 866 694 7633 Canada English en Français 1 866 694 7633 Land Taal Stad Nummer México Español Mexico City 52 55 1204 8185 Guadalajara 52 33 1031 3872 Monterrey 52 81 1107 2639 Venezuela Español Caracas 58 212 335 4574 Colombia Español Bogota 57 1 508 2325 Perú...

Page 114: ...i na temat aparatu fotograficznego i rozwiązywania problemów znajdziesz w Instrukcji Obsługi na dysku CDROM dołączonym do aparatu Możesz także odwiedzić stronę http www hp com support i pobrać ją ze strony wsparcia aparatu ...

Page 115: ...odu 1 2 3 4 Lampa błyskowa 1 Dioda samowyzwalacza lampka 2 pomocnicza automatycznego ustawiania ostrości AF Obiektyw 3 Mikrofon 4 Widok z tyłu 11 10 5 9 8 7 6 Wyświetlacz LCD 5 Przyciski zoomu 6 Wskaźnik diodowy 7 Przycisk menu 8 Przycisk funkcji usuwania 9 Przycisk OK 4 przyciski nawigacji 10 Przycisk odtwarzania 11 ...

Page 116: ...3 Przycisk Stabilizator 12 Głośnik 13 Spust migawki 14 Przycisk POWER 15 Widok z dołu 16 17 18 Gwintowany otwór na statyw 16 Komora baterii 17 Komora karty SD 18 Widok z lewej prawej strony 19 20 Gniazdo USB 19 Zaczep na pasek 20 ...

Page 117: ...o upuszczenia aparatu zaleca się przymocowanie do niego i używanie paska załączonego w opakowaniu Wkładanie baterii Aby włożyć baterie do komory baterii wykonaj poniższe instrukcje Jeśli baterie są już włożone przed ich wyjęciem 1 i włożeniem nowych lub naładowanych należy wyłączyć aparat Otwórz komorę baterii na spodzie aparatu jak 2 pokazano na rysunku ...

Page 118: ...116 Włóż baterie do komory we właściwym kierunku 3 zgodnie z rysunkiem Zamknij i zablokuj komorę baterii 4 ...

Page 119: ...ci do włączonego aparatu może doprowadzić do uszkodzenia karty lub aparatu Otwórz komorę karty pamięci na spodzie aparatu 2 Włóż kartę SD SDHC do gniazda karty pamięci tak aby 3 metalowe stykibyły skierowane w stronę tyłu aparatu jak pokazano poniżej Wepchnij kartę SD SDHC do gniazda aż zaskoczy na miejscu Jeśli karta nie zaskoczy 4 powtórz poprzedni krok upewniając się że kierunek wkładania karty...

Page 120: ...m wyłącz aparat Wyjmowanie karty 1 pamięci z włączonego aparatu może doprowadzić do uszkodzenia karty lub aparatu Otwórz komorę karty pamięci 2 Delikatnie popchnij kartę aż usłyszysz kliknięcie i karta 3 zostanie zwolniona Ostrożnie wysuń kartę 4 ...

Page 121: ...zycisków kierunkowych 1 Zaznacz żądany język i naciśnij 2 przycisk OK aby go wybrać Ustawianie daty i czasu Przy użyciu 4 przycisków kierunkowych przechodź do poszczególnych pozycji i 1 odpowiednio zmieniaj wartości Po zakończeniu naciśnij 2 przycisk OK Ustawiona data i czas zostaną zapisane W razie potrzeby naciśnij 3 przycisk Menu aby zamknąć menu Aparat jest teraz ustawiony na domyślny tryb aut...

Page 122: ... po włączeniu aparatu przyciskiem POWER Oznacza to że po naciśnięciu przycisku POWER w celu włączenia aparatu automatycznie zostanie ustawiony tryb rejestrowania Tryb odtwarzania W trybie odtwarzania można przeglądać i edytować zapisane zdjęcia a także odtwarzać filmy i pliki dźwiękowe Możliwe jest także przypisanie notatki głosowej do dowolnego zdjęcia Przełączanie pomiędzy trybem rejestrowania a...

Page 123: ...owania Ustaw aparat na tryb rejestrowania 1 Naciśnij przycisk 2 MENU aby uruchomić menu trybu rejestrowania Wybierz tryb rejestrowania a następnie naciśnij przycisk aby wejść do podmenu 3 Wybierz tryb 4 Naciśnij 5 przycisk OK aby zastosować wybrany tryb Aby przemieszczać się po opcjach menu użyj 4 przycisków kierunkowych ...

Page 124: ...n się powiedzie ramka ostrości zmieni kolor na zielony Jeśli automatyczne ustawianie ostrości i ekspozycji się nie powiedzie ramka stanie się czerwona W takiej sytuacji wystarczy zwolnić spust migawki i powtórzyć ten proces aż ramka będzie zielona W niektórych sytuacjach oświetlenie i kontrast mogą być niewystarczające do wykonania prawidłowej automatycznej regulacji ostrości i poziomu ekspozycji ...

Page 125: ... balansu bieli AWB ISO pomiaru i trybu kolorów W trybie wideo menu funkcji zawiera i umożliwia modyfikowanie ustawień rozdzielczości wideo automatycznego balansu bieli AWB pomiaru i trybu kolorów Aby wyświetlić menu funkcji naciśnij przycisk FUNC na aparacie Aby zamknąć menu naciśnij ponownie przycisk FUNC Pasek menu pokazuje aktualny stan ustawień aparatu Na pasku menu wyświetlane są tylko ikony ...

Page 126: ...odtwarzać zdjęcia filmy pliki dźwiękowe wykonaj poniższe czynności Przesuń przełącznik trybu na tryb odtwarzania 1 Na ekranie LCD zostanie wyświetlony obraz Aby poznać znaczenie ikon i innych 2 informacji ekranowych zob Układ ekranu w trybie zdjęć Zdjęcie Aby przejść do następnego poprzedniego zdjęcia filmu pliku dźwiękowego naciśnij 3 przycisk lub Aby odtworzyć film lub plik dźwiękowy naciśnij 4 ...

Page 127: ...wać ogólne ustawienia aparatu Aby wejść do menu ustawień Naciśnij przycisk menu 1 aby wyświetlić menu fotografowania nagrywania lub odtwarzania Przy użyciu przycisków 2 i przejdź do karty menu Ustawienia w górnej części ekranu Aby przemieszczać się po menu używaj przycisków 3 i Aby wybrać opcję naciśnij 4 przycisk OK lub przycisk Aby zmienić ustawienia podmenu użyj 4 przycisków kierunkowych 5 Aby ...

Page 128: ...ej zostaniesz poproszony o dostarczenie kopii dowodu zakupu i wydanego numeru RMA Opłaty pocztowe za odesłanie sprzętu do serwisu ponosisz ty Pracownik serwisu poda ci adres a wszystkie koszty przesłania sprzętu do gwarancyjnego centrum serwisu także ponosisz ty Centrum serwisowe przesyła sprzęt zastępczy na ogół w ciągu 5 roboczych dni od chwili otrzymania twojego urządzenia Pomoc techniczna kont...

Page 129: ...and Nederlandsk 31 202015093 Schweiz Deutsch Français Italiano 41 18009686 UK English 44 2073652400 North America United States English 1 866 694 7633 Canada English Français 1 866 694 7633 Kraj Język Miasto Numer México Español Mexico City 52 55 1204 8185 Guadalajara 52 33 1031 3872 Monterrey 52 81 1107 2639 Venezuela Español Caracas 58 212 335 4574 Colombia Español Bogota 57 1 508 2325 Perú Espa...

Page 130: ......

Page 131: ...P N 7525C00256A ...

Reviews: