background image


Illustrated parts catalog 

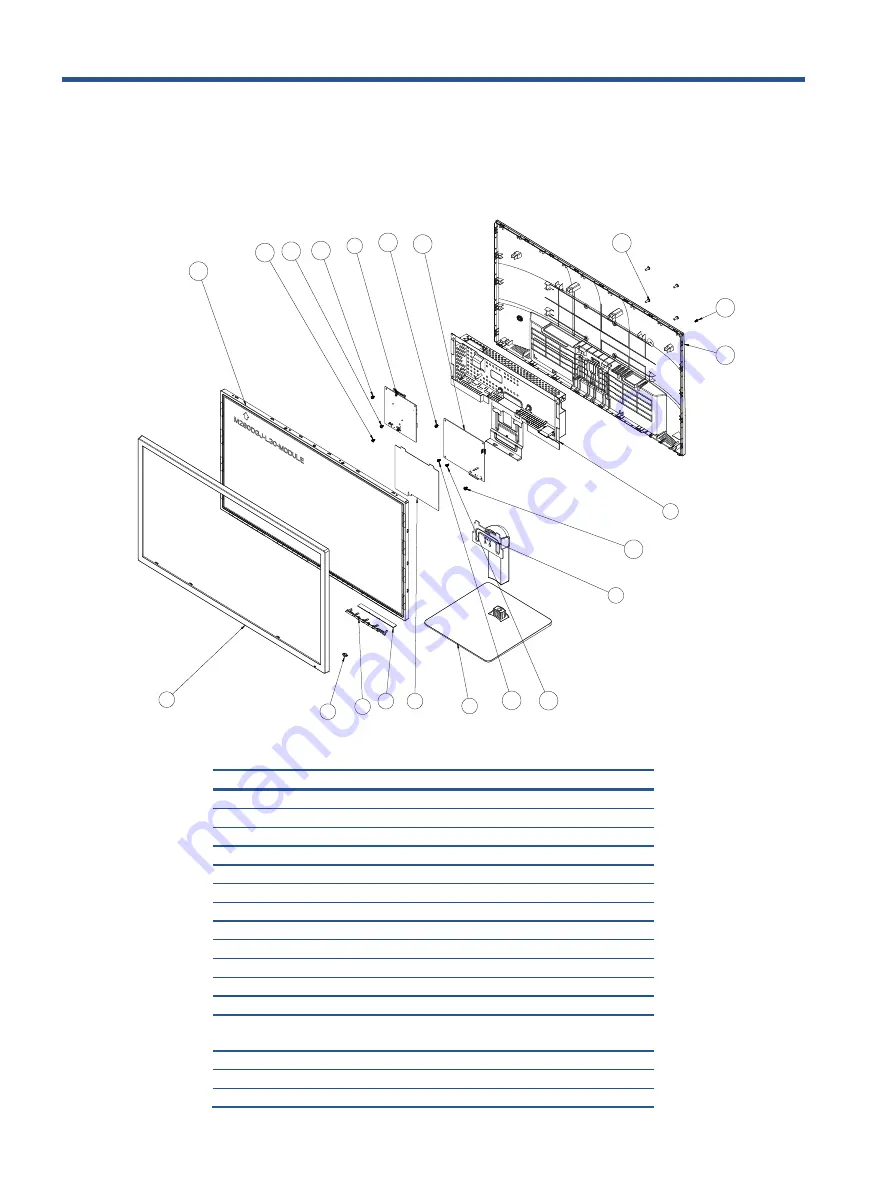
To identify the monitor major components, use this illustration and table. 


 3 

 4 

 6 

 7 

 8 

 9 

 10 

 11 

 1 

 2 

 12 

 15 

 13 

 13 

 13 

 13 

 13 

 13 

 16 

 14 

 5 


Item 

Description 

Qty 

1


BASE_ASS’Y NA NA


1


2


stand ass'y NA NA


1


4


BEZEL L28W-Dhp3-s3


1


5


INSULATING SHEET 150*135.2*0.43


1


6


KEY_FUNCTION


1


7


KEY BOARD


1


8


LENS


1


9


MAINFRAME


1


10


ADAPTER BOARD NA


1


10


CONVERSION 715GA936*


1


11


REAR_COVER L28W-Dhp3-s3


1


12


LCD M280DGJ-L30 C5 NB INX


1


13


SCREW D3 6(MAIN BOARD/POWER 
BOARD/MAINFRAME)


6


14


11REW P3 6(REAR COVER/MAINFRAME)


1


15


SCREW M4 8(POWER BOARD/MAINFRAME)


1


16


SCREW M4 10(REAR COVER/MAINFRAME)


4


Summary of Contents for V28 4K

Page 1: ...Maintenance and Service Guide HP V28 4K model SUMMARY This guide provides information about spare parts removal and replacement of parts diagnostic tests problem troubleshooting and more ...

Page 2: ...States and other countries The information contained herein is subject to change without notice The only warranties for HP products and services are set forth in the express warranty statements accompanying such products and services Nothing herein should be construed as constituting an additional warranty HP shall not be liable for technical or editorial errors or omissions contained herein First...

Page 3: ... 2 Monitor features 3 Features 3 Front components 4 Rear components 5 Locating the serial number and product number 6 3 Illustrated parts catalog 7 How to order parts 8 4 Removal and replacement procedures 9 Preparation for disassembly 9 RC 10 Power board 15 Connector repair 16 HDMI1 connector CN501 17 HDMI 2 connector CN510 18 DP connector CN5301 19 Audio connector CN603 19 Function test 20 Funct...

Page 4: ...e on the Web at http www hp com ergo IMPORTANT For the protection of the monitor and the computer connect all power cords for the computer and its peripheral devices such as a monitor printer scanner to a surge protection device such as a power strip or uninterruptible power supply UPS Not all power strips provide surge protection the power strip must be specifically labeled as having this capabil...

Page 5: ...tance in Electrical and Electronic Equipment Directive is a legal requirement by the EU European Union for the global electronics industry sold in the EU and other countries Any electrical and electronics products launched in the market after June 2006 should meet this RoHS requirement Products launched in the market before June 2006 are not required to be compliant with RoHS parts If the original...

Page 6: ...ce HDMI video inputs cable included with select products Audio out headphone jack Four on screen display OSD buttons three that you can reconfigure to quickly allow selection of the most commonly used operations Plug and Play capability if supported by your operating system VESA mounting bracket for attaching the monitor head to a wall mount device or swing arm Support for a mounting bracket to at...

Page 7: ...ns to navigate through the menu The function light icons indicate the default button functions For a description of thesefunctions see Using the function buttons on page 14 You can reassign the function buttons to quickly select the most commonly usedoperations See Reassigning the function buttons on page 14 3 Power button Turns the monitor on or off NOTE Be sure the master power switch on the mon...

Page 8: ...nect the HDMI cable to a source device such as a computer or game console 4 DisplayPort connector Connects the DisplayPort cable to a source device such as a computer or gameconsole 5 Audio out headphone jack Connects headphones to the monitor CAUTION To reduce the risk of personal injury adjust the volume before using headphones or earbuds For additional safety information see the Product Notices...

Page 9: ... number and product number The serial number and product number are located on a label on the rear of the monitor panel You may need these numbers when contacting HP about the monitor model For worldwide models except India ...

Page 10: ... stand ass y NA NA 1 4 BEZEL L28W Dhp3 s3 1 5 INSULATING SHEET 150 135 2 0 43 1 6 KEY_FUNCTION 1 7 KEY BOARD 1 8 LENS 1 9 MAINFRAME 1 10 ADAPTER BOARD NA 1 10 CONVERSION 715GA936 1 11 REAR_COVER L28W Dhp3 s3 1 12 LCD M280DGJ L30 C5 NB INX 1 13 SCREW D3 6 MAIN BOARD POWER BOARD MAINFRAME 6 14 11REW P3 6 REAR COVER MAINFRAME 1 15 SCREW M4 8 POWER BOARD MAINFRAME 1 16 SCREW M4 10 REAR COVER MAINFRAME...

Page 11: ...F 20 25V 10 20 ERS1EM681G2 EC 680UF 20 25V 10 20 4000 ECR1EXY68 C918 Digi Key ESY687M025AH4AA Connectors by manufacturer Component description Location identifier Component distributor Distributer part number AUDIO CN603 RS 913 1021 RS PRO HDMI CN501 CN510 RS SD 47151 001 Molex DisplayPort CN5301 Farnell DP1RD20JQ1 JAE NOTE Rear cover and chassis need to be modified to hold connector Connector may...

Page 12: ...ce information and precautions sections in the Getting started chapter of this guide 2 Clean the room for disassembly 3 Identify the disassembly area 4 Check the position that the monitors are to be placed along with the number of monitors Prepare the area for material flow according to the disassembly layout 5 Be sure to have the following equipment and materials Press fixture Working table Screw...

Page 13: ...embly See Preparation for disassembly on page 9 Step Figure Description 1 Preparation Lay the monitor on a flat soft and clean surface 2 Remove the Stand base Ass y Push the button the remove the stand base ass y 3 Remove the Rear cover Remove the screws to remove the Rear cover ...

Page 14: ...11 4 Remove the pin and the screw Remove the pin and the screw 5 Remove the tapes screws and the pins Remove the tapes the screws and the pins ...

Page 15: ...12 6 Remove the screws Remove the screws 7 Remove the screws Remove the screws 8 Remove the Mylar Remove the Mylar ...

Page 16: ... board and power board Remove the screws to remove the main board and power board 10 Remove the connectors Remove the connect pins 11 Remove the screws Remove the screws and the key board Power Board Main Board Main BOARD ...

Page 17: ...14 12 Remove the screws Remove the screws and the camera 13 The mainframe The mainframe 14 The panel The panel ...

Page 18: ...fore removing the power board follow these steps Prepare the monitor for disassembly See Preparation for disassembly on page 9 Remove the power board 1 The HP V28 4K power board connector position is as follows Power Board Warning After unplugging the power supply the capacitance is still charged do not touch and discharge the capacitor ...

Page 19: ...ors are on the main board board part number CBPRND9H0Q1 The connectors identifiers are as follows Connector Location HDMI 1 2 CN501 CN510 DisplayPort CN5301 Audio CN603 Before repairing connectors follow these steps Prepare the monitor for disassembly See Preparation for disassembly on page 9 Main Board CN603 CN501 CN510 CN5301 Power Board ...

Page 20: ...teady soldering condition Keep the soldering iron tip clean and well tinned and when replacing parts A close inspection of the circuit board revealed look in good condition After repaired must connect source to each port to check Main board function is ordinary Note The requirement of professional repairers regulation by ERP lot5 1 The professional repairer has the technical competence to repair e...

Page 21: ...nent HDMI 2 connector CN510 Repair the HDMI connector 1 Use a soldering iron and a desoldering pump to remove as much solder as possible from the pin 2 Use a hot air gun to melt the solder on the pins 3 Lift the CN510 connector from the PCB 4 Place the new component on the PCB Be sure that it matches the PCB footprint 5 Solder the new component ...

Page 22: ...nt on the PCB Be sure that it matches the PCB footprint 5 Solder the new component Audio connector CN603 Repair the audio connector 1 Use a hot air gun to melt the solder on the pins Pin solder with soldering iron and absorber You can gently push down with the soldering iron once everything is molten to move the M1 out of the through holes 2 Lift the CN603 connector from the PCB 3 Place the new co...

Page 23: ...pressing the power button has no effect press and hold the power button for 10 sec to disable the Power Button Lockout feature Video cable is improperly connected Connect the video cable properly For more information seeConnecting the cables on page 8 System is in Auto Sleep Mode Press any key on the keyboard or move the mouse toinactivate the screen blanking utility Video card is incompatible Ope...

Page 24: ...phics card software The monitor is off but it did not seem to enter into sleep mode The refresh rate might be set too low In Windows set the refresh rate to its maximum setting The monitor is off but it did not seem to enter into sleep mode Content and or hardware might not be VRR capable Verify the content being displayed is VRR capable Be sure a computer with an AMD Radeon graphics card or a AMD...

Page 25: ...dering 8 power board removal 15 precautions 1 preparation for disassembly 9 RC removal 10 rear components 5 removal power board 15 RC 10 removal and replacement procedures 9 returning to customer 2 RoHS 2002 95 EC requirements 2 safety information 1 serial number location 6 service information 1 spare parts 7 support and troubleshooting 20 troubleshooting 20 ...

Reviews: