background image

16

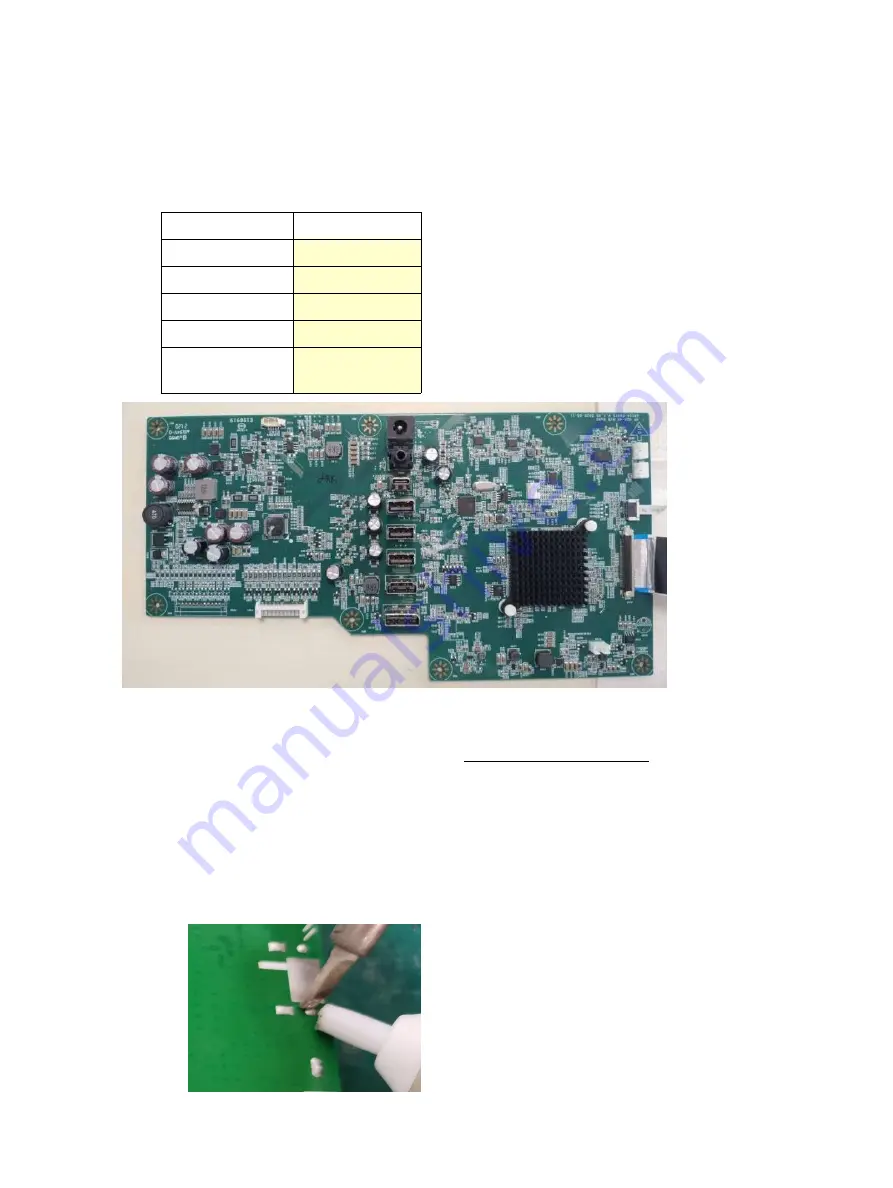
DisplayPort connector location

This procedure includes HDMI,DP connectors.
The connectors are on the main board (board part number 21201-03113).
The connectors identifiers are as follows:

Connector

Location

HDMI

P103

DP

P105

USB-C

P111

Earphone

P602

USB-A

P502

P503

P504

Before repairing connectors, follow these steps:

Prepare the monitor for disassembly. See Preparation for disassembly on page 12.

HDMI connector P103

Repair the HDMI connector:

2) Use a soldering iron and a desoldering pump to remove as much solder as possible from the pin.

Summary of Contents for U28

Page 1: ...Maintenance and Service Guide U28 model SUMMARY This guide provides information about spare parts removal and replacement of parts diagnostic tests problem troubleshooting and more ...

Page 2: ...d States and other countries The information contained herein is subject to change without notice The only warranties for HP products and services are set forth in the express warranty statements accompanying such products and services Nothing herein should be construed as constituting an additional warranty HP shall not be liable for technical or editorial errors or omissions contained herein Fir...

Page 3: ...ed product to the customer 4 2 Monitor features 5 Features 5 Front components 6 Rear components 7 Locating the serial number and product number 8 3 Illustrated parts catalog 10 How to order parts 11 4 Removal and replacement procedures 12 Preparation for disassembly 12 Rear Cover 12 Power board adapter 15 DisplayPort connector location 16 HDMI connector P103 16 Function test 18 Support and trouble...

Page 4: ...mer or make the product unsafe Use proper safety devices to ensure your personal safety Always use approved tools and test equipment for servicing Never assume the product s power is disconnected from the main power supply Check that it is disconnected before opening the product s cabinet Modules containing electrical components are sensitive to electrostatic discharge ESD Follow ESD safety proced...

Page 5: ... and comply with the applicable regulations for repairers of electrical equipment in the Member States where the repairer operates Reference to an official registration system as professional repairer where such a system exists in the Member States shall be accepted as proof of compliance 2 A professional repairer must have insurance that covers liabilities resulting from repairs regardless of whe...

Page 6: ... product to the customer Perform an AC leakage current check on exposed metallic parts to be sure the product is safe to operate without the potential of electrical shock Do not use a line isolation transformer during this check Measurements that are not within specified limits present a possible shock hazard You must check and repair the product before returning it to the customer ...

Page 7: ... Multimedia Interface Audio headphone USB Type C upstream port for high speed data network audio and video and power delivery up to 65 W USB 3 0 hub with one upstream port connects to the computer and three downstream ports connect to USB devices Picture in Picture PIP functionality to enable the DisplayPort and HDMI inputs to be viewed in each half of the screen Plug and play capability if suppor...

Page 8: ... 1 1 Front components and their descriptions Component Function 1 Power button Turns the monitor on or of NOTE Be sure that the master power switch on the monitor is in the On position to turn on the monitor 2 Power light White The monitor is on Amber The monitor is in a reduced power state because of inactivity ...

Page 9: ...B hard drive 5 USB Type C port upstream Connects a USB Type C cable to a source device such as a computer or game console You can use this port to deliver up to 65 W of power to a device Power outputs are 5 V 9 V 10 V 12 V 15 V 20 V to achieve a 65 W output This port also enables the USB Type A ports to perform their functions 6 Audio out headphones jack Connects optional headphones WARNING To red...

Page 10: ...r The SPEC label 1 and Barcode label 2 are located on the rear of the monitor The serial number and product number are located on a Safety label You may need these numbers when contacting HP about the monitor model For worldwide models except India ...

Page 11: ...9 For India ...

Page 12: ...25_ 1 2C01 Bucket GR_ABS OBP 1 5F08 EVA_GR_10 1_6_4 1 2C02 Warning Lable_GR 1 5F09 HAS_Bracket_GR_SGCC 1 2C03 DC in Lens_GR_PC 1 5F11 Chassis_GR_HP_AL 1 2C04 Mylar_GR_PET_482 4_16 77 _0 325 1 5F12 SCRW_1018_3_6_HAT 7 2C05 OSD Key_GR_ABS OBP 1 5F13 SCRW_1018_3_5_PAN 12 2C11 SCRW_Cross_4_10 4 5F14 SCRW_1018_3_4_PAN 4 5F01 RUBBER_20_20 1 5F15 SCRW_1018_3_3_PAN 2 5F02 Middle Frame Label 4k HDR_GR 1 5F...

Page 13: ... RS Component 769 3466 NOTE The connector may need to be modified to meet functionality regulatory and safety requirements if it is not an exact match You can purchase cables from the HP part store at https partsurfer hp com Search aspx NOTE HP continually improves and changes product parts For complete and current information about supported parts for your computer go to http partsurfer com selec...

Page 14: ...room for disassembly 3 Identify the disassembly area 4 Check the position that the monitors are to be placed along with the number of monitors Prepare the area for material flow according to the disassembly layout 5 Be sure to have the following equipment and materials Press fixture Working table Screwdriver Knife Gloves Cleaning cloth ESD protection Scraper bar in the following dimensions Rear Co...

Page 15: ...he rear cover hold the rear cover with your hand do not damage the wire remove the buttons from the rear cover and then put the rear cover aside 3 Remove the function key board and power key board After opening the hook at the connector of the function key board in the blue circle unplug the two FFC wires Take out the power keypad from the yellow square and unplug the cable place the power keyboar...

Page 16: ...ove the backlight wire from the hook as shown in the blue square 5 Remove the screws of the shielding cover Take the electric screwdriver and remove the three screws at the red circle and then remove the two black foams at the blue square 6 Remove FFC cable Lift the shielding cover and pull out the FFC cable to pull out the FFC cable you need to pinch both sides of the blue circle and then pull it...

Page 17: ...emove the screw as shown in the red circle 8 Remove the mid bezel and main bracket Remove the mid bezel and the main bracket as shown in the figure Power board adapter The power board part number is 60703 00280 adapter 1 The HP U28 power board connector position is as follows ...

Page 18: ...ers are as follows Connector Location HDMI P103 DP P105 USB C P111 Earphone P602 USB A P502 P503 P504 Before repairing connectors follow these steps Prepare the monitor for disassembly See Preparation for disassembly on page 12 HDMI connector P103 Repair the HDMI connector 2 Use a soldering iron and a desoldering pump to remove as much solder as possible from the pin ...

Page 19: ...17 3 Use a hot air gun to melt the solder on the pins 4 Lift the P103 connector from the PCB 5 Place the new component on the PCB Be sure that it matches the PCB footprint 6 Solder the new component ...

Page 20: ...sable the Power button lockout feature Video cable is improperly connected Connect the video cable properly System is in Sleep mode Press any key on the keyboard or move the mouse to exit Sleep mode Video card is incompatible Open the OSD menu and select the Input Control menu Set Auto Switch Input to Off and manually select the input Image appears blurred indistinct or too dark Brightness is too ...

Page 21: ...wer saving control is disabled Open the OSD menu and select Power Control Auto Sleep Mode and set auto sleep to On On Screen Menus are Locked is displayed The monitor s OSD lock function is enabled Press and hold the Menu button on the front bezel to 10 seconds to disable the OSD lockout function Power Button is Locked is Displayed The monitor s power button is locked Press and hold the power butt...

Page 22: ...s 10 parts ordering 10 power board removal 14 precautions 2 preparation for disassembly 11 RC removal 11 rear components 6 removal power board 14 RC 11 removal and replacement procedures 11 returning to customer 3 RoHS 2002 95 EC requirements 3 safety information 2 serial number location 7 service information 2 spare parts 11 support and troubleshooting 18 troubleshooting 18 ...

Reviews: