background image

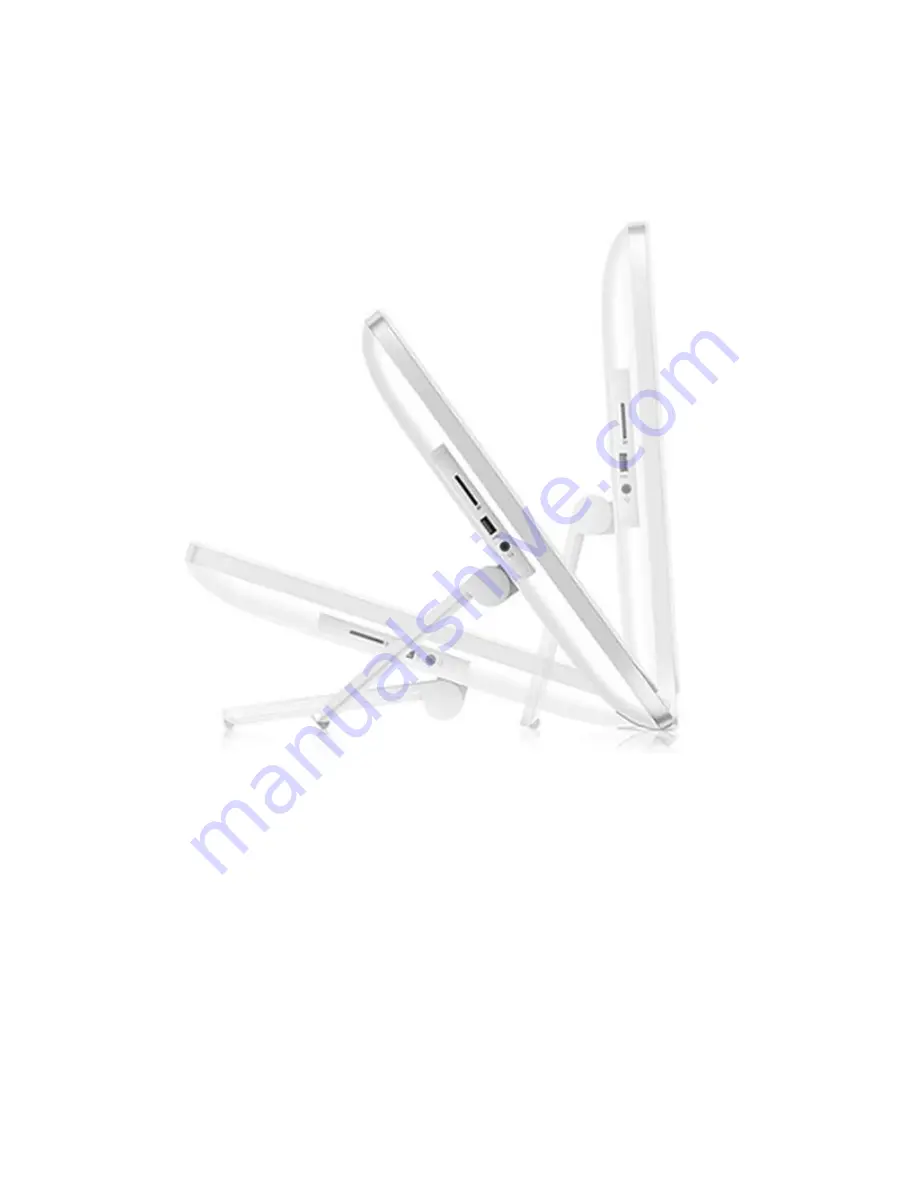
Adjusting the tilt

For optimal viewing, adjust the screen tilt to your own preference.

1.

Face the rear of the all-in-one and hold it so that you do not topple it while changing the tilt.

2.

Without touching the screen, adjust the tilt by rotating the stand up and down.

10

Chapter 2   Setting up the hardware

Summary of Contents for Slate 21

Page 1: ...HP Slate 21 All in One User Guide ...

Page 2: ...le for technical or editorial errors or omissions contained herein This document contains proprietary information that is protected by copyright No part of this document may be photocopied reproduced or translated to another language without the prior written consent of Hewlett Packard Company First Edition August 2013 Document Part Number 734558 001 Product notice This guide describes features th...

Page 3: ...in this manner indicates that failure to follow directions could result in bodily harm or loss of life CAUTION Text set off in this manner indicates that failure to follow directions could result in damage to equipment or loss of information NOTE Text set off in this manner provides important supplemental information iii ...

Page 4: ...iv About This Guide ...

Page 5: ...12 One finger slide 12 Tapping 12 Pinching stretching 12 Rotating 13 Swipes 13 Connecting to networks 14 Connecting to wireless networks 14 Connecting to wired networks 15 Bluetooth 15 3 Using the user interface 16 Browsing the internet 17 Playing media 17 Using the camera 18 Printing 18 Adjusting the settings 18 Date time settings 18 Security settings 19 Screen lock 19 Encryption 19 Sound setting...

Page 6: ...ons 28 Cables 28 Declaration of Conformity for Products Marked with the FCC Logo United States Only 28 Canadian Notice 29 Avis Canadien 29 European Union Regulatory Notice 30 German Ergonomics Notice 30 Japanese Notice 30 Korean Notice 30 Power Cord Set Requirements 31 Japanese Power Cord Requirements 31 Product Environmental Notices 31 ENERGY STAR Qualification 31 Materials Disposal 32 Disposal o...

Page 7: ...o Tilt capability from 15 to 70 degrees 2 point optical touchscreen that uses 3 cameras NvidiaTegra 4 Quad Core T40S processor 8 GB flash memory storage 3 USB 2 0 ports Secure Digital SD card reader HP TrueVision Webcam 720p HD and microphone Ethernet jack Audio out ports Plug and play capability that lets the all in one automatically recognize hardware devices Wireless 802 11 a b g n Bluetooth 4 ...

Page 8: ...und 3 Webcam light On The webcam is in use 4 Volume up button Increases volume 5 Volume down button Decreases volume 6 Brightness up button Increases display brightness 7 Brightness down button Decreases display brightness 8 Power button Turns the all in one on and off 9 Speakers Produce sound 2 Chapter 1 Product features ...

Page 9: ...adphone jack Produces sound when connected to optional powered stereo speakers headphones earbuds or a headset 4 DC power connector Connects the DC in cable from the AC power adapter 5 Ethernet connector Connects an Ethernet cable to the all in one 6 USB 2 0 connector Connects external USB devices to the all in one 7 USB 2 0 connector Connects external USB devices to the all in one Rear components...

Page 10: ... for desk use To assemble the all in one for desktop use 1 Set the all in one face down on a flat soft protected table or desk surface 2 Pull the stand outward until you hear it click 3 Lift the all in one to an upright position and place on a flat stable surface Preparing for wall mounting NOTE This all in one is intended to be supported by UL or CSA Listed wall mount bracket You can only VESA mo...

Page 11: ...ght up so you can access the screw that secures the stand to the all in one 3 Remove the two screws that secure the stand to the all in one 1 and then lift up the bottom of the stand slightly and remove it from the all in one 2 Preparing for wall mounting 5 ...

Page 12: ...0 mm mounting holes To attach a third party mounting solution to the all in one four 4 mm 0 7 pitch and 10 mm long screws are required Longer screws must not be used because they may damage the all in one It is important to verify that the manufacturer s mounting solution is compliant with the VESA standard and is rated to support the weight of the all in one For best performance it is important t...

Page 13: ...he all in one in a convenient well ventilated location 2 Remove the rear I O cover from the all in one 3 If you want to use a wired network connection connect an Ethernet cable to the Ethernet port on the all in one s rear panel 1 and then to an active Ethernet jack 2 For more information see Connecting to wired networks on page 15 Connecting the cables 7 ...

Page 14: ...4 If you want to use a keyboard and or mouse connect the keyboard and mouse to the USB ports on the all in one s rear panel 8 Chapter 2 Setting up the hardware ...

Page 15: ...ng plug is an important safety feature Plug the power cord into a grounded earthed electrical outlet that is easily accessible at all times Disconnect power from the equipment by unplugging the power cord from the electrical outlet For your safety do not place anything on power cords or cables Arrange them so that no one may accidentally step on or trip over them Do not pull on a cord or cable Whe...

Page 16: ... screen tilt to your own preference 1 Face the rear of the all in one and hold it so that you do not topple it while changing the tilt 2 Without touching the screen adjust the tilt by rotating the stand up and down 10 Chapter 2 Setting up the hardware ...

Page 17: ... consecutive hours of non use When you turn on the all in one for the first time the Startup Wizard will begin Follow the instructions in the Startup Wizard to Select your language Enter the network settings Configure the all in one to automatically be backed up HP strongly recommends that you back up the all in one In the case of hardware replacement backups will allow you to restore your system ...

Page 18: ...en lightly slide one finger across the screen in the direction you want to move To drag press and hold an object and then drag the object to move it Tapping To make an on screen selection use the tap function Use one finger to tap an object on the screen to make a selection and or to open it Pinching stretching Pinching and stretching allows you to zoom out or in on images or text Zoom in by placi...

Page 19: ...to 3 o clock To reverse the rotation move your forefinger from 3 o clock to 12 o clock NOTE Rotate is intended for specific apps where you can manipulate an object or image Rotate may not be functional for all apps Swipes With swipes you can flip between screens or images Gently swipe your finger inward from the edge of the display onto the screen to reveal the next or previous screen or image Usi...

Page 20: ...cess point NOTE To set up a WLAN and connect to the Internet you need a broadband modem either DSL or cable purchased separately high speed Internet service purchased from an Internet service provider and a wireless router purchased separately To connect to a wireless network 1 Select the All Apps icon from the Home page and then select Settings 2 Select Wi Fi 3 Select the ON button to turn the wi...

Page 21: ...o a network wall jack 2 or router NOTE If the network cable contains noise suppression circuitry 3 which prevents interference from TV and radio reception orient the circuitry end of the cable toward the all in one Bluetooth The all in one includes Bluetooth capability which creates a personal area network PAN to connect to other Bluetooth enabled devices such as computers phones printers headsets...

Page 22: ... may look different from the icons shown in the user guide Google apps KingSoft Office Email Gallery Google calendar Camera Google Play Store HP Media Player All apps HP File Manager The row of icons near the bottom of the screen provide quick access to popular apps Three navigation icons in the black area at the bottom of the screen perform the following functions 16 Chapter 3 Using the user inte...

Page 23: ...g media Use the Play icon to open the app that lets you play music videos and view photos that you have stored on a USB flash media device or media card You can also access the camera using the Play icon NOTE The audio file name and the folder s name can be any length but cannot include special characters or spaces in order for the file manager to recognize the audio file To play or view your medi...

Page 24: ...will have more control over how your printouts appear HP ePrint lets you print from virtually anywhere to an HP printer that supports ePrint Once enabled ePrint assigns an email address to your printer To print simply send an email containing your document to your printer s address For more information visit http www hp com go ePrintCenter for compatibility and details To configure HP ePrint 1 Sel...

Page 25: ...ock 4 Select the action required to unlock to the screen Encryption You can encrypt your accounts settings downloaded apps and their data media and other files Once you encrypt your all in one you need to type a numeric PIN or password to decrypt it each time you power it on NOTE The encryption process can take a long time to complete CAUTION Once you set up encryption the only way to remove it is...

Page 26: ... then select Settings 2 Select About tablet NOTE You may have to scroll down the settings list to display About tablet 3 Select System updates 4 To check for updates select the Check Now button and follow the on screen instructions Backup reset You can configure the all in one to back up app data and restore backed up settings and data when reinstalling an app You can erase all personal data on th...

Page 27: ...3 Select Default and then select More keyboards 4 Click the More keyboards icon 5 On the More keyboard settings menu under IME and keyboard settings select Primary IME and then select your language Helpful hints To switch languages on the virtual keyboard Press the selected language key or EN US English US key to toggle between the selected language and English If you press and hold the language k...

Page 28: ...me form of surge protection device such as a power strip or Uninterruptible Power Supply UPS Not all power strips provide surge protection the power strips must be specifically labeled as having this ability Use a power strip whose manufacturer offers a Damage Replacement Policy so you can replace the equipment if surge protection fails Use the appropriate and correctly sized furniture designed to...

Page 29: ...ight heat or moisture When removing the all in one stand you must lay the all in one face down on a soft area to prevent it from getting scratched defaced or broken Cleaning the all in one 1 Turn off the all in one and unplug the power cord from the back of the unit 2 Dust the all in one by wiping the screen and the cabinet with a soft clean antistatic cloth 3 For more difficult cleaning situation...

Page 30: ...nd use the camera How do I open files You can open files with the app or apps they are associated with Files are opened within apps or by utilizing the HP File Manager application preinstalled on your all in one Where do I save files on my all in one You can use local storage an SD memory card a USB flash drive or online cloud storage to save files How do I print Print wirelessly from your all in ...

Page 31: ...ort The Ethernet cable and Internet access are not provided If the information provided in the guide does not address your questions you can contact support For U S support go to http www hp com go contactHP For worldwide support go to http welcome hp com country us en wwcontact_us html Here you can Chat online with an HP technician NOTE When support chat is not available in a particular language ...

Page 32: ... Temperature Non operating Temperature 5 C to 35 C 41 to 95 F 20 C to 60 C 4 to 140 F Humidity Operating noncondensing NonOperating 38 7 C maximum wet bulb temperature 20 to 80 5 to 95 Altitude Operating Non operating 0 to 5 000 m 0 to 16 400 feet 0 to 12 192 m 0 to 40 000 feet Optimum graphic resolution 1920 1080 Power source 90 265 VAC 45 63 Hz Processor ARM A15 Quad Core 1 6 GHz Flash RAM memor...

Page 33: ...roductivity document handler KingSoft Office External input device Secure Digital SD card reader VESA mounting 100 mm 100 mm For a list of recommended USB and card reader storage devices consult the HP Slate 21 All in One Quickspecs NOTE HP recommends that the storage device is formatted FAT16 32 or NTFS ExFAT is not supported Energy saver feature The all in one supports a reduced power state The ...

Page 34: ...t and the receiver Connect the equipment into an outlet on a circuit different from that to which the receiver is connected Consult the dealer or an experienced radio or television technician for help Modifications The FCC requires the user to be notified that any changes or modifications made to this device that are not expressly approved by Hewlett Packard Company may void the user s authority t...

Page 35: ...s product refer to the Part Series or Model number found on the product Canadian Notice This Class B digital apparatus meets all requirements of the Canadian Interference Causing Equipment Regulations CAN ICES 3 B NMB 3 B Avis Canadien Cet appareil numérique de la classe B respecte toutes les exigences du Règlement sur le matériel brouilleur du Canada Canadian Notice 29 ...

Page 36: ...ttp www hp eu certificates Search with the product model name or its Regulatory Model Number RMN which may be found on the regulatory label The point of contact for regulatory matters is Hewlett Packard GmbH Dept MS HQ TRE Herrenberger Strasse 140 71034 Boeblingen GERMANY German Ergonomics Notice HP products which bear the GS approval mark when forming part of a system comprising HP brand computer...

Page 37: ...s from the product Japanese Power Cord Requirements For use in Japan use only the power cord received with this product CAUTION Do not use the power cord received with this product on any other products Product Environmental Notices ENERGY STAR Qualification As an ENERGY STAR Partner Hewlett Packard Company has followed the EPA s enhanced product qualification and certification process to ensure t...

Page 38: ... or the Electronic Industries Alliance EIA http www eiae org Disposal of Waste Equipment by Users in Private Household in the European Union This symbol on the product or on its packaging indicates that this product must not be disposed of with your household waste Instead it is your responsibility to dispose of your waste equipment by handing it over to a designated collection point for the recyc...

Page 39: ...urers provide Material Content Declarations for certain categories of electronic products offered for sale after July 1 2006 To view the JIS C 0950 material declaration for this product visit http www hp com go jisc0950 Turkey EEE Regulation In Conformity with the EEE Regulation EEE Yönetmeliğine Uygundur Product Environmental Notices 33 ...

Page 40: ...uirements of the Technical Regulation approved by the Resolution of Cabinet of Ministry of Ukraine as of December 3 2008 No 1057 in terms of restrictions for the use of certain dangerous substances in electrical and electronic equipment 34 Appendix A Agency Regulatory Notices ...

Reviews: