background image

ze1000 Series Troubleshooting and Self-Repair Guide 

Troubleshooting and Diagnostics 

19 

Memory Problems 

If a message says you are out of memory 

• 

Make sure drive C is not running low on free space. 

• 

Use the memory troubleshooter in Windows Help and Support. 

• 

If you are having memory problems while running MS-DOS programs, use the application and 
software problems troubleshooter in Windows Help and Support. 

• 

Not all third-party memory cards have been tested for use with the notebook. Check the HP 
Notebook Web site (www.hp.com/notebooks) for a list of approved and tested memory cards. 

• 

Test your notebook’s memory with the e-DiagTools diagnostics—see “Using the e-DiagTools 
Diagnostic Tests” on page 29. 

If memory doesn’t increase after adding RAM 

• 

Make sure all RAM modules are installed properly. 

• 

Test your notebook’s memory with the e-DiagTools diagnostics—see “Using the e-DiagTools 
Diagnostic Tests” on page 29. 

If the notebook will not boot up after adding RAM 

• 

Make sure your notebook is using only PC133 SDRAM modules, or it will not boot up. (You will 
also see an error message.) 

Modem Problems 

If the modem seems slow 

• 

Check for excess static or noise on the line, which reduces the overall transmission speed. If 
necessary, contact your telephone company about fixing this type of problem. 

• 

If you’re dialing internationally, line noise is often difficult or impossible to eliminate. 

• 

If you have call-waiting, disable it—see Windows Help and Support, and contact your telephone 
company for information. 

• 

Eliminate extra connections in the line. If possible, connect directly to the wall jack. 

• 

Try another telephone line, preferably one normally used for a fax machine or modem. 

If the modem doesn’t dial or no dial tone is detected 

• 

Check all cables and connections. 

• 

Connect a standard telephone to the phone line and make sure the line is working. 

• 

Make sure someone else isn’t using the same phone line. 

• 

Try another telephone line, preferably one normally used for a fax machine or modem. 

• 

If you’re in a foreign country/region, the dial tone may not be recognized by the modem. Click 
Start, Control Panel, Printers and Other Hardware, Phone and Modem Options. Select your 
modem on the Modems tab, then click Properties, Modem, and disable the option that waits for a 
dial tone. 

Summary of Contents for Pavilion xf300 Series

Page 1: ...WURXEOHVKRRWLQJ DQG VHOI UHSDLU JXLGH KS SDYLOLRQ QRWHERRN H DQG I VHULHV ...

Page 2: ...Thank you for purchasing this Factory Service Manual CD DVD from servicemanuals4u com Please check out our eBay auctions for more great deals on Factory Service Manuals servicemanuals4u ...

Page 3: ... permission of Hewlett Packard Company except as allowed under the copyright laws The programs that control this product are copyrighted and all rights are reserved Reproduction adaptation or translation of those programs without prior written permission of Hewlett Packard Co is also prohibited Portions of the programs that control this product may also be copyrighted by Microsoft Corporation Insy...

Page 4: ...ers to technology code differences where applicable The table below shows the technology codes and the changes they signify for the products Before downloading software or drivers or performing repairs note the technology code for the HP notebook model Note that the first two characters of the BIOS ID for example IC M1 02 indicate the hardware technology You can also determine the BIOS ID using th...

Page 5: ...y Problems 21 Modem Problems 21 One Touch Button Problems 23 Parallel and USB Problems 24 PC Card PCMCIA Problems 25 Performance Problems 25 Power and Battery Problems 26 Printing Problems 27 Startup Problems 27 Standby and Resume Problems 28 Using the e DiagTools Diagnostic Tests 29 Using the BIOS Configuration Utility 30 Reinstalling and Updating Software 33 Recovering the Factory Software Insta...

Page 6: ...tem Off Switch 11 Figure 12 Removing the Battery 36 Figure 13 Removing the Hard Disk Drive 37 Figure 14 Removing the Hard Disk Tray 38 Figure 15 Removing an SDRAM Module 40 Figure 16 Installing an SDRAM Module 40 Tables Table 1 Battery Replacement Part Numbers 36 Table 2 Hard Disk Drive Replacement Part Numbers 37 Table 3 SDRAM Module Replacement Part Numbers 39 Table 7 Replacing Small Parts 41 Ta...

Page 7: ......

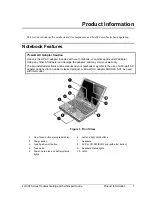
Page 8: ...ther AC adapter can damage the adapter and may void your warranty The pre installed electronic online manual on your notebook may refer to the use of a 60 watt AC adapter designed for an earlier released product A 60 watt AC adapter SHOULD NOT be used with this model Figure 1 Front View 1 One Touch buttons programmable 2 Power button 3 Touch pad on off button 4 Touch pad 5 Power hard disk and batt...

Page 9: ...cted models 14 USB ports 2 15 External monitor VGA port colored blue 16 Parallel port colored burgundy 17 Modem port 18 LAN port and indicators selected models 19 External microphone jack colored pink and headphone jack colored lime green 20 PC Card slot and eject button Figure 3 Bottom View 21 Battery 22 Hard disk drive 23 Battery latch 24 RAM expansion cover 25 System off switch ...

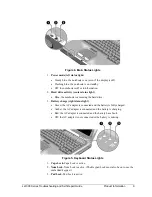
Page 10: ... Blue the notebook is accessing the hard drive 3 Battery charge right status light Green the AC adapter is connected and the battery is fully charged Amber the AC adapter is connected and the battery is charging Red the AC adapter is connected and the battery has a fault Off the AC adapter is not connected or the battery is missing Figure 5 Keyboard Status Lights 1 Caps Lock Caps Lock is active 2 ...

Page 11: ...puter Stand By or Press the power button or Allow timeout Press the power button to quickly resume your session Hibernation Saves maximum power Saves the current session to disk then turns off Restores network connections Power mode status light is off Click Start Turn Off Computer then press and hold Shift and click Hibernate or Allow timeout Press the power button to resume your session Turn off...

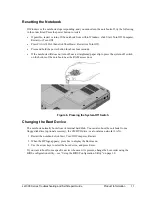
Page 12: ...f use a straightened paper clip to press the system off switch on the bottom of the notebook near the RAM access door Figure 6 Pressing the System Off Switch Changing the Boot Device The notebook normally boots from its internal hard disk You can also boot the notebook from a floppy disk drive optional accessory the CD DVD drive or a local area network LAN 1 Restart the notebook click Start Turn O...

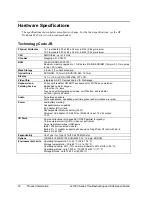
Page 13: ...ed numeric keypad 12 function Fn keys Touch pad with integrated scroll pad on off button and indicator Left and right click buttons Audio Two stereo speakers Color coded jacks headphone out lime green and microphone in pink Power Low battery warning Suspend resume capability AC adapter DC in jack Rechargeable lithium ion battery 55 W Universal AC adapter 100 240 Vac 50 60 Hz input 19 Vdc output 75...

Page 14: ...the source is not displayed click Options Properties and select the source from the volume control list If sound does not record Make sure the microphone is securely connected to the microphone jack Check the software controls for recording sound click Start All Programs Accessories Multimedia or Entertainment Sound Recorder Double click the speaker symbol in the taskbar Then click Options Propert...

Page 15: ...nue playing the movie If you get a Region Code error when playing a DVD movie DVDs can have regional codes embedded in the disk data These codes prevent DVD movies from being played outside the region of the world in which they are sold If you get a Region Code error you are trying to play a DVD intended for a different region Important most DVD drives let you change the region code only a limited...

Page 16: ...e mouse or tap the touch pad This will wake the display if it is off Try pressing Fn F2 to increase the display brightness Press Fn F5 in case the internal display was disabled Do this three times to return to the state you started from If the notebook is cold allow it to warm up If the screen is difficult to read Try setting the display resolution to its default of 1024 768 click Start Control Pa...

Page 17: ...ixel Contact HP Customer Care if you have a display quality problem and require a more comprehensive explanation of HP display quality We expect that over time the industry will continue to produce displays with fewer inherent cosmetic imperfections and we will adjust our HP guidelines as these improvements are implemented Floppy Disk Drive Problems If a floppy drive connected to the USB port does...

Page 18: ...ound the notebook Make sure there is adequate clearance at the back of the notebook so that its fan vent is not blocked Always turn off the notebook or put it into hibernation before placing it in a carrying case or other enclosed space Make sure the fan is working properly If needed test the fan s operation see Using the e DiagTools Diagnostic Tests on page 29 Keyboard Touch Pad and Mouse Problem...

Page 19: ...eration Maximum cable length is 100 meters 330 feet Use the networking problems troubleshooter in Windows Help and Support Click Start Control Panel Performance and Maintenance System On the Hardware tab open the Device Manager If the network interface is disabled try to enable it If it has a conflict try disabling another device If you can t browse My Network Places Click Start Search to look for...

Page 20: ...ll not boot up You will also see an error message Modem Problems If the modem seems slow Check for excess static or noise on the line which reduces the overall transmission speed If necessary contact your telephone company about fixing this type of problem If you re dialing internationally line noise is often difficult or impossible to eliminate If you have call waiting disable it see Windows Help...

Page 21: ...y for information If the modem dials but doesn t connect Make sure you re using an analog telephone line You must not use a digital line In a hotel ask for a data line Try another telephone line preferably one normally used for a fax machine or modem The modem at the other end may have a problem Try dialing to a different modem If the modem will not connect at 56K speed The host modem may not supp...

Page 22: ...erred data is bad In Control Panel open Phone and Modem Options Make sure the hardware settings match on the sending and receiving modems If the modem causes an ERROR message A string of AT commands may contain an incorrect command If you entered commands as extra settings for the modem in Control Panel or in your communications software check the commands If the modem doesn t fax If you re using ...

Page 23: ... the Device Manager 2 Double click Modem to list the current modem devices 3 Double click the internal modem then select the option to disable the modem Check the port settings in Control Panel click Start Control Panel Performance and Maintenance System On the hardware tab open the Device Manager then double click Universal Serial Bus controllers If the parallel port is not working Make sure the ...

Page 24: ...e PC Card with the e DiagTools diagnostics see Using the e DiagTools Diagnostic Tests on page 29 If an I O card stops communicating properly The card may have been reset if your notebook went on standby or into hibernation or turned off Exit any applications then remove and reinsert the card If a PC Card modem is not working Disable the internal modem 1 Click Start Control Panel Performance and Ma...

Page 25: ... or plug in the AC adapter If the battery doesn t charge Make sure the AC adapter is fully plugged into the power source and the notebook and that the light on the adapter is on If you re using a power strip remove the AC adapter from the power strip and plug it directly into a wall outlet Make sure the battery is fully installed and locked in place Move the notebook away from any nearby heat sour...

Page 26: ...ormance and Maintenance Power Options then click the Hibernate tab Also check the Power Schemes tab Make sure the hibernation timeouts for AC power and battery power are not set to Never Use the BIOS configuration utility to make sure I O Performance is set to Max Battery Life see Using the BIOS Configuration Utility on page 30 Printing Problems Hint You can solve most printing problems using the ...

Page 27: ... battery If the notebook won t boot from the floppy disk drive Make sure the optional USB floppy disk drive is connected correctly Make sure the floppy disk is bootable Make sure the floppy disk drive is selected as the boot device see Changing the Boot Device on page 11 Standby and Resume Problems If the notebook takes a long time to resume after being on standby The notebook can take a minute or...

Page 28: ... e DiagTools for Windows 2 Click View to display the Support Ticket 3 To add information about your problem click Comments and type the information then click OK To save or print the Support Ticket click Save As or Print To e mail the Support Ticket to your support agent click e Mail The first time you make an e mail connection from this program click Change Settings in the Connect window and ente...

Page 29: ...ok click Start Turn Off Computer Restart 2 When the HP logo appears press F2 to enter the BIOS configuration utility 3 The pointing devices are not active in the BIOS configuration utility so you will need to use the keyboard to navigate Press the left and right arrow keys to move among menus Press the up and down arrow keys to move among parameters in a menu Press Enter to open the dialog for the...

Page 30: ...appears in the list only if a built in LAN is present it provides diskless boot from a network server 1 Hard Disk 2 CD ROM DVD 3 Diskette A 4 Internal LAN I O Performance models with technology code GE only Enables Max Battery Life and disables Max I O Performance battery saving features to provide for improved I O transfers Max Battery Life Exit Menu Setting Description Save and Reboot Saves chan...

Page 31: ......

Page 32: ...ed you ll need to reinstall your applications Do not interrupt the following process or unplug the AC adapter until the process is complete 1 Important If possible back up all data from the notebook s hard disk The following steps delete all data from the disk 2 Connect the AC adapter to the notebook 3 Insert the Recovery CD disk 1 into the notebook s CD DVD drive If the notebook is turned off use...

Page 33: ... the instructions that appear Once the update process begins do not interrupt it The first time you make an Internet connection from this program click Change Settings in the Connect window to define your connection settings 7 When the process is completed reset the notebook see Resetting the Notebook on page 11 BIOS updates are also available from the HP Business Support Web site www hp com go bi...

Page 34: ...ic discharge can damage the notebook and its components Notes To reassemble a component perform the removal procedure in reverse order Any special notes required for reassembly are included at the end of each section Symbols like this are used throughout this chapter to show approximate full size screw outlines Use these to verify the sizes of screws before you install them Installing a wrong size...

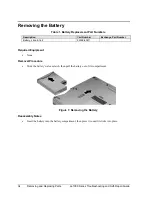
Page 35: ...bers Description Part Number Exchange Part Number Battery LiIon 8 Cell F5398 60911 Required Equipment None Removal Procedure Slide the battery s release latch then pull the battery out of its compartment Figure 7 Removing the Battery Reassembly Notes Insert the battery into the battery compartment then press it in until it clicks into place ...

Page 36: ... ATA100 FDB Cascade 0950 4319 F3414 69500 HDD 30BG 9 5mm TITAN Toshiba ATA100 TITAN 0950 4360 F3414 69501 Tray Assy HDD F5398 60914 Required Equipment 0 Phillips screwdriver Removal Procedure 1 Unplug the AC adapter if present and remove the notebook s battery 2 Remove both hard drive retaining screws from the bottom of the notebook Figure 8 Removing the Hard Disk Drive 3 Carefully remove the hard...

Page 37: ...rrier then lower the drive into place Carefully slide the new drive into the hard drive compartment Press firmly to make sure its connector seats properly Important If you are installing a new hard disk drive install the factory software and operating system on the drive before loading any additional software see Recovering the Factory Software Installation on page 33 Screws M2 5x4mm 2 Screws M2 5...

Page 38: ... 8504 Module SDRAM 256 MB PC133 SODIMM X16 1818 8635 Module SDRAM 256 MB PC133 SODIMM X8 1818 8604 F2298 69001 Caution Provide proper grounding and handle the SDRAM module only by its edges or you could damage the module through electrostatic discharge Required Equipment 0 Phillips screwdriver Removal Procedure 1 Turn off the notebook click Start Turn Off Computer Turn Off 2 Important Unplug the A...

Page 39: ...air Guide Figure 10 Removing an SDRAM Module Reassembly Notes Carefully press the SDRAM module into the connector at an angle of about 30 until it is fully inserted Then press down on both sides of the module until the latches snap closed Figure 11 Installing an SDRAM Module ...

Page 40: ...DRAM F5398 60912 On the bottom of the notebook loosen the screw holding the RAM cover the cover retains the screw and remove the cover Feet rubber F3410 60915 kit Insert a small flat blade screwdriver under the foot and pry it loose To replace firmly press the adhesive side of the foot into the recess Table 5 Accessories Part Part Numbers Technology code JB AC adapter Ultraslim 75 W 19 V output F4...

Page 41: ......

Page 42: ...e the password of a notebook for any non owner even if it is requested by law enforcement agencies If you receive such a request you should notify management and HP Corporate Legal immediately These requests may require a court order prior to our participation Further the entity removing the password must log the name serial number and date of the removal and file the written backup with the log T...

Page 43: ...ctions that do not conform to the above conditions and tests will not normally be considered for display replacement The HP responsible person working with the customer should identify work arounds that are reasonable and appropriate for that customer Customers who require a more perfect display solution should consider switching to a notebook with a DSTN display We expect that over time the indus...

Reviews: