background image

Operating the Monitor

User’s Guide

4–13

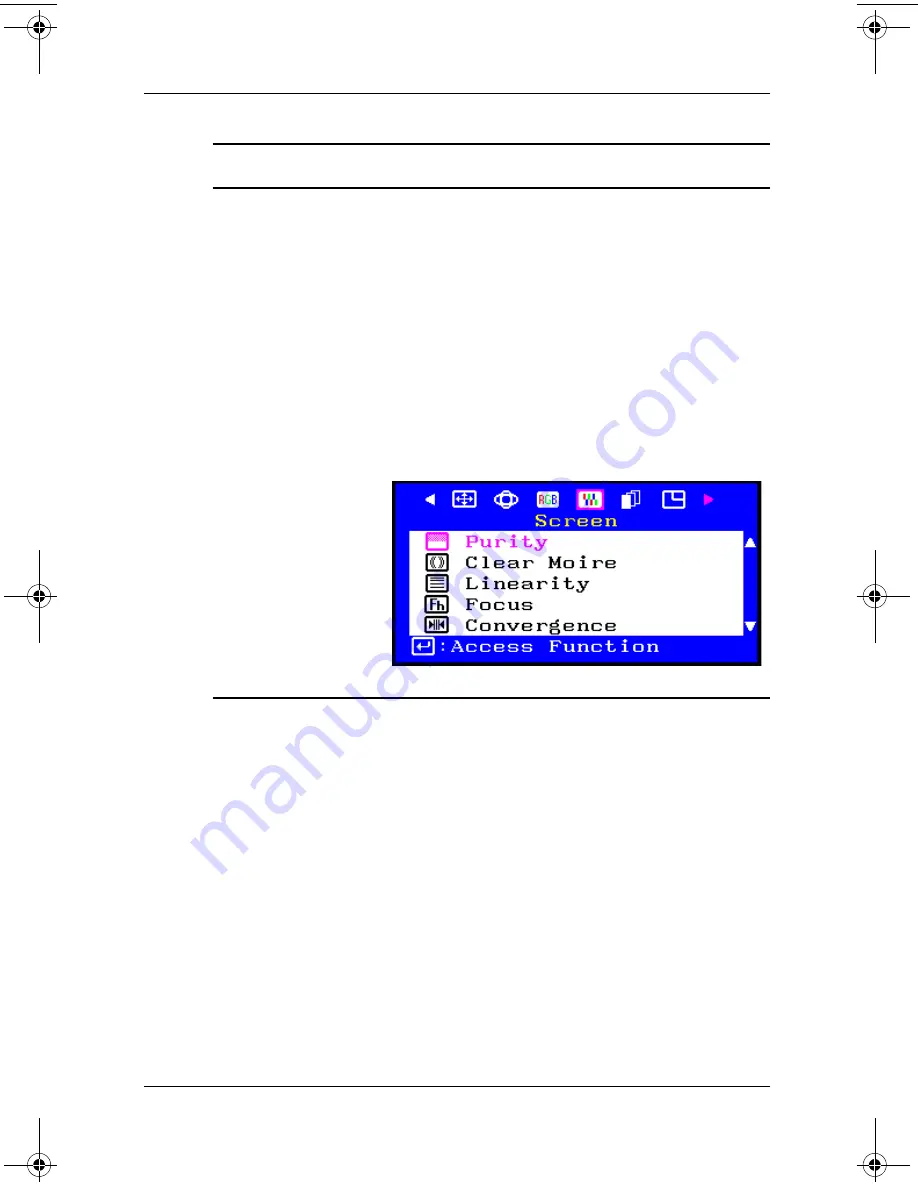
Screen

• Select Clear Moire when a moire pattern, 

which looks like a series of concentric circles 

or arcs, appears on your screen.

• Select Linearity to adjust the settings when the 

display image is compressed at the left, right 

or top, bottom.

• Select Focus when the image displayed on 

the screen is not sharp in all areas.

• Select Convergence to adjust the horizontal or 

vertical convergence to properly align the 

color dots that make up the image. 

Convergence affects picture clarity.

Menu

Function  

Continued

P930.book Page 13 Monday, September 9, 2002 12:20 PM

Summary of Contents for P930

Page 1: ...User s Guide P930 Monitor Document Part Number 305776 001 September 2002 ...

Page 2: ...cular purpose and is subject to change without notice The warranties for HP products are set forth in the express limited warranty statements accompanying such products Nothing herein should be construed as constituting an additional warranty This document contains proprietary information that is protected by copyright No part of this document may be photocopied reproduced or translated to another...

Page 3: ...oving the base 3 1 Connecting the monitor 3 3 4 Operating the Monitor Installing information files 4 1 Front panel components 4 2 Rear components 4 4 Using the on screen display 4 5 Viewing the OSD menu 4 6 Monitor messages 4 16 Energy saver feature 4 16 User modes 4 17 A Troubleshooting Solving common problems A 1 Using the worldwide Web A 2 Preparing to call technical support A 3 ...

Page 4: ...ns C 2 Cables C 2 Declaration of Conformity for Products Marked with FCC Logo United States Only C 2 Canadian Notice C 3 Avis Canadien C 3 European Union Notice C 3 Japanese Notice C 3 EPA Energy Star Compliance C 4 Power Cord Set Requirements C 4 D TCO 99 Requirements Environmental Requirements D 3 Flame Retardants D 3 Cadmium D 4 Mercury D 4 CFCs Freons D 5 Lead D 5 ...

Page 5: ...ported by your system On Screen Display OSD adjustments in ten different languages English French German Italian Swedish and Spanish Portuguese Russian Polish and Magyar for ease of set up and screen optimization Software and Reference Library CD that comes with your monitor includes an information file INF and Image Color Matching file ICM software Energy Saver feature for Energy Star compliance ...

Page 6: ... risk of electric shock or damage to your equipment do not disable the power cord grounding feature This equipment is designed to be connected to a grounded earthed power outlet that is easily accessible to the operator The grounding plug is an important safety feature ÅWARNING For your safety be sure that the power outlet you plug the power cord into is easily accessible and located as close to t...

Page 7: ... are covered in the operating instructions If your monitor is not operating properly or has been dropped or damaged contact your HP authorized dealer reseller or service provider Adjust only those controls that are discussed in the operating instructions Place your monitor at least 3 inches 76 mm away from walls or other enclosures Use only a power source and connection appropriate for this monito...

Page 8: ... and openings in the cabinet are provided for ventilation These openings must not be blocked or covered Never push objects of any kind into cabinet slots or other openings Do not place plants on top of your monitor Water or dirt from the plant may get into the vents Do not drop your monitor or place it on an unstable surface Do not allow anything to rest on the power cord Do not walk on the cord K...

Page 9: ...st be attached prior to setting up the monitor To attach the base 1 Place the monitor bottom side up on a flat work surface 2 Align the tabs on the base with the corresponding slots on the bottom of the monitor 3 Press the base onto the monitor until the tabs are fully engaged in the slots 4 Push the base toward the front of the monitor until the release latch clicks into the locked position ÄCAUT...

Page 10: ...ign with the monitor slots in only one position To remove the base 1 Please the monitor bottom side up on a flat work surface 2 Squeeze and pull up on the release latch on the base 3 Push the base toward the back of the monitor and lift up to remove the base ...

Page 11: ...he power cord for your monitor to the power port on the back of the monitor Plug the power cord for the monitor into a nearby electrical outlet 3 Connect the monitor signal cable to your computer s video port video board video card or graphics card 4 Connect the computer s power cord to an electrical outlet 5 Turn on your computer and monitor If you monitor displays an image installation is comple...

Page 12: ...let Do not place anything on power cords or cables Arrange them so that no one may accidentally step on or trip over them Do not pull on a cord or cable When unplugging from the electrical outlet grasp the cord by the plug After you turn on the monitor and computer equipment refer to Installing Information Files in chapter 4 to install the software contained on the CD that is included with your mo...

Page 13: ...hics adapter The INF files are also downloadable from the Internet by clicking on www hp com go support and selecting your monitor model The ICM file provides color matching consistency from monitor screen to printer and is activated from within graphics programs that have this feature To install these files on your computer 1 Insert the Software and Reference Library CD ROM in your computer s opt...

Page 14: ...el components No Component Function 1 Information button Displays information about your monitor such as model name vertical and horizontal frequencies and the serial number 2 Exit button Use to close the active menu or the On screen display OSD menu ...

Page 15: ...s on setting energy saver features sometimes called power management features 3 Adjust buttons Allows you to highlight and adjust items in the menu 4 Menu button Use to open the OSD and activate a highlighted menu item 5 Power indicator Illuminates green during normal operation and blinks green when the monitor is in sleep mode 6 Power button Use to turn the monitor on and off No Component Functio...

Page 16: ...ear components No Component Function 1 Power port connector Connects the monitor power cord 2 Signal cable Connects to the computer s video video port video board video card or graphics card 3 Tilt Swivel Base Can be removed from the monitor ...

Page 17: ...tion 1 Information Displays information about your monitor such as model name vertical and horizontal frequencies and the serial number 2 Exit Closes the active menu or OSD 3 Adjust Highlights and adjust items using the OSD 4 Menu Opens the OSD and activates a highlighted menu item ...

Page 18: ...tor if the monitor is not already on 2 Press the Menu button to open the On Screen Display menu 3 To move to a menu screen press the Adjust buttons until the menu is highlighted 4 When your menu screen is displayed press the Adjust buttons left arrow right arrow up arrow or down arrow to adjust or change your preferred OSD setting 5 Press the Exit button to close the active menu or OSD ...

Page 19: ...following feature settings Menu Function Information Provides information on monitor model name vertical and horizontal frequencies and serial number You may need to provide the monitor serial number to support technicians when calling customer support This screen can not be adjusted ...

Page 20: ...4 8 User s Guide Operating the Monitor Brightness Contrast Adjusts the screen brightness and contrast Menu Function Continued ...

Page 21: ...Operating the Monitor User s Guide 4 9 Control Lock Allows you to lock or unlock the OSD To lock or unlock the OSD press the menu button for 10 seconds Menu Function Continued ...

Page 22: ...rizontal position of the monitor s entire viewing area Select Size to change the vertical or horizontal size of the monitor s entire viewing area Select Zoom to get a close up or a longshot view of the monitor s viewing area You can decrease or enlarge the screen viewing area Menu Function Continued ...

Page 23: ...adjust the trapezoid setting when the top or bottom of the display is too large or small Select Pinbalance to adjust the settings when the sides of the display are bowed towards the left or right Select Sidepin to adjust the sidepin corner correction when the sides of the display are bowed in or bowed out or when the top or bottom of the display is too large or small Select the Pinbalance Corner c...

Page 24: ...e the color temperature and adjust individual red green and blue color control Color temperature is a measure of the warmth of the image colors The available range is between 5000 to 9300K If you select recall to reset your monitor setting the Color settings will not reset Menu Function Continued ...

Page 25: ...elect Linearity to adjust the settings when the display image is compressed at the left right or top bottom Select Focus when the image displayed on the screen is not sharp in all areas Select Convergence to adjust the horizontal or vertical convergence to properly align the color dots that make up the image Convergence affects picture clarity Menu Function Continued ...

Page 26: ...mage will jiggle for a few seconds These effects are normal Select Recall to reset the monitor settings to their original levels If you press Yes to reset the monitor the position size pincushion trapezoid parallelogram pinbalance rotation and clear moire settings will be reset All other settings will remain the same Select Video Input Level to set the level to 1 0 V for video cards that use video...

Page 27: ...ect Menu Position to change the position of where the OSD menu appears on your monitor Select Menu Duration to set the amount of time the menu will wait before it automatically turns off if no adjustments Select Languages to choose from one of ten languages English German French Italian Portuguese Spanish Swedish Russian Polish or Magyar Some languages may not appear in some regions The language c...

Page 28: ...s normal operating mode the monitor uses 120 watts maximum of power and the Power light is green The monitor also supports a reduced power state The reduced power state will be entered into if the monitor detects the absence of either the horizontal sync signal and or the vertical sync signal Upon detecting the absence of these signals the monitor screen is blanked and the power light flashes gree...

Page 29: ...nd preload modes If this occurs you may need to readjust the parameters of the monitor screen by using the on screen display User changes can be made to any or all of these modes and saved in memory The monitor automatically stores the new setting then recognizes the new mode just as it does the preset and preload modes In addition to the 10 factory preset and preload modes there are 10 user modes...

Page 30: ... Power cord is disconnected Connect the power cord Power switch is off Turn on power Video cable is improperly connected Connect video cable properly Screen blanking utility is active Depress any key on the keyboard or move the mouse Image appears blurred indistinct or too dark Brightness and contrast are too low Press one of the Adjust buttons to access the brightness contrast OSD menu Adjust the...

Page 31: ...s disconnected Connect the 15 pin monitor video cable to the computer Be sure that the computer power is on Sync Out of Range 68 77kHz 168Hz PP is displayed on screen Video resolution and or refresh rate are set higher than what your monitor supports Restart your computer and enter Safe Mode Change your settings to a supported setting see Technical Specifications Restart your computer so that the ...

Page 32: ...ips in this section you may need to call technical support Have the following information available when you call The monitor Monitor model number Serial number for the monitor Purchase date on invoice Conditions under which the problem occurred Error messages received Hardware configuration Hardware and software you are using ...

Page 33: ...t Aluminized tri color phosphor dot trio with black matrix Anti doming invar shadow mask Multilayer coated with anti static Maximum Weight Unpacked 55 11 lbs 25 0 kg Dimensions with stand Height Depth Width 19 3 in 18 6 in 18 4 in 490 7 mm 472 8 mm 469 mm Maximum Graphics Resolution 1920 x 1440 60Hz Screen Pitch 0 24 mm Dot Pitch 0 25 mm Horizontal Horizontal Frequency 30 to 110 kHz ...

Page 34: ...ndependent of Altitude Operating Temperature Storage Temperature 32 to 104 o F 04 to 113 o F 0 to 40 o C 20 to 45 o C Humidity Noncondensing Operating Nonoperating 10 to 80 5 to 95 Power Source 100 240 VAC 50 60 3 Hz Power Consumption 120 watts Input Terminals 15 pin D type cable Technical Specifications Continued ...

Page 35: ...ming mode Factory Preset and Preload Display Modes Mode Pixel Format Horz Freq kHz Horz Polarity Vert Freq Hz Vert Polarity Pixel Clk MHz Source 1 640 x 480 31 47 60 0 25 175 VGA 2 640 x 480 43 27 85 0 36 00 VESA 3 720 x 400 31 47 70 0 28 322 VGA 4 800 x 600 53 67 85 0 56 25 VESA 5 1024 x 786 68 68 84 99 94 50 VESA 6 1280 x 1024 79 98 75 0 135 00 VESA 7 Primary 1280 x 1024 91 15 85 0 157 50 VESA 8...

Page 36: ...ay cause harmful interference to radio communications However there is no guarantee that interference will not occur in a particular installation If this equipment does cause harmful interference to radio or television reception which can be determined by turning the equipment off and on the user is encouraged to try to correct the interference by one or more of the following measures Reorient or ...

Page 37: ... Logo United States Only This device complies with Part 15 of the FCC Rules Operation is subject to the following two conditions 1 this device may not cause harmful interference and 2 this device must accept any interference received including interference that may cause undesired operation For questions regarding your product contact Hewlett Packard Company P O Box 692000 Mail Stop 530113 Houston...

Page 38: ...with the CE Marking comply with both the EMC Directive 89 336 EEC and the Low Voltage Directive 73 23 EEC issued by the Commission of the European Community Compliance with these directives implies conformity to the following European norms in brackets are the equivalent international standards EN55022 CISPR 22 Electromagnetic Interference EN55024 IEC61000 4 2 3 4 5 6 8 11 Electromagnetic Immunity...

Page 39: ...for use in the country where you purchased the equipment If you need to obtain a power cord for a different country you should purchase a power cord that is approved for use in that country The power cord must be rated for the product and for the voltage and current marked on the product s electrical ratings label The voltage and current rating of the cord should be greater than the voltage and cu...

Page 40: ... we have environmentally labelled computers In many countries environmental labelling has become an established method for encouraging the adaptation of goods and services to the environment The main problem as far as computers and other electronics equipment are concerned is that environmentally harmful substances are used both in the products and during their manufacture Since it is not so far p...

Page 41: ...Employees Svenska Naturskyddsforeningen The Swedish Society for Nature Conservation and Statens Energimyndighet The Swedish National Energy Administration Approval requirements cover a wide range of issues environment ergonomics usability emission of electric and magnetic fields energy consumption and electrical and fire safety The environmental demands impose restrictions on the presence and use ...

Page 42: ...p www tco info com Environmental Requirements Flame Retardants Flame retardants are present in printed circuit boards cables wires casings and housings Their purpose is to prevent or at least to delay the spread of fire Up to 30 of the plastic in a computer casing can consist of flame retardant substances Most flame retardants contain bromine or chloride and those flame retardants are chemically r...

Page 43: ... the colour generating layers of display screens and the electrical or electronics components must not contain any cadmium Cadmium is a heavy metal that is Bioaccumulative Mercury Mercury is sometimes found in batteries relays and switches It damages the nervous system and is toxic in high doses The relevant TCO 99 requirement states that batteries may not contain any mercury It also demands that ...

Page 44: ...damage the ozone layer in the stratosphere causing increased reception on earth of ultraviolet light with e g increased risks of skin cancer malignant melanoma as a consequence Lead Lead can be found in picture tubes display screens solders and capacitors Lead damages the nervous system and in higher doses causes lead poisoning The relevant TCO 99 requirement permits the inclusion of lead since no...

Reviews: