


162
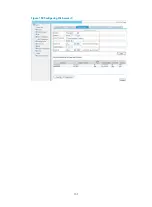
Figure 160
Add a blacklist entry
Table 94
Configuration items
Item
Description
IP Address
Specify the IP address to be added to the blacklist. This IP address cannot be a
broadcast address, a class D address, a class E address, 127.0.0.0/8, or
255.0.0.0/8.
Hold Time
Configure the entry as a non-permanent entry and specify the hold time of the
blacklist entry.
Permanence
Configure the entry as a permanent entry.
Viewing blacklist entries
Select
Security Setup
>
Attack Defend
>
Blacklist
from the navigation to view blacklist entries.
Table 95
Fields description
Field
Description
IP Address
IP address of the blacklist entry.
Add Method
The way in which the blacklist entry was added,
Manual
or
Automatic
.
•
Manual
: The entry was added manually or has been modified after being
added automatically.
•
Automatic
: The entry was added automatically by the scanning attack
protection function.
IMPORTANT:
Modifying an automatically added entry will change the type of the entry to
Manual
.
Start Time
The time when the blacklist entry was added.
Hold Time
Duration for which the blacklist entry will be held in the blacklist.
Dropped Count
Number of packets matching the blacklist entry and therefore dropped by the
device.
Configuring intrusion detection
On MSR900/20-1X routers
Select
Security Setup
>
Attack Defend
>
Intrusion Detection
from the navigation tree to enter the intrusion
detection configuration page, as shown in
. Select the box before
Enable attack defense policy
Summary of Contents for MSR SERIES
Page 17: ...xv Documents 835 Websites 835 Conventions 836 Index 838 ...
Page 20: ...3 Figure 3 Initial page of the Web interface ...
Page 42: ...25 Figure 13 Firefox Web browser setting ...
Page 59: ...42 Figure 27 Checking the basic service configuration ...
Page 73: ...56 Figure 35 Sample interface statistics ...
Page 156: ...139 Figure 139 Rebooting the 3G modem ...
Page 168: ...151 Figure 152 Configuring Web server 2 ...
Page 174: ...157 Figure 158 Configure the URL filtering function ...
Page 242: ...225 Figure 233 Enabling the DHCP client on interface Ethernet 0 1 ...
Page 247: ...230 Figure 236 The page for configuring an advanced IPv4 ACL ...
Page 255: ...238 Figure 241 Advanced limit setting ...
Page 298: ...281 e Click Apply 2 Configure Router B in the same way Router A is configured ...
Page 400: ...383 Figure 387 Verifying the configuration ...
Page 405: ...388 ...
Page 523: ...506 Figure 530 Ping configuration page ...
Page 775: ...758 Figure 785 Configuring a jump node ...